Vue+SpringMVC---前后端分离极简尝试
【前后端分离】的开发方式是目前WEB开发中的一个大的趋势,随着各种前后端框架的出现,加上REST编程规范慢慢深入人心,前端后端之间通过更加轻量级、简洁高效的JSON作为数据传输格式,使得一切变得开朗起来,前后端分工更加明晰,前端被赋予了更多的功能,从而能分担原来由后端完成的工作,开发人员的学习成本明显下降。
通过VUE+SPringMVC的组合来尝试实现前后端分离的开发模式,下面给出具体的过程。
1.搭建前端
VUE是优秀的前端框架,搭建基于VUE的前端工程需要安装Node.js,并通过NPM包管理工具和VUE-cli脚手架工具来辅助构建前端工程,如下:
# 全局安装 vue-cli
$ npm install --global vue-cli
# 创建一个基于 webpack 模板的新项目
$ vue init webpack my-project
# 安装依赖,走你
$ cd my-project
$ npm install
$ npm run dev
这样我们就构建了一个前段项目的架子my-project,目录结构如下图:

然后再浏览器中可以看到如下的页面:

前端搞定,轮到后端
2.搭建后端
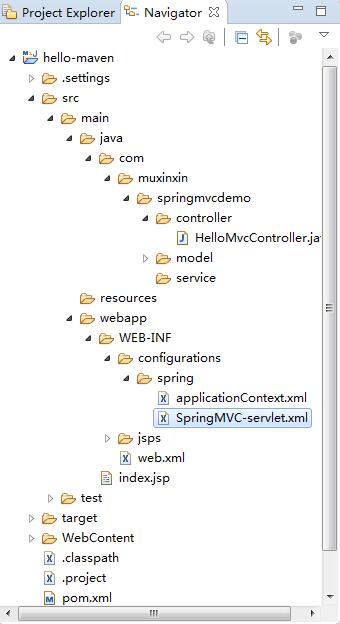
后端是用maven来构建的web项目,在eclipse(使用2017年6月发布的Oxygen)目录结构如下:

其中配置文件主要为pom.xml、web.xml、applicationContext.xml、SpringMVC-servlet.xml,具体内容如下。
pom.xml是maven的配置文件,如下
<project xmlns="http://maven.apache.org/POM/4.0.0" xmlns:xsi="http://www.w3.org/2001/XMLSchema-instance"
    xsi:schemaLocation="http://maven.apache.org/POM/4.0.0 http://maven.apache.org/maven-v4_0_0.xsd">
    <modelVersion>4.0.0modelVersion>
    <groupId>my-first-maven-projectgroupId>
    <artifactId>hello-mavenartifactId>
  <version>0.0.1-SNAPSHOTversion>
  <name>hello-maven Maven Webappname>
  <url>http://maven.apache.orgurl>


  <dependencies>

        <dependency>
          <groupId>junitgroupId>
          <artifactId>junitartifactId>
          <version>3.8.1version>
          <scope>testscope>
        dependency>


        <dependency>
            <groupId>org.springframeworkgroupId>
            <artifactId>spring-webmvcartifactId>
            <version>4.3.10.RELEASEversion>
        dependency>


        <dependency>
            <groupId>com.fasterxml.jackson.coregroupId>
            <artifactId>jackson-databindartifactId>
            <version>2.7.9.1version>
        dependency>

    dependencies>


  <build>
    <finalName>hello-mavenfinalName>
    <plugins>
        <plugin>
            <groupId>org.eclipse.jettygroupId>
            <artifactId>jetty-maven-pluginartifactId>
            <version>9.2.2.v20140723version>
        plugin>
    plugins>
  build>
project>
web.xml为整个web应用的配置文件
<web-app>
  <display-name>My first SpringMVC APPdisplay-name>


  <context-param>
    <param-name>contextConfigLocationparam-name>
    <param-value>/WEB-INF/configurations/spring/applicationContext*.xmlparam-value>
  context-param>

  <listener>
    <listener-class>org.springframework.web.context.ContextLoaderListenerlistener-class>
  listener>


    <servlet>
        <servlet-name>SpringMVC-dispatcherservlet-name>
        <servlet-class>org.springframework.web.servlet.DispatcherServletservlet-class>
        <init-param>
            <param-name>contextConfigLocationparam-name>
            <param-value>/WEB-INF/configurations/spring/SpringMVC-servlet.xmlparam-value>

        init-param>
        <load-on-startup>1load-on-startup>
    servlet>

    <servlet-mapping>
        <servlet-name>SpringMVC-dispatcherservlet-name>
        <url-pattern>/url-pattern>
    servlet-mapping>
web-app>
applicationContext.xml为Spring配置文件
<beans xmlns="http://www.springframework.org/schema/beans"
    xmlns:xsi="http://www.w3.org/2001/XMLSchema-instance"
    xmlns:p="http://www.springframework.org/schema/p"
    xmlns:context="http://www.springframework.org/schema/context"
    xsi:schemaLocation="
        http://www.springframework.org/schema/beans
        http://www.springframework.org/schema/beans/spring-beans.xsd
        http://www.springframework.org/schema/context
        http://www.springframework.org/schema/context/spring-context.xsd
        http://www.springframework.org/schema/mvc
        http://www.springframework.org/schema/mvc/spring-mvc.xsd">


    <context:annotation-config/>


    <context:component-scan base-package="com.muxinxin.springmvcdemo">
        <context:exclude-filter type="annotation" expression="org.springframework.stereotype.Controller"/>
    context:component-scan>

beans>
SpringMVC-servlet.xml为SpringMVC配置文件
<beans xmlns="http://www.springframework.org/schema/beans"
    xmlns:xsi="http://www.w3.org/2001/XMLSchema-instance"
    xmlns:mvc="http://www.springframework.org/schema/mvc"
    xmlns:context="http://www.springframework.org/schema/context"
    xmlns:aop="http://www.springframework.org/schema/aop"
    xmlns:tx="http://www.springframework.org/schema/tx"
    xsi:schemaLocation="http://www.springframework.org/schema/beans
                        http://www.springframework.org/schema/beans/spring-beans-4.0.xsd
                        http://www.springframework.org/schema/mvc
                        http://www.springframework.org/schema/mvc/spring-mvc-4.0.xsd
                        http://www.springframework.org/schema/context
                        http://www.springframework.org/schema/context/spring-context-4.0.xsd
                        http://www.springframework.org/schema/aop
                        http://www.springframework.org/schema/aop/spring-aop-4.0.xsd
                        http://www.springframework.org/schema/tx
                        http://www.springframework.org/schema/tx/spring-tx-4.0.xsd">


    <context:annotation-config/>


    <context:component-scan base-package="com.muxinxin.springmvcdemo">
        <context:include-filter type="annotation" expression="org.springframework.stereotype.Controller"/>
    context:component-scan>


    <mvc:annotation-driven/>


    <mvc:resources location="/resources/" mapping="/resources/**"/>


    <bean class="org.springframework.web.servlet.view.InternalResourceViewResolver">
        <property name="viewClass" value="org.springframework.web.servlet.view.JstlView"/>
        <property name="prefix" value="/WEB-INF/jsps/"/>
        <property name="suffix" value=".jsp"/>
    bean>


beans>
作为测试的controller为HelloMvcController.java
package com.muxinxin.springmvcdemo.controller;

import org.springframework.stereotype.Controller;
import org.springframework.web.bind.annotation.CrossOrigin;
import org.springframework.web.bind.annotation.PathVariable;
import org.springframework.web.bind.annotation.RequestMapping;
import org.springframework.web.bind.annotation.RequestMethod;
import org.springframework.web.bind.annotation.ResponseBody;

import com.muxinxin.springmvcdemo.model.Person;


@Controller
@RequestMapping("/hello")
public class HelloMvcController {

    @RequestMapping("/home")
    public String homeHandler(){
        return "home";
    }

    @RequestMapping("/test")
    public String testHandler(){
        return "test";
    }

    /**
     * 使用JSON作为响应内容
     */

    @CrossOrigin(origins="*",maxAge=3600)
    @RequestMapping(value="/getperson/{personID}",method=RequestMethod.GET)
     public @ResponseBody Person getPerson(@PathVariable int personID) {
        Person p = new Person();
        p.setName("Eric");
        p.setSex("male");
        p.setId(personID);
        return p;
    }
}
使用jetty的maven插件作为web容器,配置在pom.xml中,在项目所在目录输入下面命令启动后端项目
mvn jetty:run3.结果
对前端APP.vue做如下修改,数据异步请求使用的是Vue官方推荐的axios插件。
修改前
<template>
  <div id="app">
    <img src="./assets/logo.png">
    <router-view>router-view>
  div>
template>

<script>
export default {
  name: 'app'
}
script>
修改后
<template>
  <div id="app">
    <h1>服务端数据为:{{serverData}}h1>
    <img src="./assets/logo.png" @click="getData()">
    <router-view>router-view>
  div>
template>

<script>
export default {
  name: 'app',
  data () {
    return {
      serverData: 'data from fake server'
    }
  },
  mounted: function () {
    this.getData()
  },
  methods: {
    getData () {
      console.log('-------getData')
      var that = this
 //192.168.1.101为后端IP地址     this.$http.get('http://192.168.1.101:8080/hello/getperson/33333')
                .then(function (response) {
                  console.log(response)
                  console.log(this)
                  that.serverData = response.data
                })
                .catch(function (error) {
                  console.log(error)
                })
    }
  }

}
script>
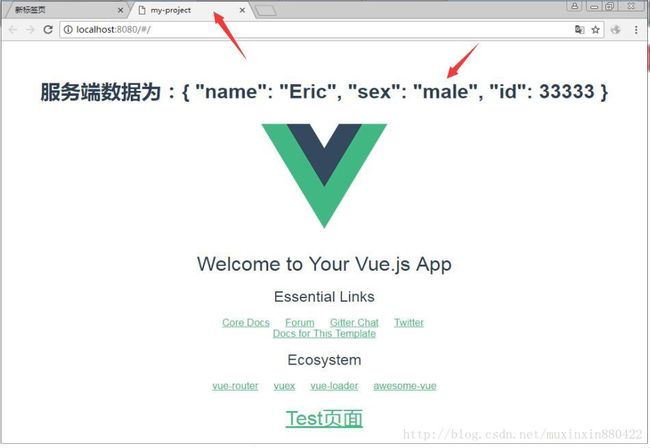
准备就绪后查看前端页面,变为
4.遇到的坑(经验)
- NRM
在使用npm安装依赖包的时候,可以用nrm这个插件来切换npm镜像,非常方便,推荐使用。 - 跨域
一般跨域的解决方式为:粗粒度和细粒度
粗粒度(全局):配置全局允许跨域
细粒度:在具体API上通过注解配置,如SpringMVC中的@CrossOrigin
5.总结
至此,使用VUE+SpringMVC的方式来实现前后端分离开发就被简单完成了。

