SpringBoot2.x学习之路(一)HelloWorld入门
最近准备好好学习一下Spring Boot和Spring Cloud,在公司一直没有机会使用,只能靠自己了,下面小七分以下几个方面来给大伙简单介绍一下:
一、Spring Boot是什么,有什么好处
这里小七先贴出Spring Boot官网的原文(谷歌翻译):
通过Spring Boot,可以轻松地创建独立的,基于生产级别的基于Spring的应用程序,您可以“运行”它们。
我们对Spring平台和第三方库持固执己见的观点,因此您可以以最小的麻烦开始使用。大多数Spring Boot应用程序需要最少的Spring配置。
特征如下:
- 创建独立的Spring应用程序
- 直接嵌入Tomcat,Jetty或Undertow(无需部署WAR文件)
- 提供自以为是的“入门”依赖项,以简化构建配置
- 尽可能自动配置Spring和3rd Party库
- 提供可用于生产的功能,例如指标,运行状况检查和外部化配置
- 完全没有代码生成,也不需要XML配置
说通俗一点,Spring Boot不是什么新框架,而是默认配置了很多框架的使用方式,就像 Maven整合了所有的 Jar 包,Spring Boot 整合了所有的框架,省去了很多繁琐的配置。
大家可以想想,咱们之前要创建一个SSM(Spring、SpringMVC、Mybatis)的工程有哪些步骤,比如pom.xml各种依赖配置、web.xml配置、springMVC.xml配置、application.xml配置,还有数据库连接配置、属性文件加载配置、事务配置以及日志文件配置等等,相当繁琐。但是使用了Spring Boot,一切变得简单起来。。。
约定胜于配置,怎么方便使用,就怎么来。
二、如何创建一个Spring Boot工程
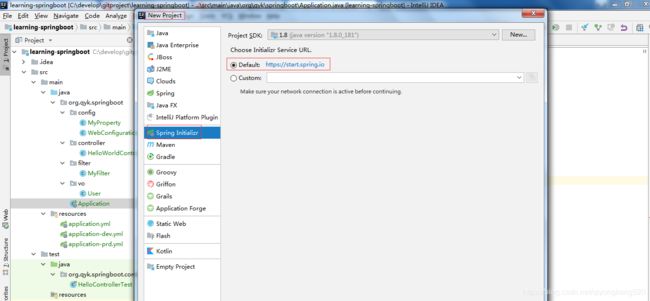
idea其实已经集成了Spring Boot工程的创建,截图如下:

其实很简单,只需要引入依赖即可,pom.xml文件如下:
  4.0.0

    org.springframework.boot
    spring-boot-starter-parent
    2.2.5.RELEASE


  org.qyk
  learning-springboot
  1.0-SNAPSHOT
  Learning SpringBoot
  Demo project for Spring Boot


    1.8


      org.springframework.boot
      spring-boot-starter-web


      org.springframework.boot
      spring-boot-starter-test
      test


      org.springframework.boot
      spring-boot-devtools
      true


        org.springframework.boot
        spring-boot-maven-plugin

          true
主要是继承parent:spring-boot-starter-parent,然后依赖spring-boot-starter-web,如果不是web工程,引入spring-boot-starter。
spring-boot已经帮忙把spring项目的基本包都集成好了,无需我们再去一个个找依赖了,所以使用很简单。
三、Spring Boot配置文件使用
首先,小七先把自己工程的三个配置文件:application.yml、application-dev.yml、application-prd.yml,这个相信大家看得懂,dev和prd分别对应开发环境和生产环境,是为了区分不同环境的配置,方便切换环境配置,当然还可以加个测试环境等等。
application.yml:
spring:
  profiles:
    active: dev # dev表示使用开发环境配置,prd表示使用生成环境配置

# 字符编码设置
  http:
    encoding:
      charset: UTF-8
      enabled: true
      force: true

server:
  tomcat:
    uri-encoding: UTF-8

# 自定义属性
org:
  qyk:
    name: 小七
    age: 18

# 日志设置
logging:
  file:
    path: E:\log
  level:
    org.qyk.springboot: INFO
application-dev.yml:
server:
  port: 8080
  servlet:
    context-path: /apidev
application-prd.yml:
server:
  port: 8080
  servlet:
    context-path: /apiprd
这些配置大家应该看得懂,无法是指定tomcat访问端口、请求上下文路径、字符编码设置、日志设置、自定义属性设置等等,就像以前的properties文件一样,只不过Spring Boot约定了很多配置,所以按它提供的方式配置即可。
四、如何运行Spring Boot工程
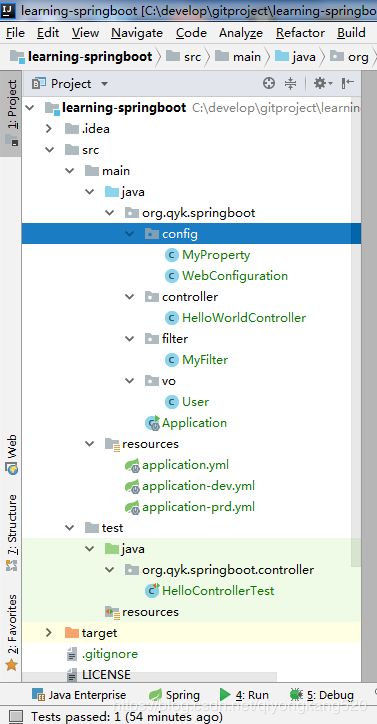
首先,小七给大家看一下自己的工程目录结构:

其实,和以前的SpringMVC目录结构差不多的,无非是多了一个Application入口类,其它的Controller层、业务层、持久层可以和以前保持一下即可,这个看不同公司的风格了。
下面,小七贴一下入口类Application.java的代码,如下:
package org.qyk.springboot;

import org.springframework.boot.SpringApplication;
import org.springframework.boot.autoconfigure.SpringBootApplication;

/**
 * SpringBoot入口类
 *
 * @version 1.0
 *
 * Author       Date            Changes
 * yongkang.qi   2020年03月22日   Created
 *
 *
 * @since 1.7
 */
@SpringBootApplication
public class Application {
    public static void main(String[] args) {
        SpringApplication.run(Application.class, args);
    }
}
注意要加上@SpringBootApplication注解,这里顾名思义就应该知道这个注解是干嘛用的了,想了解深入的话,可以看一下源码。
有的小伙伴如果之前一直是使用SpringMVC的话,可能会疑惑,不是打成war包,放到Tomcat或者Jetty中运行么,为啥还要指定一个带有main函数的入口类呢?
因为SpringBoot可以直接集成Tomcat组件了,无需再打成war包丢到Tomcat中运行了,是不是很方便啦。
下面,小七写了一个简单的控制器类HelloWorldController,代码如下:
package org.qyk.springboot.controller;

import org.qyk.springboot.config.MyProperty;
import org.qyk.springboot.vo.User;
import org.springframework.web.bind.annotation.RequestMapping;
import org.springframework.web.bind.annotation.RestController;

import javax.annotation.Resource;

/**
 *
 *
 * @version 1.0
 *
 * Author       Date            Changes
 * yongkang.qi   2020年03月22日   Created
 *
 *
 * @since 1.7
 */
@RestController
public class HelloWorldController {
    @Resource
    private MyProperty myProperty;

    @RequestMapping("/hello")
    private String hello() {
        return "hello world.";
    }

    @RequestMapping("/getUser")
    private User getUser() {
        User user = new User();
        user.setUserName("小七");
        user.setPassword("password");
        return user;
    }

    @RequestMapping("/getProperty")
    private String getProperty() {
        return myProperty.getName() + myProperty.getAge();
    }
}
@RestController和@RequestMapping,相信大家都能看懂,@RestController无非是表明这个类是控制器类,可以被扫描到,同时返回的对象还能以JSON格式输出;@RequestMapping这个就不多说了。
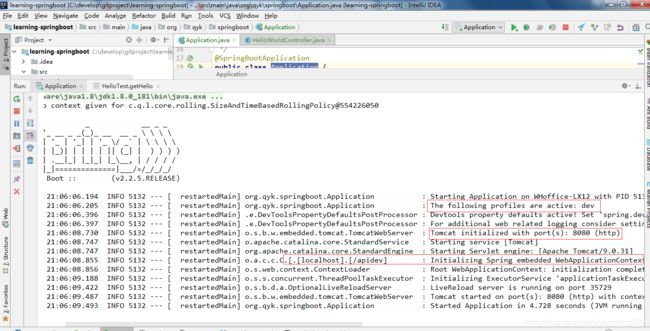
好啦,下面来运行一下Application的main方法看看,启动日志如下:

看到日志,是不是就明白啦,就是这么方便。当然,如果不是Web工程,那怎么办呢。哈哈,不用慌,咱们不是有单元测试可以使用么。
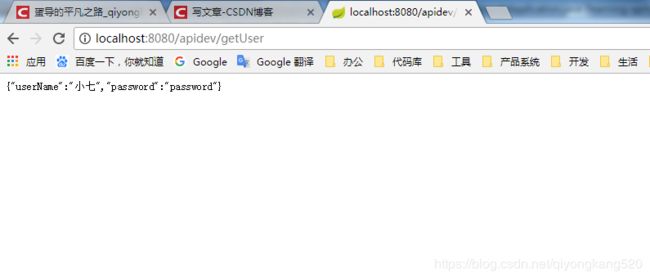
下面,小七给大家在浏览器测试一把试试看,结果如下:

请求成功啦,是不是比以前的方式快多啦,所以赶紧开始使用吧。
五、Spring Boot进行单元测试
上面,咱们是通过页面请求进行测试的,那如果要求写单元测试,改怎么写呢,其实和之前的Spring测试也差不多的,之前不是要指定spring配置文件和SpringJUnit4ClassRunner么,Spring Boot也差不多,小七就直接贴代码了,如下:
package org.qyk.springboot.controller;

import org.junit.Before;
import org.junit.Test;
import org.junit.runner.RunWith;
import org.springframework.boot.test.context.SpringBootTest;
import org.springframework.http.MediaType;
import org.springframework.test.context.junit4.SpringRunner;
import org.springframework.test.web.servlet.MockMvc;
import org.springframework.test.web.servlet.request.MockMvcRequestBuilders;
import org.springframework.test.web.servlet.setup.MockMvcBuilders;

import static org.hamcrest.Matchers.equalTo;
import static org.springframework.test.web.servlet.result.MockMvcResultMatchers.content;
import static org.springframework.test.web.servlet.result.MockMvcResultMatchers.status;

/**
 *
 *
 * @version 1.0
 *
 * Author       Date            Changes
 * yongkang.qi   2020年03月22日   Created
 *
 *
 * @since 1.7
 */
@RunWith(SpringRunner.class)
@SpringBootTest
public class HelloControllerTest {

    private MockMvc mvc;

    @Before
    public void setUp() {
        mvc = MockMvcBuilders.standaloneSetup(new HelloWorldController()).build();
    }

    @Test
    public void getHello() throws Exception {
        mvc.perform(MockMvcRequestBuilders.get("/hello").accept(MediaType.APPLICATION_JSON))
                .andExpect(status().isOk())
                .andExpect(content().string(equalTo("hello world.")));
    }
}
运行方式和Junit一样的。
结语
今天,就给还没有使用过Spring Boot的小伙伴入入门啦,后续会把咱们经常使用的一些技术和框架,通过Spring Boot引入进来。小七都是刚学,如有讲得不对的地方,请大家多多指正。