Flutter(二):实现网络请求、json解析、ListView展示数据
效果图如下,用的接口数据是聚合数据的历史今日的接口
首先看Flutter的网络请求实现,我暂时简单实现了,放在HttpController里,实现代码如下:
import 'package:http/http.dart' as http;

class HttpController {
  static void get(String url, Function callback,
      {Map params, Function errorCallback}) async {
    if (params != null && params.isNotEmpty) {
      StringBuffer sb = new StringBuffer("?");
      params.forEach((key, value) {
        sb.write("$key" + "=" + "$value" + "&");
      });
      String paramStr = sb.toString();
      paramStr = paramStr.substring(0, paramStr.length - 1);
      url += paramStr;
    }
    try {
      http.Response res = await http.get(url);
      if (callback != null) {
        callback(res.body);
      }
    } catch (exception) {
      if (errorCallback != null) {
        errorCallback(exception);
      }
    }
  }

  static void post(String url, Function callback,
      {Map params, Function errorCallback}) async {
    try {
      http.Response res = await http.post(url, body: params);

      if (callback != null) {
        callback(res.body);
      }
    } catch (e) {
      if (errorCallback != null) {
        errorCallback(e);
      }
    }
  }
}
简单封装了get和post 请求,有其他复杂的需求可以继续拓展这个类Function callback是成功时的回调,{Map
import 'dart:convert';

import 'package:flutter/material.dart';
import 'package:flutter_app/HttpController.dart';

class HomePage extends StatefulWidget {
  @override
  State createState() {
    // TODO: implement createState
    return new Page();
  }
}

class Page extends State {
  String dataStr = "";
  var _items = [];

  @override
  Widget build(BuildContext context) {
    return layout(context);
  }

  @override
  void initState() {
    super.initState();
    getData();
  }

  void getData() {
    Map map = new Map();
    map["v"] = "1.0";
    map["month"] = "7";
    map["day"] = "25";
    map["key"] = "bd6e35a2691ae5bb8425c8631e475c2a";
    HttpController.post("http://api.juheapi.com/japi/toh", (data) {
      if (data != null) {
        final body = JSON.decode(data.toString());
        final feeds = body["result"];
        var items = [];
        feeds.forEach((item) {
          items.add(Model(item["_id"], item["title"], item["pic"], item["year"],
              item["month"], item["day"], item["des"], item["lunar"]));
        });
        setState(() {
          dataStr = data.toString();
          _items = items;
        });
      }
    }, params: map);
  }

  Widget layout(BuildContext context) {
    return new Scaffold(
      appBar: buildAppBar(context),
      body:
          new ListView.builder(itemCount: _items.length, itemBuilder: itemView),
    );
  }

  Widget itemView(BuildContext context, int index) {
    Model model = this._items[index];
    //设置分割线
    if (index.isOdd) return new Divider(height: 2.0);
    return new Container(
        color: Color.fromARGB(0x22, 0x49, 0xa9, 0x8d),
        child: new Padding(
            padding: const EdgeInsets.all(8.0),
            child: new Padding(
                padding: const EdgeInsets.all(8.0),
                child: new Column(
                  children: [
                    new Row(
                      children: [
                        new Text('${model.year}年${model.month}月${model.day}日',
                            style: new TextStyle(fontSize: 15.0)),
                        new Text('(${model.lunar})',
                            style: new TextStyle(fontSize: 15.0)),
                      ],
                    ),
                    new Center(
                      heightFactor: 6.0,
                      child: new Text("${model.title}",
                          style: new TextStyle(fontSize: 17.0)),
                    )
                  ],
                ))));
  }

  Widget buildAppBar(BuildContext context) {
    return new AppBar(title: const Text('历史今日'));
  }
}

class Model {
  String _id;
  String title;
  String pic;
  int year;
  int month;
  int day;
  String des;
  String lunar;

  Model(this._id, this.title, this.pic, this.year, this.month, this.day,
      this.des, this.lunar);
}
首先来看网络请求方法,如下所示,在initState生命周期方法里调用getData(),如果有入参,则声明map,其中以map["v"] = "1.0";为例,“v”就是参数名,“1.0”就是value值,因为params是选择参数,所以调方法时要带上参数名:params:map;
  void getData() {
    Map map = new Map();
    map["v"] = "1.0";
    map["month"] = "7";
    map["day"] = "25";
    map["key"] = "bd6e35a2691ae5bb8425c8631e475c2a";
    HttpController.post("http://api.juheapi.com/japi/toh", (data) {
      if (data != null) {
        final body = JSON.decode(data.toString());
        final feeds = body["result"];
        var items = [];
        feeds.forEach((item) {
          items.add(Model(item["_id"], item["title"], item["pic"], item["year"],
              item["month"], item["day"], item["des"], item["lunar"]));
        });
        setState(() {
          dataStr = data.toString();
          _items = items;
        });

      }
    }, params: map);
  }
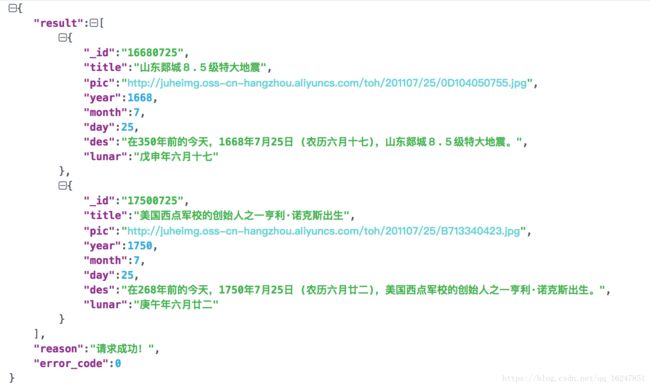
以下是返回的数据结构,通过
final body = JSON.decode(data.toString());
final feeds = body["result"];
将result的数据解析成feeds,然后遍历feeds,初始化我们的实体类Model,将Modle放到items数组中,这样我们就已经完成数据解析了,通过setState方法更新数据。
下面讲述关于Listview的实现:
new ListView.builder(itemCount: _items.length, itemBuilder: itemView)
_items就是存放我们实体的数组,有多少数据就有多少个item,这个不难理解,接下来就是完成itemView,其实都是创建布局,拿到元素,设置数据,道理都一样,详情可以看以上代码,相信都是看得懂的!

