安卓接收消息通知——从后台发出到显示消息弹窗详解
系统:win10 64bit
使用工具及技术:IDEA rabbitmq3.7.15 otp_win64_21.0.1 spring-boot-starter-amqp-2.0.6.RELEASE springboot maven
步骤:
1.下载安装rabbitmq,前提是装好erlang,因为rabbitmq是建立在Erlang OTP平台上的,两个安装包放百度网盘了。
otp_win64_21.0.1下载链接:https://pan.baidu.com/s/1u9Y24LYsH0PBRvTSqhVgjA
提取码:65xm
rabbitmq-server-3.7.15下载链接:https://pan.baidu.com/s/1T_ppzxRGqpff3o4i9MAr9g
提取码:lqxo
安装过程很简单,能登陆进去就没问题了。
注意:15672是默认端口,这个端口和一会儿代码里要连接mq的端口不一样,注意区分。
2.创建一个springboot项目,在pom文件中加入依赖:
     org.springframework.boot
     spring-boot-starter-amqp
3.接下来就是生产者和消费者的代码
(1)生产者的代码放到服务器端,在springboot项目里新建一个类,或者在已有项目里需要的地方直接调用该方法,发送后可以在http://127.0.0.1:15672/#/里面看到。
import com.rabbitmq.client.*;
import org.springframework.stereotype.Component;

@Component
public class MqProducer {

    public static void main(String[] args) {
        try {
            sendMsgToAll("这是发送的内容","这个参数是发送给谁");
        }catch (Exception e){
            e.printStackTrace();
        }
    }

    public static final String EXCHANGE_NAME = "orderInfo33";
    /**
     *
     * @param message 要发送的消息,包括标题和内容
     * @param consumer 接收者用户id
     * @throws Exception
     */
    public static void sendMsgToAll(String message,String consumer)
            throws Exception {

        ConnectionFactory factory = new ConnectionFactory();
        factory.setHost("装rabbitmq那台机器的ip");
        factory.setPort(8085);
        factory.setUsername("admin");
        factory.setPassword("admin");
        Connection connection = factory.newConnection();
        Channel channel = connection.createChannel();
        // 声明转发器和类型,并持久化,保证服务重启时交换机存在
        //参数意义:1交换机名称。2类型fanout direct topic
        channel.exchangeDeclare(EXCHANGE_NAME, "direct",true);

//      // 往转发器上发送消息
        channel.basicPublish(EXCHANGE_NAME, consumer, MessageProperties.PERSISTENT_TEXT_PLAIN, message.getBytes());
        System.out.println("开始向所有消费者推送数据"+ message);
        channel.close();
        connection.close();
    }
}
注意:channel.exchangeDeclare(EXCHANGE_NAME, "direct",true);
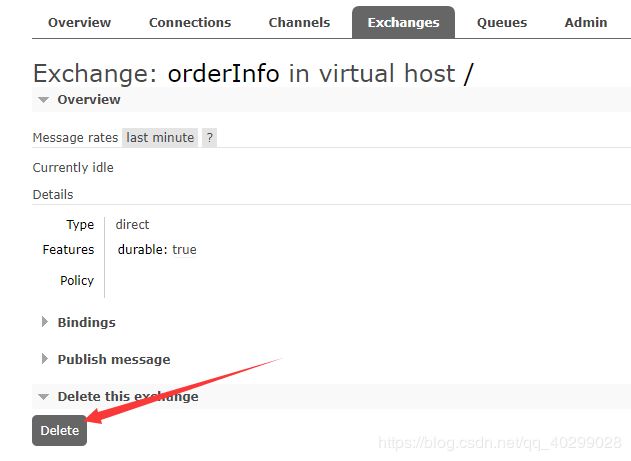
这里的第二个参数,如果类型改变,交换机的名字没变会报错。因为同一个交换机的类型不能改变,必须更换交换机名字,或者删除后重新创建。
在这里可以删除
(2)创建一个安卓项目,在MainActivity中放入以下代码。
private static ConnectionFactory factory;
factory = new ConnectionFactory();
        //下面参数这里要根据实际改
        factory.setHost("安装mq机器的地址");
        factory.setUsername("admin");
        factory.setPassword("admin");
        factory.setPort(8085);//这个端口号和进rabbitmq管理页面的端口号不一样,默认好像是5672

        //开启消费者线程
        MqUtil.subscribe(incomingMessageHandler,factory);

       final Handler incomingMessageHandler = new Handler() {
            @Override
            public void handleMessage(Message msg) {
                String message = msg.getData().getString("msg");//这里就是接收到的消息
                //写一个textView,看看能不能接收到消息
            }
        };
package utils;

import android.app.KeyguardManager;
import android.content.Context;
import android.os.Bundle;
import android.os.Handler;
import android.os.Message;
import android.os.PowerManager;
import android.util.Log;
import com.example.hao.myapplication.Attribute;
import com.rabbitmq.client.*;

import java.io.IOException;

public class MqUtil {
    static Thread subscribeThread;
    private static String mMessage;
    private final static String EXCHANGE = "orderInfo33";
    private static Attribute attr;

    public static void subscribe(final Handler handler, ConnectionFactory factory) {
        subscribeThread = new Thread(new Runnable() {
            @Override
            public void run() {
//                while (true) {
                try {
                    //使用之前的设置,建立连接
                    Connection connection = factory.newConnection();
                    //创建一个通道
                    Channel channel = connection.createChannel();
                    //一次只发送一个,处理完成一个再获取下一个
                    channel.basicQos(1);
                    channel.exchangeDeclare(EXCHANGE,"direct",true);//这里要根据实际改
                    String mQueue = channel.queueDeclare().getQueue();
                    channel.queueBind(mQueue,EXCHANGE,"消费者的名字");//这里要根据实际改
                    Consumer consumer = new DefaultConsumer(channel) {
                        @Override
                        public void handleDelivery(String consumerTag, Envelope envelope,
                                                   AMQP.BasicProperties properties, byte[] body) throws IOException {
                            mMessage = new String(body, "UTF-8");
                            System.out.println(" [x] Received '" + envelope.getRoutingKey() + "':'" + mMessage + "'");
//                                从message池中获取msg对象更高效
                            Message msg = handler.obtainMessage();
                            Bundle bundle = new Bundle();
                            bundle.putString("msg", mMessage);
                            msg.setData(bundle);
                            handler.sendMessage(msg);
                        }
                    };
                    channel.basicConsume(mQueue, true, consumer);
//

                } catch (Exception e1) {
                    Log.d("", "Connection broken: " + e1.getClass().getName());
                    try {
                        Thread.sleep(2000); //sleep and then try again
                    } catch (InterruptedException e) {
//                            break;
                    }
                }
                Log.i("1111111111111111111111", "run: ");
//                }
            }
        });
        subscribeThread.start();
    }

}
message就是从mq中获取的信息,在MainActivity中写一个textView,把message放上去,点击生产者的Main方法,在安卓上的textView就会显示出消息了,好了,赶紧试一试吧。
4.现在只是安卓接收到了,但还没有显示出像QQ那样的消息通知。
接下来,把刚刚接收到消息后,写的textView,改成这个方法。
     final Handler incomingMessageHandler = new Handler() {
            @Override
            public void handleMessage(Message msg) {
                String message = msg.getData().getString("msg");
                setNotification(message);

            }
        };
//设置通知栏消息样式
private void setNotification(String msg) {
String title = msg.split("\\;")[0];
String content = msg.split("\\;")[1];
int i = 0;
//点击通知栏消息跳转页
Intent intent = new Intent(this, UserActivity.class);
PendingIntent pendingIntent = PendingIntent.getActivity(this, 0, intent, 0);
//创建通知消息管理类
manager = (NotificationManager) getSystemService(NOTIFICATION_SERVICE);
//高版本需要渠道,很多人弹不出消息通知,就是因为没加这个
if(Build.VERSION.SDK_INT >= Build.VERSION_CODES.O){
//只在Android O之上需要渠道
NotificationChannel notificationChannel = new NotificationChannel("channelid1","channelname",NotificationManager.IMPORTANCE_HIGH);
//如果这里用IMPORTANCE_NOENE就需要在系统的设置里面开启渠道,通知才能正常弹出
manager.createNotificationChannel(notificationChannel);
}
builder = new NotificationCompat.Builder(this,"channelid1")//创建通知消息实例
.setContentTitle(title)
.setContentText(content)
.setWhen(System.currentTimeMillis())//通知栏显示时间
.setSmallIcon(R.mipmap.ic_launcher)//通知栏小图标
.setLargeIcon(BitmapFactory.decodeResource(getResources(), R.mipmap.ic_launcher))//通知栏下拉是图标
.setContentIntent(pendingIntent)//关联点击通知栏跳转页面
.setPriority(NotificationCompat.PRIORITY_MAX)//设置通知消息优先级
.setAutoCancel(true)//设置点击通知栏消息后,通知消息自动消失
// .setSound(Uri.fromFile(new File("/system/MP3/music.mp3"))) //通知栏消息提示音
.setVibrate(new long[]{0, 1000, 1000, 1000}) //通知栏消息震动
.setLights(Color.GREEN, 1000, 2000) //通知栏消息闪灯(亮一秒间隔两秒再亮)
.setDefaults(NotificationCompat.DEFAULT_ALL); //通知栏提示音、震动、闪灯等都设置为默认
//短文本
notification = builder.build();
//Constant.TYPE1为通知栏消息标识符,每个id都是不同的
manager.notify(i, notification);
}5.好了,以上就是安卓接收消息通知的全过程,有需要改正的地方请大佬指出。


