linux安装zabbix4,添加监测客户机(centos7)(一)
文章目录
- 一、linux系统配置
- 二、yum安装zabbix-server
- 三、配置zabbinx-server
- 四、登陆zabbix-server,设置中文语言
- 五、被监控客户端部署zabbix-agent
- 六、添加被监测客户机
| 软件 | 版本号 | 查询命令 |
|---|---|---|
| centos7 | CentOS Linux release 7.7.1908 (Core) | cat /etc/redhat-release |
| zabbix-server-mysql | zabbix-server-mysql-4.4.5-2.el7.x86_64 | rpm -qa |grep zabbix |
| zabbix-release | zabbix-release-4.4-1.el7.noarch | rpm -qa |grep zabbix |
| zabbix-web-mysql | zabbix-web-mysql-4.4.5-2.el7.noarch | rpm -qa |grep zabbix |
| zabbix-web | zabbix-web-4.4.5-2.el7.noarch | rpm -qa|grep zabbix |
| zabbix-agent | zabbix-agent-4.4.5-2.el7.x86_64 | rpm -qa |grep zabbix-agent |
| mariadb-server | mariadb-server-5.5.64-1.el7.x86_64 | rpm -qa|grep mariadb-server |
| php | php-5.4.16-46.1.el7_7.x86_64 | rpm -qa|grep php |
| apache | httpd-2.4.6-90.el7.centos.x86_64 | rpm -qa|grep httpd |
| ntp | ntpdate-4.2.6p5-29.el7.centos.x86_64 | rpm -qa |grep ntpdate |
一、linux系统配置
1、临时关闭seLinux。
setenforce 0
2、永久关闭selinux 需编辑配置文件/etc/selinux/config,设置SELINUX=disabled,重启系统后生效。
vi /etc/selinux/config
3、关闭防火墙或设置防火墙开放80端口。
systemctl stop firewalld
或
firewall-cmd --zone=public --add-port=80/tcp --permanent
firewall-cmd --reload
firewall-cmd --query-port=80/tcp
二、yum安装zabbix-server
1、从zabbix官方的源码库https://repo.zabbix.com下载、安装部署包文件。
wget -c -t 0 https://repo.zabbix.com/zabbix/4.4/rhel/7/x86_64/zabbix-release-4.4-1.el7.noarch.rpm
rpm -ivh zabbix-release-4.4-1.el7.noarch.rpm


2、安装zabbix-server-mysql,启动服务并设置为开机启动。
yum install -y  zabbix-server-mysql
systemctl start zabbix-server
systemctl enable zabbix-server
3、安装zabbix-web-mysql。
yum install -y zabbix-web-mysql
4、安装客户端zabbix-agent,启动服务并设置为开机启动。
yum install -y zabbix-agent
systemctl start zabbix-agent
systemctl enable zabbix-agent
5、安装数据库mysql,启动服务并设置为开机启动,设置数据库账户root密码。
yum install -y  mariadb-server
systemctl  start    mariadb.service
systemctl  enable    mariadb.service
mysqladmin -uroot  password  'server7'
6、登录mysql,创建zabbix数据库,授权用户zabbix使用密码zabbix访问本地zabbix数据库时拥有所有权限。
mysql -uroot -p
create database zabbix character set utf8 collate utf8_bin;
grant all privileges on zabbix.* to zabbix@localhost identified by 'zabbix';
quit;
find / -name "zabbix-server-mysql*"
cd  /usr/share/doc/zabbix-server-mysql-4.4.5
zcat  create.sql.gz  | mysql -uroot  -pserver7  zabbix
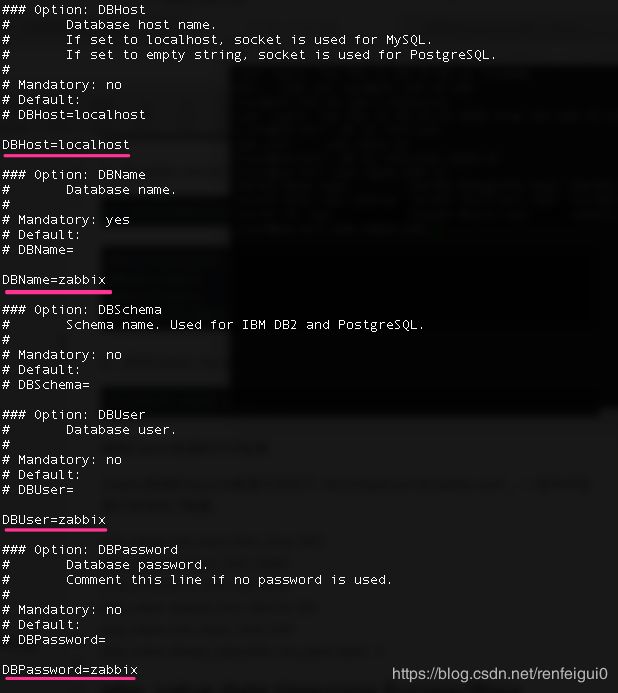
8、在配置文件zabbix_server.conf中编辑数据库配置。
vi /etc/zabbix/zabbix_server.conf
DBHost=localhost
DBName=zabbix
DBUser=zabbix
DBPassword=zabbix
yum install -y zabbix-web
10、安装apache服务,启动服务并设置为开机启动。
yum install -y httpd
systemctl start httpd
systemctl enable httpd
11、安装php。
yum install -y php
12、安装时间同步ntp服务,修改系统时间为亚洲上海时区。
 yum install -y  ntpdate
 ln -sf /usr/share/zoneinfo/Asia/Shanghai /etc/localtime
 ntpdate us.pool.ntp.org
 date
13、修改配置文件/etc/httpd/conf.d/zabbix.conf,时区改成 Asia/Shanghai。
vi /etc/httpd/conf.d/zabbix.conf
#
# Zabbix monitoring system php web frontend
#

Alias /zabbix /usr/share/zabbix

<Directory "/usr/share/zabbix">
    Options FollowSymLinks
    AllowOverride None
    Require all granted

    <IfModule mod_php5.c>
        php_value max_execution_time 300
        php_value memory_limit 128M
        php_value post_max_size 16M
        php_value upload_max_filesize 2M
        php_value max_input_time 300
        php_value max_input_vars 10000
        php_value always_populate_raw_post_data -1
        # php_value date.timezone Europe/Riga
        php_value date.timezone Asia/ShangHai
    </IfModule>
</Directory>

<Directory "/usr/share/zabbix/conf">
    Require all denied
</Directory>

<Directory "/usr/share/zabbix/app">
    Require all denied
</Directory>

<Directory "/usr/share/zabbix/include">
    Require all denied
</Directory>

<Directory "/usr/share/zabbix/local">
    Require all denied
</Directory>
14、重启apache,zabbix-server服务。
systemctl   restart   httpd
systemctl   restart   zabbix-server
三、配置zabbinx-server
1、浏览器输入http://192.168.43.100/zabbix,进入如下界面。

2、点击下一步,进入先决条件检查界面,确保状态都是OK。

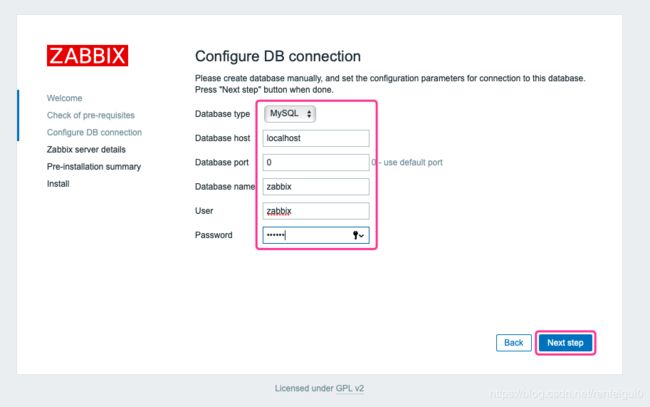
3、点击下一步,进入配置数据库连接界面。

4、点击下一步,进入zabbix服务配置界面。

5、点击下一步,进入安装前总结界面。

6、点击下一步,进入安装界面,点击finish,完成安装。

四、登陆zabbix-server,设置中文语言
1、浏览器输入http://192.168.43.100/zabbix,进入登陆界面,使用默认用户名/密码(Admin / zabbix)登陆,A是大写字母。

2、zabbinx监控界面如下。

五、被监控客户端部署zabbix-agent
1、从zabbix官方的源码库https://repo.zabbix.com下载、安装部署包文件。
wget -c -t 0 https://repo.zabbix.com/zabbix/4.4/rhel/7/x86_64/zabbix-release-4.4-1.el7.noarch.rpm
rpm -ivh zabbix-release-4.4-1.el7.noarch.rpm


2、安装zabbix-agent,启动服务并设置为开机启动。
yum  install -y  zabbix-agent
systemctl start zabbix-agent
systemctl enable zabbix-agent
systemctl status zabbix-agent
3、编辑配置文件/etc/zabbix/zabbix_agentd.conf,设置zabbix服务器ip,重启zabbix-agent服务。未正确配置时报错如下图:Received empty response from Zabbix Agent at [192.168.43.120]. Assuming that agent dropped connection because of access permissions.
vi  /etc/zabbix/zabbix_agentd.conf
systemctl restart zabbix-agent
Server=192.168.43.100
ServerActive=192.168.43.100
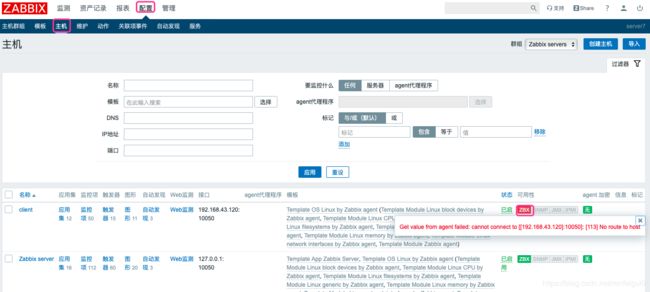
4、防火墙开放10050端口。未开放端口时报错如下图:Get value from agent failed: cannot connect to [[192.168.43.120]:10050]: [113] No route to host
firewall-cmd --zone=public --list-ports
firewall-cmd --zone=public --add-port=10050/tcp --permanent
firewall-cmd --reload
firewall-cmd --zone=public --query-port=10050/tcp
5、如果报错如下图:Get value from agent failed: cannot connect to [[127.0.0.1]:10050]: [111] Connection refused,说明zabbix-agent服务未启动,启动即可。
systemctl start zabbix-agent
六、添加被监测客户机
1、浏览器输入http://192.168.43.100/zabbix,进入登陆界面,使用默认用户名/密码(Admin / zabbix)登陆。
2、选择配置->主机->创建主机。

3、设置zabbix-agent主机名称,根据实际情况选择合适群组,设置ip、dns,选中已启用;点击模板,选择合适模板。


