Android天天飞车游戏辅助系统
Android天天飞车游戏辅助系统
声明:单纯的辅助模拟人操作,非修改游戏内存,非修改游戏运行文件,非修改调用库……
(避免使用外挂这个词,毕竟离外挂还有好远的距离~)
玩了好久的腾讯天天飞车,每天的20局任务相当蛋疼,遂头脑一热想开发个Android应用,来模拟手动操作。
花了几天时间,把Android开发环境搭建了,搞了个简单的能识别当前游戏处在哪个界面,并模拟操作点击左右转向按键,马马虎虎算是可以完成每日20局任务了~
摸索新领域总是充满未知和惊喜的,遂记之如下。
整体思路
通过屏幕像素点的颜色信息,判断当前处于哪个界面(弱爆了的感觉~~~~~)
然后模拟按键操作~~~
手机:移动M701 ROOT
一、如何搭建Android开发环境
度娘之~
二、如何创建浮动窗口
因为考虑到不能影响到正常使用其他应用,需要将控制按钮放在浮动于所有应用之上的窗口上。
先要在OnCreate()函数里初始化如下变量:
private static WindowManager wm =(WindowManager)getApplicationContext().getSystemService(Context.WINDOW_SERVICE);
private static WindowManager.LayoutParamsparams = new WindowManager.LayoutParams();
public ViewGroup controlViewGroup =(ViewGroup) View.inflate(getApplicationContext(), R.layout.floating, null);
创建悬浮窗的代码:
/**
 * 创建可移动的悬浮窗,在所有应用最顶层显示
 */
private void createFloatView()
{
         Log.i(TAG,TAG+"createFloatView()");

         btn_floatView= new Button(getApplicationContext());
         btn_floatView.setBackgroundResource(R.drawable.img_float);

         //设置window type
         params.type= WindowManager.LayoutParams.TYPE_SYSTEM_ALERT;
         params.format= PixelFormat.RGBA_8888; // 设置图片格式,效果为背景透明
         //设置Window flag
         params.flags= WindowManager.LayoutParams.FLAG_NOT_TOUCH_MODAL
                            |WindowManager.LayoutParams.FLAG_NOT_FOCUSABLE ;
         params.flags&= ~WindowManager.LayoutParams.FLAG_KEEP_SCREEN_ON; // 屏幕常亮仅在控制板可见时有效
         params.alpha= CONTROL_VIEW_ALPHA; // 设置悬浮窗的透明度
         //设置悬浮窗的长得宽
         params.width= FLOATING_VIEW_SIZE;
         params.height= FLOATING_VIEW_SIZE;

         //设置悬浮窗的Touch监听
//可以实现按住拖放的功能,单击后,弹出控制窗口
         btn_floatView.setOnTouchListener(newOnTouchListener()
         {
                   intlastX, lastY;
                   intparamX, paramY;
                   intupX,upY;

                   publicboolean onTouch(View v, MotionEvent event)
                   {
                            switch(event.getAction())
                            {
                            caseMotionEvent.ACTION_DOWN:
                                     lastX= (int) event.getRawX();
                                     lastY= (int) event.getRawY();
                                     paramX= params.x;
                                     paramY= params.y;
                                     break;
                            caseMotionEvent.ACTION_MOVE:
                                     intdx = (int) event.getRawX() - lastX;
                                     intdy = (int) event.getRawY() - lastY;
                                     params.x= paramX + dx;
                                     params.y= paramY + dy;
                                     //更新悬浮窗位置
                                     wm.updateViewLayout(btn_floatView,params);
                                     break;
                            caseMotionEvent.ACTION_UP:
                                     upX= (int) event.getRawX();
                                     upY= (int) event.getRawY();
                                     if(Math.abs(lastX-upX) < 5 && Math.abs(lastY-upY) < 5)
                                     {
                                               //单击后,弹出控制面板
                                               createControlView();
                                     }
                                     break;
                            }
                            returntrue;
                   }
         });
         wm.addView(btn_floatView,params);
}
控制窗口的显示代码如下:
/**
 * 创建控制面板
 * 启动/暂停按钮、 最小化按钮、 退出按钮
 */
private void createControlView()
{
         //设置Window flag
         //params.flags&= ~WindowManager.LayoutParams.FLAG_NOT_TOUCH_MODAL;
         params.flags&= ~WindowManager.LayoutParams.FLAG_NOT_FOCUSABLE; // 接受焦点输入
         params.flags|= WindowManager.LayoutParams.FLAG_KEEP_SCREEN_ON; // 屏幕常亮
         //wm.updateViewLayout(gView,params);
         //设置悬浮窗的长得宽
         params.width= CONTROL_VIEW_WIDTH;
         params.height= CONTROL_VIEW_HEIGHT;

         //params.x= 200;
         //params.y= 400;

         wm.removeView(btn_floatView);
         wm.addView(controlViewGroup,params);
}
三、如何模拟控制按键操作
有很多种方法,这里我采用的方法是直接往linux底层/dev/input/event*写事件,当然是需要手机root权限的。
先说下android界面捕获事件的流程吧:
用户点击-(硬件驱动部分)硬件产生一个中断,往/dev/input/event*写入一个相应的信号,android循环读取/dev/input/event*的事件,再分发给WindowManagerServer,最后再发到相应的ViewGroup和View。因此这里可以通过往/dev/input/event*写信号的方式,来达到模拟按键的目的。
类似分析可参见这里:
http://zuoshu.iteye.com/blog/1775606
http://blog.csdn.net/learnrose/article/details/6236890
总而言之,步骤如下:
1、查看设备属性
查看当前手机的输入设备:
>adb shell getevent
可以看到触摸屏name=mtk-tpd, 是event3,如果不放心,可以随意触摸屏幕,会发现收到很多event3的数据
2、确定按键命令格式信息
>adb shell getevent | grep event3这个命令可以使得命令窗口只显示event3的数据信息,快速点击下屏幕发现有很多数据,如下图左侧部分:
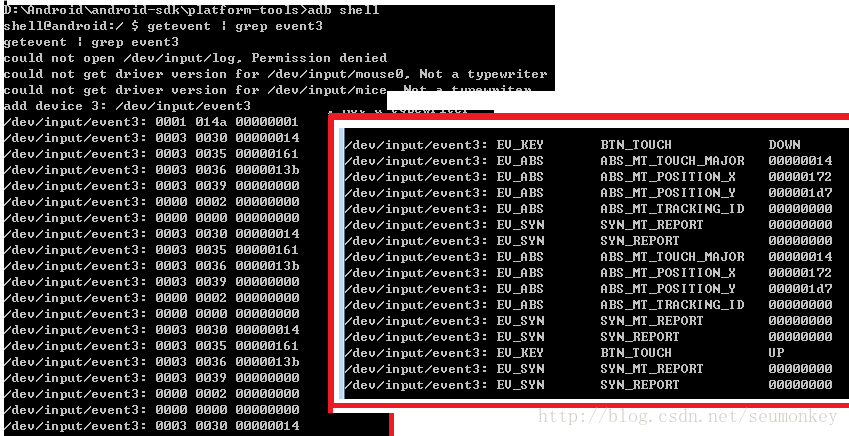
但这些数据都是16进制数字,我们可没法看,别急,输入下面命令:
>adb shell getevent -d -l/dev/input/event3通过给getevent加上-d -l参数来查看:
-d: show HID descriptor, if available
-l: label event types and names in plain text
这样就得到上图右边红色框里的数据了。
这样我们就得到了一次按键的数据命令格式如下:
EV_KEY BTN_TOUCH DOWN
0001 014a 00000001

EV_ABS ABS_MT_TOUCH_MAJOR 00000001
EV_ABS ABS_MT_POSITION_X 0000003e
EV_ABS ABS_MT_POSITION_Y 000000ef
EV_ABS ABS_MT_TRACKING_ID 00000001
0003 0030 00000001
0003 0035 00000028
0003 0036 00000112
0003 0039 00000001

EV_SYN SYN_MT_REPORT 00000000
EV_SYN SYN_REPORT 00000000
0000 0002 00000000
0000 0000 00000000

EV_KEY BTN_TOUCH UP
0001 014a 00000000

EV_SYN SYN_MT_REPORT 00000000
EV_SYN SYN_REPORT 00000000
0000 0002 00000000
0000 0000 00000000
根据手指的抖动情况,xy坐标可能会发送多次。
3、代码模拟按键
现在我们通过向event3发送数据来模拟按键。
这里,我们通过app操作手机的超级终端来发送命令。
代码如下:
// 命令定义 切记不要忘记最后的换行符
public static final String CMD_DOWN =                            "sendevent/dev/input/event3 1 330 1 \n";
public static final String CMD_TOUCH_MAJOR= "sendevent /dev/input/event3 3 4820 \n";
public static final String CMD_X =                              "sendevent/dev/input/event3 3 53 ";
public static final String CMD_Y =                              "sendevent/dev/input/event3 3 54 ";
public static final String CMD_TRACK_ID =             "sendevent /dev/input/event3 357 0 \n";
public static final StringCMD_SYN_MT_REPORT =        "sendevent/dev/input/event3 0 2 0 \n";
public static final String CMD_SYN_REPORT =      "sendevent /dev/input/event3 00 0 \n";
public static final String CMD_UP =                           "sendevent/dev/input/event3 1 330 0 \n";

Process proc;
// 先获取root,运行shell
//  因为su需要花一定时间,所以os放在最后才初始化
try {
         proc= Runtime.getRuntime().exec("su"); // 以root运行超级终端,设备需要拥有su权限
         }catch (IOException e) {
         e.printStackTrace();
}
DataOutputStream os = newDataOutputStream(proc.getOutputStream());

// 模拟按键
os.writeBytes(CMD_DOWN);
os.flush();
for (int i=0; i<1; i++)
{
         os.writeBytes(CMD_TOUCH_MAJOR);
         os.flush();
         os.writeBytes(CMD_X+ x +" \n");
         os.flush();
         os.writeBytes(CMD_Y+ y +" \n");
         os.flush();
         os.writeBytes(CMD_TRACK_ID);
         os.flush();
         os.writeBytes(CMD_SYN_MT_REPORT);
         os.flush();
         os.writeBytes(CMD_SYN_REPORT);
         os.flush();
}
os.writeBytes(CMD_UP);
os.flush();
os.writeBytes(CMD_SYN_MT_REPORT);
os.flush();
os.writeBytes(CMD_SYN_REPORT);
os.flush();
实际可能还需要根据屏幕的坐标系,确定xy的方向。
我的手机是右上角为原点,自上向下为x正方向,自右向左为y正方向。
四、如何感知当前屏幕像素点颜色信息?
其实这有点类似于“Android屏幕截图”这个问题。
我们知道,DDMS可以很容易的获取Android 手机的屏幕截图,那么它是怎么做到的呢?
其实,android手机上有一个叫做FrameBuffer的设备,图像信息都是通过FrameBuffer写到手机屏幕上去的。因此可以通过读取此设备中的数据来获取当前正在显示的图像。当然DDMS也是这么做到的。
FrameBuffer 对应的设备文件就是/dev/graphics/fb0。因此我们可以通过读取这个设备文件的内容来获取屏幕的图像数据。这个文件的信息如下:

使用这种方法第一个难题是获取FrameBuffer,因为默认的配置中FrameBuffer的读取权限是“root”,而Apk的权限最高只能提升到“system”,framework工作的权限也是“system”,所以需要手机root。
1、修改设备文件/dev/graphics/fb0的属性
为了能够读取内容,我们可以修改下fb0的设备权限为一般用户可读:
chmod 444 /dev/graphics/fb02、读取设备文件/dev/graphics/fb0内的数据
好了,接下来就是将fb0内的数据读入到我们自己的数组里:
// 获取屏幕大小:
DisplayMetrics metrics = new DisplayMetrics();
WindowManager WM = (WindowManager)getApplicationContext().getSystemService(Context.WINDOW_SERVICE);
Display display = WM.getDefaultDisplay();
display.getMetrics(metrics);
int height = metrics.heightPixels; //屏幕高
int width = metrics.widthPixels;     //屏幕的宽
// 获取显示方式
int pixelformat = display.getPixelFormat(); // 1  RGBA_8888 实际读取到的fb0的数据格式为BGRA
PixelFormat localPixelFormat1 = new PixelFormat();
PixelFormat.getPixelFormatInfo(pixelformat,localPixelFormat1);
int deepth = localPixelFormat1.bytesPerPixel;//位深 // 4
//         // 读取buffer
myFrameBuffer = new byte[height * width * deepth * 2];// 双缓冲,实际我们也只需要用一个就够了
 try {
         os.writeBytes("chmod666 /dev/graphics/fb0 \n");
         os.flush();

         FileInputStreamstream = new  FileInputStream(newFile("/dev/graphics/fb0"));
         myFrameBufferStream= new DataInputStream(stream);
         myFrameBufferStream.readFully(myFrameBuffer);
         myFrameBufferStream.close();
         stream.close();
} catch (FileNotFoundException e) {
         // TODOAuto-generated catch block
         e.printStackTrace();
} catch (IOException e) {
         // TODOAuto-generated catch block
         e.printStackTrace();
}
接下来就是将读取到的数据显示在我的控件之上:
readFrameBuffer();
int w = 720;
int h = 1280;
Bitmap bitmap =Bitmap.createBitmap(w, h, Bitmap.Config.ARGB_8888);
for (int i=0; i
3、正确解析FrameBuffer内的数据
这里还需要强调一点,就是变量line_length,因为在adb shell里查看fb0的信息如下:

我们可以看到fb0的大小为7536640,我的手机是720*1280的,根据代码里的PixelFormat可以看到位深4,即一个像素4字节数据(BGRA),这样算下来应该是 720*1280*4=3686400,考虑双缓冲有3686400*2=7372800,咦,怎么比fb0的实际大小略小?我一直以为类似于bmp的数据格式,按行存储的,通过winhex查看fb0 cat出来的文件数据也没发现什么问题,但是显示的始终就是花屏,类似于这样:

折腾了好几天,度娘了好久,最后还是google到一个牛逼国外网友:
http://stackoverflow.com/questions/15468542/how-to-discover-framebuffer-width-on-android
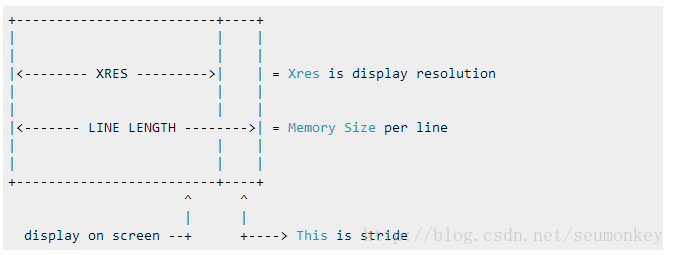
The right padding is called"stride" (stride = (line_length in pixel) - width). Many device hadthis stride in the framebuffer if the display resolution is not multiply of 8.
So the formula is:
fileSize = line_length * yres * numberOfFrames
Don't multiply it with bpp/8, because the line_length is memory size (not pixelsize).
To retrive the line_length Youshould used FBIOGET_FSCREENINFO (0x4602 -17922) rather thanFBIOGET_VSCREENINFO (0x4600 -17922) like this:
>adb shell ioctl -rl 50 /dev/graphics/fb0 17922
My Galaxy Nexus return like this:
return buf: 6f 6d 61706662 00 00000000 00 00000000 00 00 a0 ac000000
01 00 00 00000000 00 00020000 00 01000100 00 00000080 0b 00000000
My Galaxy Nexus have line_length: 2944(0xb80).
意思就是说,内存里的一行字节数是line_length,而不是width*4!
查了好久,貌似基本都会提到ioctl,没想到强大的adb竟然也提供了这个命令,可以查看屏幕的参数信息:
>adbshell ioctl -rl 28 /dev/graphics/fb0 17920
屏幕宽度:0x000002d0 = 720
屏幕高度:0x00000500 = 1280
每像素bit:0x00000020 = 32
为了查看line_length,根据这位牛逼国外网友的提示:
>adbshell ioctl -rl 50 /dev/graphics/fb0 17922
也即我的line_length:0x00000b80 = 2944
这样,7536640 = 1280行 * 2944 * 2屏, 这回就可以正确解析FrameBuffer里的图像数据了。
五、 最终效果图
很粗糙,期待后续改进,现在是随机控制左右转向,要是能识别车辆就好了~(这个貌似单纯的通过像素点来判断恐怕不现实,不知是不是可以从游戏使用的引擎入手,不过那么高的高度也是后话了~~~)