【Android】移动端与服务器端简单的交互(账号密码登录) Android+PHP+MySQL
整体的流程是这样的:移动端获取到了数据,然后发送http请求和json格式数据吗,调用php文件,php解析json数据之后,根据数据对数据库进行不同的操作,操作完成之后返回相应,移动端获取响应内容即可知道是否成功。
这里我们就用一个账号密码注册熟悉一下流程,其他的请求与交互都可以在此基础上进行修改。
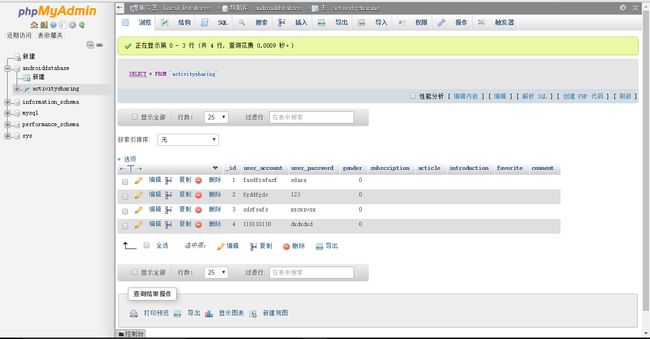
首先交代一下环境,这里使用的是wampserver ,数据库是androiddatabase,table名是activitysharing,如下图,这里的内容是我之前添加测试的。

服务器端首先配置数据库内容
db_config.php
根据自己数据库名字不同、phpadmin登录密码自行修改
php
define('DB_USER', "root");
define('DB_PASSWORD', "");
define('DB_DATABASE', "androiddatabase");
define('DB_SERVER', "localhost");
?>
db_connect.php
用于连接打开数据库的类
     /**
     * A class file to connect to database
     */
    class DB_CONNECT {

        // constructor
        function __construct() {
        }

        // destructor
        function __destruct() {
            // closing db connection
            $this->close();
        }

        /**
         * Function to connect with database
         */
        function connect() {
            // import database connection variables
            require_once __DIR__ . '/db_config.php';

            // Connecting to mysql database
            $con = mysqli_connect(DB_SERVER, DB_USER, DB_PASSWORD,DB_DATABASE);

            if ($con) echo "connect complete"."
";
            // returing connection cursor
            return $con;
        }

        /**
         * Function to close db connection
         */
        function close() {
            // closing db connection
            //mysql_close();
        }
    }

    ?>
test.cpp
用于接收json数据并对数据库进行操作
        define('DEFAULT_STRING', "");
        define('DEFAULT_GENDER', "0");
        $response =array();

        $v=json_decode(file_get_contents("php://input"),true);


         if (isset($v['user_account']) && (isset($v['user_password'])))
        {

            $user_account = $v['user_account'];
            $user_password = $v['user_password'];


            //gender
            if (isset($v['gender']))
                $user_gender=$v['gender'];
            else $user_gender= DEFAULT_GENDER;

            //subscription
            if (isset($v['subscription']))
                $user_subscription=$v['subscription'];
            else $user_subscription= DEFAULT_STRING ;

            //article
             if (isset($v['article']))
                $user_article=$v['article'];
            else $user_article= DEFAULT_STRING ;

            //introduction
             if (isset($v['introduction']))
                $user_introduction=$v['introduction'];
            else $user_introduction= DEFAULT_STRING ;

            //favorite
            if (isset($v['favorite']))
                $user_favorite=$v['favorite'];
            else $user_favorite= DEFAULT_STRING ;

            //comment
            if (isset($v['comment']))
                $user_comment=$v['comment'];
            else $user_comment= DEFAULT_STRING ;

            // include db connect class
            require_once __DIR__ . '/db_connect.php';

            // 连接数据库
            $db = new DB_CONNECT();
            $mysqli= $db->connect();
            if ($mysqli) {
                echo "connect database succeed";

            $result = mysqli_query($mysqli,"INSERT INTO activitysharing(
                                        user_account,
                                        user_password,
                                        gender,
                                        subscription,
                                        article,
                                        introduction,
                                        favorite,
                                        comment)
                                 VALUES('$user_account',
                                        '$user_password',
                                        '$user_gender',
                                        '$user_subscription',
                                        '$user_article',
                                        '$user_introduction',
                                        '$user_favorite',
                                        '$user_comment')");
                //创建新账号成功
                if ($result){
                    $response["success"]=1;
                    $response["message"] = "Account successfully created.";
                    echo json_encode($response);
                }else{
                //创建失败
                    $response["success"]=0;
                    $response["message"] = "Account can to be created.";
                    echo json_encode($response);
                }

          mysqli_close($mysqli);
            }
            else {
                    $response["success"]=0;
                    $response["message"] = "connect failed.";
                    echo json_encode($response);
            }
        }
        else{
                     $response["success"]=0;
                     $response["message"] = "user_account or user_password missing.";
            echo json_encode($response);
        }
    ?>
由于数据库一开始设置了有很多字段,而很多字段是TEXT类型没有默认值,所以必须对其进行赋默认值。
注意一点的是:由于php版本的不同,在PHP5.5版本之后将mysql系列例如mysql_query、mysql_select等函数在之后用mysqli和pod代替了,具体的可以看php文档,不在这里详细叙述了,不同版本的API还是有些区别的。
服务器端基本就这些了,剩下的是android 移动端。
由于android不允许在主线程中进行http请求所以注意要另开一个线程。还有在android SDK23(6.0)当中,已经取出了org.apache.http中的大部分包,也就是说不在推荐使用httpclient方式进行http访问,而推荐使用HttpURLConnection这个类进行网络操作,是为了更加效率和省电。
 new Thread(new Runnable() {
                    @Override
                    public void run() {

                        try {

                            URL url = new URL(url_new_account);
                            HttpURLConnection httpURLConnection = (HttpURLConnection) url.openConnection();
                            //设置请求方式
                            httpURLConnection.setRequestMethod("POST");
                            // 设置是否向httpUrlConnection输出,因为这个是post请求,参数要放在
                            // http正文内,因此需要设为true, 默认情况下是false;
                            httpURLConnection.setDoOutput(true);
                            // 设置是否从httpUrlConnection读入,默认情况下是true;
                            httpURLConnection.setDoInput(true);
                            // Post 请求不能使用缓存
                            httpURLConnection.setUseCaches(false);
                            // 设置请求的超时时间
                            httpURLConnection.setReadTimeout(5000);
                            httpURLConnection.setConnectTimeout(5000);
                            // 设定传送的内容类型是可序列化的java对象
                            httpURLConnection.setRequestProperty("Content-type", "application/json;charset=utf-8");
                            httpURLConnection.connect();

                            //POST请求

                            OutputStream out = httpURLConnection.getOutputStream();
                            JSONObject obj = new JSONObject();
                            obj.put("user_account", account);
                            obj.put("user_password", password);
                            Log.v("TAG", obj.toString());
                            out.write(obj.toString().getBytes());
                            out.flush();
                            out.close();

                            //读取响应
                            BufferedReader reader = new BufferedReader(new InputStreamReader(
                                    httpURLConnection.getInputStream()));
                            String lines;
                            StringBuffer sb = new StringBuffer("");
                            while ((lines = reader.readLine()) != null) {
                                lines = new String(lines.getBytes(), "utf-8");
                                sb.append(lines);
                            }
                            Log.v("TAG", sb.toString());
                            reader.close();
                            // 断开连接
                            httpURLConnection.disconnect();
                        } catch (Exception e) {
                            Log.getStackTraceString(e);
                        }
                    }
                }).start();
这里注意不同的POST方式所需要的格式和Content-type是不同的,可以参考http://www.cnblogs.com/aaronjs/p/4165049.html