使用Spring Boot搭建个人博客全记录
使用Spring Boot搭建个人博客
简介
后端使用Spring Boot搭建的一个博客系统,前端使用的是thymeleaf + bootstrap,集成了editormd的markdown编辑器。
本项目适合Spring初学者作为练手项目,包含的主要技术点:
从开始到项目完成的全过程,篇幅可能较长
- spring data jpa的基本使用
- 数据绑定
- 拦截器
- spring boot 注解配置
地址
项目的思路以及前端代码来自他的博客:
一个JavaWeb搭建的开源Blog系统,整合SSM框架
项目GitHub地址:
https://github.com/wchstrife/blog
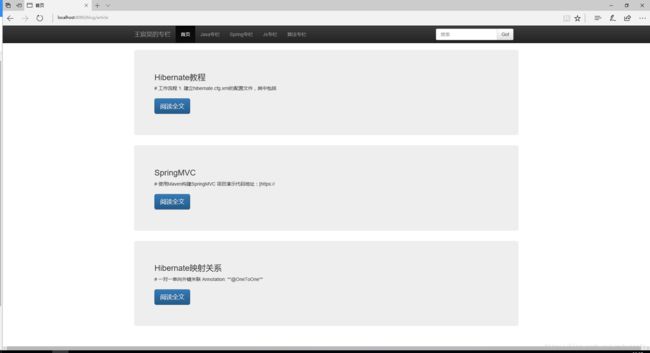
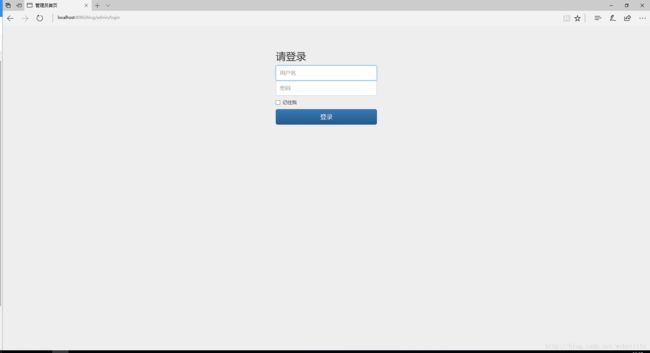
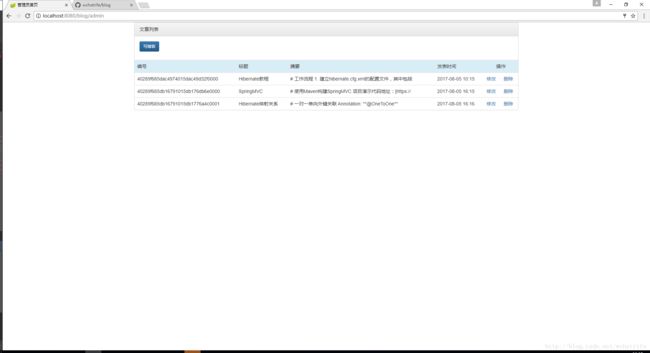
功能展示
把工程导入本地后,在mysql中添加一个叫做blog的database,然后在配置文件中把数据库的账号密码地址修改成自己的即可运行
主界面:

下面我们的正式开始
一、项目搭建
我使用的是IDEA使用Maven构建一个Spring Boot工程,搭建过程请自行百度
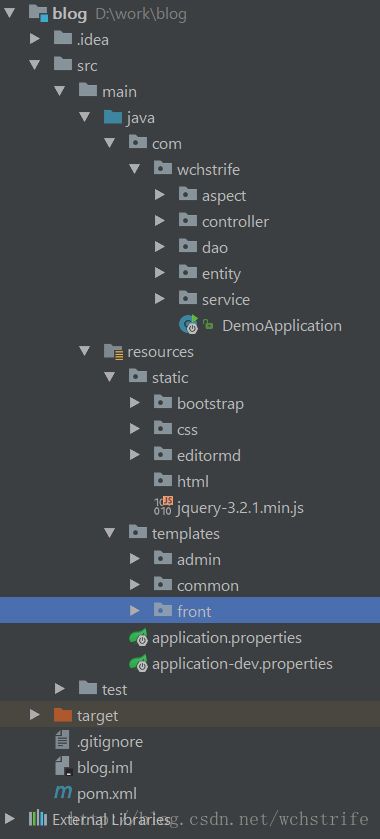
建好工程之后手动添加一些目录,下面展示一下详细的目录
项目目录
这里主要介绍一下resources目录
static目录是spring boot 默认的一个扫描的路径,所以我们要把引用的资源放在这里。
bootstrap是我们引进的一个样式控制的组件
editormd是引入的支持MarkDown语法的编辑器
css是一些全局的样式控制
jquery是bootstrap必要的
templates目录下放的是前端的HTML页面
admin是后台的管理
common是所有页面公用的部分
front是前台的展示界面
pom.xml
展示一下我们项目完整的依赖:
<project xmlns="http://maven.apache.org/POM/4.0.0" xmlns:xsi="http://www.w3.org/2001/XMLSchema-instance"
    xsi:schemaLocation="http://maven.apache.org/POM/4.0.0 http://maven.apache.org/xsd/maven-4.0.0.xsd">
    <modelVersion>4.0.0modelVersion>

    <groupId>com.wchstrifegroupId>
    <artifactId>demoartifactId>
    <version>0.0.1-SNAPSHOTversion>
    <packaging>jarpackaging>

    <name>demoname>
    <description>Demo project for Spring Bootdescription>

    <parent>
        <groupId>org.springframework.bootgroupId>
        <artifactId>spring-boot-starter-parentartifactId>
        <version>1.5.6.RELEASEversion>
        <relativePath/>
    parent>

    <properties>
        <project.build.sourceEncoding>UTF-8project.build.sourceEncoding>
        <project.reporting.outputEncoding>UTF-8project.reporting.outputEncoding>
        <java.version>1.8java.version>
    properties>

    <dependencies>
        <dependency>
            <groupId>org.springframework.bootgroupId>
            <artifactId>spring-boot-starter-data-jpaartifactId>
        dependency>
        <dependency>
            <groupId>org.springframework.bootgroupId>
            <artifactId>spring-boot-starter-webartifactId>
        dependency>

        <dependency>
            <groupId>mysqlgroupId>
            <artifactId>mysql-connector-javaartifactId>
            <scope>runtimescope>
        dependency>
        <dependency>
            <groupId>org.springframework.bootgroupId>
            <artifactId>spring-boot-starter-testartifactId>
            <scope>testscope>
        dependency>

        <dependency>
            <groupId>org.springframework.bootgroupId>

            <artifactId>spring-boot-starter-thymeleafartifactId>
        dependency>


        <dependency>
            <groupId>org.springframework.bootgroupId>
            <artifactId>spring-boot-starter-thymeleafartifactId>
            <version>1.5.4.RELEASEversion>
        dependency>


        <dependency>
            <groupId>net.sourceforge.nekohtmlgroupId>
            <artifactId>nekohtmlartifactId>
            <version>1.9.22version>
        dependency>


        <dependency>
            <groupId>org.springframework.bootgroupId>
            <artifactId>spring-boot-devtoolsartifactId>
            <optional>trueoptional>
        dependency>


        <dependency>
            <groupId>org.tautua.markdownpapersgroupId>
            <artifactId>markdownpapers-coreartifactId>
            <version>1.4.1version>
        dependency>


    dependencies>

    <build>
        <plugins>
            <plugin>
                <groupId>org.springframework.bootgroupId>
                <artifactId>spring-boot-maven-pluginartifactId>
            plugin>
        plugins>
    build>


project>
实体映射
实体的映射是在entity包下
下面我们使用Spring data jpa 对我们项目需要的实体进行数据库的映射
通过这种方式,我们可以避免直接操作数据库,而是通过Spring data jpa来进行增删改查的操作
这里我们一共用到三张表:Aritcle Category User 分别对应博客,分类,用户
主键生成策略:
这里我采用的是UUID的生成方式,会生成一串字符串作为主键
@Id
    @GeneratedValue(generator = "uuid")
    @GenericGenerator(name = "uuid", strategy = "uuid")
    @Column(name = "id", columnDefinition = "varchar(64) binary")
    private String id;
外键约束
在Article表中,我们使用了ManyToOne的外键约束
在Article中有一个Categoriy的引用,代表一个博客有对应的一个分类,而一个分类下应该有多个博客
@ManyToOne
    private Category category;
数据访问层dao
在dao包下封装了一系列的对数据库增删改查的操作
Spring data jpa强大之处就是可以根据方法名进行解析。所以在dao层下的接口,大部分只有方法名和接收的参数。
如果需要自定义sql语句只需要加注解即可
这里演示一个自定义的模糊查询
@Query("from Article where title like %:title%")
    public List findByTitleLike(@Param("title") String title);
controller和service
划分这两层体现了很重要的分层的思想,即每一层只针对一层提供方法,不去了解其他层的方法,这样方便维护。
所以为了体现这种分层的思想,所以针对数据库的操作都放在service层进行封装
在controller层主要负责url地址的分配,对外提供的接口,部分简单的逻辑写在这里
二、front前台展示
在前端我们使用了Thymeleaf前端模板,里面有很多类似JSP标签的写法,进行对数据的遍历操作
在后端Control里面返回页面的时候,使用Model向其中添加属性,在前端页面上可以通过${}来获取这个属性值,并且用th:each来遍历
注意带th的语法表示交给thyme leaf模板解析的语法
例如前台index界面:
controller返回所有的博客列表
@RequestMapping("")
    public String list(Model model){
        List<Article> articles = articleService.list();
        model.addAttribute("articles", articles);

        return "front/index";
    }
在前台使用ty的语法进行遍历显示
<div th:each="articles:${articles}">
     <h3 th:text="${articles.title}">h3>
     <span class="summary" th:text="${articles.summary}">span><br/><br/>
div>
所以在前台展示只有三个页面,分别是列表显示所有博客,按类型显示博客,某个博客的全文
所以对应在controller里面只需要从数据库筛选全部的博客、某个类型的博客、取出某个博客(通过ID)的全文在页面上展示即可
管理员界面
在管理员界面要实现的功能比较多,最重要的是对博客的增删改
同时这里有一个登录的功能,只有在User表中有对应的账号密码才能登录,所以这里需要一层登陆拦截,这个稍后介绍。
引入Markdown组件
在编辑博客的时候我们支持使用markdown语法,我在网上找了一款叫做editormd的开源项目,放到static目录下
在我们write.html用如下的语法引入编辑器
<script th:src="@{/jquery-3.2.1.min.js}">script>
    <script th:src="@{/editormd/editormd.js}">script>
    <script th:src="@{/bootstrap/js/bootstrap.js}">script>

    <script type="text/javascript" th:inline="javascript">
        //    调用编辑器
        var testEditor;
        $(function() {
            testEditor = editormd("test-editormd", {
                width   : "1000px",
                height  : 640,
                syncScrolling : "single",
                path    : [[@{/editormd/lib/}]]
            });
        });
    script>

    <script th:inline="javascript">
        function selectCategory(obj) {
            var name = $(obj).attr("name");
            var displayName = $(obj).attr("abbr");
            console.log(name + "   " + displayName);
            $("#categoryBtn").html(displayName);
            $("#cateoryInput").val(name);
        }
    script>
在需要编辑器的地方输入一个textarea即可
<div id="test-editormd">
div>深坑:
如果在js中要使用thymeleaf的语法,比如@{} ${}这种语法,一定要加上这句话th:inline="javascript
这样来使用该值[[@{/editormd/lib/}]]
write 操作
在写文章按钮上绑定好要提交的action,在controller里面对这个action进行处理,这里我们重点是要返回一个new出来的Article对象,因为要对对象进行数据的绑定,所以如果不传这个参数的话会报错
@RequestMapping("/write")
    public String write(Model model){
        List categories = categoryService.list();
        model.addAttribute("categories", categories);
        model.addAttribute("article", new Article());

        return "admin/write";
    }
在write.html中引入相关的编辑器组件以后,通过th:object绑定到Article对象上,然后Spring Boot会自动的帮我们把表单中的数据组合成一个ArtIicle对象,是不是很方便
save操作
前面html的表达提交之后,提交到save这个action中,在这里我们对提交的数据进行一个简单的处理,然后调用service里面封装的dao层的save方法即可
这里主要是对博客的日期,简介进行一个处理
@RequestMapping(value = "/save", method = RequestMethod.POST)
    public String save(Article article){
        //设置种类
        String name = article.getCategory().getName();
        Category category = categoryService.fingdByName(name);
        article.setCategory(category);
        //设置摘要,取前40个字
        if(article.getContent().length() > 40){
            article.setSummary(article.getContent().substring(0, 40));
        }else {
            article.setSummary(article.getContent().substring(0, article.getContent().length()));
        }
        article.setDate(sdf.format(new Date()));
        articleService.save(article);

        return "redirect:/admin";
    }
update操作
更新博客其实和写博客是一个道理,不过在更新的时候需要把id传给controller,然后根据id找到这个文章
把这个博客的内容、标题渲染在update.html中
然后在表单提交的字段中加一个隐藏表单,把博客的id传进去
调用save方法即可完成更新(根据id进行save,所以这时候会执行更新操作)
@RequestMapping("/update/{id}")
    public String update(@PathVariable("id") String id, Model model){
        Article article = articleService.getById(id);
        model.addAttribute("target", article);
        List<Category> categories = categoryService.list();
        model.addAttribute("categories", categories);
        model.addAttribute("article", new Article());

        return "admin/update";
    }
登陆拦截
对于后台的增删改操作,我们只对管理员开放,虽然我们增加了一个登录界面,但是别人还是可以通过直接输入对应url进行访问,所以我们要在这里增加一层登陆拦截,让没有登录的人不允许访问到我们后天的界面
在登录处理登录的doLogin方法中,我们在登录成功之后在cookie中加一个标志
Cookie cookie = new Cookie(WebSecurityConfig.SESSION_KEY, user.toString());
            response.addCookie(cookie);
在aspect包中建立一个拦截器
在WebSecurityConfig类中继承WebMvcConfigurerAdapter
重写addInterceptors方法,在里面配置要拦截的路径
在里面建一个内部类
SecurityInterceptor继承HandlerInterceptorAdapter
重写preHandle方法,表明在方法执行前执行拦截的动作
我们在这里对cookie的内容进行判断,如果有登录成功的标志,就进入后台管理界面,否则跳转到登录界面注意:使用session的方法是不可以的,因为我们在登录的controller当中使用的是重定向(redirect),所以会导致session里面的值取不到


