1 简介
参考视频:https://www.bilibili.com/video/BV1XW411x7NU?p=74
使用多线程的好处:提高应用程序响应速度、使多CPU更加高效、改善程序结构。
在Qt中使用QThread来管理线程。Qt中使用线程时,需要自己实现一个thread的类。
2 测试说明
(1)基本使用
功能说明如下:
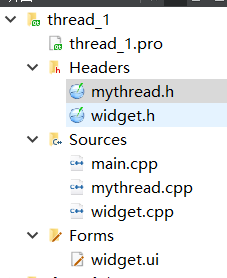
工程文件有:
mythread.h和mythread.cpp是自定义的线程类,需要改为继承自QThread,QThread类有一个虚函数run(),它就是线程处理函数,我们需要重写它。
当我们调用QThread的start()函数时,会间接的调用run()函数。
widget.h和widget.cpp是主窗口的代码。
mythread.h的代码:
1 #ifndef MYTHREAD_H 2 #define MYTHREAD_H 3 4 #include5 #include 6 7 class MyThread : public QThread 8 { 9 Q_OBJECT 10 public: 11 explicit MyThread(QObject *parent = nullptr); 12 13 signals: 14 void isDone(); 15 16 protected: 17 //QThread的虚函数,线程处理函数 18 //不能直接调用,通过start()间接调用 19 void run(); 20 21 public slots: 22 }; 23 24 #endif // MYTHREAD_H
mythread.cpp代码:
 1 #include "mythread.h"
 2
 3 MyThread::MyThread(QObject *parent) : QThread(parent)
 4 {
 5
 6 }
 7
 8 void MyThread::run()
 9 {
10     //很复杂的数据处理,需要耗时5s
11     sleep(5);
12     //发送处理完成信号
13     emit isDone();
14 }
widget.h代码:
1 #ifndef WIDGET_H 2 #define WIDGET_H 3 4 #include5 #include //定时器 6 #include "mythread.h" //线程 7 8 namespace Ui { 9 class Widget; 10 } 11 12 class Widget : public QWidget 13 { 14 Q_OBJECT 15 16 public: 17 explicit Widget(QWidget *parent = 0); 18 ~Widget(); 19 20 void dealTimeout(); //定时器处理函数 21 void dealThread(); //处理子线程发来的信号 22 void stopThread(); //停止线程 23 24 private slots: 25 void on_pushButton_start_clicked(); 26 27 private: 28 Ui::Widget *ui; 29 30 QTimer *timer = NULL; 31 MyThread *thread = NULL; 32 }; 33 34 #endif // WIDGET_H
widget.cpp代码:
1 #include "widget.h" 2 #include "ui_widget.h" 3 #include4 #include 5 6 Widget::Widget(QWidget *parent) : 7 QWidget(parent), 8 ui(new Ui::Widget) 9 { 10 ui->setupUi(this); 11 12 timer = new QTimer(this); 13 //分配空间 14 thread = new MyThread(this); 15 16 //只要定时器启动,自动触发timerout()信号 17 connect(timer, &QTimer::timeout, this, &Widget::dealTimeout); 18 //接收子线程发送的isDone信号并处理 19 connect(thread, &MyThread::isDone, this, &Widget::dealThread); 20 //当按窗口右上角x时(关闭窗口),触发 21 connect(this, &Widget::destroyed, this, &Widget::stopThread); 22 } 23 24 Widget::~Widget() 25 { 26 delete ui; 27 } 28 29 void Widget::dealTimeout() 30 { 31 static int i = 0; 32 i++; 33 //设定lcd的值 34 ui->lcdNumber->display(i); 35 } 36 37 void Widget::dealThread() 38 { 39 //处理完数据后,关闭定时器 40 timer->stop(); 41 qDebug() << "timer turn off!!!"; 42 } 43 44 void Widget::stopThread() 45 { 46 //停止线程 47 thread->quit(); 48 //等待线程处理完事情 49 thread->wait(); 50 } 51 52 void Widget::on_pushButton_start_clicked() 53 { 54 if (timer->isActive() == false) { 55 timer->start(100); 56 } 57 //启动线程,处理数据 58 thread->start(); 59 }
运行测试:
可以看到计数了45次之后(每次100ms),定时器停止了,表示接收到了线程发送的信号(线程睡眠5s之后发出的)。可能会有疑问为什么不是50次(刚好5s),那是因为我们先启动定时器,在去启动线程,这个过程需要花费时间。
(2)多线程的使用
多线程的实现模型如下,记下来就好了:
先给出实现的代码,后面再介绍。
工程文件有:
mythread.h和mythread.cpp是自定义的线程类,继承自QThread,和前一个例子不一样。
widget.h和widget.cpp是主窗口的代码。
mythread.h代码:
1 #ifndef MYTHREAD_H 2 #define MYTHREAD_H 3 4 #include5 6 class MyThread : public QObject 7 { 8 Q_OBJECT 9 public: 10 explicit MyThread(QObject *parent = nullptr); 11 12 //线程处理函数 13 void myTimerout(); 14 //设置flag,用于判断是否结束线程处理函数的while循环 15 void setFlag(bool flag = true); 16 17 signals: 18 void mySignal(); 19 20 public slots: 21 22 private: 23 bool isStop; 24 }; 25 26 #endif // MYTHREAD_H
mythread.c代码:
1 #include "mythread.h" 2 #include3 #include 4 5 MyThread::MyThread(QObject *parent) : QObject(parent) 6 { 7 isStop = false; 8 } 9 10 void MyThread::myTimerout() 11 { 12 while (isStop == false) { 13 QThread::sleep(1); 14 emit mySignal(); 15 qDebug() << "子线程号:" << QThread::currentThread(); 16 if (true == isStop) { 17 break; 18 } 19 } 20 } 21 22 void MyThread::setFlag(bool flag) 23 { 24 isStop = flag; 25 }
widget.h代码:
1 #ifndef WIDGET_H 2 #define WIDGET_H 3 4 #include5 #include "mythread.h" 6 #include 7 8 namespace Ui { 9 class Widget; 10 } 11 12 class Widget : public QWidget 13 { 14 Q_OBJECT 15 16 public: 17 explicit Widget(QWidget *parent = 0); 18 ~Widget(); 19 20 void dealsignal(); 21 void dealclose(); 22 signals: 23 //启动子线程的信号 24 void startThreadSignal(); 25 26 private slots: 27 void on_pushButton_start_clicked(); 28 29 void on_pushButton_stop_clicked(); 30 31 private: 32 Ui::Widget *ui; 33 MyThread *mythread = NULL; 34 QThread *thread = NULL; 35 }; 36 37 #endif // WIDGET_H
widget.cpp代码:
1 #include "widget.h" 2 #include "ui_widget.h" 3 #include4 5 Widget::Widget(QWidget *parent) : 6 QWidget(parent), 7 ui(new Ui::Widget) 8 { 9 ui->setupUi(this); 10 //动态分配空间,不能指定父对象 11 mythread = new MyThread; 12 //创建子线程 13 thread = new QThread(this); 14 //把自定义的线程加入到子线程中 15 mythread->moveToThread(thread); 16 17 //处理子线程发送的信号 18 connect(mythread, &MyThread::mySignal, this, &Widget::dealsignal); 19 qDebug() << "主线程号:" << QThread::currentThread(); 20 //发送信号给子线程,通过信号和槽调用子线程的线程处理函数 21 connect(this, &Widget::startThreadSignal, mythread, &MyThread::myTimerout); 22 //关闭主窗口 23 connect(this, &Widget::destroyed, this, &Widget::dealclose); 24 } 25 26 Widget::~Widget() 27 { 28 delete ui; 29 } 30 31 void Widget::dealsignal() 32 { 33 static int i = 0; 34 i++; 35 ui->lcdNumber->display(i); 36 } 37 38 void Widget::dealclose() 39 { 40 mythread->setFlag(true); 41 thread->quit(); 42 thread->wait(); 43 delete mythread; 44 } 45 46 void Widget::on_pushButton_start_clicked() 47 { 48 if (thread->isRunning() == true) { 49 return; 50 } 51 //启动线程,但是没有启动线程处理函数 52 thread->start(); 53 mythread->setFlag(false); 54 //不能直接调用线程处理函数 55 //直接调用导致线程处理函数和主线程在同一个线程 56 //只能通过信号和槽调用 57 emit startThreadSignal(); 58 } 59 60 void Widget::on_pushButton_stop_clicked() 61 { 62 if (thread->isRunning() == false) { 63 return; 64 } 65 mythread->setFlag(true); 66 thread->quit(); 67 thread->wait(); 68 }
需要说明以下几点:
(1)创建自定义线程变量时,不能指定父对象(mythread=newMyThread;),因为调用moveToThread函数之后,变量在创建的线程中使用回收,而不是在主线程。
(2)子线程会睡眠1s就发送一个信号mySignal给主线程,主线程接收信号,在槽函数中将数值累加一,并在LCD上显示。
(3)主线程通过信号和槽的方式调用子线程处理函数,主线程发送信号给子线程,槽函数就是子线程的线程处理函数。
(4)子线程setFlag()的作用是:关闭子线程时,quit()函数会等待子线程执行结束之后再回收,但是如果不设置标志,while循环会一直执行,子线程也就没有结束。
运行测试:
注意看打印的信息,可以看到子线程和主线程的id。
多线程使用过程中注意事项:
1)线程不能操作UI对象(从Qwidget直接或间接派生的窗口对象)
2)需要移动到子线程中处理的模块类,创建的对象的时候不能指定父对象。


