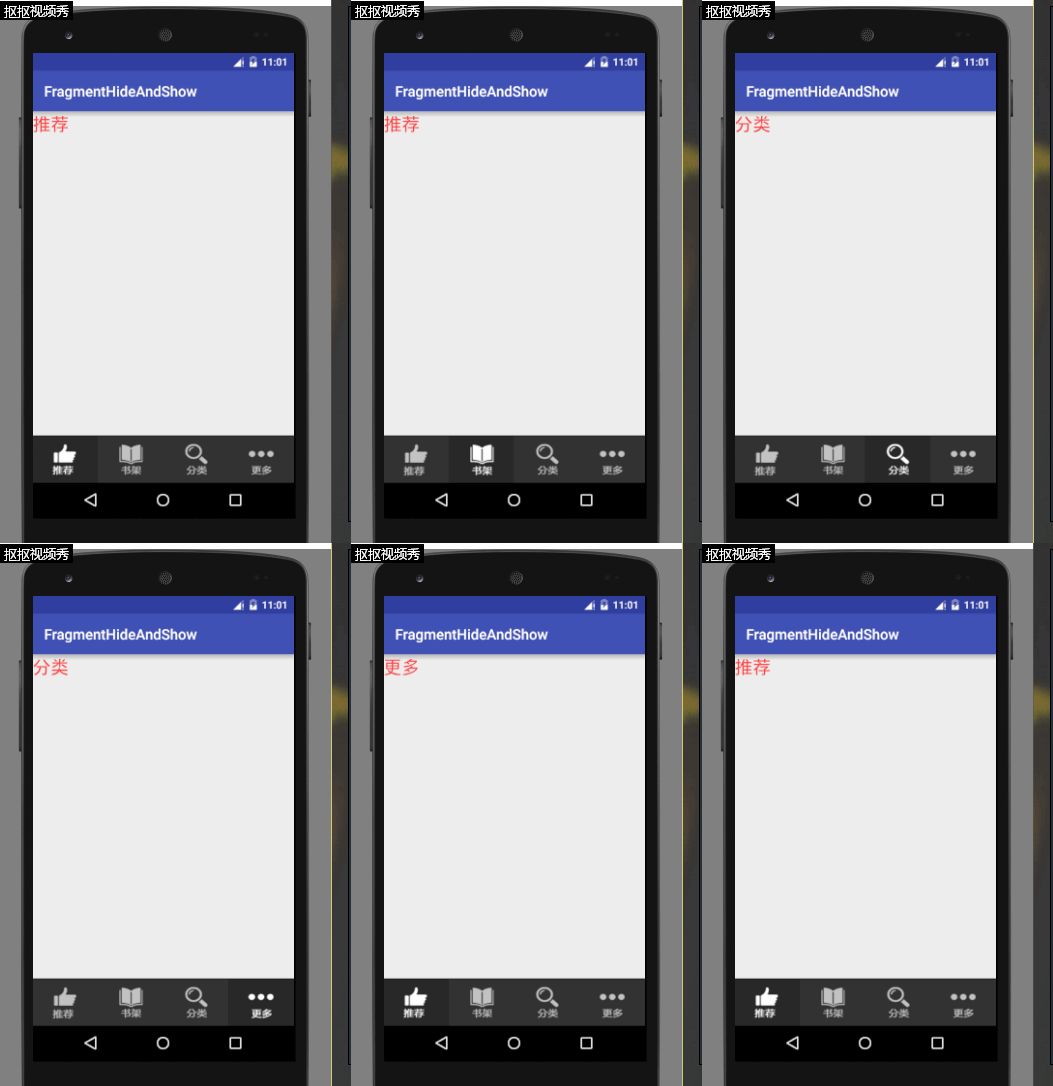
我们都知道,Fragment动态添加的时候我们可以使用FragmentTransaction的add和replace方法,replace方法就等效于对这个Fragment先执行remove(),再执行add()。但是在实际的项目中,有很多时候我们会用到底部是一个RadioGroup包裹的RadioButton,上面用Fragment的情况,因为我们是从网络上获取的数据,这种时候我们不希望点击加载过的页面(也就是加载过的Fragment)的时候,每次都重新加载。也就是使用FragmentTransaction#replace()或者是add()方法行不通了,影响用户体验,这个时候就要用到FragmentTracsaction中的另两个方法了,也就是今天要提到的hide()和show()方法。这两个方法简单地说是会隐藏指定的Fragment,并不会销毁此Fragment,所以也就是可以保存下来之前在此Fragment中加载的数据了~。下面来看一下这个Demo吧:
我们要实现的就是这样一个效果:
其实不在网络上加载数据的话看不出来什么具体的效果,不过我们还是先看一下代码吧:
主页面的布局如下:
1 23 android:layout_width="match_parent" 4 android:layout_height="match_parent" 5 android:orientation="vertical" 6 > 7 8 <LinearLayout 9 android:id="@+id/layout_main_fragment" 10 android:layout_weight="1" 11 android:layout_width="match_parent" 12 android:layout_height="0dp" 13 android:orientation="vertical"> 14 15 16 17 <RadioGroup 18 android:id="@+id/rg" 19 android:layout_width="match_parent" 20 android:layout_height="wrap_content" 21 android:gravity="center" 22 android:layout_alignParentBottom="true" 23 android:orientation="horizontal"> 24 25 <RadioButton 26 android:id="@+id/rb_tj" 27 android:layout_width="0dp" 28 android:layout_height="65dp" 29 android:layout_weight="1" 30 android:background="@drawable/rb_tuijian" 31 android:button="@null" 32 android:checked="true" /> 33 34 <RadioButton 35 android:id="@+id/rb_sj" 36 android:layout_width="0dp" 37 android:layout_height="65dp" 38 android:layout_weight="1" 39 android:background="@drawable/rb_shujia" 40 android:button="@null" /> 41 42 <RadioButton 43 android:id="@+id/rb_fl" 44 android:layout_width="0dp" 45 android:layout_height="65dp" 46 android:layout_weight="1" 47 android:background="@drawable/rb_fenlei" 48 android:button="@null" /> 49 50 <RadioButton 51 android:id="@+id/rb_gd" 52 android:layout_width="0dp" 53 android:layout_height="65dp" 54 android:layout_weight="1" 55 android:background="@drawable/rb_gengduo" 56 android:button="@null" /> 57 58
这里用到了四个selector选择器作为RadioButton的背景,其他的没有什么,很简单的布局。当然,为了展示,我们还需要一个Fragment以及其对应的布局:
1 23 android:layout_width="match_parent" 4 android:layout_height="match_parent" 5 android:orientation="vertical"> 6 <TextView 7 android:id="@+id/tv" 8 android:layout_width="wrap_content" 9 android:layout_height="wrap_content" 10 android:textSize="25sp" 11 android:textColor="@android:color/holo_red_light" 12 android:text="哈哈哈"/> 13
由于只是一个小Demo,这里就没有写多个Fragment,而是复用了这一个Fragment,通过Fragment#setArgument(Bundle bundle)方法和getArgument()方法来复用该Fragment:
 1 package ggcomic.rabbit.lx.fragmenthideandshow.fragment;
 2
 3 import android.os.Bundle;
 4 import android.support.annotation.Nullable;
 5 import android.support.v4.app.Fragment;
 6 import android.view.LayoutInflater;
 7 import android.view.View;
 8 import android.view.ViewGroup;
 9 import android.widget.TextView;
10
11 import ggcomic.rabbit.lx.fragmenthideandshow.R;
12
13 /**
14  * Created by Lx on 2016/9/20.
15  */
16 public class MyFragment extends Fragment {
17
18     private TextView tv;
19
20     @Nullable
21     @Override
22     public View onCreateView(LayoutInflater inflater, @Nullable ViewGroup container, @Nullable Bundle savedInstanceState) {
23         View view = inflater.inflate(R.layout.fragment_page, null);
24         tv = (TextView) view.findViewById(R.id.tv);
25         Bundle bundle = getArguments();
26         int tag = bundle.getInt("tag");
27         switch (tag) {
28             case 1:
29                 tv.setText("推荐");
30                 break;
31             case 2:
32                 tv.setText("书架");
33                 break;
34             case 3:
35                 tv.setText("分类");
36                 break;
37             case 4:
38                 tv.setText("更多");
39                 break;
40         }
41         return view;
42     }
43 }
最主要的就是在MainActivity中的处理:
  1 package ggcomic.rabbit.lx.fragmenthideandshow.main;
  2
  3 import android.support.v4.app.Fragment;
  4 import android.support.v4.app.FragmentManager;
  5 import android.support.v4.app.FragmentTransaction;
  6 import android.support.v7.app.AppCompatActivity;
  7 import android.os.Bundle;
  8 import android.view.View;
  9 import android.widget.LinearLayout;
 10 import android.widget.RadioButton;
 11
 12 import ggcomic.rabbit.lx.fragmenthideandshow.R;
 13 import ggcomic.rabbit.lx.fragmenthideandshow.fragment.MyFragment;
 14
 15 public class MainActivity extends AppCompatActivity implements View.OnClickListener {
 16
 17     private Fragment currentFragment=new Fragment();
 18     private LinearLayout layout;
 19     private RadioButton rb_tj,rb_sj,rb_fl, rb_gd;
 20     private Fragment fragment_tj,fragment_sj,fragment_fl, fragment_gd;
 21     private FragmentManager manager;
 22
 23     @Override
 24     protected void onCreate(Bundle savedInstanceState) {
 25         super.onCreate(savedInstanceState);
 26         setContentView(R.layout.activity_main);
 27         initView();
 28         initFragment();
 29         initEvent();
 30         showFragment(fragment_tj);
 31     }
 32
 33     /**
 34      * 初始化监听
 35      */
 36     private void initEvent() {
 37         rb_tj.setOnClickListener(this);
 38         rb_sj.setOnClickListener(this);
 39         rb_fl.setOnClickListener(this);
 40         rb_gd.setOnClickListener(this);
 41     }
 42
 43     /**
 44      * 初始化Fragment
 45      */
 46     private void initFragment() {
 47         manager = getSupportFragmentManager();
 48
 49         Bundle bundle = new Bundle();
 50         bundle.putInt("tag", 1);
 51         fragment_tj = new MyFragment();
 52         fragment_tj.setArguments(bundle);
 53
 54         bundle = new Bundle();
 55         bundle.putInt("tag", 2);
 56         fragment_sj = new MyFragment();
 57         fragment_sj.setArguments(bundle);
 58
 59         bundle = new Bundle();
 60         bundle.putInt("tag", 3);
 61         fragment_fl = new MyFragment();
 62         fragment_fl.setArguments(bundle);
 63
 64         bundle = new Bundle();
 65         bundle.putInt("tag", 4);
 66         fragment_gd = new MyFragment();
 67         fragment_gd.setArguments(bundle);
 68     }
 69
 70     /**
 71      * 展示Fragment
 72      */
 73     private void showFragment(Fragment fragment) {
 74         if (currentFragment!=fragment) {
 75             FragmentTransaction transaction = manager.beginTransaction();
 76             transaction.hide(currentFragment);
 77             currentFragment = fragment;
 78             if (!fragment.isAdded()) {
 79                 transaction.add(R.id.layout_main_fragment, fragment).show(fragment).commit();
 80             } else {
 81                 transaction.show(fragment).commit();
 82             }
 83         }
 84     }
 85
 86     /**
 87      * 初始化控件
 88      */
 89     private void initView() {
 90         rb_tj = (RadioButton) findViewById(R.id.rb_tj);
 91         rb_sj = (RadioButton) findViewById(R.id.rb_sj);
 92         rb_fl = (RadioButton) findViewById(R.id.rb_fl);
 93         rb_gd = (RadioButton) findViewById(R.id.rb_gd);
 94     }
 95
 96     @Override
 97     public void onClick(View v) {
 98         switch (v.getId()) {
 99             case R.id.rb_tj:
100                 showFragment(fragment_tj);
101                 break;
102             case R.id.rb_sj:
103                 showFragment(fragment_sj);
104                 break;
105             case R.id.rb_fl:
106                 showFragment(fragment_fl);
107                 break;
108             case R.id.rb_gd:
109                 showFragment(fragment_gd);
110                 break;
111         }
112     }
113 }
可以看到,我们定义了一个全局Fragment,currentFragment,用来标示当前是哪一个Fragment。其中initFragment()方法只是为了初始化所有的Fragment,相信大家也看得出来,最主要的方法是showFragment(),下面我就来说一下这个方法:
 1 /**
 2  71      * 展示Fragment
 3  72      */
 4  73     private void showFragment(Fragment fragment) {
 5  74         if (currentFragment!=fragment) {
 6  75             FragmentTransaction transaction = manager.beginTransaction();
 7  76             transaction.hide(currentFragment);
 8  77             currentFragment = fragment;
 9  78             if (!fragment.isAdded()) {
10  79                 transaction.add(R.id.layout_main_fragment, fragment).show(fragment).commit();
11  80             } else {
12  81                 transaction.show(fragment).commit();
13  82             }
14  83         }
15  84     }
这个方法主要完成Fragment的隐藏和展示,也就是完成Fragment的切换功能。可以看到,在方法的开始我们先判断一下传入的Fragment是不是当前currentFragment,如果不是的话,我们就隐藏currentFragment,并且将我们传入的Fragment赋值给currentFragment。然后再调用Fragment#isAdded()方法,判断传入的Fragment是否已经被add()过了,如果已经被add()过了,那么就直接FragmentTransaction#show()并且commit()即可,否则的话先add()当前fragment,然后在show()展示出来。这样我们就成功实现了保存加载过的Fragment中的内容了(其实不算保存,只是不让加载过的内容销毁),是不是很简单呢?快下一个小Demo尝试一下吧~
