mac使用git管理Github
- #### 安装或更新git
git --version查看是否安装git,如果已安装,会显示git版本
如果未安装 安装网址:https://www.git-scm.com/downloads
建议更新git:
git clone https://github.com/git/git需要知道的是本地的git仓库和Github服务器之间是通过ssh加密的。在终端执行:
$ ssh -v
usage: ssh [-1246AaCfGgKkMNnqsTtVvXxYy] [-b bind_address] [-c cipher_spec]
           [-D [bind_address:]port] [-E log_file] [-e escape_char]
           [-F configfile] [-I pkcs11] [-i identity_file]
           [-J [user@]host[:port]] [-L address] [-l login_name] [-m mac_spec]
           [-O ctl_cmd] [-o option] [-p port] [-Q query_option] [-R address]
           [-S ctl_path] [-W host:port] [-w local_tun[:remote_tun]]
           [user@]hostname [command]
表示mac已经安装ssh
- #### 创建SSH Key
$ cd ~
$ cd .ssh
-bash: cd: .ssh: No such file or directory
如果是第一次,它会出现No such file or directory,
不要担心,我们建立密钥就好,输入ssh-keygen -t rsa -C “你的邮箱github”,一路回车,一个是修改密码,不过密码大于4位,否则要重新来过,这是在你提交项目的时候需要输入的密码,不设即为空,看自己喜欢;默认是保存在users/ 下面,到时会出现信息的
$ ssh-keygen -t rsa -C "你的github账号邮箱"
Generating public/private rsa key pair.
Enter file in which to save the key (/Users/zhangweipeng/.ssh/id_rsa):
Created directory '/Users/zhangweipeng/.ssh'.
Enter passphrase (empty for no passphrase):
Enter same passphrase again:
Your identification has been saved in /Users/zhangweipeng/.ssh/id_rsa.
Your public key has been saved in /Users/zhangweipeng/.ssh/id_rsa.pub.
The key fingerprint is:
The key's randomart image is:
+---[RSA 2048]----+
|        ..o... ..|
|   .   o + .... o|
|  . . o * B o.. o|
|   B o = X B o o |
|  + B   S + = o  |
|   . + . . . . . |
|      . E .   =  |
|          ...= . |
|           o=o.  |
+----[SHA256]-----+
接着可以在用户主目录里找到.ssh目录,里面有github_rsa和github_rsa.pub两个文件,这两个就是SSH Key的秘钥对
- #### 在Github设置ssh key
登陆Github, “Settings”->SSH keys->Add SSH key
title:可以随便填名字
key:在Key文本框里粘贴github_rsa.pub文件的内容
点击add key 配置完成
- #### 测试本地是否和Github连接上
ssh -T git@github.com第一次链接Github,会有一个确认,需要你确认GitHub的Key的指纹信息是否真的来自GitHub的服务器,输入yes回车即可。
- ### 使用: 一 使用git在本地建立的项目更新到Github
1. 配置本地用户和邮箱
用户名邮箱作用 : 我们需要设置一个用户名 和 邮箱, 这是用来上传本地仓库到GitHub中, 在GitHub中显示代码上传者;
使用命令 :
$ git config --global user.name "username"
$ git config --global user.email "email"
查看用户名和邮箱地址:
$ git config user.name
$ git config user.email
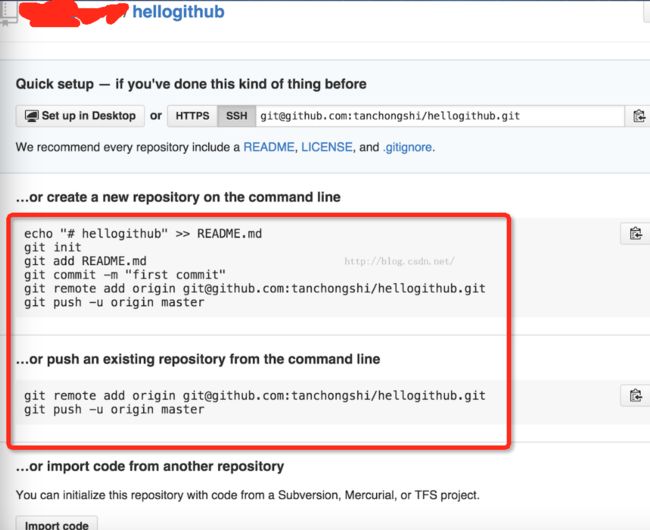
2.为了把本地库推到远程服务器,首先需要在Github上面也建一个项目

在Repository name填上我们的项目名字,description随便填,别的大家可以暂时参照图片选择勾选。
$ git remote add origin git@github.com:yun591855479/hellogithub.git
$ git push -u origin master
“origin”经常被用作远端仓库别名,就因为 git clone 默认用它作为克隆自的链接的别名。 “git remote add xxx 远程服务器仓库地址aaa”: 该方法是关联本地与服务器的仓库,为服务器的仓库取个别名叫xxx,一般情况下该别名就叫origin,此时他关联的就是远程服务器地址aaa这个仓库。 而删除某个别名用:“git remote rm tt” 删除现存的某个别名tt,也就是断开别名tt所对应的远程仓库的连接,不再需要它了、项目已经没了,等等。 例如:git remote rm origin
可能会报以下错
To github.com:yun591855479/hellogithub.git
 ! [rejected]        master -> master (fetch first)
error: failed to push some refs to '[email protected]:yun591855479/hellogithub.git'
hint: Updates were rejected because the remote contains work that you do
hint: not have locally. This is usually caused by another repository pushing
hint: to the same ref. You may want to first integrate the remote changes
hint: (e.g., 'git pull ...') before pushing again.
hint: See the 'Note about fast-forwards' in 'git push --help' for details.
这是本地没有README文件造成的
现在去将该文件pull下来
git pull --rebase origin masterwarning: no common commits
remote: Counting objects: 5, done.
remote: Compressing objects: 100% (4/4), done.
remote: Total 5 (delta 0), reused 0 (delta 0), pack-reused 0
Unpacking objects: 100% (5/5), done.
From https://github.com/yun591855479/hellogithub
* branch master -> FETCH_HEAD
* [new branch] master -> origin/master
First, rewinding head to replay your work on top of it...
Applying: first commit因为他们是两个不同的项目,需要把两个不同的项目合并,假如我们的源是origin,分支是master,那么我们需要这样写:
git pull origin master –allow-unrelated-histories更新github代码仓库到本地。
使用下面的命令即可更新代码
git pull origin master然后查看是否已经同步下来
$ ls
LICENSE        README.md    newfile
然后再执行
$ git push -u origin master想要与他人分享你牛鼻的提交,你需要将改动推送到远端仓库。 执行 git push [alias] [branch],就会将你的 [branch] 分支推送成为 [alias] 远端上的 [branch] 分支.
遇到的问题:
如果再次关联时报错
$ git remote add origin git@github.com:yun591855479/hellogithub.git
fatal: remote origin already exists.
我们需要移除
$ git remote rm origin再执行
$ git remote add origin https://github.com/yun591855479/hellogithub.git$ git push -u origin master
Counting objects: 3, done.
Delta compression using up to 4 threads.
Compressing objects: 100% (2/2), done.
Writing objects: 100% (3/3), 263 bytes | 0 bytes/s, done.
Total 3 (delta 1), reused 0 (delta 0)
remote: Resolving deltas: 100% (1/1), completed with 1 local objects.
To https://github.com/yun591855479/hellogithub.git
546c5fe..f355d1c master -> master
Branch master set up to track remote branch master from origin.- ### 使用:二 直接将github上的仓库clone下来
直接在gitHub上创建仓库,本地不创建。
在终端输入’git clone’命令就能下载github的代码了:
例如:我们在github上创建了一个仓库test2
命令行执行:
“`
$ git clone https://github.com/yun591855479/test2.git
Cloning into ‘test2’…
remote: Counting objects: 5, done.
remote: Compressing objects: 100% (4/4), done.
remote: Total 5 (delta 0), reused 0 (delta 0), pack-reused 0
Unpacking objects: 100% (5/5), done.
Checking connectivity… done.
““
补充
在下载下来的下面做一些修改并提交。
进入刚下载的代码仓库:cdexample/ 进 入 刚 下 载 的 代 码 仓 库 : c d e x a m p l e / 修改”README.md”文件:echo “hello github” > README.md
添加修改的代码:gitaddREADME.md 添 加 修 改 的 代 码 : g i t a d d R E A D M E . m d 查看修改的状态:git status
填写提交信息:gitcommit−m“addtestmessage” 填 写 提 交 信 息 : g i t c o m m i t − m “ a d d t e s t m e s s a g e ” 正式提交代码:git push origin master
