Spring入门——IOC
Spring概述
Spring是分层的、JavaSE/EE一站式(full-stack)、轻量级开源框架。以IoC(Inverse Of Control:反转控制)和AOP(Aspect Oriented Programming:面向切面编程)为内核,提供了表现层Spring MVC和持久层Spring JDBC以及业务层事务管理等众多的企业级应用技术,还能整合开源世界众多著名的第三方框架和类库,逐渐成为使用最多的Java EE企业应用开源框架。
spring 的优势
方便解耦,简化开发、 AOP编程的支持、 声明式事务的支持、 方便程序的测试、 方便集成各种优秀框架、 降低JavaEE API的使用难度
关于框架的特性,我们也会俗称Spring为开发架构的粘合剂。
spring 的体系结构
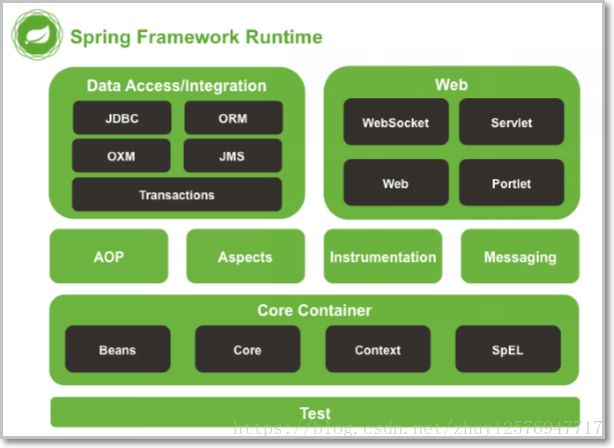
Spring的核心
IoC(Inverse of Control 控制反转): 将对象创建权利交给Spring工厂进行管理。
AOP(Aspect Oriented Programming 面向切面编程),基于动态代理的功能增强方式。
1、IoC 的概念和作用
什么是程序的耦合: 我们在开发中,会写很多的类,而有些类之间不可避免的产生依赖关系,这种依赖关系称之为耦合。
代码中的体现:早期我们的 JDBC 操作,注册驱动时,我们为什么不使用 DriverManager 的 register 方法,而是采 用 Class.forName 的方式?原因就是:我们的类依赖了数据库的具体驱动类(MySQL),如果这时候更换了数据库品牌(比如 Oracle), 需要修改源码来重新数据库驱动。
解决程序耦合的思路:当是我们讲解 jdbc 时,是通过反射来注册驱动的,代码如下:
Class.forName("com.mysql.jdbc.Driver");//此处只是一个字符串
此时的好处是,我们的类中不再依赖具体的驱动类,此时就算删除 mysql 的驱动 jar 包,依然可以编译(运行就不要想了,没有驱动不可能运行成功的)。
工厂模式解耦:
代码准备:

dao接口和实现类:
dao接口:
public interface IAccountDao {
    /**
     * 模拟保存账户
     */
    void saveAccount();
}
dao实现类:
public class AccountDaoImpl implements IAccountDao {


    public void saveAccount() {

       System.out.println("保存了账户");

    }

}
service接口和实现类:
service接口:
public interface IAccountService {


    /**

     * 模拟保存账户

     */

    void saveAccount();

}
service实现类:
public class AccountServiceImpl implements IAccountService {


    //手动初始化

    private IAccountDao accountDao = new AccountDaoImpl();


    public void saveAccount() {

       accountDao.saveAccount();

    }

}
Web层:模拟一个表现层
public class Client {


    public static void main(String[] args) {


       IAccountService as = new AccountServiceImpl();

       as.saveAccount();

    }

}
代码解耦
在上述的代码中,代码耦合体现在两个地方: service中手动初始化了dao; web层手动初始化了service
而解耦最明显的特征就是:哪怕缺少一个对象,起码在编译时不会报错,只有在运行时才会报错。既然在jdbc中我们可以使用反射来进行解耦,那么我们能否在三层中使用这个方案呢?
第一步:创建工厂
在resources目录下创建资源文件,beans.properties:
accountDao=cn.itcast.dao.impl.AccountDaoImpl
accountService=cn.itcast.service.impl.AccountServiceImpl
第二步:编写一个工厂:用来反射生成需要的对象
public class BeanFactory {

    private static ResourceBundle rb = ResourceBundle.getBundle("beans");


    private static Map map = new HashMap();


    static{

        try {

            //获取所有的key

            Enumeration keys = rb.getKeys();

            //遍历所有的key

            while (keys.hasMoreElements()){

                String key = keys.nextElement();

                //通过key获取value

                String value = rb.getString(key);

                //初始化对象

                Object bean = Class.forName(value).newInstance();

                //将所有初始化的对象存入map中。

                map.put(key,bean);

            }


        } catch (Exception e) {

            e.printStackTrace();

        }


    }


    /**

     * 对外提供一个从map中获取对象的方法

     * @param beanName

     * @return

     */

    public static Object getBean(String beanName){

        return map.get(beanName);

    }

}
第三步:代码解耦
Web层:
public class Client {

    public static void main(String[] args) {

        //手动初始化

        //IAccountService accountService = new AccountServiceImpl();

        //从容器中获取

        IAccountService accountService = (IAccountService) BeanFactory.getBean("accountService");

        accountService.saveAccount();

    }

}
Service层:
public class AccountServiceImpl implements IAccountService {


    //手动初始化

    //private IAccountDao accountDao = new AccountDaoImpl();

    //从容器中获取

    private IAccountDao accountDao = (IAccountDao) BeanFactory.getBean("accountDao");

    public void saveAccount() {

        accountDao.saveAccount();

    }

}
控制反转-Inversion Of Control
我们通过使用工厂模式,实现了表现层——业务层以及业务层——持久层的解耦。
它的核心思想就是:(1) 通过读取配置文件反射创建对象;(2) 把创建出来的对象都存起来,当我们下次使用时可以直接从存储的位置获取。
2、使用 spring的 IOC解决程序耦合
案例的前期准备[会用]:
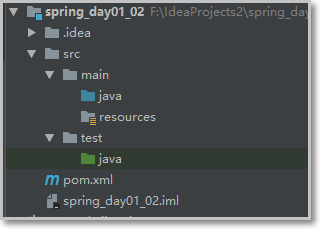
一、创建工程
二、业务层接口和实现类
接口:
public interface IAccountService {


    /**

     * 模拟保存账户

     */

    void saveAccount();

}
实现类:
public class AccountServiceImpl implements IAccountService {

    //手动初始化

    private IAccountDao accountDao = new AccountDaoImpl();

    @Override

    public void saveAccount() {

        accountDao.saveAccount();

    }

}
三、持久层接口和实现类
接口:
public interface IAccountDao {

    void saveAccount();

}
实现类:
public class AccountDaoImpl implements IAccountDao {

    @Override

    public void saveAccount() {

        System.out.println("保存账户");

    }

}
四、表现层
public class Client {

public static void main(String[] args) {

IAccountService accountService = new AccountServiceImpl();

accountService.saveAccount();

}

}
Spring基于xml的IOC解耦方案
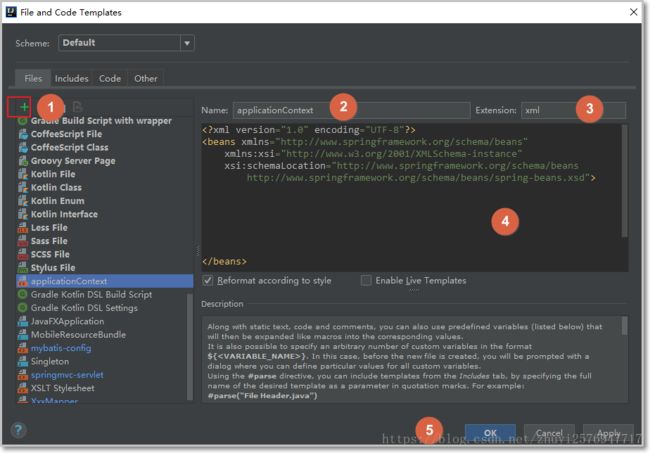
一、 创建配置文件模板
ApplicationContext.xml:
Idea里配置模板
二、创建配置文件
IoC底层实现:工厂(设计模式)+反射(机制) + 配置文件
在spring中,工厂和反射机制由框架完成,我们只需要编写配置文件即可。
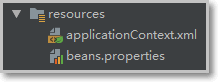
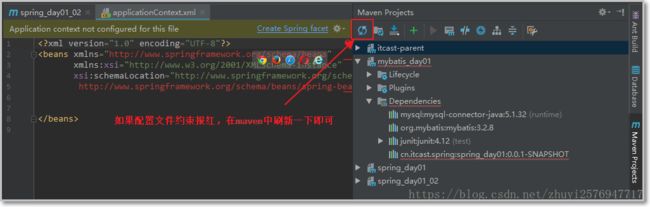
在resources下创建:applicationContext.xml
如果创建的配置文件报红,刷新maven即可
三、导入依赖
            org.springframework

            spring-context

            5.0.6.RELEASE
四、将dao和service的实现类装配到容器中
五、从容器中获取dao和service实现类
将web层代码修改如下:
public class Client {

public static void main(String[] args) {

//加载配置文件,获取spring工厂,从容器中获取dao和service的实现类

ApplicationContext ac = new ClassPathXmlApplicationContext("applicationContext.xml");

//从容器中获取service

IAccountService accountService = (IAccountService) ac.getBean("accountService");

System.out.println(accountService);

//从容器中获取dao

IAccountDao accountDao = (IAccountDao) ac.getBean("accountDao");

System.out.println(accountDao);
}
}
Spring基于 XML 的 IOC 细节[掌握]
spring 中工厂的类结构图
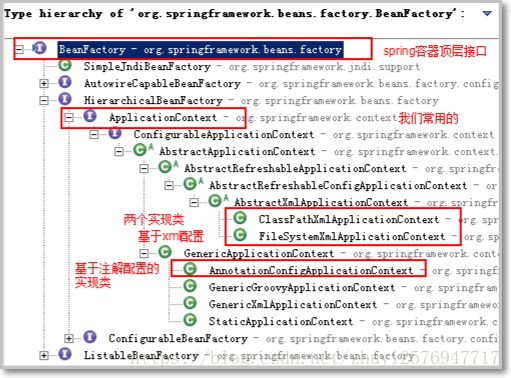
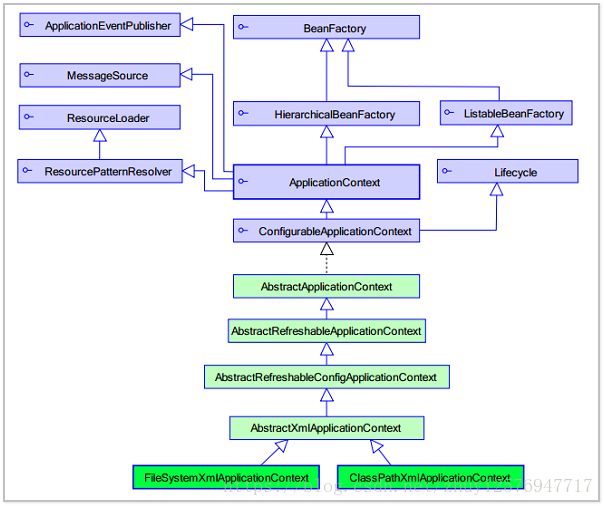
BeanFactory和 ApplicationContext 的区别
BeanFactory 才是 Spring 容器中的顶层接口。
ApplicationContext 是它的子接口。
BeanFactory 和 ApplicationContext 的区别: 创建对象的时间点不一样。
ApplicationContext:只要一读取配置文件,默认情况下就会创建对象。
BeanFactory:什么使用什么时候创建对象。
Beanfactory的用法:
BeanFactory ac = new XmlBeanFactory(new ClassPathResource("applicationContext.xml"));
IOC 中 bean 标签和管理对象细节
bean 标签
作用:
用于配置对象让 spring 来创建的。
默认情况下它调用的是类中的无参构造函数。如果没有无参构造函数则不能创建成功。
属性:
-
id:给对象在容器中提供一个唯一标识。用于获取对象。
-
class:指定类的全限定类名。用于反射创建对象。默认情况下调用无参构造函数。
-
scope:指定对象的作用范围。
* singleton :默认值,单例的.
* prototype :多例的.
-
init-method:指定类中的初始化方法名称(生命周期相关)。
-
destroy-method:指定类中销毁方法名称(生命周期相关)。
bean 的生命周期
单例对象:scope="singleton"
一个应用只有一个对象的实例。它的作用范围就是整个应用。
生命周期:
对象出生:当应用加载,创建容器时,对象就被创建了。
对象活着:只要容器在,对象一直活着。
对象死亡:当应用卸载,销毁容器时,对象就被销毁了。
多例对象:scope="prototype"
每次访问对象时,都会重新创建对象实例。
生命周期:
对象出生:当使用对象时,创建新的对象实例(getBean)。
对象活着:只要对象在使用中,就一直活着。
对象死亡:当对象长时间不用时,被java的垃圾回收器回收了。
生命周期方法:
init-method:指定类中的初始化方法名称(生命周期相关)。
destroy-method:指定类中销毁方法名称(生命周期相关)。
实例化 Bean 的三种方式
第一种方式:使用默认无参构造函数创建对象
在默认情况下: 它会根据默认无参构造函数来创建类对象。如果 bean 中没有默认无参构造函数,将会创建失败
第二种方式:使用静态工厂的方法创建对象
使用工厂中的静态方法创建对象,并存入 spring 容器
id 属性:指定 bean 的 id,用于从容器中获取
class 属性:指定静态工厂的全限定类名
factory-method 属性:指定生产对象的静态方法
第三种方式:使用实例工厂的方法创建对象
先把工厂的创建交给 spring 来管理。
然后再使用工厂的 bean 来调用里面的方法
factory-bean 属性:用于指定实例工厂 bean 的 id。
factory-method 属性:用于指定实例工厂中创建对象的方法。
默认无参构造创建对象
静态工厂方法创建对象
第一步:创建静态工厂
/**

 * 假设service的实现类是由工厂中的静态方法创建的

 */

public class StaticFactory {

public static IAccountService createAccountService(){

return new AccountServiceImpl();

}

}
第二步:编写配置文件
第三步:测试
public class ClientStatic {

public static void main(String[] args) {

ApplicationContext ac = new ClassPathXmlApplicationContext("applicationContext.xml");

IAccountService accountService = (IAccountService) ac.getBean("accountService");

System.out.println(accountService);

}

}
实例工厂方法创建对象
第一步:创建实例工厂
/**

 * 假设service的实现类是由一个工厂的非静态方法创建的

 */

public class InstanceFactory {

public IAccountService createAccountService(){

return new AccountServiceImpl();

}

}
第二步:编写配置文件
第三步:测试
public class ClientInstance {

public static void main(String[] args) {

ApplicationContext ac = new ClassPathXmlApplicationContext("applicationContext.xml");

IAccountService accountService = (IAccountService) ac.getBean("accountService");

System.out.println(accountService);

}

}
Spring的依赖注入
依赖注入的概念
依赖注入:Dependency Injection。它是 spring 框架核心 ioc 的具体实现。
我们的程序在编写时,通过控制反转,把对象的创建交给了 spring,但是代码中不可能出现没有依赖的情况。 ioc 解耦只是降低他们的依赖关系,但不会消除。例如:我们的业务层仍会调用持久层的方法。
那这种业务层和持久层的依赖关系,在使用 spring 之后,就让 spring 来维护了。
简单的说,就是坐等框架把持久层对象传入业务层,而不用我们自己去获取。
一、 构造方法注入属性
顾名思义,就是使用类中的构造函数,给成员变量赋值。注意,赋值的操作不是我们硬编码的,而是通过配置的方式,让spring框架来为我们注入。
要求:
-
bean对象需要创建有参数的构造方法
-
在配置文件中通过constructor-arg标签注入属性
创建AccountServiceImpl2: 创建并添加有参构造函数
public class AccountServiceImpl2 implements IAccountService {

private String name;

private Integer age;

private IAccountDao accountDao;


//使用有参构造来注入属性

public AccountServiceImpl2(String name, Integer age, IAccountDao accountDao) {

this.name = name;

this.age = age;

this.accountDao = accountDao;

}


public void saveAccount() {

System.out.println(name+"..."+age+"..."+accountDao);

}

}
编写配置文件
二、Set方法注入
顾名思义,就是使用类中的set方法,给成员变量赋值。注意,赋值的操作不是我们硬编码的,而是通过配置的方式,让spring框架来为我们注入。
要求:
-
在配置文件中通过proprety标签注入属性
创建AccountServiceImpl3:创建并提供属性的set方法
public class AccountServiceImpl3 implements IAccountService {

private String name;

private Integer age;

private IAccountDao accountDao;


public void setName(String name) {

this.name = name;

}


public void setAge(Integer age) {

this.age = age;

}


public void setAccountDao(IAccountDao accountDao) {

this.accountDao = accountDao;

}


public void saveAccount() {

System.out.println(name+"..."+age+"..."+accountDao);

}
}
编写配置文件
创建Client3测试
public class Client3 {

public static void main(String[] args) {

//加载配置文件,获取spring工厂,从容器中获取dao和service的实现类

ApplicationContext ac = new ClassPathXmlApplicationContext("applicationContext.xml");

//从容器中获取service

IAccountService accountService = (IAccountService) ac.getBean("accountService3");

accountService.saveAccount();

}

}
三、P名称空间注入
此种方式是通过在 xml中导入 p名称空间,使用 p:propertyName属性 来注入数据,它的本质仍然是调用类中的 set 方法实现注入功能
创建AccountServiceImpl4
public class AccountServiceImpl4 implements IAccountService {

private String name;

private Integer age;

private IAccountDao accountDao;


public void setName(String name) {

this.name = name;

}


public void setAge(Integer age) {

this.age = age;

}


public void setAccountDao(IAccountDao accountDao) {

this.accountDao = accountDao;

}


public void saveAccount() {

System.out.println(name+"..."+age+"..."+accountDao);

}

}
编写配置文件
xmlns:p="http://www.springframework.org/schema/p"
配置文件:
创建Client4测试
public class Client4 {

    public static void main(String[] args) {

        //加载配置文件,获取spring工厂,从容器中获取dao和service的实现类

        ApplicationContext ac = new ClassPathXmlApplicationContext("applicationContext.xml");

        //从容器中获取service

        IAccountService accountService = (IAccountService) ac.getBean("accountService4");

        accountService.saveAccount();

    }

}
四、复杂类型的注入
顾名思义,就是给类中的集合成员传值,它用的也是set方法注入的方式,只不过变量的数据类型都是集合。 我们这里介绍注入数组,List,Set,Map,Properties。
创建AccountServiceImpl5
public class AccountServiceImpl5 implements IAccountService {

private String[] myStrs;

private List myList;

private Set mySet;

private Map myMap;

private Properties myProps;


public void setMyStrs(String[] myStrs) {

this.myStrs = myStrs;

}


public void setMyList(List myList) {

this.myList = myList;

}


public void setMySet(Set mySet) {

this.mySet = mySet;

}


public void setMyMap(Map myMap) {

this.myMap = myMap;

}


public void setMyProps(Properties myProps) {

this.myProps = myProps;

}


public void saveAccount() {

System.out.println(myStrs);

System.out.println(myList);

System.out.println(mySet);

System.out.println(myMap);

System.out.println(myProps);

}

}
编写配置文件
              AAA

              BBB

              CCC


              AAA

              BBB

              CCC


              AAA

              BBB

              CCC


              AAA

              BBB

              CCC
创建Client5测试
public class Client5 {

public static void main(String[] args) {

//加载配置文件,获取spring工厂,从容器中获取dao和service的实现类

ApplicationContext ac = new ClassPathXmlApplicationContext("applicationContext.xml");

//从容器中获取service

IAccountService accountService = (IAccountService) ac.getBean("accountService5");

accountService.saveAccount();

}

}
基于注解的IOC配置[掌握]——重点:18大注解标签
明确:写在最前
学习基于注解的IoC配置,大家脑海里首先得有一个认知,即注解配置和xml配置要实现的功能都是一样的,都是要降低程序间的耦合。只是配置的形式不一样。
关于实际的开发中到底使用xml还是注解,每家公司有不同的习惯。所以这两种配置方式我们都需要掌握。
1、用于装配Bean的注解
@Component (value=”xxx”):
作用:
在类上使用该注解,把资源让spring来管理。相当于在xml中配置一个bean。
属性:
value:指定bean的id。如果不指定value属性,默认bean的id是当前类的类名。首字母小写。
/**

 * @Component注解:相当于配置了标签

 *     value = "accountService":相当于配置了bean标签的id属性,单独配置value时,可以省略value属性名称

*/

@Component(value="accountService")

public class AccountServiceImpl implements IAccountService {

}
@Component的三个衍生注解:
@Controller(value=”xxx”):
一般用于将web层装配到容器中,使用方法和@Component(value=”xxx”)一摸一样
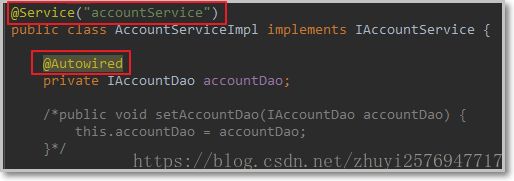
@Service(value=”xxx”):
一般用于将web层装配到容器中,使用方法和@Component(value=”xxx”)一摸一样
@Repository(value=”xxx”):
一般用于将web层装配到容器中,使用方法和@Component(value=”xxx”)一摸一样
2、 用于属性注入的注解
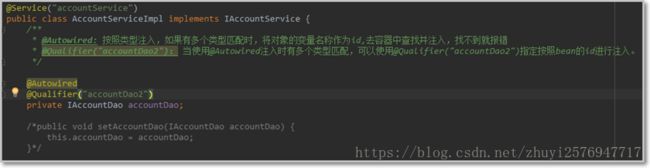
@Autowired:
只能按照bean类型注入,如果有多个类型匹配,默认将属性名称作为id去容器中查找。
@Qualifier:
一般和@Autowired配合使用,用来注入指定id的bean,做方法的参数中可以独立使用 属性:value:指定bean的id。
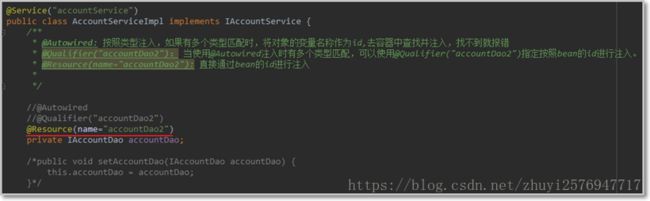
@Resource:
用来注入指定id的bean类型,相当于@Autowired+@Qualifier 属性name:指定bean的id。
@Value:
只能注入基本类型等数据,不能注入bean类型,可以使用${}在资源文件中获取数据,前提是,外部资源文件被加载

3、 作用域的
@Scope:
用于指定bean的作用域,一般就是singleton和prototype

4、 生命周期相关的
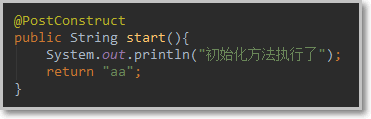
@PostConstruct:
用于指定某一个方法为初始化方法
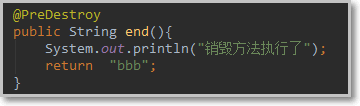
@PreDestroy:
用于指定某一个方法为销毁方法
关于Spring注解和XML的选择问题
注解的优势:
配置简单,维护方便(我们找到类,就相当于找到了对应的配置)。
XML的优势:
修改时,不用改源码。
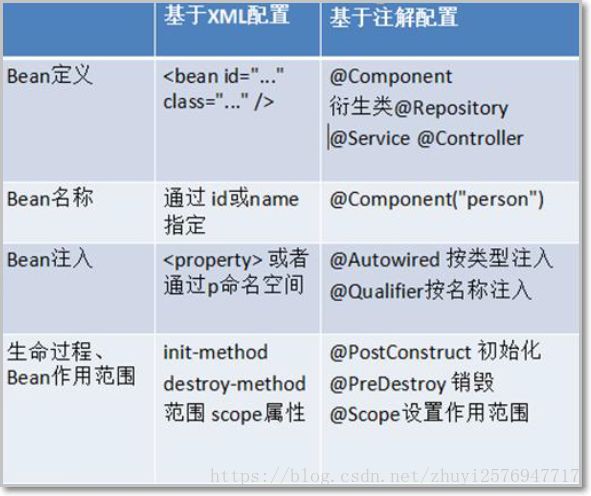
Spring管理Bean方式的比较:
5、 其他配置类相关的
@Configuration:
声明一个类为配置类,用于替代applicationContext.xml的
@ComponentScan:
用于开启注解扫描的包
@Import:
用于导入其他类的
@PropertySource:
用于加载外部资源文件的
@Bean:
用于将方法返回的bean类型的对象装配到容器中
纯注解案例
环境搭建
创建配置类
@Configuration

@ComponentScan("cn.itcast")

public class SpringConfiguration {


    @Bean(name="jdbcTemplate")

    public JdbcTemplate createJdbcTempalte(@Qualifier("dataSource") DataSource dataSource){

        return new JdbcTemplate(dataSource);

    }


    @Bean(name="dataSource")

    public DataSource createDataSource(){

        DruidDataSource dataSource = new DruidDataSource();

        dataSource.setDriverClassName("com.mysql.jdbc.Driver");

        dataSource.setUrl("jdbc:mysql://localhost:3306/heima37");

        dataSource.setUsername("root");

        dataSource.setPassword("root");

        return dataSource;

    }

}
测试
public class AccountControllerTest {


@Test

public void saveAccuont() {

ApplicationContext ac = new AnnotationConfigApplicationContext(SpringConfiguration.class);

AccountController accountController = (AccountController) ac.getBean("accountController");


Account account = new Account();

account.setName("admin11");

account.setMoney(1000f);


accountController.saveAccuont(account);

}


}
优化
在resources类的根目录下创建properties资源文件:
jdbc.driverClass=com.mysql.jdbc.Driver
jdbc.url=jdbc:mysql://localhost:3306/heima25
jdbc.username=root
jdbc.password=root
springConfiguration:
@Configuration//声明这是一个配置类,用来代替xml的

@ComponentScan("cn.itcast")//开启注解扫描

@Import(value={JdbcConfig.class})

public class SpringConfiguration {

}
//加载外部资源文件
@PropertySource(value = {"classpath:jdbc.properties"})
public class JdbcConfig {
@Value("${jdbc.driverClass}")
private String driverClassName;
@Value("${jdbc.url}")
private String url;
@Value("${jdbc.username}")
private String username;
@Value("${jdbc.password}")
private String password;
@Bean(name="jdbcTemplate")
public JdbcTemplate createJdbcTempalte(@Qualifier("dataSource") DataSource dataSource){
return new JdbcTemplate(dataSource);
}
@Bean(name="dataSource")
public DataSource createDataSource(){
DruidDataSource dataSource = new DruidDataSource();
dataSource.setDriverClassName(driverClassName);
dataSource.setUrl(url);
dataSource.setUsername(username);
dataSource.setPassword(password);
return dataSource;
}
}
6、 Junit相关的
@RunWith:
用于替换底层的运行器,初始化spring容器的
属性:
value:单独配置时,value属性名称可以省略,配置SpringJUnit4ClassRunner.class来代替原来junit的运行器
@ContextConfiguration
用于指定配置文件或者配置类的
属性:
value[]:用来指定xml配置文件的路径
class[]: 用来指定配置类
Xml的配置步骤案例:
导入spring-test的坐标: 此处需要注意的是,spring5及以上版本要求junit的版本必须是4.12及以上,否则用不了
    org.springframework

    spring-test

    5.0.6.RELEASE
测试
@RunWith(SpringJUnit4ClassRunner.class)

@ContextConfiguration(locations = {"classpath:applicationContext.xml"})

public class AccountControllerTest {


@Autowired

private AccountController accountController;


@Test

public void saveAccuont() {


Account account = new Account();

account.setName("admin13");

account.setMoney(1000f);


accountController.saveAccuont(account);

}

}
纯注解的配置步骤(配置类)
环境搭建
导入spring-test的坐标
    org.springframework

    spring-test

    5.0.6.RELEASE
测试
@RunWith(SpringJUnit4ClassRunner.class)

@ContextConfiguration(classes = {SpringConfiguration.class})

public class AccountControllerTest {


@Autowired

private AccountController accountController;

@Test

public void saveAccuont() {


Account account = new Account();

account.setName("admin14");

account.setMoney(1000f);

accountController.saveAccuont(account);

}
}
附:Spring—ICO练习源码
https://download.csdn.net/download/zhuyi2576947717/10679802