ElasticSearch7.3.0安装及监控工具Cerebro-0.8.4
1.官网下载相应软件
elasticsearch7.3.0:https://www.elastic.co/cn/downloads/elasticsearch
cerebro-0.8.4:https://github.com/lmenezes/cerebro/releases
jdk1.8:https://www.oracle.com/technetwork/java/javase/downloads/jdk8-downloads-2133151.html
2.软件安装
tar -zxvf elasticsearch-7.3.0-linux-x86_64.tar.gz
cd elasticsearch-7.3.0-linux-x86_64/config
mkdir -p config-data1
mkdir -p config-data2
mkdir -p config-data3
将config下面的文件
elasticsearch.keystore
jvm.options
role_mapping.yml
users
elasticsearch.yml
log4j2.properties
roles.yml
users_roles
分别复制到config-data1,config-data2,config-data3
3.配置修改
3.1增大文件打开数
vim /etc/security/limits.conf
##############################
*    -    nofile    65536
*    -    nproc    65535
##############################
重启后生效
3.2增大虚拟内存
vim /etc/sysctl.conf
###########################
vm.max_map_count = 262144
###########################
3.3ES节点配置文件
#############################
#修改节点1的配置文件
#############################
vim config-data1/elasticsearch.yml

cluster.name: LCP
node.name: node-1
discovery.zen.minimum_master_nodes: 1
node.max_local_storage_nodes: 4
path.data: /appdata/es-data/data1
path.logs: /applog/es-log/log1
network.host: 127.0.0.1
http.port: 9200
transport.tcp.port: 9300
discovery.seed_hosts: ["127.0.0.1:9300","127.0.0.1:9302","127.0.0.1:9304"]
cluster.initial_master_nodes: ["node-1","node-2","node-3"]
http.cors.enabled: true
http.cors.allow-origin: "*"
path.repo: ["/backup/es-backup"]
bootstrap.memory_lock: true
indices.memory.index_buffer_size: 30%
thread_pool.search.queue_size: 1000
thread_pool.write.queue_size: 1000

xpack.monitoring.enabled: true
xpack.monitoring.collection.enabled: true
#############################
#修改节点2的配置文件
#############################
vim config-data2/elasticsearch.yml
cluster.name: LCP
node.name: node-2
discovery.zen.minimum_master_nodes: 1
node.max_local_storage_nodes: 4
path.data: /appdata/es-data/data2
path.logs: /applog/es-log/log2
network.host: 127.0.0.1
http.port: 9202
transport.tcp.port: 9302
discovery.seed_hosts: ["127.0.0.1:9300","127.0.0.1:9302","127.0.0.1:9304"]
cluster.initial_master_nodes: ["node-1","node-2","node-3"]
http.cors.enabled: true
http.cors.allow-origin: "*"
path.repo: ["/backup/es-backup"]
bootstrap.memory_lock: true
indices.memory.index_buffer_size: 30%
thread_pool.search.queue_size: 1000
thread_pool.write.queue_size: 1000
xpack.monitoring.enabled: true
xpack.monitoring.collection.enabled: true#############################
#修改节点3的配置文件
#############################
vim config-data1/elasticsearch.yml
cluster.name: LCP
node.name: node-3
discovery.zen.minimum_master_nodes: 1
node.max_local_storage_nodes: 4
path.data: /appdata/es-data/data3
path.logs: /applog/es-log/log3
network.host: 127.0.0.1
http.port: 9204
transport.tcp.port: 9304
discovery.seed_hosts: ["127.0.0.1:9300","127.0.0.1:9302","127.0.0.1:9304"]
cluster.initial_master_nodes: ["node-1","node-2","node-3"]
http.cors.enabled: true
http.cors.allow-origin: "*"
path.repo: ["/backup/es-backup"]
bootstrap.memory_lock: true
indices.memory.index_buffer_size: 30%
thread_pool.search.queue_size: 1000
thread_pool.write.queue_size: 1000
xpack.monitoring.enabled: true
xpack.monitoring.collection.enabled: true3.4修改java内存大小
vim config/config-data1/jvm.options
###############################
-Xms512m
-Xmx512m
###############################
由于单台电脑配置较低,改成512M。
4.ES节点启动
依次启动三个ES节点
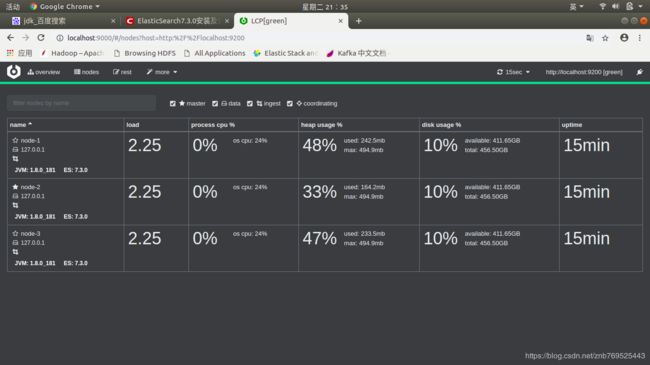
5.安装cerebro工具
unzip cerebro-0.8.4.zip
cd cerebro-0.8.4/
nohup bin/cerebro >/dev/null &
6.启动效果