第二章 Etcd的初步认识
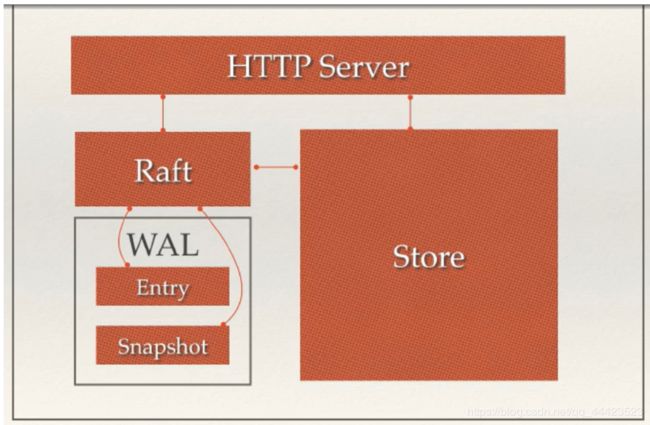
本文章主要讲解实操与重要知识点,理论知识较少,若不清楚etcd是什么,请自觉百度初步认识以下。
1 、Etcd的一些常见的应用场景
1.1、服务注册发现:

如下图所示:Etcd充当服务注册方的角色。
当请求方—>提供方—>注册方,发现2宕机了,服务注册方会删掉2,且选择改成1,3。请求方会继续查找注册方的服务。
1.2、配置中心:
实际上就是实现了热加载,时时更新数据,不需要先关闭网络,在更新数据,然后再启动网络。只需要直接时时启动,修改即可。
这时候就要问了,那为什么要用etcd,而不去用zookeeper?
- 第一点,zookeeper比较复杂。底层使用Paxos的强一致性算法(很难的一个算法),使用起来也比较复杂,需要安装客户端,而且只支持c与java
- Zookeeper是使用java编写的,java偏向与中型应用,它会导入大量的依赖,使用起来与维护起来比较繁琐。而相对etcd,比较简单·,算法本身也不是很复杂。
- Apache基金会发展比较缓慢。导致版本上更不上。
etcd使用的好处又在哪?
- etcd是使用go语言编写,比较简单,部署简单,使用http接口也简单,raft也可以保证强一致性,raft也很容易让人理解。
- 数据持久化,时时更新追踪
- 安全,且etcd支持tls安全认证。
1.3、Etcd的日志功能:
2、实战:
2.1、启动etcd
开始尝试使用etcd:(连接etcd)
注意:(如果使用的etcd是v3版本)[默认的etcdctl使用的是v2版本的命令。]
我们需要设置环境变量ETCDCTL_API=3来让他使用3的API
export ETCDCTL_API=3
github下载etcd:https://github.com/etcd-io/etcd
下载完之后进行解压即可使用,里面有etcd、etcdctl的工具,【这里我使用的是ubuntu版本】
启动etcd工具:

然后另外启动终端启动etcdctl。

这就表明启动etcd成功。
2.2、用docker启动etcd
我们怎么将etcd装到docker中:https://blog.csdn.net/ucmir183/article/details/84454575
docker run -d \
-p 2379:2379 \
-p 2380:2380 \
--name etcd etcd /usr/local/bin/etcd \
-name etcd0 \
--listen-client-urls http://0.0.0.0:2379 \
--advertise-client-urls http://0.0.0.0:2379 \
--listen-peer-urls http://0.0.0.0:2380 \
--initial-advertise-peer-urls http://0.0.0.0:2380 \
--initial-cluster etcd0=http://0.0.0.0:2380 \
--initial-cluster-token tkn \
--initial-cluster-state new
查看etcd Server版本
docker exec etcd /bin/sh -c "/usr/local/bin/etcd --version"
docker exec etcd /bin/sh -c "ETCDCTL_API=3 /usr/local/bin/etcdctl version"
docker exec etcd /bin/sh -c "ETCDCTL_API=3 /usr/local/bin/etcdctl endpoint health"
![]()
Docker操作etcd进行读写:
docker exec etcd /bin/sh -c "ETCDCTL_API=3 /usr/local/bin/etcdctl put zwx "zwx" "
docker exec etcd /bin/sh -c "ETCDCTL_API=3 /usr/local/bin/etcdctl get zwx"
2.3、Docker启动多个etcd
安装goreman:go get github.com/mattn/goreman
开发中使用则推荐轻量级小工具goreman。goreman用于多线程管理工具
有关goreman网址:https://studygolang.com/articles/01373
在etcd中编写local-cluster-profile文件
etcd1:
etcd --name infra1 --listen-client-urls http://127.0.0.1:12379 --advertise-client-urls http://127.0.0.1:12379 --listen-peer-urls http://127.0.0.1:12380 --initial-advertise-peer-urls http://127.0.0.1:12380 --initial-cluster-token etcd-cluster-1 --initial-cluster 'infra1=http://127.0.0.1:12380,infra2=http://127.0.0.1:22380,infra3=http://127.0.0.1:32380' --initial-cluster-state new
etcd2:
etcd --name infra2 --listen-client-urls http://127.0.0.1:22379 --advertise-client-urls http://127.0.0.1:22379 --listen-peer-urls http://127.0.0.1:22380 --initial-advertise-peer-urls http://127.0.0.1:22380 --initial-cluster-token etcd-cluster-1 --initial-cluster 'infra1=http://127.0.0.1:12380,infra2=http://127.0.0.1:22380,infra3=http://127.0.0.1:32380' --initial-cluster-state new
ectd3:
etcd --name infra3 --listen-client-urls http://127.0.0.1:32379 --advertise-client-urls http://127.0.0.1:32379 --listen-peer-urls http://127.0.0.1:32380 --initial-advertise-peer-urls http://127.0.0.1:32380 --initial-cluster-token etcd-cluster-1 --initial-cluster 'infra1=http://127.0.0.1:12380,infra2=http://127.0.0.1:22380,infra3=http://127.0.0.1:32380' --initial-cluster-state new
通过goreman启动三个etcd服务:goreman -f local-cluster-profile start
用户可以使用 etcd 的命令行工具 etcdctl 与启动的集群进行交互,例如,访 问任意一个 etcd server 获取集群 member 信息, 对应的命令就是 member listo
etcdctl 默认访问 localhost:2379,我们可以通过“–endpoints ”参数来指定etcd server的地址。
etcdctl --endpoints=localhost 12379 member list
![]()
如果 etcd1 和 etcd2 要与 etcd3 通信,使用的 URL 就是 http://localhost:32380。 而 clientURLs 指的就是该 etcd server 向客户端暴露的通信地址。 例如,如果客户
端要与 etcd2 进行通信,使用的 URL 则是 http://127.0.0.1:32379
当我们向etcd2写入数据时:

这时我们尝试下让ectd1宕机,再对etcd1操作,再让etcd1恢复看看效果:
记得先打开启动etcd工具。也就是启动etcd客户端。

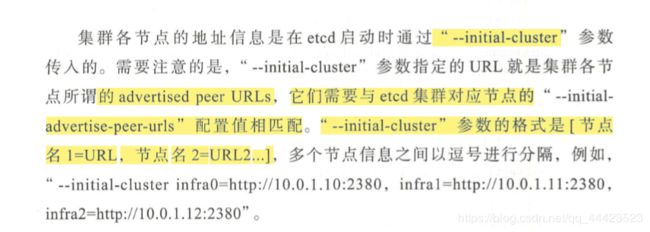

2.3、多节点集群化部署
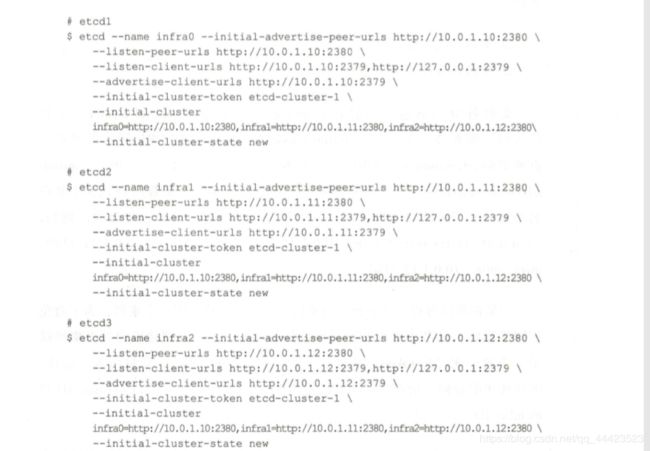
将三个节点集体设置不同地址,同一个端口。
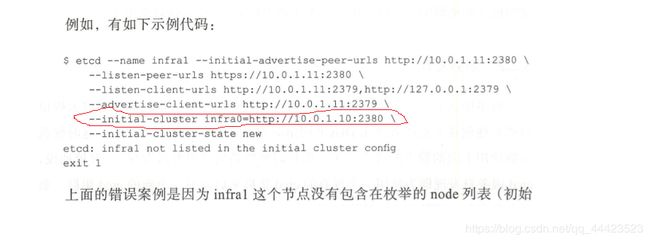
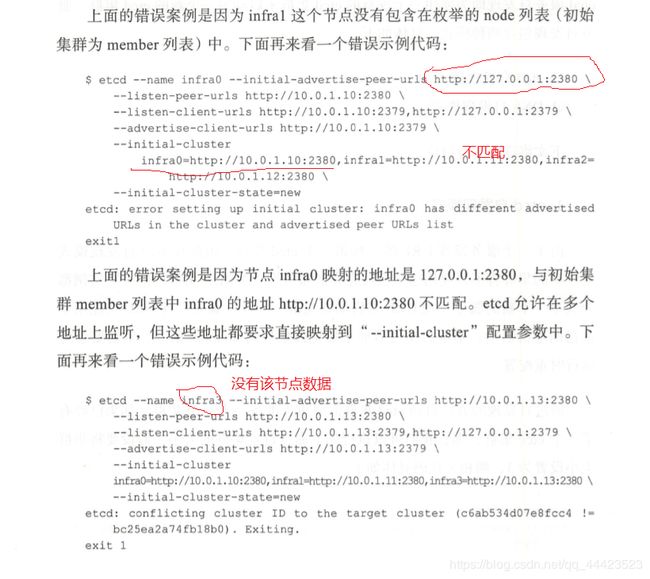

建议去网上观看电子书或者买书:云原生分布式存储基石 etcd深入解析
第一章 初步学习etcdRaft
第三章 介绍etcdctl的命令代码
