因为Xcode8出于安全考虑,禁止使用第三方插件。不能用第三方插件后,确实有很多不方便,但提供了source editor extensions来取代它,我们可以自己写一个来提高编程效率。PS:source editor extensions只提供了对源文件做操作,没有UI交互。
一. 创建流程
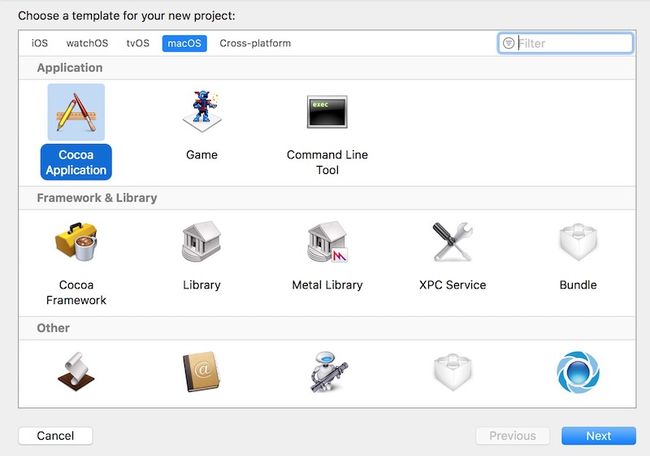
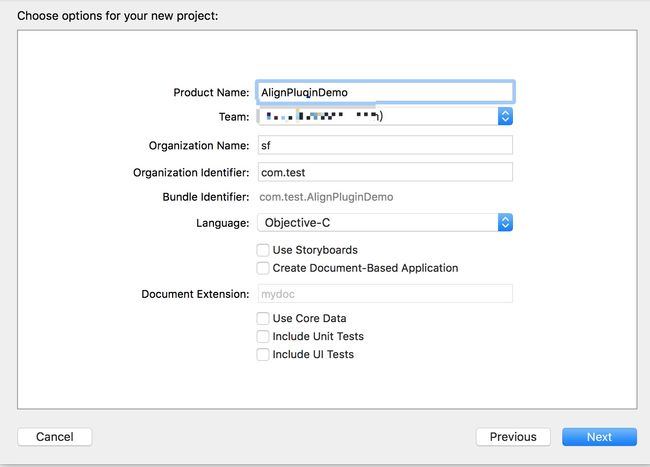
首先要新建一个macOS项目
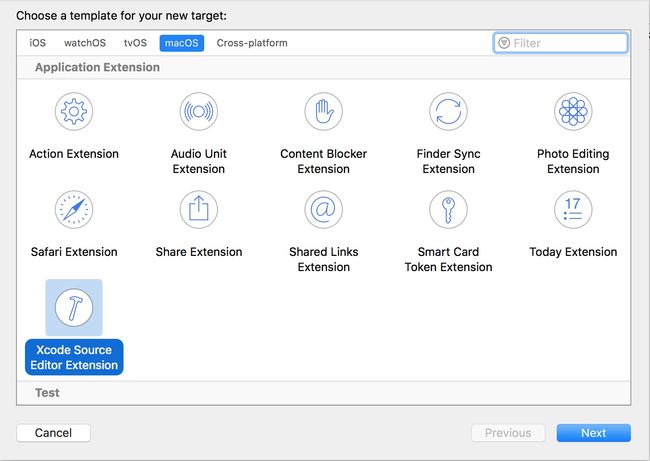
点击editor,添加一个新的target。
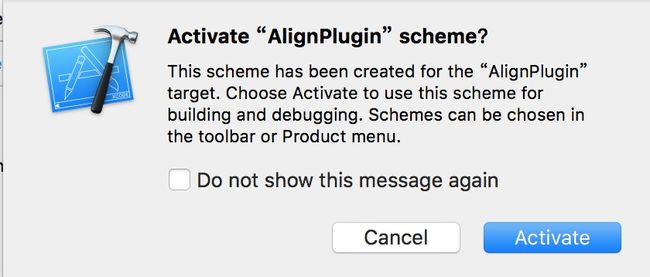
完成后,在出现的对话框中,点击Activate激活Scheme
配置签名,两个target的签名都要配置,且保证两个的签名是一样的,不然测试不了:
配置完,在确定当前target是alignplugin时,command+R运行;
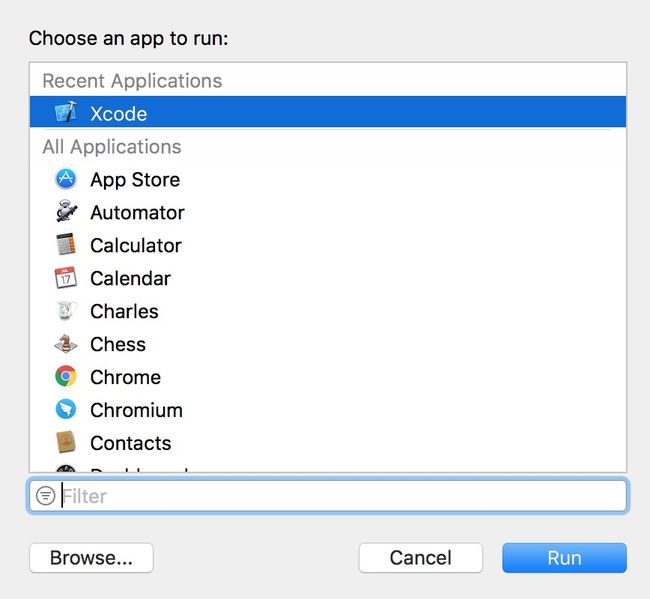
会弹出一个选择框:
- 如果当前Xcode是8.0以上的,可以直接选择run,如果有多个Xcode,选择Xcode为8.0以上的运行。
- 运行之后会弹出一个黑色的Xcode,选择一个项目运行(例如:AlignPluginDemo),进入项目后选择一个.m或者.h的文件,点击editor:
当然点击里面的命令是没什么效果的,因为什么代码都没写。
再来看代码文件,在SourceEditorExtension.h中:
- (void)extensionDidFinishLaunching
{
    // If your extension needs to do any work at launch, implement this optional method.
    //在extension启动的时候会被调用,如果需要的话开发者可以在此方法里面做一些初始化的工作

}


- (NSArray  *> *)commandDefinitions
{
    // If your extension needs to return a collection of command definitions that differs from those in its Info.plist, implement this optional property getter.
    return @[];
}
commandDefinitions函数的作用和info.plist里面的NSExtension属性的差不多。PS:如果没打算在commandDefinitions中实现命令属性的设置就把函数注释了,否则info.plist里面的设置无效。
XCSourceEditorCommandName : 命令名称
XCSoureEditorCommandIdentifier :标示符
XCSourceEditorCommandClassName : 类名
二.实例-排版
主要需要实现的函数:
- (void)performCommandWithInvocation:(XCSourceEditorCommandInvocation *)invocation completionHandler:(void (^)(NSError * _Nullable nilOrError))completionHandler
{
    // Implement your command here, invoking the completion handler when done. Pass it nil on success, and an NSError on failure.

    completionHandler(nil);
}
参数invocation的属性buffer就是当前文件的数据源。在buffer中
/** The lines of text in the buffer, including line endings. Line breaks within a single buffer are expected to be consistent. Adding a "line" that itself contains line breaks will actually modify the array as well, changing its count, such that each line added is a separate element. */
@property (readonly, strong) NSMutableArray  *lines;

/** The text selections in the buffer; an empty range represents an insertion point. Modifying the lines of text in the buffer will automatically update the selections to match. */
@property (readonly, strong) NSMutableArray  *selections;
lines表示当前文件全部行数的代码,selections表示当前光标所在的位置。打印看一下结果:
NSLog(@"lines : %@",invocation.buffer.lines);
NSLog(@"selections : %@",invocation.buffer.selections);
打印结果:
对lines(字符串数组)做增删改操作会同时作用的到文件上,所以我们可以写一个排版的命令。
首先创建一个名为AlignCommand的类,并在info.plist中添加一个命令:
#import

@interface AlignCommand : NSObject

@end
接下来就是需要实现排版的代码,我的做法是找到光标覆盖区域中的目标字符(如:@":")在当前行最远的位置。找到后把遍历在包含目标字符的前边填充空白字符串@" ",填充到最远的位置为止。
实现:
- (BOOL)typesetWithInvocation:(XCSourceEditorCommandInvocation *)invocation key:(NSString *)key{
    XCSourceTextRange *range  = invocation.buffer.selections.firstObject;
    NSInteger startLine       = range.start.line;
    NSInteger endLine         = range.end.line;
    NSInteger maxLocation     = 0;
    NSMutableDictionary *mdic = [NSMutableDictionary dictionary];
    for (NSInteger i = startLine; i <= endLine; i++) {
        NSStringCompareOptions options = NSCaseInsensitiveSearch;
        NSString *str = invocation.buffer.lines[i];
        if ([key isEqualToString:@" "]) {
            //判断属性
            NSRange range = [str rangeOfString:@";"];
            if (range.location == NSNotFound) continue;
            str = [str substringToIndex:range.location];
            range = [str rangeOfString:@" *"];
            if (range.location != NSNotFound) {
                key = @" *";
            }
            options = NSBackwardsSearch;
        }
        NSRange range = [str rangeOfString:key options:options];
        if (range.location != NSNotFound) {
            [mdic setObject:@(range.location) forKey:@(i).description];
            maxLocation = maxLocation < range.location ? range.location : maxLocation;
        }
        if ([key isEqualToString:@" *"]) {
            key = @" ";
        }
    }

    if (maxLocation) {
        [mdic enumerateKeysAndObjectsUsingBlock:^(id  _Nonnull key, NSNumber *  _Nonnull obj, BOOL * _Nonnull stop) {
            if (obj.integerValue != maxLocation) {
                NSMutableString *str = [invocation.buffer.lines[[(NSString *)key integerValue]] mutableCopy];
                for (NSInteger i = obj.integerValue; i < maxLocation; i++) {
                    [str insertString:@" " atIndex:obj.integerValue];
                }
                invocation.buffer.lines[[(NSString *)key integerValue]] = str;
            }
        }];
        return YES;
    }else{
        return NO;
    }
}
排版属性时会略有不同,排版属性时经常会出现光标覆盖区域带有注释,所以先用;来区分,截取;前的代码,在截取的代码中用*来区分对象的类型进行判断最远位置。
AlignCommand.m中全部代码:
- (void)performCommandWithInvocation:(XCSourceEditorCommandInvocation *)invocation completionHandler:(void (^)(NSError * _Nullable nilOrError))completionHandler
{
  // Implement your command here, invoking the completion handler when done. Pass it nil on success, and an NSError on failure.


  XCSourceTextRange *range = invocation.buffer.selections.firstObject;
  NSInteger startLine = range.start.line;
  NSInteger endLine = range.end.line;
  if (startLine >= endLine) {
      completionHandler(nil);
      return;
  }

  NSArray *array = @[@":",@"=",@" "];
  [array enumerateObjectsUsingBlock:^(NSString *  _Nonnull obj, NSUInteger idx, BOOL * _Nonnull stop) {
      if ([self typesetWithInvocation:invocation key:obj]) {
          *stop = YES;
      }
  }];

  completionHandler(nil);
}


- (BOOL)typesetWithInvocation:(XCSourceEditorCommandInvocation *)invocation key:(NSString *)key{
  XCSourceTextRange *range  = invocation.buffer.selections.firstObject;
  NSInteger startLine       = range.start.line;
  NSInteger endLine         = range.end.line;
  NSInteger maxLocation     = 0;
  NSMutableDictionary *mdic = [NSMutableDictionary dictionary];
  for (NSInteger i = startLine; i <= endLine; i++) {
      NSStringCompareOptions options = NSCaseInsensitiveSearch;
      NSString *str = invocation.buffer.lines[i];
      if ([key isEqualToString:@" "]) {
          //判断属性
          NSRange range = [str rangeOfString:@";"];
          if (range.location == NSNotFound) continue;
          str = [str substringToIndex:range.location];
          range = [str rangeOfString:@" *"];
          if (range.location != NSNotFound) {
              key = @" *";
          }
          options = NSBackwardsSearch;
      }
      NSRange range = [str rangeOfString:key options:options];
      if (range.location != NSNotFound) {
          [mdic setObject:@(range.location) forKey:@(i).description];
          maxLocation = maxLocation < range.location ? range.location : maxLocation;
      }
      if ([key isEqualToString:@" *"]) {
          key = @" ";
      }
  }

  if (maxLocation) {
      [mdic enumerateKeysAndObjectsUsingBlock:^(id  _Nonnull key, NSNumber *  _Nonnull obj, BOOL * _Nonnull stop) {
          if (obj.integerValue != maxLocation) {
              NSMutableString *str = [invocation.buffer.lines[[(NSString *)key integerValue]] mutableCopy];
              for (NSInteger i = obj.integerValue; i < maxLocation; i++) {
                  [str insertString:@" " atIndex:obj.integerValue];
              }
              invocation.buffer.lines[[(NSString *)key integerValue]] = str;
          }
      }];
      return YES;
  }else{
      return NO;
  }
}
运行测试:
三.实例-生成模型
模型转换工具我习惯于使用mantle,但创建模型的过程是很枯燥的,需要把服务器返回的json中全部或者每个需要使用的属性写出来,有的时候一个模型的属性有二十多个甚至更多,在Xcode7的时候还有很多工具可以转,Xcode8后就只能手动了。
功能:把一个光标所在的json数据转成属性列表,顺便把mantle需要的函数也列出来。
- 取光标所在区域的代码并转为字典对象,如果不存在,则不执行。
    XCSourceTextRange *range = invocation.buffer.selections.firstObject;
    NSInteger startLine = range.start.line;
    NSInteger endLine = range.end.line;
    NSString *totalstr = @"";
    for (NSInteger i = startLine; i <= endLine; i++) {
        totalstr = [totalstr stringByAppendingString:invocation.buffer.lines[i]];
    }

    NSData *resData = [[NSData alloc] initWithData:[totalstr dataUsingEncoding:NSUTF8StringEncoding]];
    id  jsonObj = [NSJSONSerialization JSONObjectWithData:resData options:NSJSONReadingMutableLeaves error:nil];
    NSDictionary *dic = [self getDictionaryWithjsonObj:jsonObj];
    if (dic == nil) return;
- 对字典中的值进行类型判断,然后拼接成字符串插入到当前代码中
    __block NSString *str = @"";
    __block NSString *str2 = @"+ (NSDictionary *)JSONKeyPathsByPropertyKey {\n    return @{ ";
    __block NSInteger maxLocation = 0;
    NSMutableArray *str2Arr = [NSMutableArray array];

    [dic enumerateKeysAndObjectsUsingBlock:^(id  _Nonnull key, id  _Nonnull obj, BOOL * _Nonnull stop) {
        NSString *type = @"";
        if ([obj isKindOfClass:[NSString class]]) {
            type = @"NSString";
        }else if ([obj isKindOfClass:[NSDictionary class]]){
            type = @"NSDictionary";
        }else if ([obj isKindOfClass:[NSArray class]]){
            type = @"NSArray";
        }else if ([obj isKindOfClass:[NSNumber class]]){
            type = @"NSNumber";
        }else{
            type = @"id";
        }

        str = [str stringByAppendingString:@"\n/**   */"];
        str = [str stringByAppendingString:[NSString stringWithFormat:@"\n@property (nonatomic, strong) %@ *%@;",type,key]];

        NSString *dicStr = [NSString stringWithFormat:@"@\"%@\" : @\"%@\",\n              ",key,key];
        [str2Arr addObject:dicStr];
        NSRange range = [dicStr rangeOfString:@":"];
        maxLocation = maxLocation < range.location ? range.location : maxLocation;

    }];

    if (maxLocation) {
        [str2Arr enumerateObjectsUsingBlock:^(NSString *  _Nonnull obj, NSUInteger idx, BOOL * _Nonnull stop) {
            NSRange range = [obj rangeOfString:@":"];
            NSMutableString *mstr = [obj mutableCopy];
            for (NSInteger i = range.location; i < maxLocation; i++) {
                [mstr insertString:@" " atIndex:range.location];
            }
            str2 = [str2 stringByAppendingString:mstr];
        }];
    }
    str2 = [str2 stringByAppendingString:@"}\n}"];
    [invocation.buffer.lines insertObject:str2 atIndex:endLine+1];
    [invocation.buffer.lines insertObject:str atIndex:endLine+1];
    completionHandler(nil);
运行测试:
四.如何安装?
写完之后Commad+B,找到工程中的products
- 将 AlignPlugin(即.appex文件) 拷贝到 /Applications/Xcode.app/Contents/PlugIns路径下(Finder中Command+shift+G),重启Xcode就可以看到了。
五.快捷键
为插件添加快捷键: Xcode -> "Preferences" -> "Key Bindings" -> 搜索插件plugin或者插件名字 -> 添加对应的快捷键:
git地址:https://github.com/yxsufaniOS/Alugin-Model-Extension
