Ceph使用系列之——Ceph RGW使用
本文分享主题是《Ceph使用系列之——Ceph RGW使用》,欢迎关注。
Ceph RGW介绍
Ceph对象网关是在librados之上构建的对象存储接口,旨在为应用程序提供通往Ceph存储集群的RESTful网关,Ceph对象存储使用Ceph对象网关守护进程(radosgw),它是用于与Ceph存储群集进行交互的HTTP服务器。其有多种体现方式,Ceph老版本使用的,如:apache2、Nginx等,Ceph在Hammer版本后使用civetweb替换原有版本apache2并作为默认的http服务器,而在Nautilus版本时又换成了默认的beast作为http服务端。
由它提供OpenStack Swift和Amazon S3兼容的接口,介绍如下:
-
S3兼容口:该对象存储接口其与Amazon S3 RESTful API的大部分子集兼容。
-
Swift兼容口:该对接存储接口与OpenStack Swift API的大部分子集兼容。
S3和Swift API共享同一个命名空间,所以可以使用两种API访问相同的数据。
其实除了上面提到两种访问接口外,Ceph还有一个管理接口admin API ,其通过rest api的方式对对象存储进行管理,命令行形式为radosgw-admin,可以用来执行创建用户、删除用户、列出用户等操作,示意图如下:
使用radosgw-admin管理RGW
Ceph RGW对象存储中有以下四个概念:
用户:对象存储应⽤用的使⽤用者,一个⽤用户拥有一个或多个存储桶。RGW向您提供的⽤用户帐户包括了AK(AccessKeyId)和SK(SecretAccessKeyID)。通过使⽤用 AK 和 SK 对称加密的⽅方法来验证某个请求的发送者身份。
-
桶:桶(Bucket)是RGW中存储对象的容器。对象存储提供了基于桶和对象的扁平化存储方式,桶中的所有对象都处于同一逻辑层级,去除了文件系统中的多层级树形目录结构。
-
对象:对象(Object)是RGW中数据存储的基本单位,一个对象实际是一个文件的数据与其相关属性信息(元数据)的集合体。用户上传至RGW的数据都以对象的形式保存在桶中。
-
访问密钥(AK/SK):RGW支持通过AK/SK认证方式进行认证鉴权,即使用Access Key ID(AK)/Secret Access Key(SK)加密的方法来验证某个请求发送者身份。
用户账户有两种类型:
-
用户:是作为s3接口用户;
-
子用户:是作为swift接口用户,子用户附属于用户。
radosgw-admin创建用户。
#radosgw-admin user create --uid="testuser" --display-name="First User"{"user_id": "testuser","display_name": "First User","email": "","suspended": 0,"max_buckets": 1000,"subusers": [],"keys": [{"user": "testuser","access_key": "H1YNZV2D6E1X5PGAOSZ7","secret_key": "MasCiG6OJvEpXRTye4Ptz13SAI2dv5s3zUDXLO26"}],"swift_keys": [],"caps": [],"op_mask": "read, write, delete","default_placement": "","default_storage_class": "","placement_tags": [],"bucket_quota": {"enabled": false,"check_on_raw": false,"max_size": -1,"max_size_kb": 0,"max_objects": -1},"user_quota": {"enabled": false,"check_on_raw": false,"max_size": -1,"max_size_kb": 0,"max_objects": -1},"temp_url_keys": [],"type": "rgw","mfa_ids": []}
创建子用户。
#radosgw-admin subuser create --uid=testuser --subuser=testuser:swift --access=full{"user_id": "testuser","display_name": "First User","email": "","suspended": 0,"max_buckets": 1000,"subusers": [{"id": "testuser:swift","permissions": "full-control"}],"keys": [{"user": "testuser","access_key": "H1YNZV2D6E1X5PGAOSZ7","secret_key": "MasCiG6OJvEpXRTye4Ptz13SAI2dv5s3zUDXLO26"}],"swift_keys": [{"user": "testuser:swift","secret_key": "yahhi4lK5eJIw0cMg0cSm1ylRcncbAEGzQoximrw"}],"caps": [],"op_mask": "read, write, delete","default_placement": "","default_storage_class": "","placement_tags": [],"bucket_quota": {"enabled": false,"check_on_raw": false,"max_size": -1,"max_size_kb": 0,"max_objects": -1},"user_quota": {"enabled": false,"check_on_raw": false,"max_size": -1,"max_size_kb": 0,"max_objects": -1},"temp_url_keys": [],"type": "rgw","mfa_ids": []}
查看用户。
# radosgw-admin user list["user-rgw","rgw","admin","test","testuser"]
查看用户详细信息。
# radosgw-admin user info --uid test{"user_id": "test","display_name": "test","email": "","suspended": 0,"max_buckets": 1000,"subusers": [],"keys": [...................................................
更多可使用-h查看。
#radosgw-admin -husage: radosgw-admin[options...] commands:user create create a new useruser modify modify useruser info get user infouser rm remove useruser suspend suspend a useruser enable re-enable user after suspensionuser check check user infouser stats show user stats as accounted by quota subsystemuser list list userscaps add add user capabilitiescaps rm remove user capabilitiessubuser create create a new subusersubuser modify modify subusersubuser rm remove subuserkey create create access keykey rm remove access keybucket list list buckets (specify --allow-unordered for..............................................
使用Ceph Dashboard操作RGW
Ceph Dashboard现在支持如下三个功能:
-
查看RGW主机
-
管理用户
-
管理桶
Ceph Dashboard现在还不支持上传下载对象,只能通过s3或swift接口实现,详细可参见下文。
以下为查看RGW主机界面。
新建用户。
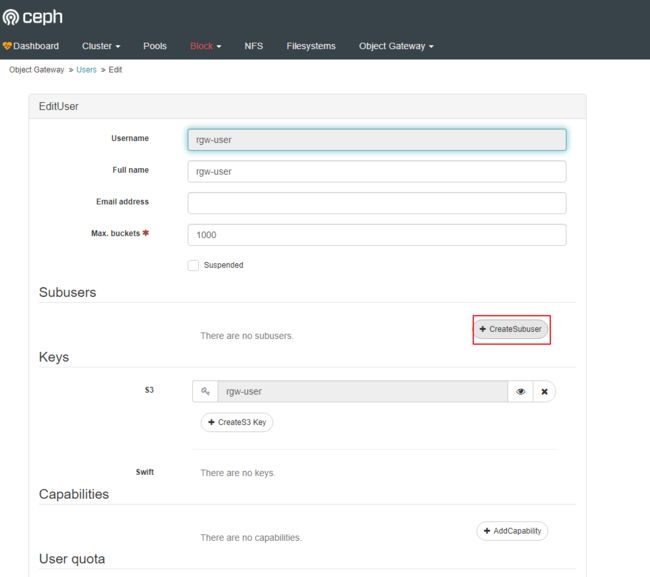
创建子用户。
可以看到子用户附属于用户。
创建桶界面。
使用s3接口操作RGW
5.1:安装s3cmd
要想使用s3接口访问rgw,需要先安装aws s3cmd命令行客户端工具,s3cmd 是一款 Amazon S3 命令行工具。它不仅能上传、下载、同步,还能设置权限。
下载并s3cmd工具。
因为s3cmd是使用python写的,所以要先安装pip工具。
# yum -y install python-pip
安装s3cmd,因为pip默认使用国外源,容易下载失败,所以加了临时使用国内源的命令,使用-i指定国内源地址。
#pip install s3cmd -i https://pypi.tuna.tsinghua.edu.cn/simple
查看s3cmd版本。
#s3cmd --versions3cmd version 2.1.0
配置s3cmd配置文件, 该命令会在/root目录下,创建.s3cfg文件。文件内容包括向导式中填写的内容。也可以一直下一步生成空的配置文件,直接编辑配置文件,也可以按向导提示填入内容。
#s3cmd --configureEnter new values or accept defaults in brackets with Enter.Refer to user manual for detailed description of all options.Access key and Secret key are your identifiers for Amazon S3. Leave them empty for using the env variables.Access Key: YC57G2R9XJIMNG825UQPSecret Key: PEDoHiveAUhEciOeeKFYLkaArlhtSy5mBMfWhWesDefault Region [US]:Use "s3.amazonaws.com" for S3 Endpoint and not modify it to the target Amazon S3.S3 Endpoint [s3.amazonaws.com]: 192.168.123.172:7480Use "%(bucket)s.s3.amazonaws.com" to the target Amazon S3. "%(bucket)s" and "%(location)s" vars can be usedif the target S3 system supports dns based buckets.DNS-style bucket+hostname:port template for accessing a bucket [%(bucket)s.s3.amazonaws.com]: 192.168.123.172:7480/%(bucket)Encryption password is used to protect your files from readingby unauthorized persons while in transfer to S3Encryption password:Path to GPG program [/usr/bin/gpg]:When using secure HTTPS protocol all communication with Amazon S3servers is protected from 3rd party eavesdropping. This method isslower than plain HTTP, and can only be proxied with Python 2.7 or newerUse HTTPS protocol [Yes]: noOn some networks all internet access must go through a HTTP proxy.Try setting it here if you can't connect to S3 directlyHTTP Proxy server name:New settings:Access Key: YC57G2R9XJIMNG825UQPSecret Key: PEDoHiveAUhEciOeeKFYLkaArlhtSy5mBMfWhWesDefault Region: USS3 Endpoint: 192.168.123.172:7480DNS-style bucket+hostname:port template for accessing a bucket: 192.168.123.172:7480/%(bucket)Encryption password:Path to GPG program: /usr/bin/gpgUse HTTPS protocol: FalseHTTP Proxy server name:HTTP Proxy server port: 0Test access with supplied credentials? [Y/n]Please wait, attempting to list all buckets...Success. Your access key and secret key worked fine :-)Now verifying that encryption works...Not configured. Never mind.Save settings? [y/N] yConfiguration saved to '/root/.s3cfg'
生产了s3cf配置文件,如果哪些设置有错误,也可以直接编辑该配置文件。
#vi /root/.s3cfg[default]access_key = YC57G2R9XJIMNG825UQPaccess_token = PEDoHiveAUhEciOeeKFYLkaArlhtSy5mBMfWhWescloudfront_host = 192.168.123.172:7480host_base = 192.168.123.172:7480host_bucket = 192.168.123.172:7480/%(bucket)
5.2:测试s3接口访问
测试 S3 访问。
#yum install python-boto
新建 Python 脚本。
#vi s3test.py
添加下面的内容到该文件中。
#!/usr/bin/python# -*- coding:utf-8 -*-import boto.s3.connectionaccess_key = 'YC57G2R9XJIMNG825UQP'secret_key ='PEDoHiveAUhEciOeeKFYLkaArlhtSy5mBMfWhWes'conn = boto.connect_s3(aws_access_key_id=access_key,aws_secret_access_key=secret_key,host='ceph-node1',port=7480,is_secure=False,calling_format=boto.s3.connection.OrdinaryCallingFormat(),)bucket = conn.create_bucket('my-new-bucket')for bucket in conn.get_all_buckets():print"{name} {created}".format(name=bucket.name,created=bucket.creation_date,)
将 host替换为你配置了网关服务的主机的主机名,比如 gateway host.将access_key替换为正确的值,将secret_key替换为正确的值。
运行这个脚本
#python s3test.py
输出类似下面的内容,说明使用s3接口连接rgw对象成功。
# python s3test.pyceph-rgw 2020-05-03T08:29:44.240Zmy-new-bucket 2020-03-14T10:21:03.179Znew-bucket-510d1576 2020-03-16T13:20:59.151Znew-bucket-6c11b821 2020-03-14T10:37:11.406Znextcloud 2020-05-03T04:32:28.547Zrgw-test 2020-05-02T13:17:02.184Ztest 2020-03-12T14:55:47.827Ztest3 2020-03-14T10:45:54.065Ztest4 2020-03-14T10:46:03.714Ztest5 2020-03-14T10:46:37.318Ztest6 2020-03-14T10:47:46.755Ztest7 2020-03-14T10:51:50.559Ztest8 2020-03-14T10:53:02.755Ztest9 2020-05-02T14:15:04.193Z
5.3:使用s3cmd操作rgw
使用s3cmd创建桶。
# s3cmd mb s3://ceph-rgwBucket 's3://ceph-rgw/' created
上传文件到rgw对象存储。
#s3cmd put prometheus-2.16.0.linux-amd64.tar.gz s3://ceph-rgwWARNING: Could not refresh roleWARNING: Could not refresh roleWARNING: Could not refresh roleupload: 'prometheus-2.16.0.linux-amd64.tar.gz' -> 's3://ceph-rgw/prometheus-2.16.0.linux-amd64.tar.gz' [part 1 of 4, 15MB] [1 of 1]15728640 of 15728640 100% in 0s 29.05 MB/s doneWARNING: Could not refresh roleupload: 'prometheus-2.16.0.linux-amd64.tar.gz' -> 's3://ceph-rgw/prometheus-2.16.0.linux-amd64.tar.gz' [part 2 of 4, 15MB] [1 of 1]15728640 of 15728640 100% in 0s 36.41 MB/s doneWARNING: Could not refresh roleupload: 'prometheus-2.16.0.linux-amd64.tar.gz' -> 's3://ceph-rgw/prometheus-2.16.0.linux-amd64.tar.gz' [part 3 of 4, 15MB] [1 of 1]15728640 of 15728640 100% in 0s 36.27 MB/s doneWARNING: Could not refresh roleupload: 'prometheus-2.16.0.linux-amd64.tar.gz' -> 's3://ceph-rgw/prometheus-2.16.0.linux-amd64.tar.gz' [part 4 of 4, 11MB] [1 of 1]12422595 of 12422595 100% in 0s 31.92 MB/s doneWARNING: Could not refresh role
查看桶中的对象。
#s3cmd ls s3://ceph-rgwWARNING: Could not refresh roleWARNING: Could not refresh role2020-05-03 08:48 59608515 s3://ceph-rgw/prometheus-2.16.0.linux-amd64.tar.gz
下载对象
#s3cmd get s3://ceph-rgw/prometheus-2.16.0.linux-amd64.tar.gz prometheus-2.16.0.linux-amd64.tar.gz.bakdownload: 's3://ceph-rgw/prometheus-2.16.0.linux-amd64.tar.gz' -> 'prometheus-2.16.0.linux-amd64.tar.gz.bak' [1 of 1]59608515 of 59608515 100% in 0s 142.89 MB/s done
删除桶中的对象,可以使用rm或del命令。
#s3cmd rm s3://ceph-rgw/prometheus-2.16.0.linux-amd64.tar.gzWARNING: Could not refresh roleWARNING: Could not refresh roledelete: 's3://ceph-rgw/prometheus-2.16.0.linux-amd64.tar.gz'
查看对象占用空间大小
#s3cmd du -H s3://ceph-rgw/prometheus-2.16.0.linux-amd64.tar.gz56.8471097946M 1 objects s3://ceph-rgw/prometheus-2.16.0.linux-amd64.tar.gz
更多命令请参考s3cmd帮助。
使用s3fs访问RGW
S3fs是基于FUSE的文件系统,允许Linux和Mac Os X 挂载S3的存储桶在本地文件系统,S3fs能够保持对象原来的格式,S3FS是POSIX的大子集,包括读/写文件、目录、符号链接、模式、uid/gid和扩展属性,与AmazonS3、Google云存储和其他基于S3的对象存储兼容。
对于原来使用本地目录访问数据的应用程序,比如使用本地磁盘或网络共享盘保存数据的应用系统,如果用户希望把数据放到S3上,则需要修改数据的访问方式,比如修改为使用S3 SDK 或CLI访问S3中存储的数据。为了让用户原来的应用系统能在不做修改的情况下直接使用 S3服务,需要把S3存储桶作为目录挂载到用户服务器的本地操作系统上。常用的挂载工具有S3fs和SubCloud等,本文主要演示s3fs使用。
S3fs是基于FUSE的文件系统,允许Linux和Mac Os X 挂载S3的存储桶在本地文件系统,S3fs能够保持对象原来的格式。
温馨提醒:
利用S3fs可以方便的把S3存储桶挂载在用户本地操作系统目录中,但是由于S3fs实际上是依托于Amazon S3服务提供的目录访问接口,所以不能简单的把S3fs挂载的目录和本地操作系统目录等同使用。用户使用S3f3挂载S3存储桶和直接访问S3服务有类似的使用场景。适用于对不同大小文件对象的一次保存(上传),多次读取(下载)。不适用于对已保存文件经常做随机修改,因为每次在本地修改并保存文件内容都会导致S3fs上传新的文件到Amazon S3去替换原来的文件。从访问性能上来说,通过操作系统目录方式间接访问Amazon S3存储服务的性能不如直接使用SDK或CLI接口访问效率高。
安装s3fs
#yum install epel-release#yum install s3fs-fuse
查看版本
#s3fs --versionAmazon Simple Storage Service File System V1.86 (commit:unknown) with OpenSSLCopyright (C) 2010 Randy RizunLicense GPL2: GNU GPL version 2This is free software: you are free to change and redistribute it.There is NO WARRANTY, to the extent permitted by law.
配置密钥
密钥文件可以存放在以下两个地址:
-
用户家目录下./passwd-s3fs((i.e. ${HOME}/.passwd-s3fs))
-
/etc/passwd-s3fs 文件
命令格式:s3fs [S3存储桶名] [本地目录名] -o passwd_file=[密钥文件名] -o url=[RGW地址] -o use_path_request_style
生成挂载目录,该目录必需为空目录。
#mkdir /home/s3fs
使用s3fs挂载桶
#s3fs ceph-rgw /home/s3fs -o passwd_file=~/.passwd-s3fs -o use_path_request_style -o url=http://192.168.123.172:7480
-
url(必需):对象网关服务ip以及端口号
-
passwd_file:如果密钥文件在以上提到的两个地方存储,则不用此选项
-
use_path_request_style(必需):使用路径访问方式,否者不能正常挂载桶。
查看是否挂载成功
#df -hFilesystem Size Used Avail Use% Mounted ondevtmpfs 967M 0 967M 0% /devtmpfs 981M 0 981M 0% /dev/shmtmpfs 981M 8.8M 972M 1% /runtmpfs 981M 0 981M 0% /sys/fs/cgroup/dev/mapper/centos-root 17G 2.1G 15G 12% //dev/sda1 1014M 176M 839M 18% /boottmpfs 981M 24K 981M 1% /var/lib/ceph/osd/ceph-8tmpfs 981M 24K 981M 1% /var/lib/ceph/osd/ceph-4tmpfs 981M 24K 981M 1% /var/lib/ceph/osd/ceph-1tmpfs 981M 24K 981M 1% /var/lib/ceph/osd/ceph-9tmpfs 197M 0 197M 0% /run/user/0s3fs 256T 0 256T 0% /home/s3fs
查看目录内容
#cd /home/s3fs/# lsprometheus-2.16.0.linux-amd64.tar.gz
开机自动挂载
添加如下内容到fstab文件中。
#vi /etc/fstabs3fs#ceph-rgw /home/s3fs fuse _netdev,allow_other,use_path_request_style,url=http://192.168.123.172:7480 0 0
-o allow_other参数用于设置挂载目录可以被任意登陆服务器的用户使用,且可以将该挂载目录用于创建NFS/SMB共享。
卸载目录
#umount /home/s3fs/
其它命令请参考s3fs帮助。
利用S3fs可以把共享的 S3存储桶直接挂载在用户服务器本地目录下,应用不需要做修改就可以直接使用S3存储服务,这种方式可以作为临时解决方案将传统应用快速迁移到RGW平台,然后逐步调整S3数据访问实现方式,最终修改为使用SDK或CLI方式高效并更加安全地访问S3存储服务。
使用S3 Browser访问RGW
打开s3 browser,点击"add new account"。
输入以下内容,注意签名版本为V4。
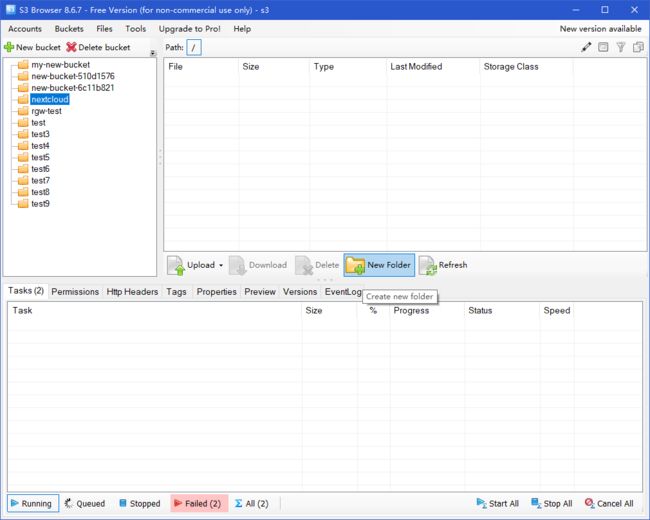
查看rgw对象存储中所有的桶。
使用swift接口操作RGW
安装swift命令行工具,配置swift安装源,因为swift是openstack一个组件,所以此处配置为openstack源,当然也有直接安装swift的命令,不用配置openstack源,不过本人没有使用那个方法安装成功,本文还是使用配置OpenStack源的方法。
#vi openstack.repo[openstack]name=openstackbaseurl=https://mirrors.cloud.tencent.com/centos/7.7.1908/cloud/x86_64/openstack-train/gpgcheck=0gpgkey=file:///etc/pki/rpm-gpg/RPM-GPG-KEY-CentOS-7
安装swift命令工具。
#yum install python2-swiftclient
查看swiftclient版本。
#swift --versionpython-swiftclient 3.8.1
查看子用户名称和密钥。
#radosgw-admin user info --uid testuser["user-rgw","rgw","admin","test10","test","testuser"]#radosgw-admin user info --uid testuser................................................................................"swift_keys": [{"user": "testuser:swift","secret_key": "yahhi4lK5eJIw0cMg0cSm1ylRcncbAEGzQoximrw"}],..................................................................................
使用swift命令查看rgw对象存储状态。
#swift -A http://192.168.123.172:7480/auth/v1.0 -U testuser:swift -K "yahhi4lK5eJIw0cMg0cSm1ylRcncbAEGzQoximrw" statAccount: v1Containers: 0Objects: 0Bytes: 0Objects in policy "default-placement-bytes": 0Bytes in policy "default-placement-bytes": 0Containers in policy "default-placement": 0Objects in policy "default-placement": 0Bytes in policy "default-placement": 0Accept-Ranges: bytesConnection: Keep-AliveX-Timestamp: 1588493556.96500X-Account-Bytes-Used-Actual: 0X-Trans-Id: tx0000000000000000003c8-005eae7cf4-f2b7f-defaultContent-Type: text/plain; charset=utf-8X-Openstack-Request-Id: tx0000000000000000003c8-005eae7cf4-f2b7f-default
但上面每次需要输入很长的命令,所以可以通过设置环境变量减少每次输入的命令,当然想要永久生效需要把以下内容存储在用户的环境变量文件中,如.bashrc文件中。
把下面的USER和KEY替换成实际的值。
#export ST_AUTH=http://production01.acme.com/auth/v1.0export ST_USER=user01export ST_KEY=password
现在就可以通过简短命令操作对象存储了。
创建桶
#swift post bucket
上传文件到桶中
创建桶并上传文件到rgw桶中
#swift upload bucket ceph-iscsi-config-2.7-1.el7.noarch.rpm#swift list bucketceph-iscsi-config-2.7-1.el7.noarch.rpm
温馨提醒:
upload命令上传文件到指定的桶中,如果存在桶名称则直接上传到指定的桶中,如果没有存在桶名称,则新建桶并上传对象到此桶中
查看指定桶中的对象,不加桶名称即查看所有。
#swift list bucket
从指定桶下载对象
#swift download bucket ceph-iscsi-config-2.7-1.el7.noarch.rpmceph-iscsi-config-2.7-1.el7.noarch.rpm [auth 0.004s, headers 0.008s, total 0.009s, 17.761 MB/s]
查看指定桶中的对象。
#swift stat bucket ceph-iscsi-config-2.7-1.el7.noarch.rpmAccount: v1Container: bucketObject: ceph-iscsi-config-2.7-1.el7.noarch.rpmContent Type: application/x-rpmContent Length: 94632Last Modified: Tue, 05 May 2020 14:42:34 GMTETag: 86f3c320ed3b5c2ea8389710c31b7997Meta Mtime: 1583988649.031517Accept-Ranges: bytesConnection: Keep-AliveX-Timestamp: 1588689754.31758X-Trans-Id: tx0000000000000000000ce-005eb1801f-fc7b1-defaultX-Openstack-Request-Id: tx0000000000000000000ce-005eb1801f-fc7b1-default
删除对象。
#swift delete bucket ceph-iscsi-config-2.7-1.el7.noarch.rpmceph-iscsi-config-2.7-1.el7.noarch.rpm
更多命令请参考swift帮助。
使用CloudBerry 访问RGW
打开cloudberry explorer。
设置账号。
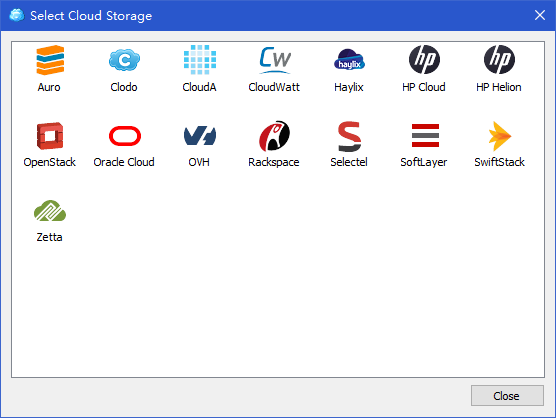
点击增加存储。
按以下内容输入详细,使用第三节创建的testuser:swift子用户以及密钥。
温馨提醒:
注意地址栏中的auth关键字,这个必须要有否者连接不上
注意keystone version中使用的是“do not user”
Nextcloud网盘应用访问Ceph RGW
10.1:nextcloud介绍
上面演示了使用很多图形或命令行工具操作使用RGW对象存储,其实RGW使用最多的还是通过应用程序使用它,本节使用一个网盘应用软件Nextcloud,配置其后端存储使用RGW对象存储,为用户提供网盘应用,用户上传的文件实现是存储在了RGW对象存储中,示意图如下:
10.2:安装nextcloud
为了简化安装步骤,本文使用snap工具安装nextcloud.
配置epel源。
#yum install epel-release
安装snapd工具。
#yum install snapd
配置snapd socket。
#systemctl enable --now snapd.socket
配置软链接
# ln -s /var/lib/snapd/snap /snap
通过snap安装nextcloud。
# snap install nextcloud
查看源已通过snap安装的nextcloud应用。
#snap listName Version Rev Tracking Publisher Notescore 16-2.44.3 9066 stable canonical✓ corenextcloud 18.0.4snap1 20498 stable nextcloud✓ -
snap安装的nextcloud默认使用80端口,输入IP地址打开nextcloud配置界面。
设置用户名和密码,点击完成。
10.3:配置nextcloud
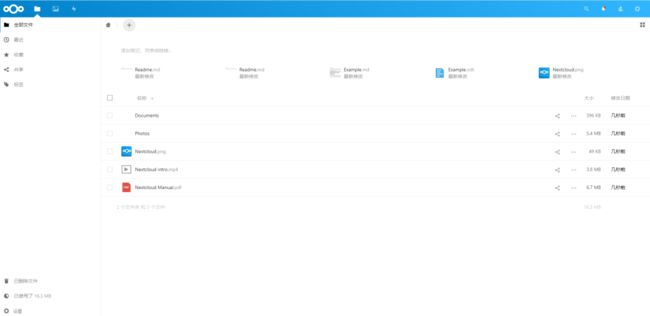
安装完成打开nextcloud使用界面。
配置nextcloud使用rgw存储,点击应用按钮。
在已禁用应用中选择“external storage support",点击启用。
完成后点击设置查看左侧功能菜单出现”外部存储“。
创建nextcloud桶。
# s3cmd mb s3://nextcloudBucket 's3://nextcloud/' created
查看桶。
# s3cmd ls |grep nextcloud2020-05-03 04:32 s3://nextcloud
配置nextcloud使用s3访问rgw对象存储,填写目录名称,并勾选启用路径,当左边出现绿色的图标表示连接成功。
温馨提醒:
启用路径样式后,将使用发出请求http://hostname.domain/bucket。只有这格式的才能对接成功(默认为http://bucket.hostname.domain)。
回到nextcloud界面,看到出现rgw目标,只有上传到该目录的文件才会使用s3接口存储到rgw存储中。
上传文件到rgw目录后,查看对应桶中的对象。
至此nextcloud使用s3对接使用rgw完成,当然nextcloud也支持使用swift接口对接nextcloud,但只能是在OpenStack中安装的swift,不能是单独的swift,因为nextcloud配置swift接口的界面中必须写keystone版本。
当然RGW的使用还不止上文中提到的这些,RGW还有Multisite场景,其涉及的内容比较多。


