使用Docker部署SpringBoot应用并推送至远程仓库(内网和阿里云)
和传统的应用部署方式相比,使用Docker部署应用可以减轻大量工作,甚至可以通过docker-maven插件集编译,打包,构建镜像,推送到远程镜像仓库于一体,然后通过容器化的方式发布应用。
本文主要对使用Docker部署SpringBoot应用并推送至内网和阿里云镜像仓库进行简单总结。
一、环境信息
本文所使用的环境如下:
开发环境:
- 开发工具:idea 2019
- 项目构建工具:maven 3.6.1
- JDK:1.8.0_181
- SpringBoot:2.2.2.RELEASE
部署环境:
- 操作系统:CentOS Linux release 7.6.1810
- Docker:18.09.8
- JDK:1.8.0_212
二、SpringBoot项目
通过maven新建一个名为springboot-docker的项目。
1.pom文件
<project xmlns="http://maven.apache.org/POM/4.0.0"
         xmlns:xsi="http://www.w3.org/2001/XMLSchema-instance"
         xsi:schemaLocation="http://maven.apache.org/POM/4.0.0 http://maven.apache.org/xsd/maven-4.0.0.xsd">
    <modelVersion>4.0.0modelVersion>

    <groupId>com.rtxtitanvgroupId>
    <artifactId>springboot-dockerartifactId>
    <version>1.0.0version>
    <packaging>jarpackaging>

    <name>springboot-dockername>
    <description>使用Docker部署SpringBoot应用并推送至远程仓库(内网和阿里云)description>

    <parent>

        <groupId>org.springframework.bootgroupId>
        <artifactId>spring-boot-starter-parentartifactId>
        <version>2.2.2.RELEASEversion>
        <relativePath/>
    parent>

    <properties>
        <project.build.sourceEncoding>UTF-8project.build.sourceEncoding>
        <project.reporting.outputEncoding>UTF-8project.reporting.outputEncoding>
        <java.version>1.8java.version>
    properties>

    <dependencies>
        <dependency>
            <groupId>org.springframework.bootgroupId>
            <artifactId>spring-boot-starter-webartifactId>
        dependency>
        <dependency>
            <groupId>org.springframework.bootgroupId>
            <artifactId>spring-boot-starter-testartifactId>
            <scope>testscope>
        dependency>
    dependencies>

    <build>
        <plugins>
            <plugin>
                <groupId>org.springframework.bootgroupId>
                <artifactId>spring-boot-maven-pluginartifactId>
            plugin>
        plugins>
    build>
project>
2.主启动类
@RestController
@SpringBootApplication
public class DockerApplication {

    @GetMapping("/")
    public String home() {
        return "Hello Docker World";
    }

    public static void main(String[] args) {
        SpringApplication.run(DockerApplication.class, args);
    }
}
三、手动构建Docker镜像并推送至远程仓库
1.项目打包
点击IDEA左下角Terminal进入命令提示行,进入工程目录,执行mvn clean package命令将项目打包,在项目target目录会生成springboot-docker-1.0.0.jar:

2.Docker构建镜像
在服务器(192.168.221.128)上新建一个目录用于构建镜像:
[root@MSI-PC ~]# mkdir /usr/local/springboot_docker
[root@MSI-PC ~]# cd /usr/local/springboot_docker/
新建一个Dockerfile文件,基础镜像用的是通过Dockerfile构建Docker镜像中构建具有的JDK1.8环境的镜像,Dockerfile内容如下:
FROM jdk1.8/ubuntu:v1.0.0
ENV ARTIFACTID springboot-docker
ENV VERSION 1.0.0
ENV HOME_PATH /work
ADD $ARTIFACTID-$VERSION.jar $HOME_PATH/app.jar
WORKDIR $HOME_PATH
ENTRYPOINT ["java","-jar","app.jar"]
将Dockerfile文件和springboot-docker-1.0.0.jar上传至服务器的/usr/local/springboot_docker目录下,然后构建镜像:
[root@MSI-PC springboot_docker]# docker build -t springboot-docker:1.0.0 .
Sending build context to Docker daemon  17.59MB
Step 1/7 : FROM jdk1.8/ubuntu:v1.0.0
 ---> 5e1253b49d45
Step 2/7 : ENV ARTIFACTID springboot-docker
 ---> Running in 8e333f95000d
Removing intermediate container 8e333f95000d
 ---> b02eb31e7d2e
Step 3/7 : ENV VERSION 1.0.0
 ---> Running in dd122b615bea
Removing intermediate container dd122b615bea
 ---> a1529b04de23
Step 4/7 : ENV HOME_PATH /work
 ---> Running in 44a152482b31
Removing intermediate container 44a152482b31
 ---> a7f6e918932b
Step 5/7 : ADD $ARTIFACTID-$VERSION.jar $HOME_PATH/app.jar
 ---> 2f1da74ee6b8
Step 6/7 : WORKDIR $HOME_PATH
 ---> Running in f7db6cfbd8fb
Removing intermediate container f7db6cfbd8fb
 ---> 12e324149f2b
Step 7/7 : ENTRYPOINT ["java","-jar","app.jar"]
 ---> Running in a2dce7155e15
Removing intermediate container a2dce7155e15
 ---> adc142752827
Successfully built adc142752827
Successfully tagged springboot-docker:1.0.0
镜像构建成功,查看镜像:

3.创建并运行容器
执行以下命令,使用刚刚构建的镜像创建运行一个容器:
docker run -i -t --name=springboot-docker-1 -p 8080:8080 springboot-docker:1.0.0
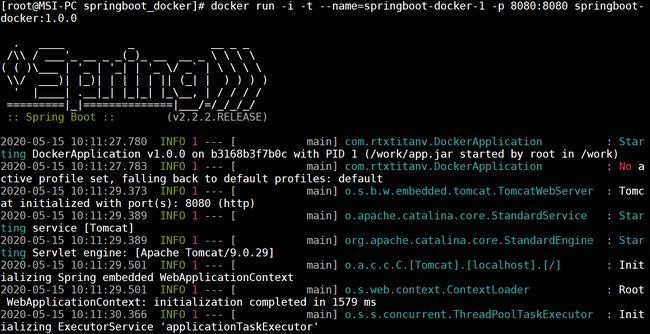
访问http://192.168.221.128:8080/,出现以下结果说明SpringBoot应用部署成功。

4.推送至内网私有镜像仓库
这里使用的是在搭建Docker Registry私有镜像仓库中搭建好的带加密认证的私有镜像仓库。手动打标签后推送到私有镜像仓库:
[root@MSI-PC springboot_docker]# docker tag springboot-docker:1.0.0 docker.domain.com/springboot-docker:1.0.0
[root@MSI-PC springboot_docker]# docker push docker.domain.com/springboot-docker:1.0.0
The push refers to repository [docker.domain.com/springboot-docker]
c6560f0a5701: Pushed
c1397790ba17: Layer already exists
863d3b797f13: Layer already exists
b68cb682fff6: Layer already exists
a719ff84f09e: Layer already exists
0a2c8f50bc93: Layer already exists
baf3be6068d1: Layer already exists
1.0.0: digest: sha256:bbd3cf239d2d2d1d8e40dac453ded530229974536cee59590cf90d7a6244453d size: 1784
然后在另一台服务器(192.168.221.132)拉取刚才推送的镜像,在登录私有镜像仓库之前:
vi /etc/hosts
添加域名解析:
192.168.221.128 docker.domain.com
然后将私有镜像仓库服务器/etc/docker/certs.d/docker.domain.com/ca.crt拷贝到这个需要登录私有镜像仓库的服务器的/etc/docker/certs.d/docker.domain.com/目录下,其中docker.domain.com为私有镜像仓库域名,然后systemctl restart docker重启Docker。然后登录私有镜像仓库,拉取镜像:
[root@MSI-PC ~]# docker login docker.domain.com
Username: rtxtitanv
Password:
WARNING! Your password will be stored unencrypted in /root/.docker/config.json.
Configure a credential helper to remove this warning. See
https://docs.docker.com/engine/reference/commandline/login/#credentials-store

Login Succeeded
[root@MSI-PC ~]# docker pull docker.domain.com/springboot-docker:1.0.0
1.0.0: Pulling from springboot-docker
4278c4af5b59: Pull complete
c05b16b3cc63: Pull complete
4b3e637c5311: Pull complete
b2eb2835f623: Pull complete
bdfee076d3cb: Pull complete
c28471820755: Pull complete
5eda4416f0b0: Pull complete
Digest: sha256:bbd3cf239d2d2d1d8e40dac453ded530229974536cee59590cf90d7a6244453d
Status: Downloaded newer image for docker.domain.com/springboot-docker:1.0.0
使用刚拉取的镜像运行一个容器可以实现快速部署:
[root@MSI-PC ~]# docker run -d --name=springboot-docker-2 -p 8080:8080 docker.domain.com/springboot-docker:1.0.0
b0c7e81ddac50fb90cdfa21e4c843cef6f777b481acd112b70539f77e97f4cd3
访问http://192.168.221.132:8080/,出现以下结果说明SpringBoot应用部署成功。

5.推送至阿里云镜像仓库
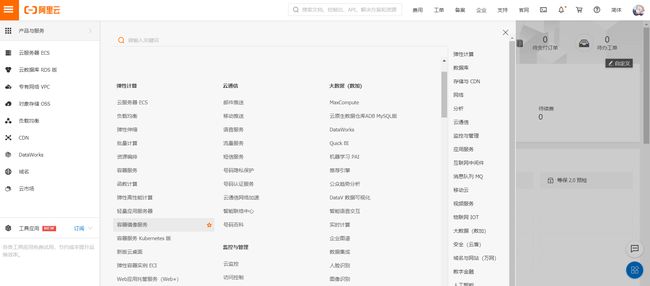
首先创建一个阿里云镜像仓库,先找到容器镜像服务:
创建命名空间:

创建镜像仓库:


左上角选择地区后,就能看见刚才创建的镜像仓库,如下图所示,查看仓库地址可知仓库公网地址为registry.cn-chengdu.aliyuncs.com/rtxtitanv/myimagesrepository。

在服务器(192.168.221.128)中登录阿里云镜像仓库:
[root@MSI-PC springboot_docker]# docker login --username=gtxtitanti registry.cn-chengdu.aliyuncs.com
Password:
WARNING! Your password will be stored unencrypted in /root/.docker/config.json.
Configure a credential helper to remove this warning. See
https://docs.docker.com/engine/reference/commandline/login/#credentials-store

Login Succeeded
将镜像推送到阿里云镜像仓库:
[root@MSI-PC springboot_docker]# docker tag springboot-docker:1.0.0 registry.cn-chengdu.aliyuncs.com/rtxtitanv/myimagesrepository:1.0.0
[root@MSI-PC springboot_docker]# docker push registry.cn-chengdu.aliyuncs.com/rtxtitanv/myimagesrepository:1.0.0
The push refers to repository [registry.cn-chengdu.aliyuncs.com/rtxtitanv/myimagesrepository]
c6560f0a5701: Layer already exists
c1397790ba17: Layer already exists
863d3b797f13: Layer already exists
b68cb682fff6: Layer already exists
a719ff84f09e: Layer already exists
0a2c8f50bc93: Layer already exists
baf3be6068d1: Layer already exists
1.0.0: digest: sha256:bbd3cf239d2d2d1d8e40dac453ded530229974536cee59590cf90d7a6244453d size: 1784
查看镜像版本,发现镜像已经成功推送:

在另一台服务器上登录阿里云镜像仓库拉取刚才推送的镜像:
[root@iZwz94v2sdd3v6zcczsu67Z ~]# docker login --username=gtxtitanti registry.cn-chengdu.aliyuncs.com
Password:
WARNING! Your password will be stored unencrypted in /root/.docker/config.json.
Configure a credential helper to remove this warning. See
https://docs.docker.com/engine/reference/commandline/login/#credentials-store

Login Succeeded
[root@iZwz94v2sdd3v6zcczsu67Z ~]# docker pull registry.cn-chengdu.aliyuncs.com/rtxtitanv/myimagesrepository:1.0.0
1.0.0: Pulling from rtxtitanv/myimagesrepository
4278c4af5b59: Already exists
c05b16b3cc63: Already exists
4b3e637c5311: Already exists
b2eb2835f623: Already exists
bdfee076d3cb: Pull complete
c28471820755: Pull complete
5eda4416f0b0: Pull complete
Digest: sha256:bbd3cf239d2d2d1d8e40dac453ded530229974536cee59590cf90d7a6244453d
Status: Downloaded newer image for registry.cn-chengdu.aliyuncs.com/rtxtitanv/myimagesrepository:1.0.0
registry.cn-chengdu.aliyuncs.com/rtxtitanv/myimagesrepository:1.0.0
创建运行容器可以实现快速部署,访问http://服务器ip:8080/可以得到与之前一样的结果。
[root@iZwz94v2sdd3v6zcczsu67Z ~]# docker run -d --name=springboot-docker-3 -p 8080:8080 registry.cn-chengdu.aliyuncs.com/rtxtitanv/myimagesrepository:1.0.0
e06ed9a01ab65f99baa38edea23866254c32448ad8c5e320f1792b0ee4c20839
四、mvn构建Docker镜像
通过docker-maven-plugin插件可以构建应用并打包成docker镜像,推送到远程镜像仓库,使应用部署变得更加简便。docker-maven-plugin插件构建镜像可以通过指定Dockerfile和参数两种方式,由于在本地开发环境使用mvn命令构建,需先在服务器中开启Docker远程api端口。
1.Docker开启远程api端口
在服务器(192.168.221.128)中使用vi编辑器打开/lib/systemd/system/docker.service文件:
vi /lib/systemd/system/docker.service
在ExecStart=/usr/bin/dockerd后面添加:
-H tcp://0.0.0.0:2375 -H unix:///var/run/docker.sock

刷新配置文件:
systemctl daemon-reload
重启docker:
systemctl restart docker
注意这种配置方式只适用于开发和学习,在公共网络中不要这样配置,容易引发安全问题。
2.指定Dockerfile的方式构建
在构建之前,首先将之前手动构建的镜像和容器都删除。docker-maven-plugin插件内容如下:
            <plugin>
                <groupId>com.spotifygroupId>
                <artifactId>docker-maven-pluginartifactId>
                <version>1.0.0version>
                <configuration>

                    <forceTags>trueforceTags>

                    <dockerHost>http://192.168.221.128:2375dockerHost>

                    <dockerDirectory>${project.basedir}/src/main/dockerdockerDirectory>

                    <imageName>${project.artifactId}:${project.version}imageName>
                    <resources>

                        <resource>

                            <targetPath>/targetPath>

                            <directory>${project.build.directory}directory>

                            <include>${project.build.finalName}.jarinclude>
                        resource>
                    resources>
                configuration>
            plugin>
在/src/main/docker下编写Dockerfile文件:
FROM jdk1.8/ubuntu:v1.0.0
ENV ARTIFACTID springboot-docker
ENV VERSION 1.0.0
ENV HOME_PATH /work
ADD $ARTIFACTID-$VERSION.jar $HOME_PATH/app.jar
WORKDIR $HOME_PATH
ENTRYPOINT ["java","-jar","app.jar"]
执行mvn clean package docker:build构建镜像,执行成功后控制台会输出如下信息:
[INFO] --- docker-maven-plugin:1.0.0:build (default-cli) @ springboot-docker ---
[INFO] Using authentication suppliers: [ConfigFileRegistryAuthSupplier]
[INFO] Copying E:\software\DevelopmentTool\IntelliJ IDEA Space\springboot-learning\springboot2.x-learning\springboot-docke
r\target\springboot-docker-1.0.0.jar -> E:\software\DevelopmentTool\IntelliJ IDEA Space\springboot-learning\springboot2.x-
learning\springboot-docker\target\docker\springboot-docker-1.0.0.jar
[INFO] Copying E:\software\DevelopmentTool\IntelliJ IDEA Space\springboot-learning\springboot2.x-learning\springboot-docke
r\src\main\docker\Dockerfile -> E:\software\DevelopmentTool\IntelliJ IDEA Space\springboot-learning\springboot2.x-learning
\springboot-docker\target\docker\Dockerfile
[INFO] Building image springboot-docker:1.0.0
Step 1/7 : FROM jdk1.8/ubuntu:v1.0.0

 ---> 5e1253b49d45
Step 2/7 : ENV ARTIFACTID springboot-docker

 ---> Running in 0fbcbf836c2f
Removing intermediate container 0fbcbf836c2f
 ---> 58513cd79791
Step 3/7 : ENV VERSION 1.0.0

 ---> Running in f0ed6e98121a
Removing intermediate container f0ed6e98121a
 ---> 6e2ce3521e07
Step 4/7 : ENV HOME_PATH /work

 ---> Running in 1fbfda2988b0
Removing intermediate container 1fbfda2988b0
 ---> 0f3274f5573b
Step 5/7 : ADD $ARTIFACTID-$VERSION.jar $HOME_PATH/app.jar

 ---> cfa334bf9ec9
Step 6/7 : WORKDIR $HOME_PATH

 ---> Running in 4a9826b97054
Removing intermediate container 4a9826b97054
 ---> 9beed53cb471
Step 7/7 : ENTRYPOINT ["java","-jar","app.jar"]

 ---> Running in bae53b162a9d
Removing intermediate container bae53b162a9d
 ---> 12bdfeebd00a
ProgressMessage{id=null, status=null, stream=null, error=null, progress=null, progressDetail=null}
Successfully built 12bdfeebd00a
Successfully tagged springboot-docker:1.0.0
[INFO] Built springboot-docker:1.0.0
[INFO] ------------------------------------------------------------------------
[INFO] BUILD SUCCESS
[INFO] ------------------------------------------------------------------------
[INFO] Total time:  19.384 s
[INFO] Finished at: 2020-05-15T19:53:51+08:00
[INFO] ------------------------------------------------------------------------
查看镜像,发现镜像已经成功构建在服务器中:

使用刚构建的镜像运行一个容器:
[root@MSI-PC springboot_docker]# docker run -d --name=springboot-docker-4 -p 8080:8080 springboot-docker:1.0.0
c3ef8fae1101ba52355f584d2888085520f924a1ead748fb78d8e08460e6c82a
访问http://192.168.221.128:8080/,出现以下结果说明SpringBoot应用部署成功。

3.指定参数的方式构建
为了与Dockerfile的方式构建区分,将项目的版本暂时改为了2.0.0。docker-maven-plugin插件内容如下:
            <plugin>
                <groupId>com.spotifygroupId>
                <artifactId>docker-maven-pluginartifactId>
                <version>1.0.0version>
                <configuration>

                    <forceTags>trueforceTags>

                    <dockerHost>http://192.168.221.128:2375dockerHost>


                    <imageName>${project.artifactId}:${project.version}imageName>

                    <baseImage>jdk1.8/ubuntu:v1.0.0baseImage>

                    <entryPoint>["java", "-jar", "/${project.build.finalName}.jar"]entryPoint>
                    <resources>

                        <resource>

                            <targetPath>/targetPath>

                            <directory>${project.build.directory}directory>

                            <include>${project.build.finalName}.jarinclude>
                        resource>
                    resources>
                configuration>
            plugin>
执行mvn clean package docker:build构建镜像,执行成功后控制台会输出如下信息:
[INFO] --- maven-jar-plugin:3.1.2:jar (default-jar) @ springboot-docker ---
[INFO] Building jar: E:\software\DevelopmentTool\IntelliJ IDEA Space\springboot-learning\springboot2.x-learning\springboot
-docker\target\springboot-docker-2.0.0.jar
[INFO]
[INFO] --- spring-boot-maven-plugin:2.2.2.RELEASE:repackage (repackage) @ springboot-docker ---
[INFO] Replacing main artifact with repackaged archive
[INFO]
[INFO] --- docker-maven-plugin:1.0.0:build (default-cli) @ springboot-docker ---
[INFO] Using authentication suppliers: [ConfigFileRegistryAuthSupplier]
[INFO] Copying E:\software\DevelopmentTool\IntelliJ IDEA Space\springboot-learning\springboot2.x-learning\springboot-docke
r\target\springboot-docker-2.0.0.jar -> E:\software\DevelopmentTool\IntelliJ IDEA Space\springboot-learning\springboot2.x-
learning\springboot-docker\target\docker\springboot-docker-2.0.0.jar
[INFO] Building image springboot-docker:2.0.0
Step 1/3 : FROM jdk1.8/ubuntu:v1.0.0

 ---> 5e1253b49d45
Step 2/3 : ADD /springboot-docker-2.0.0.jar //

 ---> 280659262e12
Step 3/3 : ENTRYPOINT ["java", "-jar", "/springboot-docker-2.0.0.jar"]

 ---> Running in d108e5019d5b
Removing intermediate container d108e5019d5b
 ---> c49e6466c718
ProgressMessage{id=null, status=null, stream=null, error=null, progress=null, progressDetail=null}
Successfully built c49e6466c718
Successfully tagged springboot-docker:2.0.0
[INFO] Built springboot-docker:2.0.0
[INFO] ------------------------------------------------------------------------
[INFO] BUILD SUCCESS
[INFO] ------------------------------------------------------------------------
[INFO] Total time:  8.609 s
[INFO] Finished at: 2020-05-15T20:00:05+08:00
[INFO] ------------------------------------------------------------------------
查看镜像,发现镜像已经成功构建在服务器中:

使用刚构建的镜像运行一个容器:
[root@MSI-PC springboot_docker]# docker run -d --name=springboot-docker-5 -p 8081:8080 springboot-docker:2.0.0
84191d3c41461550cd1496d3122fc65bed52670101e7b5b7c16560cbb52e465e
访问http://192.168.221.128:8081/,出现以下结果说明SpringBoot应用部署成功。

五、mvn构建镜像并推送至远程仓库
1.推送至内网私有镜像仓库
为了与之前手动推送的镜像区分,在服务器(192.168.221.128)中删除之前的私有镜像仓库重新创建一个:
[root@MSI-PC springboot_docker]# docker rm -f myregistry
myregistry
[root@MSI-PC springboot_docker]# docker run -d \
>   --name myregistry \
>   --restart=always \
>   -v /usr/local/docker/certs:/certs \
>   -v /usr/local/docker/auth:/auth \
>   -v /usr/local/docker/myregistry_tls_auth:/var/lib/registry \
>   -e REGISTRY_HTTP_ADDR=0.0.0.0:443 \
>   -e REGISTRY_HTTP_TLS_CERTIFICATE=/certs/myrepository.crt \
>   -e REGISTRY_HTTP_TLS_KEY=/certs/myrepository.key \
>   -e "REGISTRY_AUTH=htpasswd" \
>   -e "REGISTRY_AUTH_HTPASSWD_REALM=Registry Realm" \
>   -e REGISTRY_AUTH_HTPASSWD_PATH=/auth/htpasswd \
>   -p 443:443 registry:2.7
508d918d64e15a7a8947784a3bbec16ea9a889400e616d03c4ef51d62d2d4b34
由于私有镜像仓库带认证,需要修改maven的配置文件settings.xml,在
  <servers>
    <server>

      <id>docker.domain.comid>

      <username>rtxtitanvusername>

      <password>123456password>
    server>
  servers>
这里采用指定Dockerfile方式构建镜像,docker-maven-plugin插件内容如下:
            <plugin>
                <groupId>com.spotifygroupId>
                <artifactId>docker-maven-pluginartifactId>
                <version>1.0.0version>
                <configuration>

                    <serverId>docker.domain.comserverId>

                    <registryUrl>docker.domain.comregistryUrl>

                    <forceTags>trueforceTags>

                    <pushImage>truepushImage>

                    <dockerHost>http://192.168.221.128:2375dockerHost>

                    <dockerDirectory>${project.basedir}/src/main/dockerdockerDirectory>

                    <imageName>docker.domain.com/${project.artifactId}:${project.version}imageName>
                    <resources>

                        <resource>

                            <targetPath>/targetPath>

                            <directory>${project.build.directory}directory>

                            <include>${project.build.finalName}.jarinclude>
                        resource>
                    resources>
                configuration>
            plugin>
执行mvn clean package docker:build构建镜像并推送至私有镜像仓库,如果不使用-DpushImage参数才会执行推送。执行成功后控制台会输出如下信息:
[INFO] --- docker-maven-plugin:1.0.0:build (default-cli) @ springboot-docker ---
[INFO] Using authentication suppliers: [ConfigFileRegistryAuthSupplier, NoOpRegistryAuthSupplier]
[INFO] Copying E:\software\DevelopmentTool\IntelliJ IDEA Space\springboot-learning\springboot2.x-learning\springboot-docke
r\target\springboot-docker-1.0.0.jar -> E:\software\DevelopmentTool\IntelliJ IDEA Space\springboot-learning\springboot2.x-
learning\springboot-docker\target\docker\springboot-docker-1.0.0.jar
[INFO] Copying E:\software\DevelopmentTool\IntelliJ IDEA Space\springboot-learning\springboot2.x-learning\springboot-docke
r\src\main\docker\Dockerfile -> E:\software\DevelopmentTool\IntelliJ IDEA Space\springboot-learning\springboot2.x-learning
\springboot-docker\target\docker\Dockerfile
[INFO] Building image docker.domain.com/springboot-docker:1.0.0
Step 1/7 : FROM jdk1.8/ubuntu:v1.0.0

 ---> 5e1253b49d45
Step 2/7 : ENV ARTIFACTID springboot-docker

 ---> Using cache
 ---> 58513cd79791
Step 3/7 : ENV VERSION 1.0.0

 ---> Using cache
 ---> 6e2ce3521e07
Step 4/7 : ENV HOME_PATH /work

 ---> Using cache
 ---> 0f3274f5573b
Step 5/7 : ADD $ARTIFACTID-$VERSION.jar $HOME_PATH/app.jar

 ---> c1cfcd8f45db
Step 6/7 : WORKDIR $HOME_PATH

 ---> Running in a18fcd3845a9
Removing intermediate container a18fcd3845a9
 ---> b2585bb2c0c4
Step 7/7 : ENTRYPOINT ["java","-jar","app.jar"]

 ---> Running in 33397fdb7483
Removing intermediate container 33397fdb7483
 ---> 51facc097ed0
ProgressMessage{id=null, status=null, stream=null, error=null, progress=null, progressDetail=null}
Successfully built 51facc097ed0
Successfully tagged docker.domain.com/springboot-docker:1.0.0
[INFO] Built docker.domain.com/springboot-docker:1.0.0
[INFO] Pushing docker.domain.com/springboot-docker:1.0.0
The push refers to repository [docker.domain.com/springboot-docker]
6661c14ec8b6: Pushed
c1397790ba17: Pushed
863d3b797f13: Pushed
b68cb682fff6: Pushed
a719ff84f09e: Pushed
0a2c8f50bc93: Pushed
baf3be6068d1: Pushed
1.0.0: digest: sha256:e4640cf0fbbb41443a6ede15ef459632d442db4ace9a767bb075d07c21dd6de9 size: 1784
null: null
[INFO] ------------------------------------------------------------------------
[INFO] BUILD SUCCESS
[INFO] ------------------------------------------------------------------------
[INFO] Total time:  33.908 s
[INFO] Finished at: 2020-05-15T20:47:17+08:00
[INFO] ------------------------------------------------------------------------
查看镜像,发现镜像已经成功构建在服务器中:

然后在另一台服务器(192.168.221.132)拉取刚才推送的镜像,由于之前登录过所以不用再登录,没登录需要先登录:
[root@MSI-PC ~]# docker pull docker.domain.com/springboot-docker:1.0.0
1.0.0: Pulling from springboot-docker
4278c4af5b59: Pull complete
c05b16b3cc63: Pull complete
4b3e637c5311: Pull complete
b2eb2835f623: Pull complete
bdfee076d3cb: Pull complete
c28471820755: Pull complete
efda2e68302c: Pull complete
Digest: sha256:e4640cf0fbbb41443a6ede15ef459632d442db4ace9a767bb075d07c21dd6de9
Status: Downloaded newer image for docker.domain.com/springboot-docker:1.0.0
使用刚拉取的镜像运行一个容器:
[root@MSI-PC ~]# docker run -d --name=springboot-docker-6 -p 8090:8080 docker.domain.com/springboot-docker:1.0.0
aa9f9f38062d19a9d8cc7da47015b7485c6961dae0842705e702279276622b5c
访问http://192.168.221.132:8090/,出现以下结果说明SpringBoot应用部署成功。

2.推送至阿里云镜像仓库
先将之前手动推送到阿里云仓库的镜像删除,以及之前从阿里云仓库拉取的镜像。然后修改maven的配置文件settings.xml,在
  <servers>
    <server>

      <id>docker-aliyunid>

      <username>xxxxxxusername>

      <password>******password>
      <configuration>

        <email>******@gmail.comemail>
      configuration>
    server>
  servers>
为了便于演示,删除之前构建的镜像仓库重新构建一个仓库名与项目名相同的仓库,仓库地址为registry.cn-chengdu.aliyuncs.com/rtxtitanv/springboot-docker,然后添加属性
<properties>
    <docker.repostory>registry.cn-chengdu.aliyuncs.comdocker.repostory>
    <docker.registry.name>rtxtitanvdocker.registry.name>
properties>
这里采用指定Dockerfile方式构建镜像,docker-maven-plugin插件内容如下:
            <plugin>
                <groupId>com.spotifygroupId>
                <artifactId>docker-maven-pluginartifactId>
                <version>1.0.0version>
                <configuration>

                    <serverId>docker-aliyunserverId>

                    <registryUrl>${docker.repostory}registryUrl>

                    <forceTags>trueforceTags>

                    <pushImage>truepushImage>

                    <dockerHost>http://192.168.221.128:2375dockerHost>

                    <dockerDirectory>${project.basedir}/src/main/dockerdockerDirectory>

                    <imageName>${docker.repostory}/${docker.registry.name}/${project.artifactId}:${project.version}imageName>
                    <resources>

                        <resource>

                            <targetPath>/targetPath>

                            <directory>${project.build.directory}directory>

                            <include>${project.build.finalName}.jarinclude>
                        resource>
                    resources>
                configuration>
            plugin>
执行mvn clean package docker:build构建镜像并推送至阿里云镜像仓库,执行成功后控制台会输出如下信息:
[INFO] --- docker-maven-plugin:1.0.0:build (default-cli) @ springboot-docker ---
[INFO] Using authentication suppliers: [ConfigFileRegistryAuthSupplier, NoOpRegistryAuthSupplier]
[INFO] Copying E:\software\DevelopmentTool\IntelliJ IDEA Space\springboot-learning\springboot2.x-learning\springboot-docke
r\target\springboot-docker-1.0.0.jar -> E:\software\DevelopmentTool\IntelliJ IDEA Space\springboot-learning\springboot2.x-
learning\springboot-docker\target\docker\springboot-docker-1.0.0.jar
[INFO] Copying E:\software\DevelopmentTool\IntelliJ IDEA Space\springboot-learning\springboot2.x-learning\springboot-docke
r\src\main\docker\Dockerfile -> E:\software\DevelopmentTool\IntelliJ IDEA Space\springboot-learning\springboot2.x-learning
\springboot-docker\target\docker\Dockerfile
[INFO] Building image registry.cn-chengdu.aliyuncs.com/rtxtitanv/springboot-docker:1.0.0
Step 1/7 : FROM jdk1.8/ubuntu:v1.0.0

 ---> 5e1253b49d45
Step 2/7 : ENV ARTIFACTID springboot-docker

 ---> Using cache
 ---> 58513cd79791
Step 3/7 : ENV VERSION 1.0.0

 ---> Using cache
 ---> 6e2ce3521e07
Step 4/7 : ENV HOME_PATH /work

 ---> Using cache
 ---> 0f3274f5573b
Step 5/7 : ADD $ARTIFACTID-$VERSION.jar $HOME_PATH/app.jar

 ---> d89138cbe5e1
Step 6/7 : WORKDIR $HOME_PATH

 ---> Running in 4246cd987306
Removing intermediate container 4246cd987306
 ---> 69913b3e4f72
Step 7/7 : ENTRYPOINT ["java","-jar","app.jar"]

 ---> Running in 0b3c6853fdf4
Removing intermediate container 0b3c6853fdf4
 ---> fcf2efee343c
ProgressMessage{id=null, status=null, stream=null, error=null, progress=null, progressDetail=null}
Successfully built fcf2efee343c
Successfully tagged registry.cn-chengdu.aliyuncs.com/rtxtitanv/springboot-docker:1.0.0
[INFO] Built registry.cn-chengdu.aliyuncs.com/rtxtitanv/springboot-docker:1.0.0
[INFO] Pushing registry.cn-chengdu.aliyuncs.com/rtxtitanv/springboot-docker:1.0.0
The push refers to repository [registry.cn-chengdu.aliyuncs.com/rtxtitanv/springboot-docker]
3c6a892b2697: Pushed
c1397790ba17: Layer already exists
863d3b797f13: Layer already exists
b68cb682fff6: Layer already exists
a719ff84f09e: Layer already exists
0a2c8f50bc93: Layer already exists
baf3be6068d1: Layer already exists
1.0.0: digest: sha256:0f0976f70ffbfc25edf85648cb5ae17cb2fe7b984a931c11e2f1206b14d23292 size: 1784
null: null
[INFO] ------------------------------------------------------------------------
[INFO] BUILD SUCCESS
[INFO] ------------------------------------------------------------------------
[INFO] Total time:  25.033 s
[INFO] Finished at: 2020-05-15T22:01:48+08:00
[INFO] ------------------------------------------------------------------------
查看镜像,发现镜像已经成功构建在服务器中:

阿里云镜像库中查看镜像版本,发现镜像已经成功推送:

然后在另一台服务器(192.168.221.132)登录阿里云镜像仓库拉取刚才推送的镜像:
[root@MSI-PC ~]# docker login --username=gtxtitanti registry.cn-chengdu.aliyuncs.com
Password:
WARNING! Your password will be stored unencrypted in /root/.docker/config.json.
Configure a credential helper to remove this warning. See
https://docs.docker.com/engine/reference/commandline/login/#credentials-store

Login Succeeded
[root@MSI-PC ~]# docker pull registry.cn-chengdu.aliyuncs.com/rtxtitanv/springboot-docker:1.0.0
1.0.0: Pulling from rtxtitanv/springboot-docker
4278c4af5b59: Already exists
c05b16b3cc63: Already exists
4b3e637c5311: Already exists
b2eb2835f623: Already exists
bdfee076d3cb: Already exists
c28471820755: Already exists
788a74386c32: Pull complete
Digest: sha256:0f0976f70ffbfc25edf85648cb5ae17cb2fe7b984a931c11e2f1206b14d23292
Status: Downloaded newer image for registry.cn-chengdu.aliyuncs.com/rtxtitanv/springboot-docker:1.0.0
使用刚拉取的镜像运行一个容器:
[root@MSI-PC ~]# docker run -d --name=springboot-docker-7 -p 8091:8080 registry.cn-chengdu.aliyuncs.com/rtxtitanv/springboot-docker:1.0.0
9f2a66ccbe06f96ccd2404afac23512c3817371af1bfc9b5ea449a842027074d
访问http://192.168.221.132:8091/,出现以下结果说明SpringBoot应用部署成功。

六、Docker命令绑定mvn命令
使用docker-maven-plugin插件,可以将Docker的build、tag、push与mvn命令绑定。这里将build和tag与package绑定,push与deploy绑定,使用指定参数方式构建镜像,docker-maven-plugin插件内容如下:
            <plugin>
                <groupId>com.spotifygroupId>
                <artifactId>docker-maven-pluginartifactId>
                <version>1.0.0version>
                <executions>
                    <execution>

                        <id>build-imageid>

                        <phase>packagephase>
                        <goals>

                            <goal>buildgoal>
                        goals>
                    execution>
                    <execution>
                        <id>tag-imageid>
                        <phase>packagephase>
                        <goals>

                            <goal>taggoal>
                        goals>
                        <configuration>

                            <image>${docker.registry.name}/${project.artifactId}:${project.version}image>

                            <newName>
                                ${docker.repostory}/${docker.registry.name}/${project.artifactId}:${project.version}
                            newName>
                        configuration>
                    execution>
                    <execution>
                        <id>push-imageid>
                        <phase>deployphase>
                        <goals>

                            <goal>pushgoal>
                        goals>
                        <configuration>

                            <imageName>
                                ${docker.repostory}/${docker.registry.name}/${project.artifactId}:${project.version}
                            imageName>
                        configuration>
                    execution>
                executions>
                <configuration>

                    <serverId>docker-aliyunserverId>

                    <registryUrl>${docker.repostory}registryUrl>

                    <forceTags>trueforceTags>

                    <dockerHost>http://192.168.221.128:2375dockerHost>

                    <imageName>${docker.registry.name}/${project.artifactId}:${project.version}imageName>

                    <baseImage>jdk1.8/ubuntu:v1.0.0baseImage>

                    <entryPoint>["java", "-jar", "/${project.build.finalName}.jar"]entryPoint>
                    <resources>

                        <resource>

                            <targetPath>/targetPath>

                            <directory>${project.build.directory}directory>

                            <include>${project.build.finalName}.jarinclude>
                        resource>
                    resources>
                configuration>
            plugin>
为了与之前构建的镜像区分,将项目版本号暂时改为2.0.0,执行mvn clean package构建镜像并打上标签,执行成功后控制台会输出如下信息:
[INFO] --- docker-maven-plugin:1.0.0:build (build-image) @ springboot-docker ---
[INFO] Using authentication suppliers: [ConfigFileRegistryAuthSupplier, NoOpRegistryAuthSupplier]
[INFO] Copying E:\software\DevelopmentTool\IntelliJ IDEA Space\springboot-learning\springboot2.x-learning\springboot-docke
r\target\springboot-docker-2.0.0.jar -> E:\software\DevelopmentTool\IntelliJ IDEA Space\springboot-learning\springboot2.x-
learning\springboot-docker\target\docker\springboot-docker-2.0.0.jar
[INFO] Building image rtxtitanv/springboot-docker:2.0.0
Step 1/3 : FROM jdk1.8/ubuntu:v1.0.0

 ---> 5e1253b49d45
Step 2/3 : ADD /springboot-docker-2.0.0.jar //

 ---> f95f5f782792
Step 3/3 : ENTRYPOINT ["java", "-jar", "/springboot-docker-2.0.0.jar"]

 ---> Running in 203cf46e399a
Removing intermediate container 203cf46e399a
 ---> 0e5f291fc6f6
ProgressMessage{id=null, status=null, stream=null, error=null, progress=null, progressDetail=null}
Successfully built 0e5f291fc6f6
Successfully tagged rtxtitanv/springboot-docker:2.0.0
[INFO] Built rtxtitanv/springboot-docker:2.0.0
[INFO]
[INFO] --- docker-maven-plugin:1.0.0:tag (tag-image) @ springboot-docker ---
[INFO] Using authentication suppliers: [ConfigFileRegistryAuthSupplier, NoOpRegistryAuthSupplier]
[INFO] Creating tag registry.cn-chengdu.aliyuncs.com/rtxtitanv/springboot-docker:2.0.0 from rtxtitanv/springboot-docker:2.
0.0
[INFO] ------------------------------------------------------------------------
[INFO] BUILD SUCCESS
[INFO] ------------------------------------------------------------------------
[INFO] Total time:  5.911 s
[INFO] Finished at: 2020-05-16T14:13:37+08:00
[INFO] ------------------------------------------------------------------------
执行mvn clean package后构建和打上标签的镜像如下:

将项目版本号暂时改为3.0.0,执行mvn clean deploy构建镜像并打上标签推送至远程仓库,出现如下错误:
![]()
添加如下插件配置:
            <plugin>
                <groupId>org.apache.maven.pluginsgroupId>
                <artifactId>maven-deploy-pluginartifactId>
                <configuration>
                    <skip>trueskip>
                configuration>
            plugin>
执行成功后控制台会输出如下信息:
[INFO] --- docker-maven-plugin:1.0.0:build (build-image) @ springboot-docker ---
[INFO] Using authentication suppliers: [ConfigFileRegistryAuthSupplier, NoOpRegistryAuthSupplier]
[INFO] Copying E:\software\DevelopmentTool\IntelliJ IDEA Space\springboot-learning\springboot2.x-learning\springboot-docke
r\target\springboot-docker-3.0.0.jar -> E:\software\DevelopmentTool\IntelliJ IDEA Space\springboot-learning\springboot2.x-
learning\springboot-docker\target\docker\springboot-docker-3.0.0.jar
[INFO] Building image rtxtitanv/springboot-docker:3.0.0
Step 1/3 : FROM jdk1.8/ubuntu:v1.0.0

 ---> 5e1253b49d45
Step 2/3 : ADD /springboot-docker-3.0.0.jar //

 ---> ec57dc7df8e2
Step 3/3 : ENTRYPOINT ["java", "-jar", "/springboot-docker-3.0.0.jar"]

 ---> Running in 6d1800e99abd
Removing intermediate container 6d1800e99abd
 ---> a7e1fb073d76
ProgressMessage{id=null, status=null, stream=null, error=null, progress=null, progressDetail=null}
Successfully built a7e1fb073d76
Successfully tagged rtxtitanv/springboot-docker:3.0.0
[INFO] Built rtxtitanv/springboot-docker:3.0.0
[INFO]
[INFO] --- docker-maven-plugin:1.0.0:tag (tag-image) @ springboot-docker ---
[INFO] Using authentication suppliers: [ConfigFileRegistryAuthSupplier, NoOpRegistryAuthSupplier]
[INFO] Creating tag registry.cn-chengdu.aliyuncs.com/rtxtitanv/springboot-docker:3.0.0 from rtxtitanv/springboot-docker:3.
0.0
[INFO]
[INFO] --- maven-install-plugin:2.5.2:install (default-install) @ springboot-docker ---
[INFO] Installing E:\software\DevelopmentTool\IntelliJ IDEA Space\springboot-learning\springboot2.x-learning\springboot-do
cker\target\springboot-docker-3.0.0.jar to D:\DevTool\mvnrepository\com\rtxtitanv\springboot-docker\3.0.0\springboot-docke
r-3.0.0.jar
[INFO] Installing E:\software\DevelopmentTool\IntelliJ IDEA Space\springboot-learning\springboot2.x-learning\springboot-do
cker\pom.xml to D:\DevTool\mvnrepository\com\rtxtitanv\springboot-docker\3.0.0\springboot-docker-3.0.0.pom
[INFO]
[INFO] --- maven-deploy-plugin:2.8.2:deploy (default-deploy) @ springboot-docker ---
[INFO] Skipping artifact deployment
[INFO]
[INFO] --- docker-maven-plugin:1.0.0:push (push-image) @ springboot-docker ---
[INFO] Using authentication suppliers: [ConfigFileRegistryAuthSupplier, NoOpRegistryAuthSupplier]
[INFO] Pushing registry.cn-chengdu.aliyuncs.com/rtxtitanv/springboot-docker:3.0.0
The push refers to repository [registry.cn-chengdu.aliyuncs.com/rtxtitanv/springboot-docker]
e56fa9690a21: Pushed
c1397790ba17: Layer already exists
863d3b797f13: Layer already exists
b68cb682fff6: Layer already exists
a719ff84f09e: Layer already exists
0a2c8f50bc93: Layer already exists
baf3be6068d1: Layer already exists
3.0.0: digest: sha256:81fb31d023dac09a5899c9b365885fae6671d59169b25b026ed39e0758a2af4b size: 1784
null: null
[INFO] ------------------------------------------------------------------------
[INFO] BUILD SUCCESS
[INFO] ------------------------------------------------------------------------
[INFO] Total time:  18.837 s
[INFO] Finished at: 2020-05-16T14:27:13+08:00
[INFO] ------------------------------------------------------------------------
查看镜像仓库发现已成功推送:

代码示例
- Github:https://github.com/RtxTitanV/springboot-learning/tree/master/springboot2.x-learning/springboot-docker
- Gitee:https://gitee.com/RtxTitanV/springboot-learning/tree/master/springboot2.x-learning/springboot-docker