Android上实现MobileSSD 实时摄像头检测 - NCNN
NCNN
ncnn 是腾讯提供的移动端框架 非常时候在手机玩

在研究了一段时间的 ncnn后 准备做一个安卓的demo 以便更好的熟悉和使用 NCNN
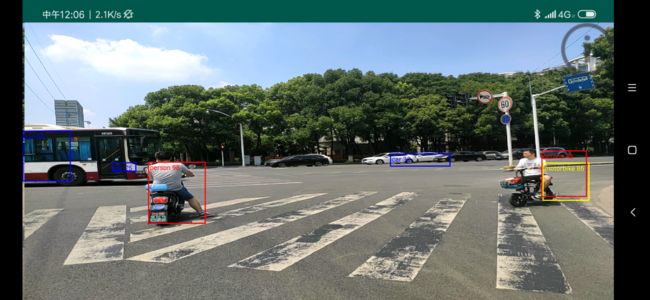
先上APP和效果
app地址 :https://pan.baidu.com/s/1MX8GnM3xR4u0dcyw7iVSRg
第二张图没框准是因为人在动 ,计算耗时还是比较长 大约需要1.几秒
安卓程序编写过程
程序本身并不复杂 但是搞安卓的过程中发现 摄像头获取下视频真的是累的要去死
程序框架
启动过程
    ----------    -----------------                 -------------
    |Main窗口| -->|Camera Fragment|  获取图像 ----> |Surface显示| <--
    ---------- |  -----------------             |   -------------   |
               |                                |                   |
               |  --------------                |   --------------  |
               -->|JNI 加载模型|                --->|ncnn推理计算|---
                  --------------                    --------------
数据流程
JAVA
    -----------    ------------------      -------------
    |CAMERAYUV| -->|YUV 转RGB Bitmap|  --> |Surface显示|
    -----------  | ------------------      -------------
                 |                                  |
JNI              | --------------    -----------    |
                 ->|YUV Y 转 RGB| -->|Mobilenet| -->|
                   --------------    -----------
编写过程
摄像头权限问题
android 7以后的程序需要获取摄像头的需要主动申请权限 一开始没弄各种不行
后参考使用camera2 官方demo解决
    private void requestCameraPermission() {
        if (shouldShowRequestPermissionRationale(Manifest.permission.CAMERA)) {
            new ConfirmationDialog().show(getChildFragmentManager(), FRAGMENT_DIALOG);
        } else {
            requestPermissions(new String[]{Manifest.permission.CAMERA}, REQUEST_CAMERA_PERMISSION);
        }
    }

    @Override
    public void onRequestPermissionsResult(int requestCode, @NonNull String[] permissions,
                                           @NonNull int[] grantResults) {
        if (requestCode == REQUEST_CAMERA_PERMISSION) {
            if (grantResults.length != 1 || grantResults[0] != PackageManager.PERMISSION_GRANTED) {
                ErrorDialog.newInstance(getString(R.string.request_permission))
                        .show(getChildFragmentManager(), FRAGMENT_DIALOG);
            }
        } else {
            super.onRequestPermissionsResult(requestCode, permissions, grantResults);
        }
    }
引入ncnn库的问题
其实官方说明已经很详细了(~ ~! 并没有找到啊~~)
实际引入需要对cmakefile进行一些调整
首先参照AS的向导建立ndk工程
然后将github上release中的 ncnn库文件 和lib拷贝到 cpp目录下
这里我使用的是 ncnn-android-lib 目录 如图

导入后需要对路径进行配置 并链接 openmp 否则会出现错误
修改CMakeLists.txt
# For more information about using CMake with Android Studio, read the
# documentation: https://d.android.com/studio/projects/add-native-code.html

# Sets the minimum version of CMake required to build the native library.

cmake_minimum_required(VERSION 3.4.1)

FIND_PACKAGE( OpenMP REQUIRED)
if(OPENMP_FOUND)
    message("OPENMP FOUND")
    set(CMAKE_C_FLAGS "${CMAKE_C_FLAGS} ${OpenMP_C_FLAGS}")
    set(CMAKE_CXX_FLAGS "${CMAKE_CXX_FLAGS} ${OpenMP_CXX_FLAGS}")
    set(CMAKE_EXE_LINKER_FLAGS "${CMAKE_EXE_LINKER_FLAGS} ${OpenMP_EXE_LINKER_FLAGS}")
endif()

# Creates and names a library, sets it as either STATIC
# or SHARED, and provides the relative paths to its source code.
# You can define multiple libraries, and CMake builds them for you.
# Gradle automatically packages shared libraries with your APK.

include_directories(./ncnn-android-lib/include)

add_library( # Sets the name of the library.
        native-lib


        # Sets the library as a shared library.
        SHARED

        # Provides a relative path to your source file(s).
        mobilenetssd.cpp)

# Searches for a specified prebuilt library and stores the path as a
# variable. Because CMake includes system libraries in the search path by
# default, you only need to specify the name of the public NDK library
# you want to add. CMake verifies that the library exists before
# completing its build.

find_library( # Sets the name of the path variable.
        log-lib

        # Specifies the name of the NDK library that
        # you want CMake to locate.
        log)


# Specifies libraries CMake should link to your target library. You
# can link multiple libraries, such as libraries you define in this
# build script, prebuilt third-party libraries, or system libraries.

target_link_libraries( # Specifies the target library.
        native-lib

        ${CMAKE_SOURCE_DIR}/ncnn-android-lib/${ANDROID_ABI}/libncnn.a

        # Links the target library to the log library
        # included in the NDK.
        ${log-lib})
然后就可以正常使用 NCNN了
jni调用的参数传递
为了提高效率 我并没有对图像数组进行拷贝
而是使用了 临界区映射的方法 GetPrimitiveArrayCritical 这样避免了拷贝但是出现了一个巨坑 各种百度不到
extern "C" JNIEXPORT jdoubleArray JNICALL
Java_com_chenty_testncnn_CameraNcnnFragment_detectyonly(JNIEnv *env, jobject thiz, jbyteArray frame, jint src_width,
                                jint src_height, jdoubleArray detect) {
    char *argb_frame = (char*)env->GetPrimitiveArrayCritical(frame, NULL);

    int size = env->GetArrayLength(frame);
    int objectcnt = 0;
    int i;

    //shift argb to rgba
    char *rgba = (char *)malloc(size);
    memcpy(rgba, argb_frame + 1, size - 1);

    env->ReleasePrimitiveArrayCritical(frame, argb_frame, JNI_ABORT);

    struct ai_object_t *obj = cpp_mobilenet_aidetect((const unsigned char *)rgba, src_width, src_height, &objectcnt);

    free(rgba);

    double *detect_out = (double *)env->GetPrimitiveArrayCritical(detect, NULL);
    if(objectcnt <= 0)
        objectcnt = 1;

    for(i = 0 ; i < objectcnt ; i++)
    {
        detect_out[i*6 + 0] = obj->label;
        detect_out[i*6 + 1] = obj->prob;
        detect_out[i*6 + 2] = obj->x;
        detect_out[i*6 + 3] = obj->y;
        detect_out[i*6 + 4] = obj->xe;
        detect_out[i*6 + 5] = obj->ye;
        obj++;
    }


    env->ReleasePrimitiveArrayCritical(detect, detect_out, JNI_ABORT);

    return detect;
}
问题是 本身函数设计是 输入图像数组 长 宽 输出 判定结果
然后在里面死活new 不了double数组
后来想想应该就是这个临界区不能new对象的原因
最后丧心病狂 直接java new一个数组传进来算了。这就是目前的实现了
YUV数据的获取
安卓默认获取摄像头数据 是直接写入到SURFACE的 效率很高 无法直接获取
目前有2个方法获取这个数据
- 先绘制到SURFACE,然后从SURFACEDUMP RGB数据(OpenCV的做法)
- 建立一个拍照Session 手动获取图片
这里使用第二种方法 这个魔改demo的地方实在是太多了 大家自己看吧
基本上就是建立session 获取YUV 其中的坑很多 但是都可以百度解决还行吧。
数据进入计算都完成了
现在已经可以在Log中看到SSD出来的目标了,很好,然后是数据绘制
数据绘制
我们截断了数据的获取过程,当需要显示的时候又很纠结了。
首先发现安卓 后摄像头默认是横着的 WTF。。。 绘制图像需要旋转90度。。。
直接锁定应用只能横屏显示(机智~~)
绘制需要使用Surface 并且缩放,so Ctrl+C Ctrl+V了一堆代码 实现了。。
显示和计算分离
经过上面的过程,已经可以显示出大体的效果了,但是每次计算耗时需要1秒,图像像幻灯片一样 这这么行。
于是做了一个简单的自锁和计算显示分离
            //split process function to prevent img reflash stop
            if(!mDetect_isbusy)
            {
                mDetect_isbusy = true;
                new Thread(new Runnable() {
                    public void run() {
                        mDetect_result = ncnnprocess_imgyuv(yuv, width, height);
                        mDetect_isbusy = false;
                    }
                }).start();
            }
            if(mDetect_result != null) {
                mSurfaceView.Draw(yuv, width, height, mDetect_result, 90);
            }
至此 功能部分已经完整OK了
     mDetect_isbusy = false;
                }
            }).start();
        }
        if(mDetect_result != null) {
            mSurfaceView.Draw(yuv, width, height, mDetect_result, 90);
        }
至此 功能部分已经完整OK了

Code:https://github.com/chentyjpm/MobileNetSSD_Demo_AndoridNCNN

