在虚拟机(CentOS)上配置fastdfs+nginx
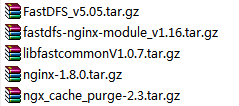
废话不多说!用到的包如下:
FastDFS--tracker安装
01 :如果没有gcc环境,安装:yum install gcc-c++
02:FastDFS依赖libevent库,需要安装:yum -y install libevent
03:libfastcommon是FastDFS官方提供的,libfastcommon包含了FastDFS运行所需要的一些基础库。
将libfastcommonV1.0.7.tar.gz拷贝至/usr/local/下,执行以下命令
cd /usr/local
tar -zxvf libfastcommonV1.0.7.tar.gz
cd libfastcommon-1.0.7
./make.sh
./make.sh install
04:注意libfastcommon安装好后会自动将库文件拷贝至/usr/lib64下,由于FastDFS程序引用usr/lib目录所以需要将/usr/lib64下的库文件拷贝至/usr/lib目录下
cp /usr/lib64/libfastcommon.so /usr/lib/libfastcommon.so
05:tracker编译安装,
将FastDFS_v5.05.tar.gz拷贝至/usr/local下后,执行以下命令
tar-zxvf FastDFS_v5.05.tar.gz
cd FastDFS
./make.sh
./make.sh install
安装成功将安装目录下的conf下的文件拷贝到/etc/fdfs/下
06:配置
安装成功后进入/etc/fdfs目录:
cp tracker.conf.example tracker.conf
修改tracker.conf
vi tracker.conf
base_path=/home/xxx/FastDFS
改为:
base_path=/home/FastDFS
配置http端口:
http.server_port=80
07:启动 /usr/bin/fdfs_trackerd /etc/fdfs/tracker.conf restart
FastDFS--storage安装
01--05步骤与tracker相同
06:配置
安装成功后进入/etc/fdfs目录,拷贝一份新的storage配置文件:cp storage.conf.sample storage.conf
修改storage.conf
vi storage.conf
group_name=group1
base_path=/home/xxx/FastDFS改为:base_path=/home/FastDFS
store_path0=/home/xxx/FastDFS改为:store_path0=/home/FastDFS/fdfs_storage
#如果有多个挂载磁盘则定义多个store_path,如下
#store_path1=.....
#store_path2=......tracker_server=192.168.160.128:22122 #配置tracker服务器IP
#如果有多个则配置多个tracker
#tracker_server=192.168.101.4:22122
#配置http端口
http.server_port=80
07:启动 /usr/bin/fdfs_storaged /etc/fdfs/storage.conf restart测试 通过fdfs_test程序上传图片
FastDFS安装成功可通过/usr/bin/fdfs_test测试上传、下载等操作
修改/etc/fdfs/client.conf
base_path=/home/fastdfs
tracker_server=192.168.160.128:22122
#tracker_server=192.168.101.4:22122
比如将/home下的图片上传到FastDFS中:/usr/bin/fdfs_test /etc/fdfs/client.conf upload /home/tomcat.png
http://192.168.160.128/group1/M00/00/00/wKhlBVVY2M-AM_9DAAAT7-0xdqM485_big.png就是文件的下载路径。
对应storage服务器上的
/home/fastdfs/fdfs_storage/data/00/00/wKhlBVVY2M-AM_9DAAAT7-0xdqM485_big.png文件。
由于现在还没有和nginx整合无法使用http下载。
FastDFS 和nginx整合
在tracker上安装nginx
01:nginx安装需要的环境
gcc:yum install gcc-c++
PCRE:yum install -y pcre pcre-devel
zlib:yum install -y zlib zlib-devel
openssl:yum install -y openssl openssl-devel
02:编译安装
将nginx-1.8.0.tar.gz和ngx_cache_purge-2.3.tar.gz拷贝至/usr/local/下,执行
tar -zxvf nginx-1.8.0.tar.gz
tar -zxvf ngx_cache_purge-2.3.tar.gz
cd nginx-1.8.0
03:configure
./configure \
--prefix=/usr/local/nginx \
--pid-path=/var/run/nginx/nginx.pid \
--lock-path=/var/lock/nginx.lock \
--error-log-path=/var/log/nginx/error.log \
--http-log-path=/var/log/nginx/access.log \
--with-http_gzip_static_module \
--http-client-body-temp-path=/var/temp/nginx/client\
--http-proxy-temp-path=/var/temp/nginx/proxy\
--http-fastcgi-temp-path=/var/temp/nginx/fastcgi\
--http-uwsgi-temp-path=/var/temp/nginx/uwsgi\
--http-scgi-temp-path=/var/temp/nginx/scgi
--add-module=/usr/local/ngx_cache_purge-2.3 //添加缓存模块
注意:上边将临时文件目录指定为/var/temp/nginx,需要在/var下创建temp及nginx目录 mkdir -p /var/temp/nginx
04:编译安装
make
make install
05:启动nginx
cd /usr/local/nginx/sbin/
./nginx06:关闭防火墙,否则http访问不了
/etc/init.d/iptables stop
在浏览器访问虚拟机ip地址,出现欢迎页面,nginx安装成功。
07:编辑/usr/local/nginx/conf配置文件目录下的nginx.conf,设置负载均衡以及缓存
worker_processes 4; #根据CPU核心数而定
events{
worker_connections 65535; #最大链接数
use epoll;#新版本的Linux可使用epoll加快处理性能
}
http{
#设置缓存参数
server_names_hash_bucket_size 128;
client_header_buffer_size 32k;
large_client_header_buffers 4 32k;
client_max_body_size 300m;
sendfile on;
tcp_nopush on;
proxy_redirect off;
proxy_set_header Host $http_host;
proxy_set_header X-Real-IP $remote_addr;
proxy_set_header X-Forwarded-For $proxy_add_x_forwarded_for;
proxy_connect_timeout 90;
proxy_send_timeout 90;
proxy_read_timeout 90;
proxy_buffer_size 16k;
proxy_buffers 4 64k;
proxy_busy_buffers_size 128k;
proxy_temp_file_write_size 128k;
#设置缓存存储路径、存储方式、分配内存大小、磁盘最大空间、缓存期限
proxy_cache_path /var/cache/nginx/proxy_cache levels=1:2 keys_zone=http-cache:500m max_size=10g inactive=30d;
proxy_temp_path /var/cache/nginx/proxy_cache/tmp;
#storage群group1组
upstream storage_server_group1{
server192.168.160.129:80 weight=10 max_fails=2 fail_timeout=30s;
#server192.168.101.6:80 weight=10 max_fails=2 fail_timeout=30s;
}
#storage群group2组
#upstream storage_server_group2{
# server192.168.101.7:80 weight=10 max_fails=2 fail_timeout=30s;
# server 192.168.101.8:80weight=10 max_fails=2 fail_timeout=30s;
}
server {
listen 80;
server_name mytracker;
location /group1/M00{
proxy_next_upstream http_502 http_504 error timeout invalid_header;
proxy_cache http-cache;
proxy_cache_valid 200 304 12h;
proxy_cache_key $uri$is_args$args;
proxy_pass http://storage_server_group1; expires 30d;
}
#location /group2{
# proxy_pass http://storage_server_group2;
}
#设置清除缓存的访问权限
location~ /purge(/.*) {
allow 127.0.0.1;
allow 172.16.1.0/24;
deny all;
proxy_cache_purge http-cache $1$is_args$args;
}
}
}
在Storage上安装nginx
01:将FastDFS-nginx-module_v1.16.tar.gz传至/usr/local/下,执行以下命令:
cd /usr/local
tar -zxvf FastDFS-nginx-module_v1.16.tar.gz
cd FastDFS-nginx-module/src
修改config文件将/usr/local/路径改为/usr/
将FastDFS-nginx-module/src下的mod_FastDFS.conf拷贝至/etc/fdfs/下:cp mod_FastDFS.conf /etc/fdfs/
并修改mod_FastDFS.conf的内容:
vi /etc/fdfs/mod_FastDFS.conf
base_path=/home/FastDFS
tracker_server=192.168.160.128:22122
#tracker_server=192.168.101.4:22122
url_have_group_name=true #url中包含group名称
store_path0=/home/FastDFS/fdfs_storage #指定文件存储路径
#如果有多个...
将libfdfsclient.so拷贝至/usr/lib下:cp /usr/lib64/libfdfsclient.so /usr/lib/
创建nginx/client目录:mkdir -p /var/temp/nginx/client
02:nginx安装
步骤同上。
添加FastDFS-nginx-module模块
./configure \
--prefix=/usr/local/nginx \
--pid-path=/var/run/nginx/nginx.pid\
--lock-path=/var/lock/nginx.lock\
--error-log-path=/var/log/nginx/error.log\
--http-log-path=/var/log/nginx/access.log\
--with-http_gzip_static_module\
--http-client-body-temp-path=/var/temp/nginx/client\
--http-proxy-temp-path=/var/temp/nginx/proxy\
--http-fastcgi-temp-path=/var/temp/nginx/fastcgi\
--http-uwsgi-temp-path=/var/temp/nginx/uwsgi\
--http-scgi-temp-path=/var/temp/nginx/scgi\
--add-module=/usr/local/fastdfs-nginx-module/src
03:编译安装
make
make install
04:编辑/usr/local/nginx/conf配置文件目录下的nginx.conf
server {
listen 80;
server_name 192.168.160.129;
location /group1/M00/{
root /home/fastdfs/fdfs_storage/data;
ngx_fastdfs_module;
}
}
location /group1/M00/:group1为nginx 服务FastDFS的分组名称,M00是FastDFS自动生成编号,对应store_path0=/home/FastDFS/fdfs_storage,如果FastDFS定义store_path1,这里就是M01
测试保证nginx、tracker、storage都开启,使用浏览器访问http://192.168.160.128/group1/M00/00/00/wKhlBVVY2M-AM_9DAAAT7-0xdqM485_big.png

