CDH6.2.1CM6.2.1版本部署操作文档
1简介
1.1Cloudera Data Hub介绍
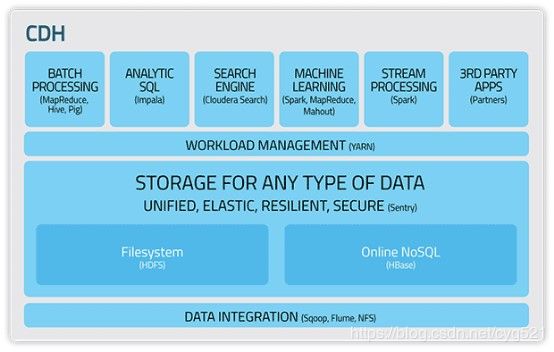
- CDH是最完整、测试最全面和最流行的Apache Hadoop及相关项目发布版本。
- CDH包含Hadoop核心元素:可扩展存储和分布式计算引擎,同时提供了Web接口和企业级功能。
- CDH基于Apache许可证开源协议,提供了包括批处理、交互式SQL、交互式查询和基于角色的访问控制一站式Hadoop大数据解决方案。
CDH优势:
- 灵活 — 存储任意类型数据,同时可以利用多种计算框架(批处理、交互式SQL、文本检索、机器学习和数理统计等)发掘数据价值
- 易于集成 — 可以在商用硬件快速部署Hadoop集群,同时容易与其他许多软件集成
- 安全—处理和控制敏感数据
- 易于扩展 — 提供了许多基础软件,在此基础上可以根据您的需求进行扩展
- 高可用性 — 无需担心重要任务处理的失败
- 兼容性 — 兼顾您现有的IT基础设施和未来投资
1.2集群结构
系统安装包括以下步骤:
- 在集群中所有的节点上安装所需要的操作系统。
- 在管理节点上安装Cloudera Manager。
- 通过Cloudera Manager来把所有的节点加到集群中、对这些节点部署相关软件和配置,并运行服务。
2安装准备
2.1硬件环境要求
2.2操作系统
| hostname | IP | 内存 | CPU |
| manager | 172.30.81.203 | 64G | |
| node1 | 172.30.81.204 | 64G | |
| node2 | 172.30.81.205 | 64G | |
| node3 | 172.30.81.206 | 32G |
2.3Java环境要求
JDK下载地址:下载地址:https://archive.cloudera.com/cm6/6.2.1/redhat7/yum/RPMS/x86_64/
JDK版本:oracle-j2sdk1.8-1.8.0+update181-1.x86_64.rpm
rpm -ivh oracle-j2sdk1.8-1.8.0+update181-1.x86_64.rpm

vim /etc/profile
#文件最后添加:
#java home
export JAVA_HOME=/usr/java/jdk1.8.0_181-cloudera
export PATH=$JAVA_HOME/bin:$PATH
export CLASSPATH=.:$JAVA_HOME/lib/dt.jar:$JAVA_HOME/lib/tools.jar
#执行
source /etc/profile
2.4支持的浏览器
- Mozilla Firefox——火狐
- Google Chrome——谷歌
- Internet Explorer——IE
- Safari.——苹果计算机的操作系统Mac OS中的浏览器,使用了KDE的KHTML作为浏览器的运算核心
3安装前的检查
3.1系统磁盘分区要求
3.2内存容量要求
| 服务 | 要求 |
| Management Server |
8GB |
| HDFS NameNode |
32GB |
| HDFS NameNode |
32GB |
| HDFS Secondary NameNode |
64GB |
| HDFS Standby NameNode |
32GB |
| HDFS DataNode |
4GB |
| YARN ResourceManager |
4GB |
| YARN NodeManager |
4GB |
| YARN NodeManager |
用户指定 |
| ZooKeeper |
4GB |
| HBase Master Server |
4GB |
- 确认所有会在节点上运行的CDH服务。
- 确认每个服务要求的内存容量。
- 将所有内存要求相加。
- 如果相加后内存要求小于64B,则最低内存要求为64GB。如果相加后内存要求大于64GB,则最低内存要求为相加后的和。
- 比如,如果节点上运行以下服务:
- • HDFS DataNode
- • YARN ResourceManager
- • HBase Region Server
- 比如,如果节点上运行以下服务:
3.3、网络设置
3.4、安全设置
systemctl stop firewalld
systemctl disable firewalld
2、关闭SE Linux
查看selinux状态:
/usr/sbin/sestatus -v | grep SELinux

临时关闭:(#setenforce 1 设置SELinux 成为enforcing模式)
setenforce 0

永久关闭:
vi /etc/selinux/config,然后设置
SELINUX=disabled
3.5、配置免密码登录
在Manager(dipc2)节点 ssh-keygen -t rsa 执行生成密钥,一路回车,直到生成秘钥如下所示:
[root@dipc2 ~]# ssh-keygen -t rsa

Generating public/private rsa key pair.
Enter file in which to save the key (/root/.ssh/id_rsa):
Created directory '/root/.ssh'.
Enter passphrase (empty for no passphrase):
Enter same passphrase again:
Your identification has been saved in /root/.ssh/id_rsa.
Your public key has been saved in /root/.ssh/id_rsa.pub.
The key fingerprint is:
SHA256:a9ptxPrlBF75F7Xg2wMsq1GRYTEEmy1rYZP0PWtCzjQ root@dipc2
The key's randomart image is:
+---[RSA 2048]----+
|         oo*.    |
|        . B =    |
|         O E +  .|
|        . X =.+ o|
|        S+.*o* o |
|        .o+o=.+ .|
|        o+..o..o.|
|       +..++   ..|
|      . .+o .    |
+----[SHA256]-----+
在/root/.ssh/下面会生成一个公钥文件id_rsa.pub , 将公钥追加到authorized_keys
#将公钥追加到私钥中
cat ~/.ssh/id_rsa.pub >> ~/.ssh/authorized_keys
#修改秘钥文件权限
chmod 600 ~/.ssh/authorized_keys
将~/.ssh从当前节点分发到其他各个节点。如:scp -r ~/.ssh/ root@node1:~/.ssh/
[root@dipc2 ~]# cat ~/.ssh/id_rsa.pub >> ~/.ssh/authorized_keys
[root@dipc2 ~]# chmod 600 ~/.ssh/authorized_keys
[root@dipc2 ~]# scp -r ~/.ssh/ root@dipc3:~/.ssh/
The authenticity of host 'dipc3 (172.30.81.204)' can't be established.
ECDSA key fingerprint is SHA256:+T6sFqPQwYg4ybLBlvHRzjRtljkfRpMYqG4ZJLne4d8.
ECDSA key fingerprint is MD5:99:61:89:61:ee:d7:82:c4:a0:52:0c:eb:ef:81:6a:a6.
Are you sure you want to continue connecting (yes/no)? yes
Warning: Permanently added 'dipc3,172.30.81.204' (ECDSA) to the list of known hosts.
root@dipc3's password:
id_rsa                                               100% 1675   950.4KB/s   00:00
id_rsa.pub                                           100%  392   280.7KB/s   00:00
authorized_keys                                      100%  392   230.8KB/s   00:00
known_hosts                                          100%  181   135.8KB/s   00:00
[root@dipc2 ~]# scp -r ~/.ssh/ root@dipc4:~/.ssh/
The authenticity of host 'dipc4 (172.30.81.205)' can't be established.
ECDSA key fingerprint is SHA256:eISTahaFjLQp1Zoua1/MnzEd4BVUky+yW98dNlNhgDQ.
ECDSA key fingerprint is MD5:33:07:75:a1:8d:f9:f3:63:ca:ce:fa:08:9f:c6:55:94.
Are you sure you want to continue connecting (yes/no)? yes
Warning: Permanently added 'dipc4,172.30.81.205' (ECDSA) to the list of known hosts.
root@dipc4's password:
id_rsa                                               100% 1675   650.1KB/s   00:00
id_rsa.pub                                           100%  392   174.1KB/s   00:00
authorized_keys                                      100%  392   200.1KB/s   00:00
known_hosts                                          100%  362   172.6KB/s   00:00
authorized_keys:存放远程免密登录的公钥,主要通过这个文件记录多台机器的公钥
id_rsa : 生成的私钥文件
id_rsa.pub : 生成的公钥文件
know_hosts : 已知的主机公钥清单
如果希望ssh公钥生效需满足至少下面两个条件:
1) .ssh目录的权限必须是700
2) .ssh/authorized_keys文件权限必须是600
3.6、NTP服务设置
ln -sf /usr/share/zoneinfo/Asia/Shanghai /etc/localtime
#安装
yum -y install ntp
#设置开机启动
chkconfig ntpd on
[root@dipc2 ~]# chkconfig ntpd on
Note: Forwarding request to 'systemctl enable ntpd.service'.
Created symlink from /etc/systemd/system/multi-user.target.wants/ntpd.service to /usr/lib/systemd/system/ntpd.service.
#或者使用新命令设置开机启动
systemctl enable ntpd.service
[root@dipc4 ~]# systemctl enable ntpd.service
Created symlink from /etc/systemd/system/multi-user.target.wants/ntpd.service to /usr/lib/systemd/system/ntpd.service.
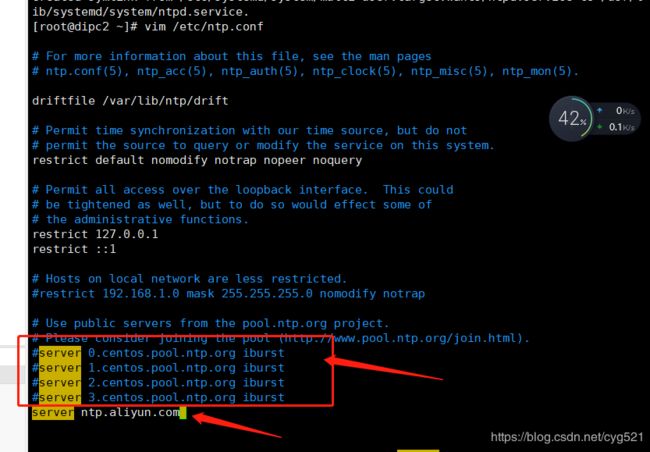
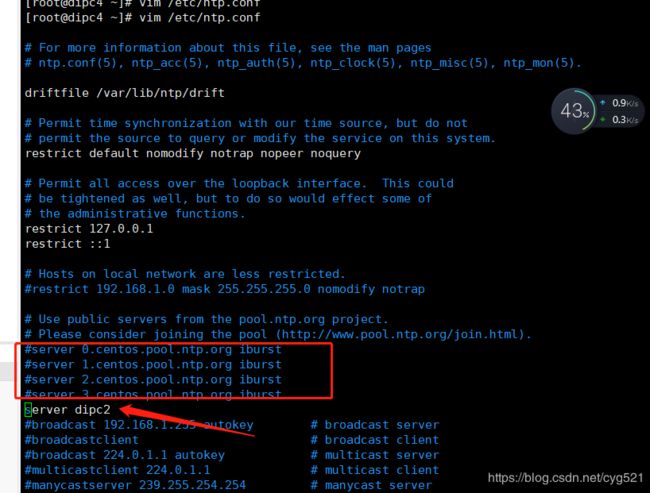
3、ntp主机配置 vi /etc/ntp.conf
manager节点(dipc3)
其余节点(dipc4、dipc5),注释掉原来的,添加指向manager节点的ntp配置
重新启动 ntp 服务:service ntpd restart
ntpdc -c loopinfo #查看与时间同步服务器的时间偏差
ntpq -p #查看当前同步的时间服务器
ntpstat #查看状态
配置成功状态(服务开启后前面出现*说明成功):
可以使用:watch ntpq -p 查看同步的状态
注意:同步ntp的时间大约需要5~10分钟,耐心等待一下
3.7修改Linux swappiness参数(所有节点)
为了避免服务器使用swap功能而影响服务器性能,一般都会把vm.swappiness修改为0(cloudera建议10以下)
echo 0 > /proc/sys/vm/swappiness
这样配置之后,服务器重启之后,会还原原本的设置
另一种方法是修改配置文件
vim /etc/sysctl.conf
在文件最后面添加
vm.swappiness=0
重启开机之后会自动配置这个参数
上述方法rhel6有效,rhel7.2中:tuned服务会动态调整系统参数
查找tuned中配置,直接修改配置
cd /usr/lib/tuned/
grep “vm.swappiness” * -R 查询出后依次修改
修改完确认:
参考:sysctl修改内核参数 重启不生效 https://blog.csdn.net/ygtlovezf/article/details/79014299
3.8.、禁用透明页(所有节点)
echo never > /sys/kernel/mm/transparent_hugepage/defrag
echo never > /sys/kernel/mm/transparent_hugepage/enabled
永久生效 在/etc/rc.local 添加上面命令
给与可执行权限:chmod +x /etc/rc.d/rc.local
3.9、安装MySQL
yum安装msyql:
rpm -Uvh http://dev.mysql.com/get/mysql57-community-release-el7-10.noarch.rpm
[root@dipc2 tuned]# rpm -Uvh http://dev.mysql.com/get/mysql57-community-release-el7-10.noarch.rpm
Retrieving http://dev.mysql.com/get/mysql57-community-release-el7-10.noarch.rpm
warning: /var/tmp/rpm-tmp.d6d7vA: Header V3 DSA/SHA1 Signature, key ID 5072e1f5: NOKEY
Preparing...                          ################################# [100%]
Updating / installing...
   1:mysql57-community-release-el7-10 ################################# [100%]
yum -y install mysql-community-server启动、配置mysql
[root@dipc2 tuned]# systemctl start  mysqld.service
[root@dipc2 tuned]# systemctl enable mysqld.service
[root@dipc2 tuned]# systemctl status mysqld.service
● mysqld.service - MySQL Server
   Loaded: loaded (/usr/lib/systemd/system/mysqld.service; enabled; vendor preset: disabled)
   Active: active (running) since Thu 2020-05-21 16:36:39 CST; 110ms ago
     Docs: man:mysqld(8)
           http://dev.mysql.com/doc/refman/en/using-systemd.html
 Main PID: 21291 (mysqld)
   CGroup: /system.slice/mysqld.service
           └─21291 /usr/sbin/mysqld --daemonize --pid-file=/var/run/mysqld/mysqld.pid

May 21 16:36:34 dipc2 systemd[1]: Starting MySQL Server...
May 21 16:36:39 dipc2 systemd[1]: Started MySQL Server.
查看初始密码:
[root@dipc2 tuned]# grep "password" /var/log/mysqld.log
2020-05-21T08:36:36.113172Z 1 [Note] A temporary password is generated for root@localhost: rApbdN#hw5gD
使用初始密码登录
mysql -u root -p
#输入初始密码
[root@dipc2 tuned]# grep "password" /var/log/mysqld.log
2020-05-21T08:36:36.113172Z 1 [Note] A temporary password is generated for root@localhost: rApbdN#hw5gD
[root@dipc2 tuned]# mysql -u root -p
Enter password:
Welcome to the MySQL monitor.  Commands end with ; or \g.
Your MySQL connection id is 2
Server version: 5.7.30

Copyright (c) 2000, 2020, Oracle and/or its affiliates. All rights reserved.

Oracle is a registered trademark of Oracle Corporation and/or its
affiliates. Other names may be trademarks of their respective
owners.

Type 'help;' or '\h' for help. Type '\c' to clear the current input statement.

mysql> set global validate_password_policy=0;
Query OK, 0 rows affected (0.01 sec)

mysql> set global validate_password_length=1;
Query OK, 0 rows affected (0.00 sec)

mysql>  ALTER USER 'root'@'localhost' IDENTIFIED BY '*********'; #修改密码
Query OK, 0 rows affected (0.01 sec)

mysql> use mysql;
Reading table information for completion of table and column names
You can turn off this feature to get a quicker startup with -A

Database changed
mysql>  update user set host = '%' where user = 'root'; #远程可访问
Query OK, 1 row affected (0.00 sec)
Rows matched: 1  Changed: 1  Warnings: 0

mysql>  flush privileges;
Query OK, 0 rows affected (0.00 sec)

mysql> exit;
Bye
创建库,后续安装服务等使用
CREATE DATABASE cmserver DEFAULT CHARSET utf8 COLLATE utf8_general_ci;

GRANT ALL ON cmserver.* TO 'cmserveruser'@'%' IDENTIFIED BY 'Yyf5211314!';

CREATE DATABASE metastore DEFAULT CHARSET utf8 COLLATE utf8_general_ci;

GRANT ALL ON metastore.* TO 'hiveuser'@'%' IDENTIFIED BY 'Yyf5211314!';

CREATE DATABASE amon DEFAULT CHARSET utf8 COLLATE utf8_general_ci;

GRANT ALL ON amon.* TO 'amonuser'@'%' IDENTIFIED BY 'Yyf5211314!';

CREATE DATABASE rman DEFAULT CHARSET utf8 COLLATE utf8_general_ci;

GRANT ALL ON rman.* TO 'rmanuser'@'%' IDENTIFIED BY 'Yyf5211314!';

CREATE DATABASE oozie DEFAULT CHARSET utf8 COLLATE utf8_general_ci;

GRANT ALL ON oozie.* TO 'oozieuser'@'%' IDENTIFIED BY 'Yyf5211314!';

CREATE DATABASE hue DEFAULT CHARSET utf8 COLLATE utf8_general_ci;

GRANT ALL ON hue.* TO 'hueuser'@'%' IDENTIFIED BY 'Yyf5211314!';

FLUSH PRIVILEGES;
同步mysql-connector-java.jar
创建路径mkdir /usr/share/java ,将mysql-jdbc jar包放置在此路径下(每个节点):
mysql-connector-java-5.1.43.jar
必须要把上传的jar文件名称改为:mv mysql-connector-java-5.1.43.jar mysql-connector-java.jar
安装Httpd服务(manager节点安装)
yum install -y  httpd #安装

service httpd start #启动

systemctl enable httpd.service #设置httpd服务开机自启
3.8集群和网络拓扑要求
- • 决定集群中的节点数目。
- • 决定集群中的机柜数目及每个机柜的名称。
- • 决定每个机柜中的节点数目。
- • 决定每个节点所在的子网(或多个子网)。
- • 决定每个节点的主机名和IP地址。
- • 决定哪个机器是管理节点。
- • 决定哪些机器是NameNode。
- • 决定哪些机器是客户端,哪些机器运行CDH服务,或二者兼是。
- • 一旦主机名分配给NameNode,主机名则不能再更改。
- • 确定你知道要加入到CDH集群中的每个节点的root密码。
- • 管理节点必须和集群中的其他节点属于同一子网。
- • 决定在集群中使用哪些组件。
- • 决定网络带宽和交换机背板带宽;决定交换机型号。
- • 决定如何连接到交换机;必须知道需要用到哪些以太网端口和是否需要绑定。
- • 确定每台机器的IP地址和主机名。决定如何分配IP(使用DHCP或静态分配)。决定如何解析主机名(使用DNS或/etc/hosts)。如果使用/etc/hosts,管理节点将负责更新集群中每台机器的/etc/hosts
3.8系统的推荐设置
- • 节点的主机名解析。注意,主机名只能由英文、数字和“-”组成,否则之后的安装会出现问题。
- • 要同时添加一组节点到集群中。
- • 要减少网络延迟,集群中的所有节点都必须属于同一子网。
- • 每个节点应配置一块10GE的网卡,用于节点间的通信和执行集群中需要网络连接的任务。
- • 如果节点没有使用10GE的网卡,则可使用网卡绑定以便将多个网卡组合在一起以提升网络流量。
- 绑定的网卡必须使用工作模式6。
- • 每个节点推荐最小的系统分区,至少有300GB的磁盘空间。
- • 每个节点应至少有6T的可用磁盘空间用于HDFS。
- • 集群中应至少有5个DataNode。
- • 如果可能,避免将物理磁盘分为多个逻辑分区。除了系统分区外,每个物理磁盘应当仅有一个分区,且该分区包含整个物理磁盘。
- • 仅使用物理机器,不要使用虚拟机器。虚拟机可能会明显导致HDFS I/O的缓慢。
- • 节点所在的单个或多个子网不允许有其他机器。
- • 集群中不能同时有物理机器和虚拟机器。
- • 要确保集群中的机器不成为性能和I/O的瓶颈,所有机器必须有相似的硬件和软件配置,包括RAM、CPU和磁盘空间。
- • 每个节点应至少有64GB的内存。
- • 在管理节点上,由于集群中节点执行的系统监控,大量数据可被写入/var。推荐分配200GB(鉴于ganglia非常消耗硬盘,建议根据节点数目调整该值)的磁盘空间给/var所在分区。
- • 由于服务可能生成大量日志,推荐将/var/log放置在其他逻辑分区。这可保证日志不会占满根分区的空间。
- • 要加快对本地文件系统的读取,可使用noatime选项挂载磁盘,这表示文件访问次数不会被写回。
3.9配置sud权限
vim /etc/sudoers
## Next comes the main part: which users can run what
software on
## which machines (the sudoers file can be shared between
multiple
## systems).
## Syntax:
##
## user MACHINE=COMMANDS
##
## The COMMANDS section may have other options added to it.
##
## Allow root to run any commands anywhere
root ALL=(ALL) ALL
##添加内容为:
sudo ALL=(ALL) NOPASSWD: ALL
4CM安装
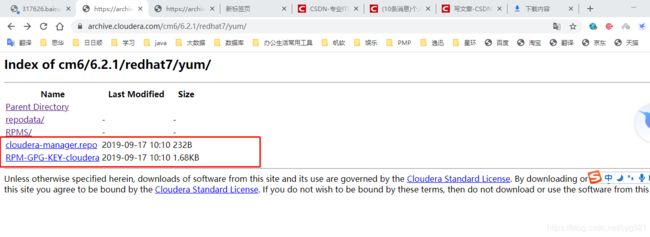
rpm --import https://archive.cloudera.com/cm6/6.2.1/redhat7/yum/RPM-GPG-KEY-cloudera
wget https://archive.cloudera.com/cm6/6.2.1/redhat7/yum/cloudera-manager.repo -p /etc/yum.repos.d/
#安装CM,在manager节点
yum install -y cloudera-manager-daemons cloudera-manager-agent cloudera-manager-server
#安装CM,在node节点
yum install -y cloudera-manager-daemons cloudera-manager-agent
可能需要安装的依赖:
yum install -y bind-utils
yum install -y psmisc
yum install -y cyrus-sasl-plain
yum install -y cyrus-sasl-gssapi
yum install -y portmap
yum install -y /lib/lsb/init-functions
yum install -y mod_ssl
yum install -y openssl-devel
yum install -y python-psycopg2
yum install -y MySQL-python
yum install -y libpq.so.5
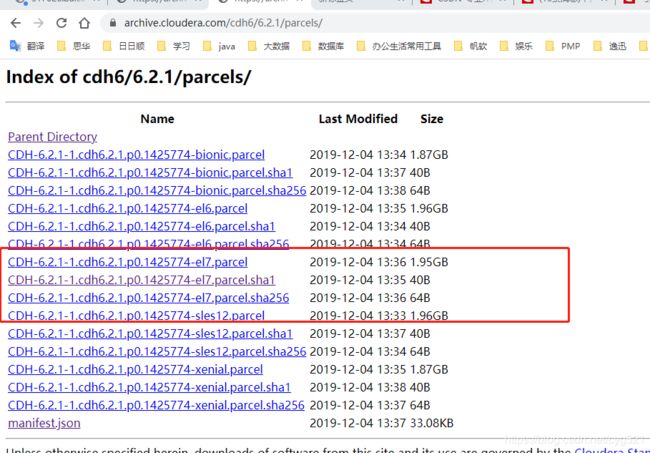
复制CDH的parcel文件到/opt/cloudera/parcel-repo
-rw-r--r-- 1 root root 2082186246 May 21 17:59 CDH-6.2.1-1.cdh6.2.1.p0.1605554-el7.parcel
-rw-r--r-- 1 root root         47 May 21 17:59 CDH-6.2.1-1.cdh6.2.1.p0.1605554-el7.parcel.sha1.txt
-rw-r--r-- 1 root root         64 May 21 17:59 CDH-6.2.1-1.cdh6.2.1.p0.1605554-el7.parcel.sha256
在/opt/cloudera/parcel-repo执行以下命令:
sha1sum CDH-6.2.1-1.cdh6.2.1.p0.1605554-el7.parcel  | awk ‘{ print $1 }’ > CDH-6.2.1-1.cdh6.2.1.p0.1605554-el7.parcel.sha


##执行初始化脚本:
/opt/cloudera/cm/schema/scm_prepare_database.sh mysql cmserver cmserveruser Yyf5211314!

##启动server服务
service cloudera-scm-server start

##查看server状态:
service cloudera-scm-server status

访问:CM web界面
http://主机ip:7180
用户名admin
密码admin
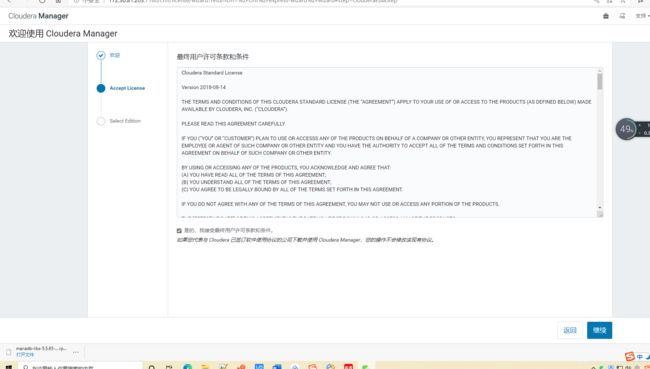
登录之后:
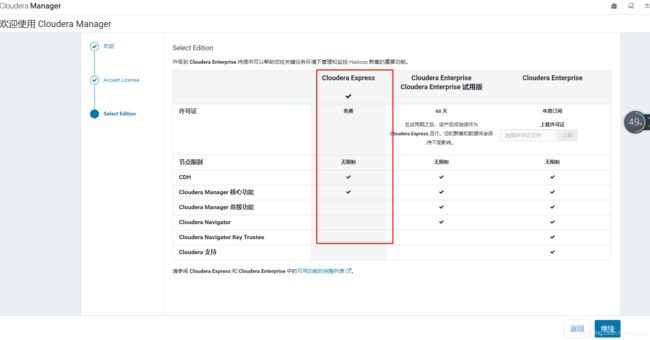
根据需要选择版本,我这里选择的是免费版本
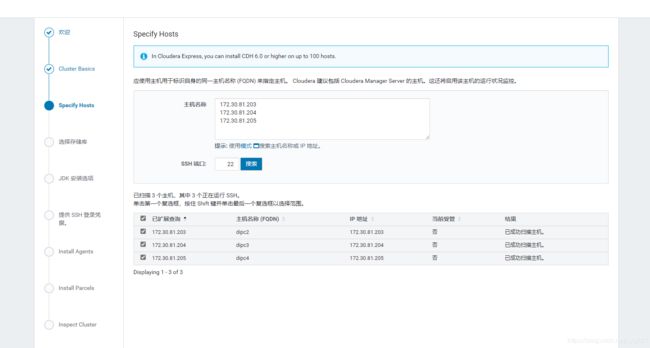
后面的就按照步骤一步一步来,选择CDH版本6.2.1,选择需要的服务或者全部安装
5CDH服务的角色
4.1Zookeeper角色
| 角色 | 描述 |
| Zookeeper |
|
4.2HDFS角色
| 角色 | 描述 |
| NameNode |
|
| DataNode |
|
| Secondary NameNode |
|
| Standby NameNode |
|
| JournalNode |
|
4.3YARN角色
| 角色 | 描述 |
| ResourceManager |
|
| Timeline Server |
|
4.4Hbase角色
| 角色 | 描述 |
| HMaster |
|
| HRegion Server |
|
| HBase Thrift |
|
| HBase-rest |
|
4.5Hive 角色
| 角色 | 描述 |
| Hive MetaStore |
|
| Hive Server |
|
4.6Streaming 角色
| 角色 | 描述 |
| Job server |
|
4.7Sqoop 角色
| 角色 | 描述 |
| Sqoop |
|
4.8Kafka 角色
| 角色 | 描述 |
| Kafka Server |
|
4.9Oozie 角色
| 角色 | 描述 |
| Oozie server |
|
4.10HUE 角色
| 角色 | 描述 |
| HUE server |
|
4.11Impala角色
| 角色 | 描述 |
| impalad |
|
| state store |
|
| CLI |
|
4.12Cloudera Search角色
| 角色 | 描述 |
| Cloudera Search |
|
4.13Cloudera Navigator
| 角色 | 描述 |
| Cloudera Navigator |
|
5操作系统安装
- 单独安装方式。
- 单独安装方式是使用Red Hat Enterprise Linux for Servers、CentOS系列或SUSE Linux Enterprise Server的安装光盘在每台服务器上独立安装操作系统。
- PXE安装方式。
vi /etc/sudoers /etc/sudoers## Next comes the main part: which users can run what
software on
## which machines (the sudoers file can be shared between
multiple
## systems).
## Syntax:
##
## user MACHINE=COMMANDS
##
## The COMMANDS section may have other options added to it.
##
## Allow root to run any commands anywhere
root ALL=(ALL) ALL
sudo ALL=(ALL) NOPASSWD: ALL6Cloudera Manager的安装
6.1Manager资源需求
- RAM – 4 GB(推荐)
- Python - Cloudera Manager支持Python 2.4及更高版本,不支持Python 3.0及更高版本。Hue和CDH 5安装需要Python 2.6或2.7.CDH支持的操作系统均包含了Python 2.4或者更高版本。
- Perl - Cloudera Manager 需要安装Perl
- python-psycopg2 package - Cloudera Manager 5.8 及其高版本依赖于包python-psycopg2. 运行Cloudera Manager agent节点需要安装该包。该包未包含在SLES 11和SLES 12仓库中。您需要添加包含该包的仓库或者是手动安装该包。
- 包含该包的仓库地址如下:
- SLES 11 SP4: http://download.opensuse.org/repositories/devel:/languages:/python/SLE_11_SP4/devel:languages:python.repo
- SLES 12 SP2: http://download.opensuse.org/repositories/devel:/languages:/python/SLE_12_SP2/devel:languages:python.repo
- 或者从如下URL中下载包,手动安装:
- SLES 11 SP4: http://download.opensuse.org/repositories/devel:/languages:/python/SLE_11_SP4/x86_64/python-psycopg2-2.6.2-1.3.x86_64.rpm
- SLES 12 SP2: http://download.opensuse.org/repositories/devel:/languages:/python/SLE_12_SP2/x86_64/python-psycopg2-2.6.2-1.4.x86_64.rpm
- 包含该包的仓库地址如下:
6.2安装介质
6.3安装前准备
6.3.1 网络配置【所有节点】
vi /etc/sysconfig/network

NETWORKING=yes
HOSTNAME=yeexun-1     注意【每个节点改成相应的hostname】
NETWORKING_IPV6=no
PEERNTP=no
保存退出:wq
service network restartvi /etc/hosts
10.21.1.10 yeexun-1
10.21.1.18 yeexun-2
10.21.1.5 yeexun-3
6.3.2 设置ssh免密登陆【所有节点】
ssh-keygen -t rsacat /root/.ssh/id_rsa.pub >> /root/.ssh/authorized_keys /root/.ssh/id_rsa.pub >> /root/.ssh/authorized_keyschmod 600 /root/.ssh/authorized_keys 600 /root/.ssh/authorized_keysscp /root/.ssh/id_rsa.pub yeexun-2:/root/(yeexun-1上执行) /root/.ssh/id_rsa.pub yeexun-2:/root/(yeexun-1上执行)cat ~/id_rsa.pub >> ~/.ssh/authorized_keys(在yeexun-2上执行) ~/id_rsa.pub >> ~/.ssh/authorized_keys(在yeexun-2上执行)scp /root/.ssh/id_rsa.pub yeexun-3:/root/(yeexun-1上执行) /root/.ssh/id_rsa.pub yeexun-3:/root/(yeexun-1上执行)cat ~/id_rsa.pub >> ~/.ssh/authorized_keys(在yeexun-3上执行) ~/id_rsa.pub >> ~/.ssh/authorized_keys(在yeexun-3上执行)ssh yeexun-ceshi-4 yeexun-ceshi-4 6.3.3 安装Oracle的JDK【所有节点】
rpm -qa | grep java -qa | grep javarpm -qa | grep openjdk | xargs rpm -e --nodeps -qa | grep openjdk | xargs rpm -e --nodepstar zxvf jdk1.7.0_67.tar.gz 解压安装jdk zxvf jdk1.7.0_67.tar.gz 解压安装jdkmkdir -p /usr/java/jdk1.7 创建多级目录 -p /usr/java/jdk1.7 创建多级目录mv jdk1.7.0_67/* /usr/java/jdk1.7 将解压文件剪切到相应目录中国 jdk1.7.0_67/* /usr/java/jdk1.7 将解压文件剪切到相应目录中国rmdir jdk1.7.0_67 另一种配置jdk 安装完毕为他建立一个链接以节省目录长度 安装完毕为他建立一个链接以节省目录长度 ln -s /usr/java/jdk1.8.0_60/ /usr/jdkln -s /usr/java/jdk1.8.0_60/ /usr/jdk (ln -s jdk1.7.0_67/ latest)(ln -s jdk1.7.0_67/ latest)vi /etc/profile /etc/profileexport JAVA_HOME=/usr/java/jdk1.7 JAVA_HOME=/usr/java/jdk1.7export PATH=$JAVA_HOME/bin:$PATH PATH=$JAVA_HOME/bin:$PATHexport CLASSPATH=.:$JAVA_HOME/lib/dt.jar:$JAVA_HOME/lib/tools.jar CLASSPATH=.:$JAVA_HOME/lib/dt.jar:$JAVA_HOME/lib/tools.jarsource /etc/profile /etc/profile6.3.4 安装配置MySQL5.7【主节点】
vi /etc/resolv.conf /etc/resolv.confnameserver 192.168.1.1 192.168.1.1nameserver 114.114.114.114 114.114.114.114yum install -y perl install -y perlyum install -y numactl install -y numactl rpm -qa | grep mysql-libs -qa | grep mysql-libsrpm -e --nodeps 【包名】 -e --nodeps 【包名】rpm -ivh mysql-community-common-5.7.15-1.el6.x86_64.rpm -ivh mysql-community-common-5.7.15-1.el6.x86_64.rpmrpm -ivh mysql-community-libs-5.7.15-1.el6.x86_64.rpm -ivh mysql-community-libs-5.7.15-1.el6.x86_64.rpmrpm -ivh mysql-community-client-5.7.15-1.el6.x86_64.rpm -ivh mysql-community-client-5.7.15-1.el6.x86_64.rpmrpm -ivh mysql-community-server-5.7.15-1.el6.x86_64.rpm -ivh mysql-community-server-5.7.15-1.el6.x86_64.rpmchkconfig mysqld on mysqld onservice mysqld start mysqld startecho "validate_password=off" >> /etc/my.cnf "validate_password=off" >> /etc/my.cnfservice mysqld restart mysqld restartcat /var/log/mysqld.log | more | grep password /var/log/mysqld.log | more | grep passwordmysql -uroot -p[查看得到的密码] -uroot -p[查看得到的密码][root@localhost ~]# mysql -uroot -proot@localhost ~]# mysql -uroot -pEnter password: password: Welcome to the MySQL monitor. Commands end with ; or \g. to the MySQL monitor. Commands end with ; or \g.Your MySQL connection id is 4 MySQL connection id is 4Server version: 5.7.12 version: 5.7.12Copyright (c) 2000, 2016, Oracle and/or its affiliates. All rights reserved. (c) 2000, 2016, Oracle and/or its affiliates. All rights reserved.Oracle is a registered trademark of Oracle Corporation and/or its is a registered trademark of Oracle Corporation and/or itsaffiliates. Other names may be trademarks of their respective. Other names may be trademarks of their respectiveowners..Type 'help;' or '\h' for help. Type '\c' to clear the current input statement. 'help;' or '\h' for help. Type '\c' to clear the current input statement. #设置数据库新密码#设置数据库新密码mysql> set password=’123qwe’;> set password=’123qwe’;Query OK, 0 rows affected (0.00 sec) OK, 0 rows affected (0.00 sec)mysql> exit> exitByecreate database hive DEFAULT CHARSET utf8 COLLATE utf8_general_ci; 创建数据库hive database hive DEFAULT CHARSET utf8 COLLATE utf8_general_ci; 创建数据库hivecreate database amon DEFAULT CHARSET utf8 COLLATE utf8_general_ci; 创建数据库amon database amon DEFAULT CHARSET utf8 COLLATE utf8_general_ci; 创建数据库amongrant all privileges on *.* to 'root'@'yeexun-ceshi-4' identified by '123qwe'; 赋予权限 all privileges on *.* to 'root'@'yeexun-ceshi-4' identified by '123qwe'; 赋予权限flush privileges; 刷新权限 privileges; 刷新权限创建数据库用做测试
create database hive; database hive;grant all privileges on hive.* to hive@'localhost' identified by 'hive'; all privileges on hive.* to hive@'localhost' identified by 'hive'; grant all privileges on hive.* to hive@' yeexun-ceshi-5' identified by 'hive'; all privileges on hive.* to hive@' yeexun-ceshi-5' identified by 'hive'; create database hue; database hue;grant all privileges on hue.* to hue@'localhost' identified by 'hue'; all privileges on hue.* to hue@'localhost' identified by 'hue'; grant all privileges on hue.* to hue@' yeexun-ceshi-5' identified by 'hue'; all privileges on hue.* to hue@' yeexun-ceshi-5' identified by 'hue'; create database monitor; database monitor;grant all privileges on monitor.* to monitor@'localhost' identified by 'monitor'; all privileges on monitor.* to monitor@'localhost' identified by 'monitor'; grant all privileges on monitor.* to monitor@' yeexun-ceshi-5' identified by 'monitor'; all privileges on monitor.* to monitor@' yeexun-ceshi-5' identified by 'monitor'; create database reports; database reports;grant all privileges on reports.* to reports@'localhost' identified by 'reports'; all privileges on reports.* to reports@'localhost' identified by 'reports'; grant all privileges on reports.* to reports@' yeexun-ceshi-5' identified by 'reports'; all privileges on reports.* to reports@' yeexun-ceshi-5' identified by 'reports'; create database oozie; database oozie;grant all privileges on oozie.* to oozie@'localhost' identified by 'oozie'; all privileges on oozie.* to oozie@'localhost' identified by 'oozie'; grant all privileges on oozie.* to oozie@'yeexun-ceshi-5' identified by 'oozie'; all privileges on oozie.* to oozie@'yeexun-ceshi-5' identified by 'oozie';flush privileges; privileges;create database navigatoraudit; database navigatoraudit;grant all privileges on navigatoraudit.* to navigatoraudit@'localhost' identified by 'navigatoraudit'; all privileges on navigatoraudit.* to navigatoraudit@'localhost' identified by 'navigatoraudit'; grant all privileges on navigatoraudit.* to navigatoraudit@'yeexun-ceshi-5' identified by 'navigatoraudit'; all privileges on navigatoraudit.* to navigatoraudit@'yeexun-ceshi-5' identified by 'navigatoraudit';flush privileges; privileges;create database navigatormetadata; database navigatormetadata;grant all privileges on navigatormetadata.* to navigatormetadata@'localhost' identified by 'navigatormetadata'; all privileges on navigatormetadata.* to navigatormetadata@'localhost' identified by 'navigatormetadata'; grant all privileges on navigatormetadata.* to navigatormetadata@'yeexun-ceshi-5' identified by 'navigatormetadata'; all privileges on navigatormetadata.* to navigatormetadata@'yeexun-ceshi-5' identified by 'navigatormetadata';flush privileges; privileges;6.3.5 关闭防火墙和SELinux 【所有节点】
service iptables stop (临时关闭) iptables stop (临时关闭) chkconfig iptables off (重启后生效) iptables off (重启后生效)setenforce 0 (临时生效) 0 (临时生效) vi /etc/selinux/config /etc/selinux/config6.3.6 配置NTP(Network Time Protocol)服务【所有节点】
- 集群中所有主机必须保持时间同步,如果时间相差较大会引起各种问题。
- 具体思路如下: master节点作为ntp服务器与外界对时中心同步时间,随后对所有slave节点提供时间同步服务。
- 所有slave节点以master节点为基础同步时间。
yum install -y ntp install -y ntpchkconfig ntpd on ntpd onchkconfig --list ntpd --list ntpdntpdate -u 202.120.2.101 -u 202.120.2.101vi /var/lib/ntp/drift /var/lib/ntp/driftrestrict 127.0.0.1 127.0.0.1restrict -6 ::1 -6 ::1restrict default nomodify notrap default nomodify notrap server 202.120.2.101 prefer 202.120.2.101 preferincludefile /etc/ntp/crypto/pw /etc/ntp/crypto/pwkeys /etc/ntp/keys /etc/ntp/keysservice ntpd start ntpd startntpstatsynchronised to NTP server () at stratum 2time correct to within 74 mspolling server every 128 s to NTP server () at stratum 2time correct to within 74 mspolling server every 128 svi /var/lib/ntp/drift /var/lib/ntp/driftrestrict 127.0.0.1 127.0.0.1restrict -6 ::1 -6 ::1restrict default kod nomodify notrap nopeer noquery default kod nomodify notrap nopeer noqueryrestrict -6 default kod nomodify notrap nopeer noquery -6 default kod nomodify notrap nopeer noquery#这里是主节点的主机名或者ipserver yeexun-1 yeexun-1includefile /etc/ntp/crypto/pw /etc/ntp/crypto/pwkeys /etc/ntp/keys /etc/ntp/keysvi /etc/resolv.conf /etc/resolv.confnameserver 192.168.1.1 192.168.1.1nameserver 114.114.114.114 114.114.114.114yum install -y perl install -y perlyum install -y numactl install -y numactl6.4安装Cloudera Manager
6.4.1解压cloudera manager
tar zxvf cloudera-manager-el6-cm5.8.1_x86_64.tar.gz zxvf cloudera-manager-el6-cm5.8.1_x86_64.tar.gzcloudera manager的目录默认位置在/opt下,将解压后的cm-5.8.1和cloudera目录放到/opt目录下
cp -r cm-5.8.1 /opt -r cm-5.8.1 /optcp -r cloudera /opt -r cloudera /opt6.4.2 为Cloudera Manager 5建立数据库
cp mysql-connector-java-5.1.26-bin.jar /opt/cm-5.8.1/share/cmf/lib/ mysql-connector-java-5.1.26-bin.jar /opt/cm-5.8.1/share/cmf/lib/CREATE USER 'cm'@'localhost' IDENTIFIED BY '123qwe'; USER 'cm'@'localhost' IDENTIFIED BY '123qwe';GRANT ALL PRIVILEGES ON *.* TO 'cm'@'localhost' ; ALL PRIVILEGES ON *.* TO 'cm'@'localhost' ;CREATE USER cm IDENTIFIED BY '123qwe'; USER cm IDENTIFIED BY '123qwe';GRANT ALL PRIVILEGES ON *.* TO cm ; ALL PRIVILEGES ON *.* TO cm ;flush privileges; privileges;/opt/cm-5.8.1/share/cmf/schema/scm_prepare_database.sh mysql cm -hlocalhost -uroot -p123qwe --scm-host localhost scm scm scmcm-5.8.1/share/cmf/schema/scm_prepare_database.sh mysql cm -hlocalhost -uroot -p123qwe --scm-host localhost scm scm scmvi /opt/cm-5.8.1/etc/cloudera-scm-agent/config.ini /opt/cm-5.8.1/etc/cloudera-scm-agent/config.iniscp -r /opt/cm-* root@yeexun-2:/opt -r /opt/cm-* root@yeexun-2:/optscp -r /opt/cm-* root@yeexun-3:/opt -r /opt/cm-* root@yeexun-3:/opt6.4.4 准备Parcels,用以安装CDH5
/opt/cloudera/parcel-repo/cloudera/parcel-repo/CDH-5.8.0-1.cdh5.8.0.p0.42-el6.parcel cp CDH-5.8.0-1.cdh5.8.0.p0.42-el6.parcel /opt/cloudera/parcel-repo/-5.8.0-1.cdh5.8.0.p0.42-el6.parcel cp CDH-5.8.0-1.cdh5.8.0.p0.42-el6.parcel /opt/cloudera/parcel-repo/CDH-5.8.0-1.cdh5.8.0.p0.42-el6.parcel.sha1 cp CDH-5.8.0-1.cdh5.8.0.p0.42-el6.parcel.sha /opt/cloudera/parcel-repo/-5.8.0-1.cdh5.8.0.p0.42-el6.parcel.sha1 cp CDH-5.8.0-1.cdh5.8.0.p0.42-el6.parcel.sha /opt/cloudera/parcel-repo/manifest.json cp manifest.json /opt/cloudera/parcel-repo/.json cp manifest.json /opt/cloudera/parcel-repo/6.4.5 启动脚本
/opt/cm-5.8.1/etc/init.d/cloudera-scm-server startcm-5.8.1/etc/init.d/cloudera-scm-server start/opt/cm-5.8.1/etc/init.d/cloudera-scm-server statusopt/cm-5.8.1/etc/init.d/cloudera-scm-server statusmkdir /opt/cm-5.8.1/run/cloudera-scm-agent /opt/cm-5.8.1/run/cloudera-scm-agent/opt/cm-5.8.1/etc/init.d/cloudera-scm-agent startcm-5.8.1/etc/init.d/cloudera-scm-agent start/opt/cm-5.8.1/run/cloudera-scm-agent/process/logcm-5.8.1/run/cloudera-scm-agent/process/log/opt/cm-5.8.1/log/cloudera-scm-server/cloudera-scm-server.logcm-5.8.1/log/cloudera-scm-server/cloudera-scm-server.log7用Cloudera Manager配置集群
