Android 中使用代码动态网格布局
Android 中使用代码动态网格布局
本文介绍在android中使用代码动态布局,有时候根据不同的需求,比如需要根据服务器上的条目个数来决定app中页面布局控件(显示个数,图标等)。此处介绍通过java代码进行动态布局。
一、效果图:
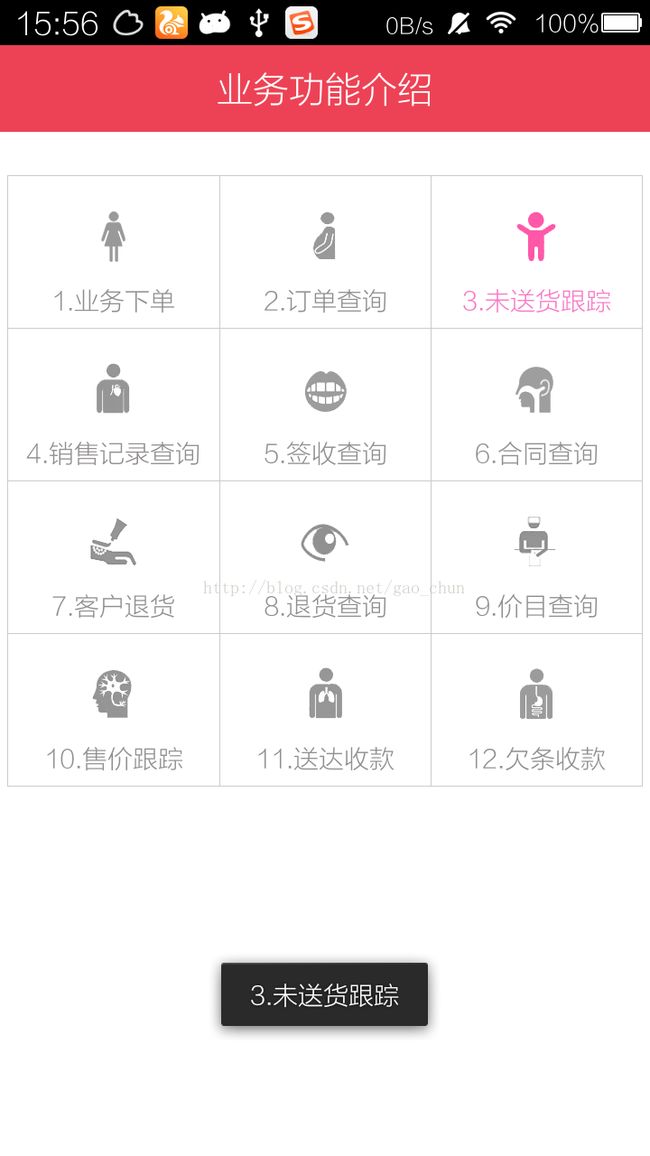
图片资源随便找的,将就将就吧
二、给出xml文件布局
三、子条目xml布局文件
如图:
四、java代码动态布局
/**
 * @author gao_chun
 *
 */
public class MainActivity extends Activity implements OnClickListener{

    private ViewGroup mMoreLayout;  //父布局容器(动态加载的资源图片和文字等布局都将添加在其里面)

    /* (non-Javadoc)
     * @see app.ui.TitleActivity#onCreate(android.os.Bundle)
     */
    @Override
    protected void onCreate(Bundle savedInstanceState) {
        super.onCreate(savedInstanceState);
        initUI();   //保证启动方法的唯一性
    }

    private void initUI() {
        setContentView(R.layout.activity_main);

        //找到该容器(这里的控件为LinearLayout,转换为ViewGroup是因为ViewGroup是容器的基类)
        mMoreLayout = (ViewGroup) findViewById(R.id.layout_more);

        //由于文字也是动态生成,使用android中array文件定义资源文件,并取出
        final String[] categories = getResources().getStringArray(R.array.categories);

        final int size = categories.length;     //String[]的长度
        final int rowCount = size / 3;          //需要布局的行数(每行三个)

        /**
         * 动态添加布局方法封装
         * 参数 1.父容器    2.资源文字数组  3.从第几个开始   4.行数
         */
        fillViews(mMoreLayout, categories, 0, rowCount);
    }

    private void fillViews(ViewGroup layout, String[] categories, int start, int end) {
        // 表格第一条线
        View.inflate(this, R.layout.layout_line_horizonal, layout);

        for (int i = start; i < end; i++) {

            //找到索引,便于根据索引添加图片文件和文字
            final int firstIndex = i * 3;
            final int secondIndex = i * 3 + 1;
            final int thirdIndex = i * 3 + 2;

            final String firstCategory = categories[firstIndex];
            final String secondCategory = categories[secondIndex];
            final String thirdCategory = categories[thirdIndex];

            //这里控制的是加载本地图片,通过应用包命找到 有规则命名的图片资源文件
            //--->因为这里有两种效果,一是默认的图片,二是按下触发后的图片和文字
            final int firstDrawableNormal = getResources().getIdentifier(String.format("ic_department_%02d_normal",
                    firstIndex + 1),"drawable",getApplicationContext().getPackageName());
            final int secondDrawableNormal = getResources().getIdentifier(String.format("ic_department_%02d_normal",
                    secondIndex + 1),"drawable",getApplicationContext().getPackageName());
            final int thirdDrawableNormal = getResources().getIdentifier(String.format("ic_department_%02d_normal",
                    thirdIndex + 1),"drawable",getApplicationContext().getPackageName());
            final int firstDrawablePressed = getResources().getIdentifier(String.format("ic_department_%02d_pressed",
                    firstIndex + 1),"drawable",getApplicationContext().getPackageName());
            final int secondDrawablePressed = getResources().getIdentifier(String.format("ic_department_%02d_pressed",
                    secondIndex + 1),"drawable",getApplicationContext().getPackageName());
            final int thirdDrawablePressed = getResources().getIdentifier(String.format("ic_department_%02d_pressed",
                    thirdIndex + 1),"drawable",getApplicationContext().getPackageName());

            //这里是将上面找到的   默认图片  和  按下时的图片 放入到  StateListDrawable缓存中
            final StateListDrawable firstDrawable = new StateListDrawable();
            firstDrawable.addState(new int[]{android.R.attr.state_pressed}, getResources().getDrawable(firstDrawablePressed));
            firstDrawable.addState(new int[]{}, getResources().getDrawable(firstDrawableNormal));

            final StateListDrawable secondDrawable = new StateListDrawable();
            secondDrawable.addState(new int[]{android.R.attr.state_pressed}, getResources().getDrawable(secondDrawablePressed));
            secondDrawable.addState(new int[]{}, getResources().getDrawable(secondDrawableNormal));

            final StateListDrawable thirdDrawable = new StateListDrawable();
            thirdDrawable.addState(new int[]{android.R.attr.state_pressed}, getResources().getDrawable(thirdDrawablePressed));
            thirdDrawable.addState(new int[]{}, getResources().getDrawable(thirdDrawableNormal));


            // 父布局
            final LinearLayout linearLayout = new LinearLayout(this);

            // 第一个子布局
            View.inflate(this, R.layout.layout_line_vertical, linearLayout);
            View.inflate(this, R.layout.layout_department, linearLayout);
            View.inflate(this, R.layout.layout_line_vertical, linearLayout);

            // 第二个子布局
            View.inflate(this, R.layout.layout_department, linearLayout);
            View.inflate(this, R.layout.layout_line_vertical, linearLayout);

            // 第三个子布局
            View.inflate(this, R.layout.layout_department, linearLayout);
            View.inflate(this, R.layout.layout_line_vertical, linearLayout);

            LayoutParams layoutParams = new LinearLayout.LayoutParams(LayoutParams.MATCH_PARENT,LayoutParams.WRAP_CONTENT);
            layout.addView(linearLayout, layoutParams);

            // 表格最后一条线
            View.inflate(this, R.layout.layout_line_horizonal, layout);

            //根据索引getChildAt到指定的位置
            final View firstView = linearLayout.getChildAt(1);
            firstView.setTag(firstCategory);        //设置tag,便于在后面判断点击的哪一个
            firstView.setOnClickListener(this);     //设置点击
            final TextView firstTextView = (TextView) firstView.findViewById(R.id.text_title);
            firstTextView.setText(firstCategory);   //设置文字
            final ImageView firstImageView = (ImageView) firstView.findViewById(R.id.image_icon);
            firstImageView.setImageDrawable(firstDrawable); //将之前缓存的图片设置出来

            final View secondView = linearLayout.getChildAt(3);
            secondView.setTag(secondCategory);
            secondView.setOnClickListener(this);
            final TextView secondTextView = (TextView) secondView.findViewById(R.id.text_title);
            secondTextView.setText(secondCategory);
            final ImageView secondImageView = (ImageView) secondView.findViewById(R.id.image_icon);
            secondImageView.setImageDrawable(secondDrawable);

            final View thirdView = linearLayout.getChildAt(5);
            thirdView.setTag(thirdCategory);
            thirdView.setOnClickListener(this);
            final TextView thirdTextView = (TextView) thirdView.findViewById(R.id.text_title);
            thirdTextView.setText(thirdCategory);
            final ImageView thirdImageView = (ImageView) thirdView.findViewById(R.id.image_icon);
            thirdImageView.setImageDrawable(thirdDrawable);

        }
    }

    /* (non-Javadoc)
     * @see app.ui.TitleActivity#onClick(android.view.View)
     */
    @Override
    public void onClick(View v) {
        final Object tag = v.getTag();      //通过之前setTag找到点击位置
        if (tag != null) {
            String department = (String) tag;
            Toast.makeText(this, department, 0).show();
        } // else ignored
    }
}
在onClick事件中通过布局时设置的Tag找出用户点击的是哪一个具体的Layout
注:关于 getResources().getIdentifier 方法可参考:http://blog.csdn.net/gao_chun/article/details/45891383
欢迎下载源码:http://download.csdn.net/download/gao_chun/8740979
转载请注明.