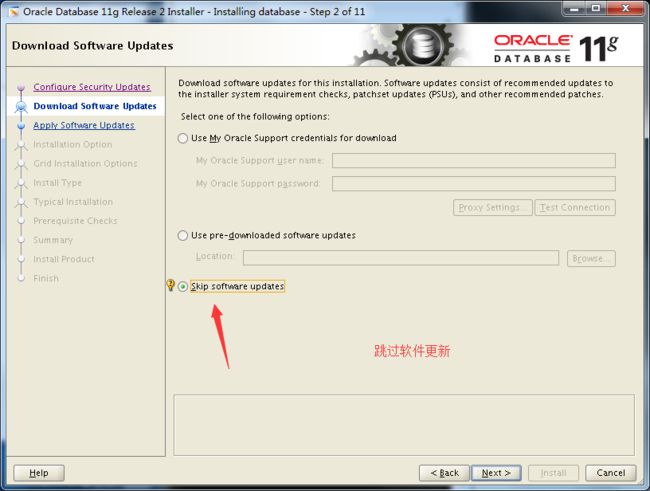
提示:上面就是我们的基础环境,如果不进行设置。可能在后期会出现error
上传软件包
[root@oracle ~]# mkdir /tmp/oracle && cd /tmp/oracle
[root@oracle oracle]# ls
p10404530_112030_Linux-x86-64_1of7.zip
p10404530_112030_Linux-x86-64_2of7.zip
#我们需要使用unzip进行解压,解压之后会在当前目录下生成database文件夹
接下来我们需要安装2个包组,因为包组比较大,建议使用本地Yum进行安装
配置本地Yum源

图①
配置yum源
[root@oracle oracle]# cd /etc/yum.repos.d/
[root@oracle yum.repos.d]# mkdir test && mv * test
mv: cannot move `test' to a subdirectory of itself, `test/test'
[root@oracle yum.repos.d]# cat CentOS-Base.repo
[local]
name=local
baseurl=file:///mnt
enable=1
gpgcheck=0
[root@oracle ~]# mount /dev/cdrom /mnt/
[root@oracle ~]# yum clean all
[root@oracle ~]# yum makecache
安装包组
[root@oracle ~]# yum groupinstall desktop -y
[root@oracle ~]# yum install xorg-x11-utils -y
[root@oracle ~]# yum groupinstall "Compatibility libraries" "Base" "Development tools" "debugging Tools" -y
安装Xmanage Enterprise5
下载地址链接:http://pan.baidu.com/s/1c14osfe 密码:ilvx
或者百度进行自行下载

这里需要填写产品密钥,打开我提供的压缩包,运行激活码文件。将时间修改为12/05/2014即可

这里需要填写产品密钥,打开我提供的压缩包,运行激活码文件。将时间修改为12/05/2014即可

安装成功之后会在桌面生成下图文件

打开,运行下图软件


提示:我们只需要打开一个就好,出现这个图标就可以
因为我们要使用图形化进行安装,需要进行IP的绑定
首先,打开网络适配器,我们的网络是NAT模式,所以是VMware 8 网卡。 如果是其他网卡,就查看对于的IP即可


提示:如果你比较逗比,找不到自己连接服务器的IP地址。我们可以使用w命令进行查看
[root@oracle ~]# w
10:48:42 up 1:00, 2 users, load average: 0.00, 0.00, 0.04
USER TTY FROM LOGIN@ IDLE JCPU PCPU WHAT
root tty1 - 09:48 59:57 0.02s 0.02s -bash
root pts/1 192.168.56.1 10:48 0.00s 0.01s 0.00s w
知道IP之后我们设置环境变量
[root@oracle ~]# export DISPLAY=192.168.56.1:0.0#因为这个变量是临时的,所有的会话必须在一个窗口
我们还需要开始转发功能,如果不勾选会无法显示图形化

设置完成后我们切换Oracle用户,执行安装脚本
[root@oracle ~]# su - oracle
[oracle@oracle ~]$ cd /tmp/oracle/database/
[oracle@oracle database]$ ./runInstaller
执行完后就会出现Oracle 11g 的logo

提示:必须按照我的方法进行操作,如果不按照我的方法进行操作。必定会出现问题
图形化安装Oracle


我们选择创建并配置数据库

我们选择Server版本,Desktop是桌面版本,Server是服务器版本

我们选择安装单实例数据库

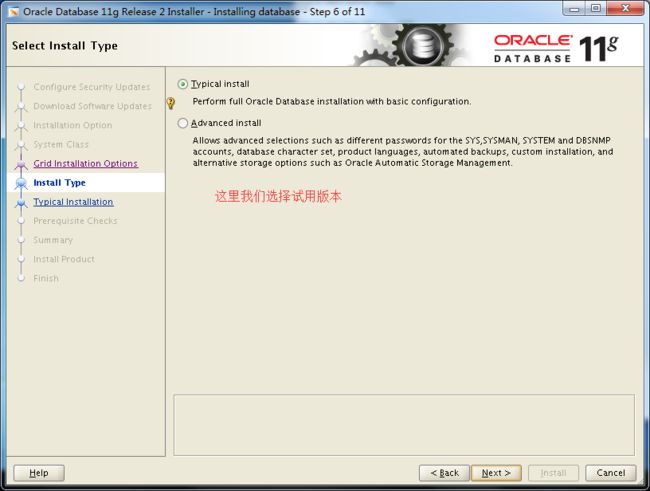
我们选择试用版本进行安装

设置账户密码


点击继续即可

检查安装环境

此处提示我们swap分区需要达到2.7273G,并且还缺少2个软件包

生成swap分区
[root@oracle ~]#cd /tmp && dd if=/dev/zero of=swap bs=1M count=2048
[root@oracle tmp]# mkswap /tmp/swap -f
[root@oracle tmp]# swapon /tmp/swap
[root@oracle tmp]# free -m
total used free shared buffers cached
Mem: 1861 1780 81 0 93 1433
-/+ buffers/cache: 253 1607
Swap: 4031 0 4031
因为还缺少软件包,我们还需要在安装软件包
[root@oracle ~]# yum install -y libaio-devel
还缺少一个pdksh软件包,我们提供软件包下载。地址如下
链接:http://pan.baidu.com/s/1hsp3sXY 密码:nbos
上传后安装软件包
[root@oracle tmp]# rpm -ivh pdksh-5.2.14-37.el5_8.1.x86_64.rpm
warning: pdksh-5.2.14-37.el5_8.1.x86_64.rpm: Header V3 DSA/SHA1 Signature, key ID e8562897: NOKEY
Preparing... ########################################### [100%]
1:pdksh ########################################### [100%]
我们进行重新检查

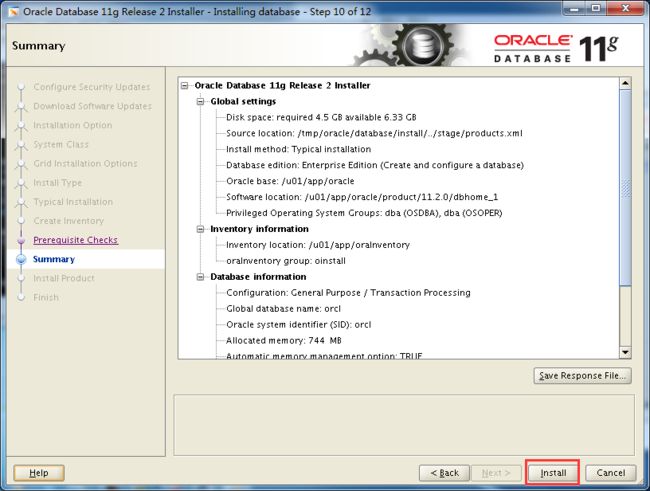
最后环境都通过之后会有下图,我们可以将它保存一份

等待安装完成

会跳转到其他窗口,继续等待即可

然后下一步

这里提示我们需要执行脚本

提示:我们不能着急点确定,先执行脚本。然后在点击确定
使用Root用户执行2个脚本
[root@oracle ~]# sh /u01/oraInventory/orainstRoot.sh[root@oracle ~]# sh /u01/app/oracle/product/11.2.0.3/db_1/root.sh
注:这个路径要根据提示进行操作!
下图提示:企业版Oracle已经安装完成,管理界面是ip:1158/em

我们点击关闭
我们可以查看是否有oracle进程
[root@oracle ~]# netstat -lntup
Active Internet connections (only servers)
Proto Recv-Q Send-Q Local Address Foreign Address State PID/Program name
tcp 0 0 0.0.0.0:22 0.0.0.0:* LISTEN 6741/sshd
tcp 0 0 127.0.0.1:25 0.0.0.0:* LISTEN 6845/master
tcp 0 0 127.0.0.1:6010 0.0.0.0:* LISTEN 6923/sshd
tcp 0 0 0.0.0.0:37919 0.0.0.0:* LISTEN 1093/rpc.statd
tcp 0 0 0.0.0.0:3938 0.0.0.0:* LISTEN 15166/emagent
tcp 0 0 0.0.0.0:111 0.0.0.0:* LISTEN 1073/rpcbind
tcp 0 0 :::1521 :::* LISTEN 12265/tnslsnr
tcp 0 0 :::38065 :::* LISTEN 1093/rpc.statd
tcp 0 0 :::22 :::* LISTEN 6741/sshd
tcp 0 0 ::1:25 :::* LISTEN 6845/master
tcp 0 0 ::1:6010 :::* LISTEN 6923/sshd
tcp 0 0 :::58049 :::* LISTEN 13105/ora_d000_orcl
tcp 0 0 :::1158 :::* LISTEN 15140/java
..................
其中1521就是oracle进程,1158就是Web端的端口
我们如果还想登陆的话就需要进行授权,需要给em设置用户名密码
[oracle@oracle ~]$ sqlplus / as sysdba #需要进入到oracle用户下,否则会没有sqlplus命令
SQL> alter user sys identified by 123456;
授权完之后使用浏览器进行访问,URL如下
https://192.168.56.11:1158/em
用户名:sys 密码:123456

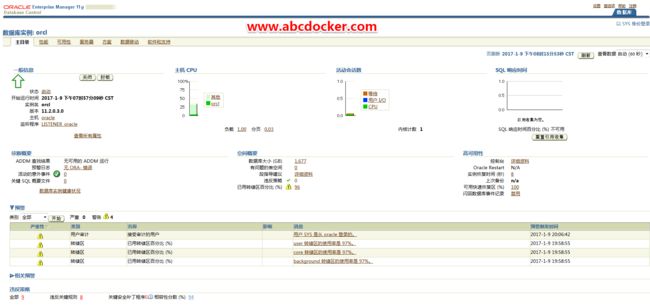
监控图如下:

文章转载于:https://www.abcdocker.com/abcdocker/2090
老男孩教育官方网站:http://www.oldboyedu.com/


