手把手带你学Docker:Docker的网络原理(五)
导语
运行容器是需要使用端口映射的,可是为什么呢?
答: 容器使用的ip是172.17.0.0/16网段的,外界的用户只能访问宿主机的10.0.0.0/24网段,无法访问172.17.0.0/16网段。们运行容器的目的:是希望运行在容器中的服务,能够被外界访问,这里就涉及到了外网10.0.0.0/24到容器内网172.17.0.0/16网段的转换,所以需要做端口映射。
进入容器
现在我们进入容器,并且查看容器的ip地址:
[root@docker01 ~]# docker run -it centos:6.8
[root@8a89c3a541c4 /]# ifconfig
eth0      Link encap:Ethernet  HWaddr 02:42:AC:11:00:02
          inet addr:172.17.0.2  Bcast:172.17.255.255  Mask:255.255.0.0
          UP BROADCAST RUNNING MULTICAST  MTU:1500  Metric:1
          RX packets:12 errors:0 dropped:0 overruns:0 frame:0
          TX packets:0 errors:0 dropped:0 overruns:0 carrier:0
          collisions:0 txqueuelen:0
          RX bytes:1016 (1016.0 b)  TX bytes:0 (0.0 b)

lo        Link encap:Local Loopback
          inet addr:127.0.0.1  Mask:255.0.0.0
          UP LOOPBACK RUNNING  MTU:65536  Metric:1
          RX packets:0 errors:0 dropped:0 overruns:0 frame:0
          TX packets:0 errors:0 dropped:0 overruns:0 carrier:0
          collisions:0 txqueuelen:1
          RX bytes:0 (0.0 b)  TX bytes:0 (0.0 b)

[root@8a89c3a541c4 /]#
注意: 这个时候我们在外网肯定是访问不了ip为 172.17.0.2,在自己电脑上ping一下可以发现:
XXX@localhost ~ % ping 172.17.0.2
PING 172.17.0.2 (172.17.0.2): 56 data bytes
Request timeout for icmp_seq 0
Request timeout for icmp_seq 1
Request timeout for icmp_seq 2
Request timeout for icmp_seq 3
Request timeout for icmp_seq 4
Request timeout for icmp_seq 5
^Z
zsh: suspended  ping 172.17.0.2
XXX@localhost ~ %
端口映射
为了使外网能够访问宿主机中的容器,就要使用到容器端口映射的方法,指定映射(docker 自动添加一条iptables规则实现端口映射):
-p hostPort:containerPort #一个ip的情况下映射
-p ip:hostPort:containerPort #绑定多个ip时,指定ip和port映射到容器的端口
-p ip::containerPort(随机端口) #多个ip时,指定ip随机端口映射到容器的端口
-p hostPort:containerPort:udp #指定端口映射协议
-p 81:80 -p 443:443 #可以指定多个-p 随机映射
docker run -P #(随机端口)
这里我启动一个Nginx容器,宿主机的端口80映射到容器端口80:
[root@docker01 ~]# docker run -d -p 80:80 nginx:latest
86a8b65b92386f0e42aeb5375c5173b366be9da9641f16dffd86121cf39268ea
[root@docker01 ~]# netstat -lntup
Active Internet connections (only servers)
Proto Recv-Q Send-Q Local Address           Foreign Address         State       PID/Program name
tcp        0      0 10.0.0.11:11211         0.0.0.0:*               LISTEN      1075/memcached
tcp        0      0 0.0.0.0:4369            0.0.0.0:*               LISTEN      1/systemd
tcp        0      0 0.0.0.0:22              0.0.0.0:*               LISTEN      1082/sshd
tcp        0      0 0.0.0.0:15672           0.0.0.0:*               LISTEN      1083/beam.smp
tcp        0      0 127.0.0.1:25            0.0.0.0:*               LISTEN      1423/master
tcp        0      0 0.0.0.0:25672           0.0.0.0:*               LISTEN      1083/beam.smp
tcp        0      0 10.0.0.11:3306          0.0.0.0:*               LISTEN      1292/mysqld
tcp6       0      0 ::1:11211               :::*                    LISTEN      1075/memcached
tcp6       0      0 :::80                   :::*                    LISTEN      2205/docker-proxy
tcp6       0      0 :::22                   :::*                    LISTEN      1082/sshd
tcp6       0      0 ::1:25                  :::*                    LISTEN      1423/master
tcp6       0      0 :::5672                 :::*                    LISTEN      1083/beam.smp
udp        0      0 10.0.0.11:11211         0.0.0.0:*                           1075/memcached
udp        0      0 0.0.0.0:123             0.0.0.0:*                           771/chronyd
udp        0      0 127.0.0.1:323           0.0.0.0:*                           771/chronyd
udp6       0      0 ::1:11211               :::*                                1075/memcached
udp6       0      0 ::1:323                 :::*                                771/chronyd
[root@docker01 ~]#
同时在iptables中进行查看(最后一条),tcp dpt:80 to:172.17.0.2:80,在宿主机防火墙中所有从80端口进来的请求都会映射到容器172.17.0.2:80:
[root@docker01 ~]# iptables -t nat -L -n
Chain PREROUTING (policy ACCEPT)
target     prot opt source               destination
DOCKER     all  --  0.0.0.0/0            0.0.0.0/0            ADDRTYPE match dst-type LOCAL

Chain INPUT (policy ACCEPT)
target     prot opt source               destination

Chain OUTPUT (policy ACCEPT)
target     prot opt source               destination
DOCKER     all  --  0.0.0.0/0           !127.0.0.0/8          ADDRTYPE match dst-type LOCAL

Chain POSTROUTING (policy ACCEPT)
target     prot opt source               destination
MASQUERADE  all  --  172.17.0.0/16        0.0.0.0/0
MASQUERADE  tcp  --  172.17.0.2           172.17.0.2           tcp dpt:80

Chain DOCKER (2 references)
target     prot opt source               destination
RETURN     all  --  0.0.0.0/0            0.0.0.0/0
DNAT       tcp  --  0.0.0.0/0            0.0.0.0/0            tcp dpt:80 to:172.17.0.2:80
[root@docker01 ~]#
同时可通过docker inspect containerName查看容器的详细信息
[root@docker01 ~]# docker inspect 86a8b65b9238
[
    {
        "Id": "86a8b65b92386f0e42aeb5375c5173b366be9da9641f16dffd86121cf39268ea",
        "Created": "2019-07-24T01:07:54.419925553Z",
        "Path": "nginx",
        "Args": [
            "-g",
            "daemon off;"
        ],
    .
    .
    .
  省略部分
    .
    .
"Networks": {
                "bridge": {
                    "IPAMConfig": null,
                    "Links": null,
                    "Aliases": null,
                    "NetworkID": "4b698436944d7da202d81fcd7275bdbc073f07e852813c6052d956a78d58d389",
                    "EndpointID": "565e396bc726166c4a7e797e1f5872800250c7d61ede7fb9c60d437682b637d5",
                    "Gateway": "172.17.0.1",
                    "IPAddress": "172.17.0.2",
                    "IPPrefixLen": 16,
                    "IPv6Gateway": "",
                    "GlobalIPv6Address": "",
                    "GlobalIPv6PrefixLen": 0,
                    "MacAddress": "02:42:ac:11:00:02",
                    "DriverOpts": null
                }
            }
[root@docker01 ~]# curl -I 172.17.0.2
HTTP/1.1 200 OK
Server: nginx/1.17.1
Date: Wed, 24 Jul 2019 01:17:48 GMT
Content-Type: text/html
Content-Length: 612
Last-Modified: Tue, 25 Jun 2019 12:19:45 GMT
Connection: keep-alive
ETag: "5d121161-264"
Accept-Ranges: bytes

[root@docker01 ~]#
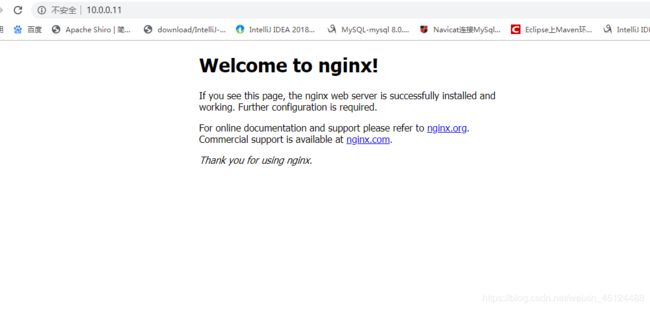
在windows(外网)访问宿主机ip:10.0.0.11,即可访问到容器中的nginx:
网络原理
通过上面的一系列操作之后,发现可以成功映射到Docker容器上了,下面我们一起看下网络原理。
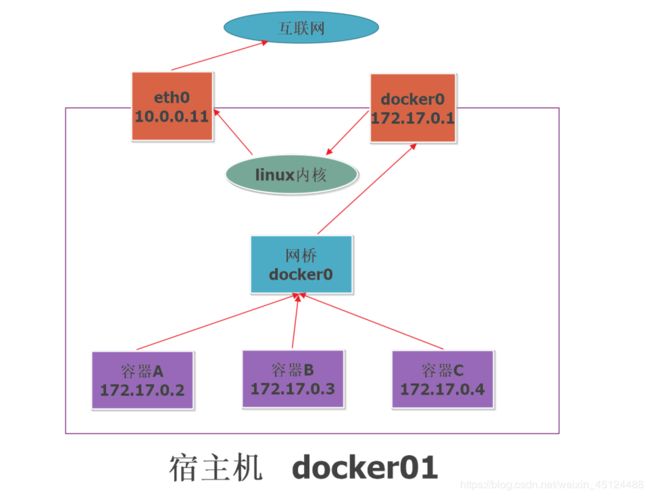
宿主机上有两块网卡:eth0(外网),docker0(内网),当docker服务启动时,会自动创建一个桥接网卡docker0(172.17.0.1),同时也会出现一个网桥docker0(通过brctl show查看,若出现-bash: brctl: command not found,则先安装bridge-utils,yum install bridge-utils),将所有docker的虚拟网卡(docker自动创建虚拟网卡)连接到docker0网桥上,docker容器启动时会按照顺序分配ip,如:172.17.0.2,172.17.0.3,172.17.0.4,172.17.0.5,…
为什么docker容器能与外网互通呢?
[root@docker01 ~]# docker run -it centos:6.8 /bin/bash
[root@c1288955af2a /]# curl -I www.baidu.com
HTTP/1.1 200 OK
Accept-Ranges: bytes
Cache-Control: private, no-cache, no-store, proxy-revalidate, no-transform
Connection: Keep-Alive
Content-Length: 277
Content-Type: text/html
Date: Wed, 24 Jul 2019 02:15:38 GMT
Etag: "575e1f60-115"
Last-Modified: Mon, 13 Jun 2016 02:50:08 GMT
Pragma: no-cache
Server: bfe/1.0.8.18

[root@c1288955af2a /]#
答: linux内核起关键性的作用,内核将容器的桥接网卡信号转发到eth0上,然后eth0与外网互通,其中net.ipv4.ip_forward=1用来配置转发。
[root@docker01 ~]# sysctl -a|grep ipv4|grep ip_forward
net.ipv4.ip_forward = 1
net.ipv4.ip_forward_use_pmtu = 0
sysctl: reading key "net.ipv6.conf.all.stable_secret"
sysctl: reading key "net.ipv6.conf.default.stable_secret"
sysctl: reading key "net.ipv6.conf.docker0.stable_secret"
sysctl: reading key "net.ipv6.conf.eth0.stable_secret"
sysctl: reading key "net.ipv6.conf.eth1.stable_secret"
sysctl: reading key "net.ipv6.conf.lo.stable_secret"
sysctl: reading key "net.ipv6.conf.veth1faf6fe.stable_secret"
sysctl: reading key "net.ipv6.conf.veth388cccb.stable_secret"
sysctl: reading key "net.ipv6.conf.vethc734548.stable_secret"
systemctl restart docker,当重启docker时内核将net.ipv4.ip_forward 临时调整为1,为了让这个内核参数永久生效,可将该配置放到内核配置文件中:
[root@docker01 ~]# vim /etc/sysctl.conf

net.ipv4.ip_forward = 1
然后重新生效内核参数:
[root@docker01 ~]# sysctl -p
net.ipv4.ip_forward = 1
[root@docker01 ~]#
总结
本篇文章讲述了Docker容器的网络原理,由于纯手打,难免会有纰漏,如果发现错误的地方,请第一时间告诉我,这将是我进步的一个很重要的环节。

