Openssh服务优化策略
1.常用命令
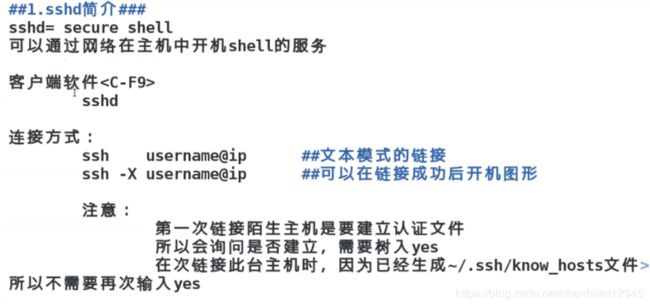
##我们首先需要找两台主机,因为我们这块没有两台主机,只能用rhel7.6和没有装图形的rhel8.1作为两台主机进行试验操作:
##我们将rhel8.1作为操作机,将rhel7.6作为服务机(被操作机)
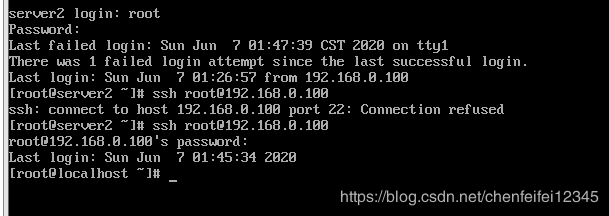
##我们先在rhel8.1上连接7.6的IPssh [email protected],以root的身份连接,
![]()
##我们进入被操作机的桌面创建个file
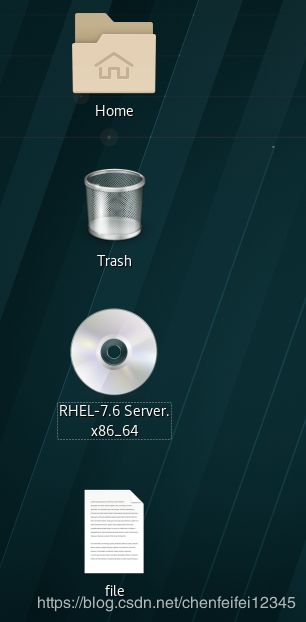
##可以看到rhel7.6中的桌面上已经创建好了file

##我们尝试用操作机打开被操作机的firefox,发现不能打开不存在图形连接,因此我们需要在前面连接的命令前加上-X 变成 ssh -X [email protected],
然后我们再输入 firefox让他运行firefox,发现这个操作机上firefox运行了,但是我们查看任务管理器看不到他的进程,在rhel7.6(被操作机上发现了他的进程),我们切断(被操作机的)firefox发现操作机上的firefox页面已经被关闭了
2.密钥和密码认证
[root@localhost ~]# ssh-keygen##密钥的生成命令
Generating public/private rsa key pair.
Enter file in which to save the key (/root/.ssh/id_rsa):##密钥保存的位置,我们按回车采用默认的
Enter passphrase (empty for no passphrase):##我们只要密钥认证不要密码认证按回车就行,想要密码必须输入大于4位的密码
Enter same passphrase again:
Your identification has been saved in /root/.ssh/id_rsa.##生成的密钥就在id_rsa,
Your public key has been saved in /root/.ssh/id_rsa.pub.##通过这个文件生成公钥文件
The key fingerprint is:
SHA256:eXbRDOKKbmJuQYpNPscyDGJvjGAu1etWUyapfknwUz4 root@localhost.localdomain
The key's randomart image is:
+---[RSA 2048]----+
|          . .    |
|         . . +   |
|   .   .  . . o  |
|+oo + o.+o   .   |
|*O++ =.*S o .    |
|ooO+*.* Eo .     |
|. .Bo+o+ .       |
|   o=oo          |
|   o..           |
+----[SHA256]-----+
[root@localhost ~]# cd /root/.ssh/
[root@localhost .ssh]# ls##id rsa为私钥,谁要登录就给别人这个, id_ras.oub这个是锁头加密的,公钥的模板
id_rsa id_rsa.pub known_hosts
[root@localhost .ssh]# ssh-copy-id -i id_rsa.pub [email protected]##公钥上传到服务器,也就是本机上。锁定的用户为root
/usr/bin/ssh-copy-id: INFO: Source of key(s) to be installed: "id_rsa.pub"
The authenticity of host '192.168.0.100 (192.168.0.100)' can't be established.
ECDSA key fingerprint is SHA256:gbwiJQP7FDiJiHRaHZrgjCnV9ZtogjioIBTP8KBLRLg.
ECDSA key fingerprint is MD5:85:5a:df:28:c7:2c:41:3e:73:1b:43:6d:5b:a0:57:08.
Are you sure you want to continue connecting (yes/no)? yes
/usr/bin/ssh-copy-id: INFO: attempting to log in with the new key(s), to filter out any that are already installed
/usr/bin/ssh-copy-id: INFO: 1 key(s) remain to be installed -- if you are prompted now it is to install the new keys
root@192.168.0.100's password:

Number of key(s) added: 1

Now try logging into the machine, with:   "ssh '[email protected]'"
and check to make sure that only the key(s) you wanted were added.
[root@localhost .ssh]# ls##这个就是真正的ssh的公钥,并且承认可以用私钥id_rsa把这个公钥打开
authorized_keys id_rsa id_rsa.pub known_hosts
[root@localhost .ssh]# cat authorized_keys ##可以看到公钥的模板和公钥内容是一致的
ssh-rsa AAAAB3NzaC1yc2EAAAADAQABAAABAQDC6NFY9o78IVMpTHkQg+3Vwd6gb0de1nxKs9HgUuAHTqIwPXPrYvRWViUnG+uEf0KwB5HDC8b7YMyISwPWr1NmBmJtkwTC4WwhTE0ir1v/p1kwSPr0OrSEXjpkE73WIlbT93vEZYEUmKdzIVfaiyxa/xQJNfo++2XjaNrajSjWD/BZyixjFSO88WDb2eukukVsFUBQQoTW1hIfFUNOyF5+Oi1rA9LYGH5JLnnRcL2C0u15m4gntHVfvLtaBdeOGJg2qpRYTarQhsrTRellxMRvD83WN878Jw1TnEItnaWIzzhx3jNpCGwT6CdKA35si+b2W/IZ6FEBqM8ZfCUtk9JB root@localhost.localdomain
[root@localhost .ssh]# cat id_rsa.pub
ssh-rsa AAAAB3NzaC1yc2EAAAADAQABAAABAQDC6NFY9o78IVMpTHkQg+3Vwd6gb0de1nxKs9HgUuAHTqIwPXPrYvRWViUnG+uEf0KwB5HDC8b7YMyISwPWr1NmBmJtkwTC4WwhTE0ir1v/p1kwSPr0OrSEXjpkE73WIlbT93vEZYEUmKdzIVfaiyxa/xQJNfo++2XjaNrajSjWD/BZyixjFSO88WDb2eukukVsFUBQQoTW1hIfFUNOyF5+Oi1rA9LYGH5JLnnRcL2C0u15m4gntHVfvLtaBdeOGJg2qpRYTarQhsrTRellxMRvD83WN878Jw1TnEItnaWIzzhx3jNpCGwT6CdKA35si+b2W/IZ6FEBqM8ZfCUtk9JB root@localhost.localdomain
##这样我们这台设备的加密已经做好了,一个是生成密钥,一个是上传密钥
##我们在用rehl8.1作为控制机控制rhel7.6,我们刚刚对7.6的ssh密钥加密了

##但是为何还是采用密码的方式进行验证
[root@localhost .ssh]# vim /etc/ssh/sshd_config##我们在这个文件的65行对将他的yes改为no

##这里下面的69行的yes也需要改为no
[root@localhost .ssh]# systemctl restart sshd.service##重新启动下sshd
![]()
##我们再次想进入rhel7.6发现被拒绝了,这就需要我们将私钥给rhel8.1才行
[root@localhost .ssh]# scp /root/.ssh/id_rsa [email protected]:/root/.ssh/
root@192.168.0.200's password:
id_rsa                                              100% 1675    89.3KB/s   00:00
##私钥已经给rhel8.1了 ,用rhel8.1可以看到私钥
![]()
##已经可以成功连接rhel7.6了
![]()
[root@localhost .ssh]# mv authorized_keys authorized_keys.backup##我们现在将公钥修改,备份成。backup,但是rhel8.1依然有私钥的情况下依然不可以登录,这样就达到了,我随时让谁登录,就可以让谁登,不想让谁登,就不让谁登,大大提高了系统的安全性
![]()
##也可以采用非交互的方法:
我们先删除前面生成的ssh的文件
[root@localhost .ssh]# rm -fr /root/.ssh/*
[root@localhost .ssh]# ssh-keygen --help##查看ssh-keygen的帮助
unknown option -- -
usage: ssh-keygen [-q] [-b bits] [-t dsa | ecdsa | ed25519 | rsa | rsa1]
                  [-N new_passphrase] [-C comment] [-f output_keyfile]
       ssh-keygen -p [-P old_passphrase] [-N new_passphrase] [-f keyfile]
       ssh-keygen -i [-m key_format] [-f input_keyfile]
       ssh-keygen -e [-m key_format] [-f input_keyfile]
       ssh-keygen -y [-f input_keyfile]
       ssh-keygen -c [-P passphrase] [-C comment] [-f keyfile]
       ssh-keygen -l [-v] [-E fingerprint_hash] [-f input_keyfile]
       ssh-keygen -B [-f input_keyfile]
       ssh-keygen -D pkcs11
       ssh-keygen -F hostname [-f known_hosts_file] [-l]
       ssh-keygen -H [-f known_hosts_file]
       ssh-keygen -R hostname [-f known_hosts_file]
       ssh-keygen -r hostname [-f input_keyfile] [-g]
       ssh-keygen -G output_file [-v] [-b bits] [-M memory] [-S start_point]
       ssh-keygen -T output_file -f input_file [-v] [-a rounds] [-J num_lines]
                  [-j start_line] [-K checkpt] [-W generator]
       ssh-keygen -s ca_key -I certificate_identity [-h] [-n principals]
                  [-O option] [-V validity_interval] [-z serial_number] file ...
       ssh-keygen -L [-f input_keyfile]
       ssh-keygen -A
       ssh-keygen -k -f krl_file [-u] [-s ca_public] [-z version_number]
                  file ...
[root@localhost .ssh]# ssh-keygen -f /root/.ssh/id_rsa -P ""##这种命令素材在指定的时候都已经给定了,不需要进行交互了 -f代表生成文件为id_rsa,-P “”生成的密码为空,就是只需要密钥,不需要密码
Generating public/private rsa key pair.
Your identification has been saved in /root/.ssh/id_rsa.
Your public key has been saved in /root/.ssh/id_rsa.pub.
The key fingerprint is:
SHA256:itwmjfwAlPmcjKLxWxxrtEpdv/Yu/4yJNu2HfPGEY0U root@localhost.localdomain
The key's randomart image is:
+---[RSA 2048]----+
|                 |
|   o          E  |
|  +          .   |
| . = .        .  |
|o o B . S    o   |
|.+ B X o    = .  |
|. o # = .o o =   |
| . = =  =o++o .  |
|  o   .ooBB+o    |
+----[SHA256]-----+
[root@localhost .ssh]# ssh-copy-id -i /root/.ssh/id_rsa.pub [email protected]##重新生成公钥但是出现报错,我们重新启动下systemctl restart sshd.service就好了
/usr/bin/ssh-copy-id: INFO: Source of key(s) to be installed: "/root/.ssh/id_rsa.pub"
/usr/bin/ssh-copy-id: INFO: attempting to log in with the new key(s), to filter out any that are already installed
/usr/bin/ssh-copy-id: INFO: 1 key(s) remain to be installed -- if you are prompted now it is to install the new keys
Password:

Number of key(s) added: 1

Now try logging into the machine, with:   "ssh '[email protected]'"
and check to make sure that only the key(s) you wanted were added.

[root@localhost ~]# ls /root/.ssh
authorized_keys  id_rsa  id_rsa.pub  known_hosts
[root@localhost ~]# scp /root/.ssh/id_rsa [email protected]:/root/.ssh/##将私钥给移动过去
The authenticity of host '192.168.0.200 (192.168.0.200)' can't be established.
ECDSA key fingerprint is SHA256:SXgwydk2vFiUVVVQqbeyWuw4qG3MdNbiGSej8KKh4ys.
ECDSA key fingerprint is MD5:6c:08:b2:bc:14:e7:cd:99:4b:59:bc:13:61:e4:21:56.
Are you sure you want to continue connecting (yes/no)? yes
Warning: Permanently added '192.168.0.200' (ECDSA) to the list of known hosts.


`root@192.168.0.200's password: `
id_rsa                                              100% 1679     1.3MB/s   00:00
3.修改端口
[root@localhost ~]# vim /etc/ssh/sshd_config##我们先把前面的设置修改回原位,将PasswordAuthentication 后面改为yes

[root@localhost ~]# systemctl restart sshd.service##然后再重启sshd服务

##我们在rhel8.1中将私钥匙删除,再加上上面关闭的功能,这样我们就关闭密钥加密了,就和最初的密码加密一样了
[root@localhost ~]# vim /etc/ssh/sshd_config##我们查看下这个sshd里面的功能里面有哪些可以提升ssh服务器更加安全
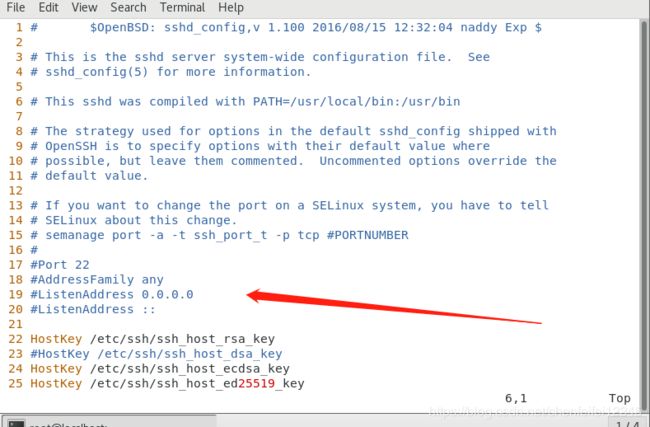
##这个Port22代表的是端口22,这个端口22怎么理解,我们的ip 192.168.0.100相当于我们系统的大门,而里面的各个服务相当于一个个小门,比如厨房的功能是做饭,卧室的功能是休息,不同的端口代表服务的功能不一样,而这个22就相当于第22个小门里面是ssh服务,可以给他提供服务
##那么我们如何修改端口,在修改端口前必须先设置为警告模式,这个在后面会学习到
[root@localhost ~]# setenforce 0
[root@localhost ~]# getenforce##必须确保是警告模式
Permissive
[root@localhost ~]# netstat -antlupe##这个命令查看我们系统的接口,a表示所有的意思,n表示不做解析(不把域名改为ip),t代表tcp协议,l代表lisen,u表示udp,p表示进程名称,e表示扩展信息。全部的意思就是扫描系统的所有端口,不做解析,显示tcp,udp,端口使用的程序,正常活跃的端口
[root@localhost ~]# netstat --help##详细的解释在help里面可以查询到
usage: netstat [-vWeenNcCF] [<Af>] -r netstat {-V|--version|-h|--help}
netstat [-vWnNcaeol] [<Socket> ...]
netstat { [-vWeenNac] -I[<Iface>] | [-veenNac] -i | [-cnNe] -M | -s [-6tuw] } [delay]
-r, --route display routing table
-I, --interfaces=<Iface> display interface table for <Iface>
-i, --interfaces display interface table
-g, --groups display multicast group memberships
-s, --statistics display networking statistics (like SNMP)
-M, --masquerade display masqueraded connections
-v, --verbose be verbose
-W, --wide don't truncate IP addresses
-n, --numeric don't resolve names
--numeric-hosts don't resolve host names
--numeric-ports don't resolve port names
--numeric-users don't resolve user names
-N, --symbolic resolve hardware names
-e, --extend display other/more information
-p, --programs display PID/Program name for sockets
-o, --timers display timers
-c, --continuous continuous listing
-l, --listening display listening server sockets
-a, --all display all sockets (default: connected)
-F, --fib display Forwarding Information Base (default)
-C, --cache display routing cache instead of FIB
-Z, --context display SELinux security context for sockets
<Socket>={-t|--tcp} {-u|--udp} {-U|--udplite} {-S|--sctp} {-w|--raw}
{-x|--unix} --ax25 --ipx --netrom
<AF>=Use '-6|-4' or '-A ' or '--' ; default: inet
List of possible address families (which support routing):
inet (DARPA Internet) inet6 (IPv6) ax25 (AMPR AX.25)
netrom (AMPR NET/ROM) ipx (Novell IPX) ddp (Appletalk DDP)
x25 (CCITT X.25)
[root@localhost ~]# netstat -antlupe |grep ssh##过滤一下ssh使用的端口
tcp        0      0 0.0.0.0:22              0.0.0.0:*               LISTEN      0          94841      13497/sshd
tcp        0      0 192.168.0.100:22        192.168.0.200:40930     ESTABLISHED 0          87041      12484/sshd: root@pt
tcp        0      0 192.168.0.100:22        192.168.0.100:40966     ESTABLISHED 0          94479      13425/sshd: root@pt
tcp        0      0 192.168.0.100:40966     192.168.0.100:22        ESTABLISHED 0          93636      13424/ssh
tcp6       0      0 :::22                   :::*                    LISTEN      0          94843      13497/sshd
##可以看到他的端口就是22端口
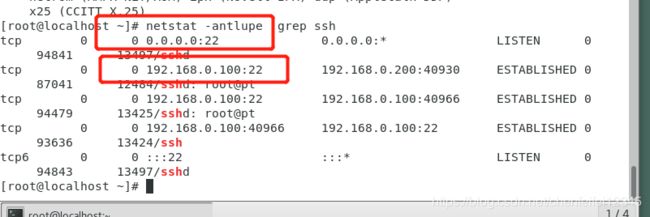
##这个0.0.0.0:22代表22端口在任何端口都是打开的
[root@localhost ~]# ifconfig##可以看到我们的接口有好几个,比如192.168.0.100127.0.0.1,包括192.168.122.1这几个端口都是打开的
ens33: flags=4163<UP,BROADCAST,RUNNING,MULTICAST>  mtu 1500
        inet 192.168.0.100  netmask 255.255.255.0  broadcast 192.168.0.255
        inet6 fe80::20c:29ff:fe0f:635a  prefixlen 64  scopeid 0x20<link>
        ether 00:0c:29:0f:63:5a  txqueuelen 1000  (Ethernet)
        RX packets 8144  bytes 661735 (646.2 KiB)
        RX errors 0  dropped 0  overruns 0  frame 0
        TX packets 2614  bytes 254492 (248.5 KiB)
        TX errors 0  dropped 0 overruns 0  carrier 0  collisions 0

lo: flags=73<UP,LOOPBACK,RUNNING>  mtu 65536
        inet 127.0.0.1  netmask 255.0.0.0
        inet6 ::1  prefixlen 128  scopeid 0x10<host>
        loop  txqueuelen 1000  (Local Loopback)
        RX packets 724  bytes 129766 (126.7 KiB)
        RX errors 0  dropped 0  overruns 0  frame 0
        TX packets 724  bytes 129766 (126.7 KiB)
        TX errors 0  dropped 0 overruns 0  carrier 0  collisions 0

virbr0: flags=4099<UP,BROADCAST,MULTICAST>  mtu 1500
        inet 192.168.122.1  netmask 255.255.255.0  broadcast 192.168.122.255
        ether 52:54:00:bd:87:59  txqueuelen 1000  (Ethernet)
        RX packets 0  bytes 0 (0.0 B)
        RX errors 0  dropped 0  overruns 0  frame 0
        TX packets 0  bytes 0 (0.0 B)
        TX errors 0  dropped 0 overruns 0  carrier 0  collisions 0
[root@localhost ~]# vim /etc/vimrc##在这个里面将显示行号可以设置为永久显示
[root@localhost ~]# vim /etc/ssh/sshd_config##我们将端口改为8888
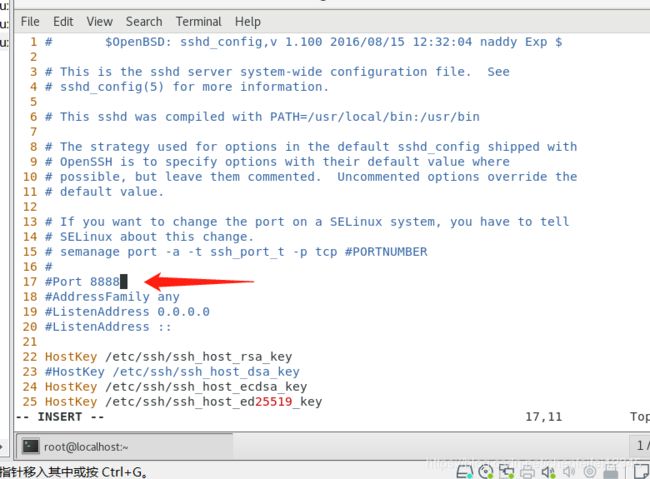
[root@localhost ~]# systemctl restart sshd.service
[root@localhost ~]# netstat -antlupe | grep ssh
tcp        0      0 0.0.0.0:8888              0.0.0.0:*               LISTEN      0          98619      13783/sshd
tcp        0      0 192.168.0.100:8888        192.168.0.200:40930     ESTABLISHED 0          87041      12484/sshd: root@pt
tcp        0      0 192.168.0.100:8888        192.168.0.100:40966     ESTABLISHED 0          94479      13425/sshd: root@pt
tcp        0      0 192.168.0.100:40966     192.168.0.100:22        ESTABLISHED 0          93636      13424/ssh
tcp6       0      0 :::22                   :::*                    LISTEN      0          98621      13783/sshd
##可以看到我们的端口已经被改为8888了。我们接下来在rhel8.1中连接rhel7.6 systemctl [email protected]发现请求被拒绝了,报错是22端口连接失败,因此我们需要把我们新修改的端口加上去systemctl [email protected] -p 8888,然后报错显示防火墙我们需要再关闭防火墙,systemctl stop firewalld,然后再systemctl [email protected] -p 8888发现就可以连接上rhel7.6了
4.参数设定
##我们再将刚才的设置还原
[root@localhost ~]# ifconfig
ens33: flags=4163<UP,BROADCAST,RUNNING,MULTICAST>  mtu 1500
        inet 192.168.0.100  netmask 255.255.255.0  broadcast 192.168.0.255
        inet6 fe80::20c:29ff:fe0f:635a  prefixlen 64  scopeid 0x20<link>
        ether 00:0c:29:0f:63:5a  txqueuelen 1000  (Ethernet)
        RX packets 8829  bytes 712250 (695.5 KiB)
        RX errors 0  dropped 0  overruns 0  frame 0
        TX packets 2831  bytes 274155 (267.7 KiB)
        TX errors 0  dropped 0 overruns 0  carrier 0  collisions 0

lo: flags=73<UP,LOOPBACK,RUNNING>  mtu 65536
        inet 127.0.0.1  netmask 255.0.0.0
        inet6 ::1  prefixlen 128  scopeid 0x10<host>
        loop  txqueuelen 1000  (Local Loopback)
        RX packets 735  bytes 130690 (127.6 KiB)
        RX errors 0  dropped 0  overruns 0  frame 0
        TX packets 735  bytes 130690 (127.6 KiB)
        TX errors 0  dropped 0 overruns 0  carrier 0  collisions 0

virbr0: flags=4099<UP,BROADCAST,MULTICAST>  mtu 1500
        inet 192.168.122.1  netmask 255.255.255.0  broadcast 192.168.122.255
        ether 52:54:00:bd:87:59  txqueuelen 1000  (Ethernet)
        RX packets 0  bytes 0 (0.0 B)
        RX errors 0  dropped 0  overruns 0  frame 0
        TX packets 0  bytes 0 (0.0 B)
        TX errors 0  dropped 0 overruns 0  carrier 0  collisions 0
[root@localhost ~]# vim /etc/ssh/sshd_config

[root@localhost ~]# systemctl restart sshd.service
[root@localhost ~]# netstat -antlpe | grep sshd##可以看到我们的端口已经由0.0.0.0。22改为我们输入的192.168.0.100.22的端口了
[root@localhost ~]# netstat -antlpe | grep ssh
tcp 0 0 192.168.0.100:22 0.0.0.0:* LISTEN 0 60624 9369/sshd
[root@localhost ~]# ssh [email protected]##这个时候我们就只允许192.168.0.100这个ip通过连接了,200那个就不能链接了
The authenticity of host '192.168.0.100 (192.168.0.100)' can't be established.
ECDSA key fingerprint is SHA256:gbwiJQP7FDiJiHRaHZrgjCnV9ZtogjioIBTP8KBLRLg.
ECDSA key fingerprint is MD5:85:5a:df:28:c7:2c:41:3e:73:1b:43:6d:5b:a0:57:08.
Are you sure you want to continue connecting (yes/no)? yes
Warning: Permanently added '192.168.0.100' (ECDSA) to the list of known hosts.
root@192.168.0.100's password:
Last login: Mon Jun  8 01:18:22 2020
[root@localhost ~]# logout
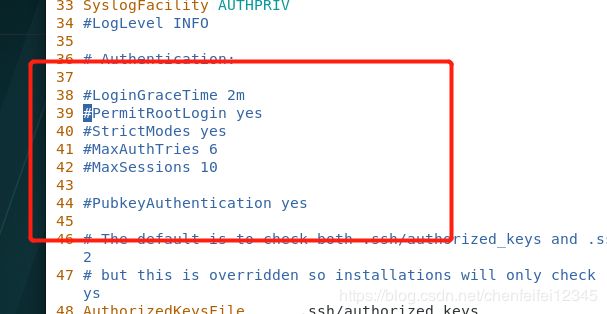
##这个permitrootlogin yes的意思是是否允许超级用户通过ssh的验证

##我们现在将他改为no
[root@localhost ~]# ssh [email protected]##我们先不重启他的服务发现他可以连接
root@192.168.0.100's password:
Last login: Mon Jun  8 01:24:24 2020 from 192.168.0.100
[root@localhost ~]# logout
Connection to 192.168.0.100 closed.
[root@localhost ~]# systemctl restart sshd.service##我们重启服务后
[root@localhost ~]# ssh [email protected]##发现他不能以root的身份进行连接了
root@192.168.0.100's password:
Permission denied, please try again.
[root@localhost ~]# ssh [email protected]##这个普通用户可以连接
cxg@192.168.0.100's password:
Last login: Tue May  5 03:36:43 2020
[cxg@localhost ~]$
[root@localhost ~]# vim /etc/ssh/sshd_config ##我们现在将刚才的设置注释掉加上#

[root@localhost ~]# systemctl restart sshd.service##重启服务后,发现root用户又可以连接了
[root@localhost ~]# ssh [email protected]
root@192.168.0.100's password:
Last failed login: Mon Jun  8 01:31:17 CST 2020 from 192.168.0.100 on ssh:notty
There were 2 failed login attempts since the last successful login.
Last login: Mon Jun  8 01:29:49 2020 from 192.168.0.100
##我们如何设置用户的黑名单和白名单呢,设置让谁用不让谁用
##我们先创建两个用户并且给他们密码,加上我们系统本来的cxg用户和root用户总共相当于四个用户了
[root@localhost ~]# useradd westos
[root@localhost ~]# useradd lee
[root@localhost ~]# passwd westos
Changing password for user westos.
New password:
BAD PASSWORD: The password is shorter than 8 characters
Retype new password:
passwd: all authentication tokens updated successfully.
[root@localhost ~]# passwd westos
Changing password for user westos.
New password:
BAD PASSWORD: The password is shorter than 8 characters
Retype new password:
passwd: all authentication tokens updated successfully.
[root@localhost ~]# vim /etc/ssh/sshd_config ##这个DenyUsers的意思是黑名单是lee

[root@localhost ~]# ssh [email protected]##lee用户不能连接,
lee@192.168.0.100's password:
Permission denied, please try again.
##要是我们想将lee拉出黑名单,只需要给刚才的DenyUsers lee加上#注释掉就行
##那白名单如何创建呢?
[root@localhost ~]# vim /etc/ssh/sshd_config##当我们把wesots放入白名单就相当于默认将其他用户放到黑名单了,所有只有他这一个用户可以连接
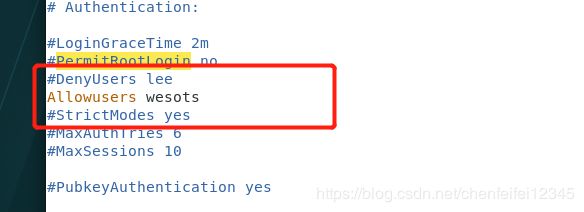
##上面应该是westos不是wesots,已经修改
[root@localhost ~]# systemctl restart sshd.service##重启服务
[root@localhost ~]# ssh [email protected]##lee用户不能连接
lee@192.168.0.100's password:
Permission denied, please try again.
lee@192.168.0.100's password:
[root@localhost ~]# ssh [email protected]##root用户不能连接
root@192.168.0.100's password:
Permission denied, please try again.
root@192.168.0.100's password:
[root@localhost ~]# ssh [email protected]##westos可以连接
westos@192.168.0.100's password:
Last failed login: Mon Jun  8 01:44:45 CST 2020 from 192.168.0.100 on ssh:notty
There were 3 failed login attempts since the last successful login.
[westos@localhost ~]$
##如果我们想加入多个用户到白名单,它们之间的分隔符是怎么设置的呢,我们可以查询man 5 sshd_config
[westos@localhost ~]$ man 5 sshd_config ##在里面搜索AllowUsers的信息

##可以看到这边已经解释了用空格分开


[root@localhost ~]# ssh [email protected]##这个时候我们的lee用户就被成功加入白名单了
lee@192.168.0.100's password:
Last login: Mon Jun  8 01:31:30 2020 from 192.168.0.100

