首先安装各种库:
apt install -y build-essential zlib1g-dev libpcre3 libpcre3-dev unzip cmake libncurses5-dev libpam0g-dev bison libboost-dev libssl-dev openssl g++ libxml2-dev libcurl3-openssl-dev libpng-dev libfreetype6-dev libfreetype6-dev dnutls-devmariadb是mysql原作者另外开发的一个版本,mariadb使用方法和mysql一样,可以直接用mysql的客户端连接.
在这下载包并解压:
https://mariadb.org/download/
建立组和用户:
groupadd mysql

useradd -s/sbin/nologin -M -g mysql mysql
建立数据文件夹,并写配置文件
mkdir  /home/mariadb
vim /home/mariadb/mariadb-10.0.20.cnf
内容:
# MariaDB 配置文件
#
# 此配置文件适用于内存大于2G的情况
#
# MariaDB programs look for option files in a set of
# locations which depend on the deployment platform.
# You can copy this option file to one of those
# locations. For information about these locations, do:
# 'my_print_defaults --help' and see what is printed under
# Default options are read from the following files in the given order:
# More information at: http://dev.mysql.com/doc/mysql/en/option-files.html
#
# In this file, you can use all long options that a program supports.
# 如果你想知道有哪些选项,可以在命令行执行这个程序,带上"--help"参数.

# 客户端配置
[client]
#password   = your_password
port        = 3306
socket      = /tmp/mysql.sock

# Here follows entries for some specific programs

# 服务端配置
[mysqld]
port        = 3306
socket      = /tmp/mysql.sock
skip-external-locking
key_buffer_size = 384M
max_allowed_packet = 1M
table_open_cache = 512
sort_buffer_size = 2M
read_buffer_size = 2M
read_rnd_buffer_size = 8M
myisam_sort_buffer_size = 64M
thread_cache_size = 8
query_cache_size = 32M
# Try number of CPU's*2 for thread_concurrency
thread_concurrency = 8

# Point the following paths to a dedicated disk
#tmpdir     = /tmp/

# Don't listen on a TCP/IP port at all. This can be a security enhancement,
# if all processes that need to connect to mysqld run on the same host.
# All interaction with mysqld must be made via Unix sockets or named pipes.
# Note that using this option without enabling named pipes on Windows
# (via the "enable-named-pipe" option) will render mysqld useless!
#
#skip-networking

# Replication Master Server (default)
# binary logging is required for replication
log-bin=mysql-bin

# required unique id between 1 and 2^32 - 1
# defaults to 1 if master-host is not set
# but will not function as a master if omitted
server-id   = 1

# Replication Slave (comment out master section to use this)
#
# To configure this host as a replication slave, you can choose between
# two methods :
#
# 1) Use the CHANGE MASTER TO command (fully described in our manual) -
#    the syntax is:
#
#    CHANGE MASTER TO MASTER_HOST=, MASTER_PORT=,
#    MASTER_USER=, MASTER_PASSWORD= ;
#
#    where you replace , ,  by quoted strings and
#     by the master's port number (3306 by default).
#
#    Example:
#
#    CHANGE MASTER TO MASTER_HOST='125.564.12.1', MASTER_PORT=3306,
#    MASTER_USER='joe', MASTER_PASSWORD='secret';
#
# OR
#
# 2) Set the variables below. However, in case you choose this method, then
#    start replication for the first time (even unsuccessfully, for example
#    if you mistyped the password in master-password and the slave fails to
#    connect), the slave will create a master.info file, and any later
#    change in this file to the variables' values below will be ignored and
#    overridden by the content of the master.info file, unless you shutdown
#    the slave server, delete master.info and restart the slaver server.
#    For that reason, you may want to leave the lines below untouched
#    (commented) and instead use CHANGE MASTER TO (see above)
#
# required unique id between 2 and 2^32 - 1
# (and different from the master)
# defaults to 2 if master-host is set
# but will not function as a slave if omitted
#server-id       = 2
#
# The replication master for this slave - required
#master-host     =
#
# The username the slave will use for authentication when connecting
# to the master - required
#master-user     =
#
# The password the slave will authenticate with when connecting to
# the master - required
#master-password =
#
# The port the master is listening on.
# optional - defaults to 3306
#master-port     =  3306
#
# binary logging - not required for slaves, but recommended
#log-bin=mysql-bin
#
# binary logging format - mixed recommended
#binlog_format=mixed

# Uncomment the following if you are using InnoDB tables
#innodb_data_home_dir = /home/mariadb
#innodb_data_file_path = ibdata1:2000M;ibdata2:10M:autoextend
#innodb_log_group_home_dir = /home/mariadb
# You can set .._buffer_pool_size up to 50 - 80 %
# of RAM but beware of setting memory usage too high
#innodb_buffer_pool_size = 384M
#innodb_additional_mem_pool_size = 20M
# Set .._log_file_size to 25 % of buffer pool size
#innodb_log_file_size = 100M
#innodb_log_buffer_size = 8M
#innodb_flush_log_at_trx_commit = 1
#innodb_lock_wait_timeout = 50

[mysqldump]
quick
max_allowed_packet = 16M

[mysql]
no-auto-rehash
# Remove the next comment character if you are not familiar with SQL
#safe-updates

[myisamchk]
key_buffer_size = 256M
sort_buffer_size = 256M
read_buffer = 2M
write_buffer = 2M

[mysqlhotcopy]
interactive-timeout
把文件分配给mysql用户
chown -R mysql:mysql /home/mariadb编译:
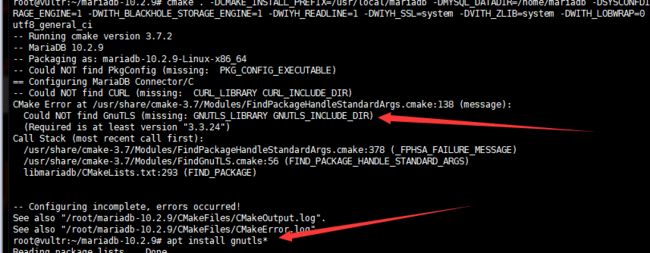
cmake . -DCMAKE_INSTALL_PREFIX=/usr/local/mariadb -DMYSQL_DATADIR=/home/mariadb -DSYSCONFDIR=/etc -DWITHOUT_TOKUDB=1 -DWITH_INNOBASE_STORAGE_ENGINE=1 -DWITH_ARCHIVE_STPRAGE_ENGINE=1 -DWITH_BLACKHOLE_STORAGE_ENGINE=1 -DWIYH_READLINE=1 -DWIYH_SSL=system -DVITH_ZLIB=system -DWITH_LOBWRAP=0 -DMYSQL_UNIX_ADDR=/tmp/mysql.sock -DDEFAULT_CHARSET=utf8 -DDEFAULT_COLLATION=utf8_general_ci这个过程中如果提示找不到库,可以像我这样操作:
make -j2

make install
配置:
cd /usr/local/mariadb/
chown -R mysql:mysql .   (←注意后面的'点')
scripts/mysql_install_db --datadir=/home/mariadb --user=mysql
mkdir /var/log/mariadb
配置systemd:
vim /usr/lib/systemd/system/mariadb.service[Unit]
Description=MariaDB Server
After=network.target
[Service]
User=mysql
Group=mysql
PIDFile=/tmp/mariadb.pid
ExecStart=/usr/local/mariadb/bin/mysqld_safe --defaults-file=/home/mariadb/mariadb-10.0.20.cnf --user=mysql --datadir=/home/mariadb --pid-file=/tmp/mariadb.pid
[Install]
WantedBy=multi-user.target配置密码:
/usr/local/mariadb/bin/mysqladmin -u root password 'new-password'