在matplotlib中,整个图像为一个Figure对象。在Figure对象中可以包含一个或者多个Axes对象。每个Axes(ax)对象都是一个拥有自己坐标系统的绘图区域。所属关系如下:
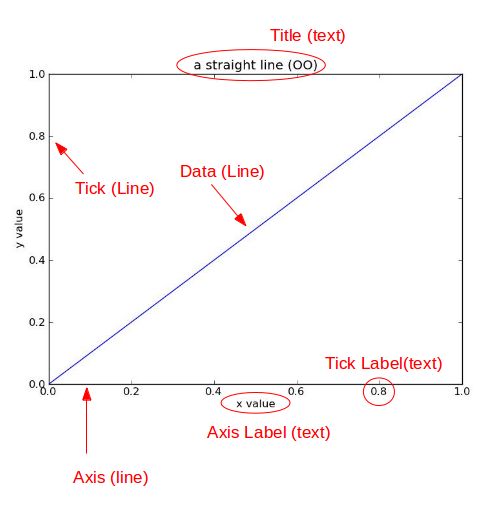
下面以一个直线图来详解图像内部各个组件内容:
其中:title为图像标题,Axis为坐标轴, Label为坐标轴标注,Tick为刻度线,Tick Label为刻度注释。
此段引用自: https://www.cnblogs.com/nju2014/p/5620776.html
数据读取
第一步依然是一个数据读取。此次的实验数据为一个国外不同媒体对不同电影的打分
import pandas as pd
reviews = pd.read_csv('fandango_scores.csv')  #不同媒体对不同电影的评分
cols = ['FILM', 'RT_user_norm', 'Metacritic_user_nom', 'IMDB_norm', 'Fandango_Ratingvalue', 'Fandango_Stars']
norm_reviews = reviews[cols]
print(norm_reviews[:1])
---------------------------------------------------------------------------------
                            FILM  RT_user_norm  Metacritic_user_nom  \
0  Avengers: Age of Ultron (2015)           4.3                 3.55

   IMDB_norm  Fandango_Ratingvalue  Fandango_Stars
0        3.9                   4.5             5.0
条形图
绘制第一个条形图
import matplotlib.pyplot as plt
from numpy import arange
#The Axes.bar() method has 2 required parameters, left and height.
#We use the left parameter to specify the x coordinates of the left sides of the bar.
#We use the height parameter to specify the height of each bar
num_cols = ['RT_user_norm', 'Metacritic_user_nom', 'IMDB_norm', 'Fandango_Ratingvalue', 'Fandango_Stars']
#取上面描述的五列
bar_heights = norm_reviews.loc[0, num_cols].values   #柱状图的高度(第一行样本不同媒体的评分)
bar_positions = arange(5) + 1 #在x轴上离原点的距离
fig, ax = plt.subplots()
ax.bar(bar_positions, bar_heights, 0.5)  #位置、高度、宽度
plt.show()
条形图进阶
#By default, matplotlib sets the x-axis tick labels to the integer values the bars
#spanned on the x-axis (from 0 to 6). We only need tick labels on the x-axis where the bars are positioned.
#We can use Axes.set_xticks() to change the positions of the ticks to [1, 2, 3, 4, 5]:

num_cols = ['RT_user_norm', 'Metacritic_user_nom', 'IMDB_norm', 'Fandango_Ratingvalue', 'Fandango_Stars']
bar_heights = norm_reviews.ix[0, num_cols].values
bar_positions = arange(5) + 1
tick_positions = range(1,6)
fig, ax = plt.subplots()

ax.bar(bar_positions, bar_heights, 0.5)
ax.set_xticks(tick_positions)
ax.set_xticklabels(num_cols, rotation=45)

ax.set_xlabel('Rating Source')
ax.set_ylabel('Average Rating')
ax.set_title('Average User Rating For Avengers: Age of Ultron (2015)')
plt.show()
“卧倒”的条形图 .barh()
import matplotlib.pyplot as plt
from numpy import arange
num_cols = ['RT_user_norm', 'Metacritic_user_nom', 'IMDB_norm', 'Fandango_Ratingvalue', 'Fandango_Stars']

bar_widths = norm_reviews.ix[0, num_cols].values
bar_positions = arange(5) + 0.75
tick_positions = range(1,6)
fig, ax = plt.subplots()
ax.barh(bar_positions, bar_widths, 0.5)

ax.set_yticks(tick_positions)
ax.set_yticklabels(num_cols)
ax.set_ylabel('Rating Source')
ax.set_xlabel('Average Rating')
ax.set_title('Average User Rating For Avengers: Age of Ultron (2015)')
plt.show()
散点图
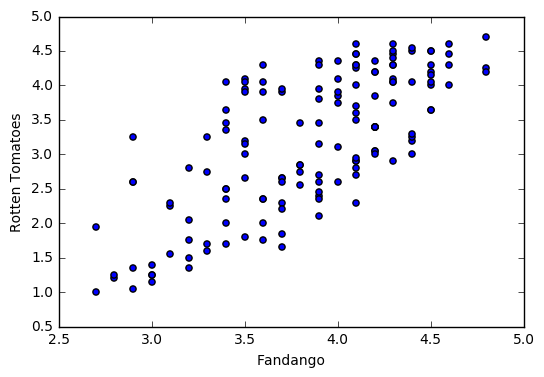
- 简单散点图的绘制.scatter
#Let's look at a plot that can help us visualize many points.
fig, ax = plt.subplots()
ax.scatter(norm_reviews['Fandango_Ratingvalue'], norm_reviews['RT_user_norm'])
ax.set_xlabel('Fandango')
ax.set_ylabel('Rotten Tomatoes')
plt.show()
- 加上子图
#Switching Axes
fig = plt.figure(figsize=(5,10))
ax1 = fig.add_subplot(2,1,1)
ax2 = fig.add_subplot(2,1,2)
ax1.scatter(norm_reviews['Fandango_Ratingvalue'], norm_reviews['RT_user_norm'])
ax1.set_xlabel('Fandango')
ax1.set_ylabel('Rotten Tomatoes')
ax2.scatter(norm_reviews['RT_user_norm'], norm_reviews['Fandango_Ratingvalue'])
ax2.set_xlabel('Rotten Tomatoes')
ax2.set_ylabel('Fandango')
plt.show()
直方图
- 读入数据
import pandas as pd
import matplotlib.pyplot as plt
reviews = pd.read_csv('fandango_scores.csv')
cols = ['FILM', 'RT_user_norm', 'Metacritic_user_nom', 'IMDB_norm', 'Fandango_Ratingvalue']
norm_reviews = reviews[cols]
print(norm_reviews[:5])
----------------------------------------------------------------------------------
                             FILM  RT_user_norm  Metacritic_user_nom  \
0  Avengers: Age of Ultron (2015)           4.3                 3.55
1               Cinderella (2015)           4.0                 3.75
2                  Ant-Man (2015)           4.5                 4.05
3          Do You Believe? (2015)           4.2                 2.35
4   Hot Tub Time Machine 2 (2015)           1.4                 1.70

   IMDB_norm  Fandango_Ratingvalue
0       3.90                   4.5
1       3.55                   4.5
2       3.90                   4.5
3       2.70                   4.5
4       2.55                   3.0
- 数据统计
fandango_distribution = norm_reviews['Fandango_Ratingvalue'].value_counts()
fandango_distribution = fandango_distribution.sort_index()

imdb_distribution = norm_reviews['IMDB_norm'].value_counts()
imdb_distribution = imdb_distribution.sort_index()

print(fandango_distribution)
print(imdb_distribution)
------------------------------------------------------------------
2.7     2
2.8     2
2.9     5
3.0     4
3.1     3
3.2     5
3.3     4
3.4     9
3.5     9
3.6     8
3.7     9
3.8     5
3.9    12
4.0     7
4.1    16
4.2    12
4.3    11
4.4     7
4.5     9
4.6     4
4.8     3
Name: Fandango_Ratingvalue, dtype: int64
2.00     1
2.10     1
2.15     1
2.20     1
2.30     2
2.45     2
2.50     1
2.55     1
2.60     2
2.70     4
2.75     5
2.80     2
2.85     1
2.90     1
2.95     3
3.00     2
3.05     4
3.10     1
3.15     9
3.20     6
3.25     4
3.30     9
3.35     7
3.40     1
3.45     7
3.50     4
3.55     7
3.60    10
3.65     5
3.70     8
3.75     6
3.80     3
3.85     4
3.90     9
3.95     2
4.00     1
4.05     1
4.10     4
4.15     1
4.20     2
4.30     1
Name: IMDB_norm, dtype: int64
- 直方图绘制
fig, ax = plt.subplots()
ax.hist(norm_reviews['Fandango_Ratingvalue'])
ax.hist(norm_reviews['Fandango_Ratingvalue'],bins=20) #bins是自动划分的格
ax.hist(norm_reviews['Fandango_Ratingvalue'], range=(4, 5),bins=20)#range需要画的区间
plt.show()
- 子图显示,及y轴范围设置
fig = plt.figure(figsize=(5,20))
ax1 = fig.add_subplot(4,1,1)
ax2 = fig.add_subplot(4,1,2)
ax3 = fig.add_subplot(4,1,3)
ax4 = fig.add_subplot(4,1,4)
ax1.hist(norm_reviews['Fandango_Ratingvalue'], bins=20, range=(0, 5))
ax1.set_title('Distribution of Fandango Ratings')
ax1.set_ylim(0, 50) #设置y轴的范围

ax2.hist(norm_reviews['RT_user_norm'], 20, range=(0, 5))
ax2.set_title('Distribution of Rotten Tomatoes Ratings')
ax2.set_ylim(0, 50)

ax3.hist(norm_reviews['Metacritic_user_nom'], 20, range=(0, 5))
ax3.set_title('Distribution of Metacritic Ratings')
ax3.set_ylim(0, 50)

ax4.hist(norm_reviews['IMDB_norm'], 20, range=(0, 5))
ax4.set_title('Distribution of IMDB Ratings')
ax4.set_ylim(0, 50)

plt.show()
盒图
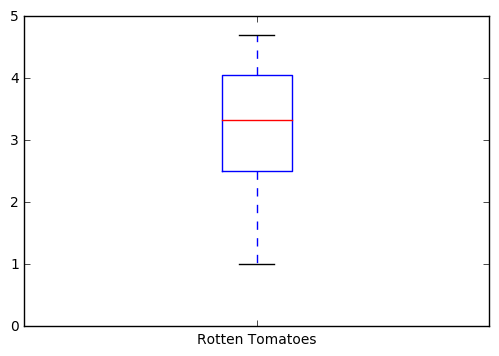
盒图(英文:Box-plot),又称为盒须图、盒式图、盒状图或箱线图,是一种用作显示一组数据分散情况资料的统计图。因型状如箱子而得名。在各种领域也经常被使用,常见于品质管理。不过作法相对较繁琐。它能显示出一组数据的最大值、最小值、中位数、下四分位数及上四分位数。
- 盒图显示.boxplot()
fig, ax = plt.subplots()
ax.boxplot(norm_reviews['RT_user_norm'])
ax.set_xticklabels(['Rotten Tomatoes'])
ax.set_ylim(0, 5)
plt.show()
- 盒图进阶
num_cols = ['RT_user_norm', 'Metacritic_user_nom', 'IMDB_norm', 'Fandango_Ratingvalue']
fig, ax = plt.subplots()
ax.boxplot(norm_reviews[num_cols].values)
ax.set_xticklabels(num_cols, rotation=90)
ax.set_ylim(0,5)
plt.show()
细节设置
- 读入数据
import pandas as pd
import matplotlib.pyplot as plt

women_degrees = pd.read_csv('percent-bachelors-degrees-women-usa.csv')
- 去掉小锯齿
ax.tick_params(bottom="off", top="off", left="off", right="off") - 边线不可见
for key,spine in ax.spines.items(): spine.set_visible(False)
例如:
fig, ax = plt.subplots()
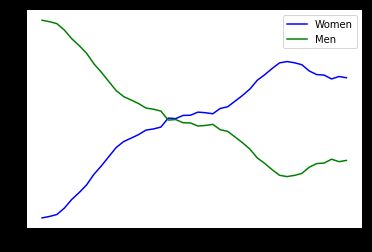
ax.plot(women_degrees['Year'], women_degrees['Biology'], c='blue', label='Women')
ax.plot(women_degrees['Year'], 100-women_degrees['Biology'], c='green', label='Men')
ax.tick_params(bottom="off", top="off", left="off", right="off")   #去掉小锯齿

for key,spine in ax.spines.items():   #边框不可见
    spine.set_visible(False)
# End solution code.
ax.legend(loc='upper right')
plt.show()
- 图例显示位置
plt.legend(loc='upper right') -
颜色设置
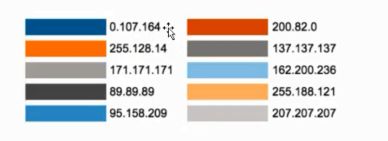
几种常用的颜色
#Color
import pandas as pd
import matplotlib.pyplot as plt

women_degrees = pd.read_csv('percent-bachelors-degrees-women-usa.csv')
major_cats = ['Biology', 'Computer Science', 'Engineering', 'Math and Statistics']


cb_dark_blue = (0/255, 107/255, 164/255)
cb_orange = (255/255, 128/255, 14/255)

fig = plt.figure(figsize=(12, 12))

for sp in range(0,4):
    ax = fig.add_subplot(2,2,sp+1)
    # The color for each line is assigned here.
    ax.plot(women_degrees['Year'], women_degrees[major_cats[sp]], c=cb_dark_blue, label='Women')
    ax.plot(women_degrees['Year'], 100-women_degrees[major_cats[sp]], c=cb_orange, label='Men')
    for key,spine in ax.spines.items():
        spine.set_visible(False)
    ax.set_xlim(1968, 2011)
    ax.set_ylim(0,100)
    ax.set_title(major_cats[sp])
    ax.tick_params(bottom="off", top="off", left="off", right="off")

plt.legend(loc='upper right')
plt.show()
- 线宽设置linewidth
ax.plot(women_degrees['Year'], 100-women_degrees[major_cats[sp]], c=cb_orange, label='Men', linewidth=10)
- 综合实例1
stem_cats = ['Engineering', 'Computer Science', 'Psychology', 'Biology', 'Physical Sciences', 'Math and Statistics']
fig = plt.figure(figsize=(18, 3))

for sp in range(0,6):
    ax = fig.add_subplot(1,6,sp+1)
    ax.plot(women_degrees['Year'], women_degrees[stem_cats[sp]], c=cb_dark_blue, label='Women', linewidth=3)
    ax.plot(women_degrees['Year'], 100-women_degrees[stem_cats[sp]], c=cb_orange, label='Men', linewidth=3)
    for key,spine in ax.spines.items():
        spine.set_visible(False)
    ax.set_xlim(1968, 2011)
    ax.set_ylim(0,100)
    ax.set_title(stem_cats[sp])
    ax.tick_params(bottom="off", top="off", left="off", right="off")

plt.legend(loc='upper right')
plt.show()
- 综合实例2
fig = plt.figure(figsize=(18, 3))

for sp in range(0,6):
    ax = fig.add_subplot(1,6,sp+1)
    ax.plot(women_degrees['Year'], women_degrees[stem_cats[sp]], c=cb_dark_blue, label='Women', linewidth=3)
    ax.plot(women_degrees['Year'], 100-women_degrees[stem_cats[sp]], c=cb_orange, label='Men', linewidth=3)
    for key,spine in ax.spines.items():
        spine.set_visible(False)
    ax.set_xlim(1968, 2011)
    ax.set_ylim(0,100)
    ax.set_title(stem_cats[sp])
    ax.tick_params(bottom="off", top="off", left="off", right="off")
plt.legend(loc='upper right')
plt.show()
fig = plt.figure(figsize=(18, 3))

for sp in range(0,6):
    ax = fig.add_subplot(1,6,sp+1)
    ax.plot(women_degrees['Year'], women_degrees[stem_cats[sp]], c=cb_dark_blue, label='Women', linewidth=3)
    ax.plot(women_degrees['Year'], 100-women_degrees[stem_cats[sp]], c=cb_orange, label='Men', linewidth=3)
    for key,spine in ax.spines.items():
        spine.set_visible(False)
    ax.set_xlim(1968, 2011)
    ax.set_ylim(0,100)
    ax.set_title(stem_cats[sp])
    ax.tick_params(bottom="off", top="off", left="off", right="off")

    if sp == 0:
        ax.text(2005, 87, 'Men')
        ax.text(2002, 8, 'Women')
    elif sp == 5:
        ax.text(2005, 62, 'Men')
        ax.text(2001, 35, 'Women')
plt.show()

