Win10 x64 vs2017 下配置Ceres Solver 环境
- 介绍
Ceres Solver 是一个开源C++库,用于建模和解决大型复杂的优化问题。可以高效地解决具有边界约束的非线性最小二乘问题和一般的无约束优化问题。
为了撸三维重建的代码,需要用到此库,特此记录一下配置过程及遇到的问题,供大家一起学习和讨论。
-
准备工作
- vs2017、CMake(默认已安装,安装过程较简单,不在描述。)
- ceres工具包和第三方依赖库(废话不多说,直接上图)

需要提前下载好ceres-solver、eigen、gflags、glog代码压缩包,然后解压到当前文件夹。下载链接:https://download.csdn.net/download/maoluluzuibang/10278956
-
编译
-
编译gflags
(注意:本人在直接使用gflags源码进行编译生成.lib库时,在最后用的时候产生了如下错误:"LNK2019 无法解析的外部符号 __imp_PathMatchSpecA",
查资料发现是因为在gflags中的,由于google为了兼容windows xp之前的系统 在config.h中有
// Define if you have the
header file (Windows 2000/XP). #define HAVE_SHLWAPI_H
而在windows 7 之后,shlwapi.lib库已经被废弃了。故在编译之前需要先找到gflags-2.2.1\src\config.h.in文件在里面找到上述代码,并注释掉即可。)
打开cmake,输入gflags的源码目录和要编译到的目录,如图

编译器选择点击config,根据自己情况选择编辑器,因为我是在vs2017下编译,且我最终需要的环境是64位,所以我的选择是Visual Studio 15 2017 Win64 。
再次点击config,这时候已经没有红框了,即配置正确,然后点击generate,生成解决方案,打开。右键ALL_BUILD生成,如果没有报错,则gflas生成成功。接下去编译glog。
- 编译glog
同理,在source code中选择刚才下载的glog,并指定编译位置,选择编译器。 点击config,这时候需要在指定先前生成的gflags的位置,如下:

再次点击config,这时候已经没有红框了,即配置正确,然后点击generate,生成解决方案,打开。右键ALL_BUILD生成,如果没有报错,则glog生成成功。接下去编译ceres-solver。
-
编译ceres-solver
同理,在source code中选择刚才下载的ceres-solver,并指定编译位置,选择编译器。点击config,这时候需要指定之前所下载的eigen库,并将EIGENSPARSE选上。
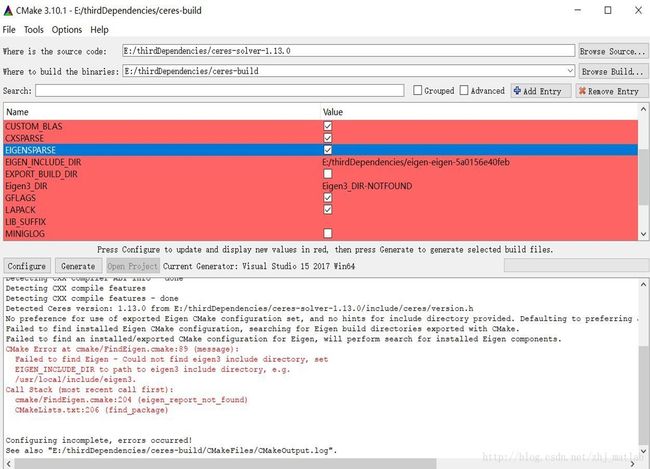
再次点击config,指定先前的gflags和glog,如下:

再次点击config,指定CMAKE_BUILD_TYPE,如下:

再次点击config,这时候已经没有红框了,即配置正确,然后点击generate,生成解决方案,打开。右键ALL_BUILD生成,如果没有报错,则ceres-solver生成成功。按照这样子的一套流程,最后得到的
是ceres的静态链接库,在使用的时候,需要包含头文件还有之前生成的静态链接库。
- 测试
打开cmd,切换到ceres-build/bin/Debug下,然后运行helloworld.exe,如果看到convergence的话,即收敛,说明编译成功。

-
-
Vs2017下使用
新建include和lib文件夹,将以下目录拷贝到include文件夹中:
- gflagsbuild\include\下的gflags文件夹。
- glogbuild\下的glog文件夹。
- ceres-solver-1.13.0\include\下的ceres文件夹。
-
eigen-eigen-67e894c6cd8f\下的Eigen文件夹。
注:gflagsbuild、glogbuild是编译后的目录,另外两个是解压缩后的目录。

将以下内容拷贝到lib目录中:
- gflagsbuild\lib\Debug下的gflags_nothreads_static.lib和gflags_static.lib。
- glogbuild\Debug下的glog.lib。
- ceresSolverbuild\lib\Debug下的ceres-debug.lib。
- ceresSolverbuild\lib\Release下的ceres.lib

然后新建vs控制台工程,打开项目-项目属性-VC/VC++目录,将上面的include和lib路径添加到包含目录和库目录中。

打开项目-项目属性-C/C++-常规,将上面的include路径添加到附加包含目录中。

打开项目-项目属性-连接器-输入,编辑附加依赖项,将之前lib目录下的链接库名添加到里面,最后点击确定,应用,即可大功告成。

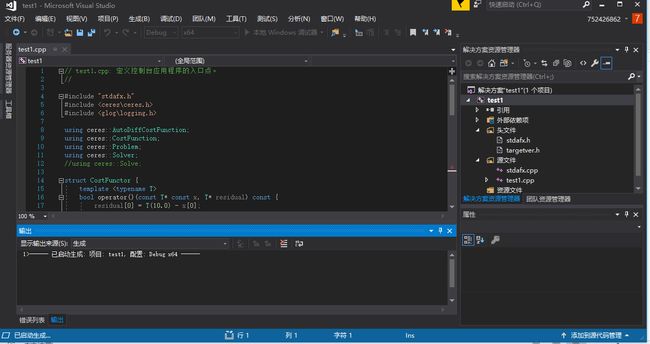
最后将如下代码粘贴到main.cpp中,在debug-x64下运行,出现下图结果即为成功。
#include "stdafx.h"
#include
#include
using ceres::AutoDiffCostFunction;
using ceres::CostFunction;
using ceres::Problem;
using ceres::Solver;
//using ceres::Solve;
struct CostFunctor {
template <typename T>
bool operator()(const T* const x, T* residual) const {
residual[0] = T(10.0) - x[0];
return true;
}
};
int main(int argc, char** argv) {
google::InitGoogleLogging(argv[0]);
// The variable to solve for with its initial value.
double initial_x = 5.0;
double x = initial_x;
// Build the problem.
Problem problem;
// Set up the only cost function (also known as residual). This uses
// auto-differentiation to obtain the derivative (jacobian).
CostFunction* cost_function =
new AutoDiffCostFunction<CostFunctor, 1, 1>(new CostFunctor);
problem.AddResidualBlock(cost_function, NULL, &x);
// Run the solver!
Solver::Options options;
options.linear_solver_type = ceres::DENSE_QR;
options.minimizer_progress_to_stdout = true;
Solver::Summary summary;
Solve(options, &problem, &summary);
std::cout << summary.BriefReport() << "\n";
std::cout << "x : " << initial_x
<< " -> " << x << "\n";
return 0;
}

- 参考链接:
- https://www.sogou.com/link?url=DOb0bgH2eKh1ibpaMGjuy1Lik7PjwcVMx2P06w9icqqueKW9M67CaVLpMY1k7wxTMGRDaSX_tISt5pUc3zy0dg..
- http://blog.csdn.net/liminlu0314/article/details/15887371
- http://blog.csdn.net/wejoncy/article/details/64158331