Nginx安装&FastDFS
NGINX安装&FastDFS
本教程是FastDFS分布式文件服务安装使用的一个环节,以Nginx作为反向代理服务器,以提高资源访问效率和负载均衡
FastDFS安装教程
FastDFS分布式服务器
本文阅读流程参考
NGINX
NGINX初学者指南
Ngin官方安装指南
进入Ngin官网 选择
选择Documentation查阅文
安装包选择与下载
教材版本: nginx 1.8.1 http://nginx.org/download/nginx-1.8.1.tar.gz
下载地址http://nginx.org/en/download.html
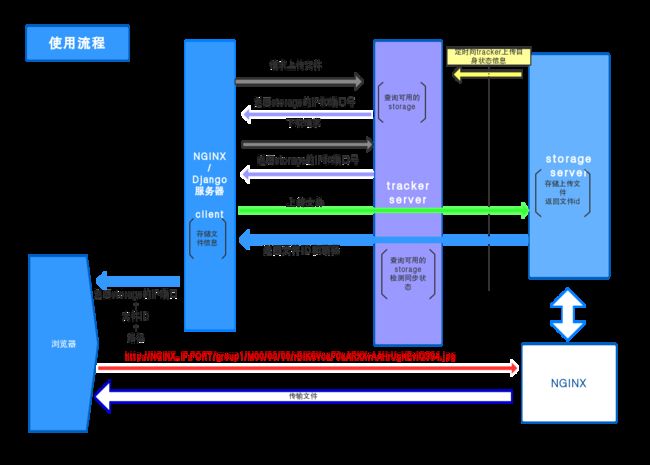
FastDFS+NGINX使用流程 参考
安装nginx依赖包
nginx是C语言开发,建议在linux上运行,本教程使用Ubuntu 18作为安装环境。
- gcc
安装nginx需要先将官网下载的源码进行编译,编译依赖gcc环境,如果没有gcc环境,需要安装gcc:
yum install gcc-c++ #centos ubuntu18上不需要安装
- PCRE
PCRE(Perl Compatible Regular Expressions)是一个Perl库,包括 perl 兼容的正则表达式库。nginx的http模块使用pcre来解析正则表达式,所以需要在linux上安装pcre库。
yum install -y pcre pcre-devel #centos sudo apt-get install libpcre3 libpcre3-dev #ubuntu
注:pcre-devel是使用pcre开发的一个二次开发库。nginx也需要此库。
- zlib
zlib库提供了很多种压缩和解压缩的方式,nginx使用zlib对http包的内容进行gzip,所以需要在linux上安装zlib库。
yum install -y zlib zlib-devel #centos sudo apt-get install zlib1g-dev #ubuntu
- openssl
OpenSSL 是一个强大的安全套接字层密码库,囊括主要的密码算法、常用的密钥和证书封装管理功能及SSL协议,并提供丰富的应用程序供测试或其它目的使用。
nginx不仅支持http协议,还支持https(即在ssl协议上传输http),所以需要在linux安装openssl库。
yum install -y openssl openssl-devel #centos sudo apt-get install openssl libssl-dev #ubuntu
参考链接
ubuntu下安装nginx时依赖库zlib,pcre,openssl安装方法
安装 nginx 1.8.1
NGINX编译安装 version 1.8.1 & 14
解压包
tar -zxvf nginx-1.8.1 tar.gz
进入 nginx-1.8.1目录
ls -l 查看configure 的执行权限 chmod -R 755 configure 赋予执行权限 sudo ./configure --prefix=/usr/local/nginx/ # --prefix=nginx的安装路径,自动创建
权限问题参考
Nginx服务器端
1、在Nginx安装&FastDFS模块添加
下载地址https://github.com/happyfish100/fastdfs-nginx-module/
解压 fastdfs-nginx-module模块
tar -zxvf fastdfs-nginx-module.tar.gz
或
unzip fastdfs-nginx-module.zip
在nginx中添加fastdfs-nginx-module模块
./configure  --add-module=文件[fastdfs-nginx-module](https://github.com/happyfish100/fastdfs-nginx-module)解压后的绝对路径/src`

`sudo ./configure  --add-module=/home/user/Document/fastdfs-nginx-module/src`
2、编译安装Nginx & FastDFS模块
在nginxn-1.8.1目录中
sudo apt-get update
sudo apt-get install ubuntu-make
sudo ./make
suod ./make install
make安装
3、在 nginx 配置文件中添加中 fastdfs服务监听端口
sudo vim /usr/local/nginx/conf/nginx.conf
在http部分中添加配置信息如下:
配置Nginx监听FastDFS服务的端口号
server {
       listen       8888;           # 浏览器访问nginx的端口号
       server_name  localhost;
	   location ~/group[0-9]/ {      # ~后面时正则匹配  匹配storage中的组
	   		ngx_fastdfs_module;
	   }
	   error_page   500 502 503 504  /50x.html;

       location = /50x.html {
       root   html;
       }
       }
FasrDFS服务器端
1、FastDFS服务器添加nginx-fasrdfs-modeul 模块配置文件
FastDFS 安装目录 /etc/fsfs
解压后的mod_fastdfs.conf 复制到 /etc/fdfs/mod_fastdfs.conf
sudo cp /home/user/Document/fastdfs-nginx-module/src/mod_fastdfs.conf /etc/fdfs/mod_fastdfs.conf
2、修改文件内容
sudo vim /etc/fdfs/mod_fastdfs.conf
connect_timeout=10                    #连接延迟

tracker_server=部署tracke服务器的Linux主机的ip地址:端口号(22122)     # 192.168.8.1:22122

url_have_group_name=true  # FastDFS 的storage服务器在存储文件时会分组

store_path0=/home/python/fastdfs/storage   # storage服务器日志文件目录
从FastDFS安装包(fassdfs-master) 拷贝http.conf到FastDFS的安装目录
sudo cp 解压缩的fastdfs-master目录中的conf目录http.conf /etc/fdfs/http.conf
sudo cp 解压缩的fastdfs-master目录中的mime.types /etc/fdfs/mime.types
启动nginx
sudo /usr/local/nginx/sbin/nginx
停止 nginx
Sudo /usr/local/nginx/sbin/nginx -s stop
查看是否启动
ps aux | grep nginx
参考文章
搭建FastDFS+Nginx+fastdfs-nginx-module安装配置


