- ansible的安装、使用
ytym00
简介高度模块化,调用特定的模块,完成特定的任务,基于Yaml,来完成批量任务的模板化,来支持playbook。基于Python语言实现,主要使用Paramiko、PyYAML和JinJa2三个关键模块,部署简单(agentless),主从模式,支持自定义模块,支持playbook,幂等性:允许重复执行N次,没有变化时,只会执行第一次。特点:1、Configuration(cfengine,chef
- Ubuntu Juju 与 Ansible的区别
xidianjiapei001
#Kubernetesubuntuansiblelinux云原生Juju
JujuandAnsiblearebothpowerfultoolsusedformanagingandorchestratingITinfrastructureandapplications,buttheyhavedifferentapproachesandusecases.Here’sabreakdownofthekeydifferencesbetweenthem:1.ConceptualFo
- ansible安全优化篇
happy_king_zi
运维自动化配置管理安全ansible安全devops
一、安全概况对与一台全新安装的服务器,尤其是直接面向公网的服务器来说:最重要的一项配置就是安全配置。针对非授权连接和截取通信信息等攻击行为,避免攻击手段带来的危害,处理方法有以下方法:使用安全加密的通信方式——使用https加密传输;禁止root用户远程登录并充分利用sudo;移除非必需的软件,只开发需要用到的端口;遵守权限最小化原则;及时更新操作系统和软件——修复旧版本的bug,并使用新版本的最
- Ansible架构介绍与安装
2401_86637445
ansible架构
一、介绍Ansible什么是Ansible?Ansible是一款自动化运维工具,其主要功能是帮助运维实现IT工作的自动化、降低人为操作失误、提高业务自动化率、提升运维工作效率。实现了批量系统配置、批量程序部署、批量运行命令等功能。ansiblepuppetsaltstack主流的三种。ansible自动化运维工具被红帽收购阿里巴巴在用saltstackpython开发。无客户端,只需安装SSH、P
- Linux学习-Ansible(一)
丢爸
Linuxlinux学习ansible
环境-Rocky-Linux8.6安装部署Ansible#安装ansible[root@harboransible]#dnfinstall-yansible-core#查看安装信息[root@harboransible]#ansible-doc--versionansible-doc[core2.12.2]configfile=/root/ansible/ansible.cfgconfigured
- Ansible简单部署与使用
大哥您好
Linuxansible数据库运维linux
目录环境安装Ansibleaptinstallmarkupsafeerror配置Ansible创建个人目录ansible.cfghosts测试Ansibleping批量执行自定义命令环境Ubuntu20.04安装Ansibleaptinstallsudoaptinstallansiblemarkupsafeerror安装成功后,尝试运行ansible,部分环境下会有如下报错:ubuntu@ubun
- Ansible自动化部署kubernetes集群
theo.wu
kubernetesansible自动化
机器环境介绍1.1.机器信息介绍IPhostnameapplicationCPUMemory192.168.204.129k8s-master01etcd,kube-apiserver,kube-controller-manager,kube-scheduler,kubelet,kube-proxy,containerd2C4G192.168.204.130k8s-worker01etcd,kub
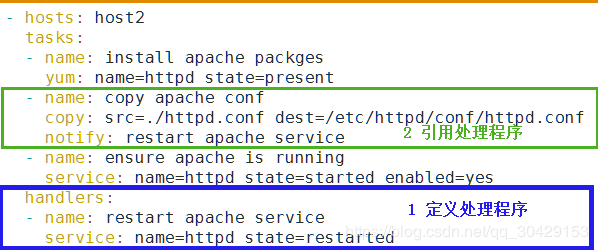
- Linux之ansible的playbook剧本(yaml文件)
小橞
linuxansible运维服务器
playbook剧本一个剧本(即playbook),可以包含多个play每个play用于在指定的主机上,通过模块和参数执行相应的任务每个play可以包含多个任务。任务有模块和参数构成。paly要建立在ansible文件夹下才能使用因为yaml文件对格式要求很严格所有本人在编写时会设置一下vim编译器的一些功能格式setai:自动缩进setts=2:设置tab键缩进两个空格setet:将tab键转换
- ansible_find模块
打败404
ansiblelinux
found_files:changed:falsefiles:-path:/etc/yum.repos.d/example1.repomode:'0644'size:1542-path:/etc/yum.repos.d/example2.repomode:'0644'size:2842matched:21.find模块返回的格式2.在后面调用的时候按照相应的key取对应的value3.支持正则表达
- ansible入门
打败404
运维linuxansible
一、ansible简介1、ansible是什么?ansible是目前最受运维欢迎的自动化运维工具,基于Python开发,集合了众多运维工具(SaltStackpuppet、chef、func、fabric)的优点,实现了批量系统配置、批量程序部署、批量运行命令等功能。ansible是基于paramiko开发的,并且基于模块化工作,本身没有批量部署的能力。真正具有批量部署的是ansible所运行的模
- 使用Ansible实现高效服务器配置管理的最佳实践
范范0825
ansible服务器运维
使用Ansible实现高效服务器配置管理的最佳实践在现代IT运维中,服务器的配置管理是一个关键环节。传统的手动配置方法不仅耗时耗力,而且容易出错,特别是在规模庞大的服务器集群中,配置的一致性难以保证。Ansible作为一款无代理的自动化运维工具,通过其易用性和灵活性,提供了一种高效的服务器配置管理解决方案。本指南将从基础到高级应用,详细介绍使用Ansible实现高效服务器配置管理的最佳实践。目录什
- 使用ansible的剧本制作salt-master与salt-minion的安装与启动服务过程
qq_42750608
linuxansibleansible
虚拟机版本:RockyLinuxrelease8.6(GreenObsidian)准备几台虚拟机ipv4地址主机名192.168.137.13center192.168.137.14sp-1192.168.137.15sp-2192.168.137.16sp-3一、center主机的配置1.vim/etc/hosts127.0.0.1localhostlocalhost.localdomainlo
- Ansible Tower与AWX:构建可视化的运维自动化解决方案
勤劳兔码农
运维ansible自动化
AnsibleTower与AWX:构建可视化的运维自动化解决方案引言随着企业数字化转型的深入,运维自动化逐渐成为IT管理的重要组成部分。Ansible作为一种简单、灵活且功能强大的自动化工具,广泛应用于配置管理、应用部署和任务自动化中。然而,在大规模、复杂的企业环境中,单纯使用Ansible命令行来管理和执行任务,难以满足对自动化流程的可视化、可审计和权限管理等高级需求。为了解决这些问题,RedH
- Ansible在CentOS下批量部署Nginx到Kubernetes集群
酱江奖
RHELzabbix自学ansiblecentosnginx
在现代云计算环境中,Kubernetes(简称K8s)作为容器编排平台的标准,广泛应用于应用程序的管理和部署。Ansible作为一种自动化运维工具,可以帮助我们高效地完成各种任务,包括在Kubernetes集群上部署应用。本文将详细介绍如何在CentOS操作系统中使用Ansible来批量部署Nginx服务至Kubernetes环境,并通过具体示例说明每一步的操作。环境准备1.安装Ansible确保
- 双vip高可用的MySQL集群
Hi,你好啊
数据库mysql数据库高可用
文章目录项目介绍项目架构项目环境项目步骤环境准备Ansible服务器部署1、安装Ansible2、配置免密登录3、修改Ansible的主机清单Prometheus部署1、下载软件包2、二进制安装PrometheusServer3、通过服务管理Prometheus4、安装node_exporter5、安装mysqld_exporter6、添加被监控的服务器部署MySQL集群(基于GTID的半同步)1
- 【DevOps工具篇】使用Ansible部署Keycloak oauth2proxy 和 单点登录(SSO)设置
小涵
DevOps企业级项目实战devopsansible运维ldapkeycloakproxyoauth
【DevOps工具篇】使用Ansible部署Keycloakoauth2proxy和单点登录(SSO)设置目录【DevOps工具篇】使用Ansible部署Keycloakoauth2proxy和单点登录(SSO)设置Ansible基础知识部署Keycloak创建OIDC-客户端创建oauth2proxy部署顶级AnsiblePlaybookHost.iniplaybook.yaml推荐超级课程:D
- ansible register 之用法
图灵AI云
ansibleansibleregister
ansibleregister这个功能非常有用。当我们需要判断对执行了某个操作或者某个命令后,如何做相应的响应处理(执行其他ansible语句),则一般会用到register。举个例子:我们需要判断sda6是否存在,如果存在了就执行一些相应的脚本,则可以为该判断注册一个register变量,并用它来判断是否存在,存在返回succeeded,失败就是failed.-name:Createaregis
- linux自动化运维之ansible实战
浓黑的daidai
运维自动化ansible
ansible基础介绍优点-相比于saltatack和puppet,没有客户端,更轻量级-只是一个工具,可以很容易实现分布式拓展-更强的远程执行命令特点-模块化-支持自定义模块,可以用任何语言编写模块-基于python语言实现-部署简单,基于python和ssh,agentless,无需代理-安全安装yum安装首先安装epel源:yuminstallepel-release-y下载ansible:
- ansible实战自动化运维项目
清风 001
Linux系统运维
Ansible是一个强大的自动化工具,广泛应用于配置管理、应用部署、任务自动化和IT环境编排。在实际生产环境中,Ansible可以帮助运维团队高效地管理服务器、应用和服务。以下是一个详细的Ansible自动化运维项目的生产实际案例,包括代码和详细讲解。项目背景假设我们有一个Web应用,需要在多台服务器上进行部署和配置。我们使用Ansible来自动化以下任务:安装必要的软件包。部署应用代码。配置和启
- python自动化运维项目实战_全网稀缺的Python/Django/Ansible Playbook自动化运维项目实战视频课程...
weixin_39977642
python自动化运维项目实战
配置文件properties比yml优先级高SpringBoot使用一个全句的配置文件,配置文件名是固定的;application.propertiesapplication.yml配置文件的作用:修改SpringBoot自动配置的默认值,SpringBoot在底层都给我们自动配置好了。YAML,是/不是一个标记语言标记语言:以前的配置文件:xxx.xmlyaml:以数据为中心,比json、xml
- ansible自动化运维
芷阳99
自动化运维运维ansible自动化
1、ansble介绍ansble为一款批量化处理系统配置的服务,对批量化系统部署、批量程序部署、批量运行命令、批量修改服务、批量安装软件包、批量修改配置等诸多功能。ansible基于SSH架构,含有丰富的模块,支持win、路由器、交换机远程操作。查看playbook的网址:https://galaxy.ansible.com2、ansble部署环境准备ansible:192.168.4.10nod
- ansible自动化运维项目
不会代码的小林
运维
Ansible是一个基于Python开发的开源自动化运维工具,它通过其模块化的架构和强大的功能,实现了配置管理、批量系统配置、程序部署和运行命令等任务,旨在帮助运维工程师提高工作效能并减少重复性劳动。下面将深入探讨Ansible在自动化运维项目中的具体应用和优势:Ansible的基础架构与组件核心组件:Ansible的运作依赖于几个关键组件,包括连接插件、主机清单、模块、插件以及剧本。其中,连接插
- ansible自动化运维项目
shiming8879
运维ansible自动化
在MySQL中创建数据库和表是数据库管理的基础步骤,它们构成了数据存储和操作的基础结构。下面,我将详细介绍如何在MySQL中创建数据库和表,包括创建数据库的基本语法、设计表的考虑因素、表的创建过程、数据类型和约束的使用等,力求内容详尽且不少于2000字。一、创建数据库在MySQL中,数据库是一个创建简单的操作,使用CREATEDATABASE语句即可完成。这个语句允许你指定数据库的名称,并可选地指
- 使用Ansible进行自动化运维
weixin_58606202
运维ansible自动化
引言简介自动化运维在现代IT基础架构管理中扮演着重要角色。通过自动化,我们可以提高效率、减少人为错误和加速部署流程。本篇文章将深入介绍如何使用Ansible这款强大的工具来实现自动化运维,帮助你简化服务器管理和配置任务。什么是Ansible?Ansible是一款开源的自动化工具,基于Python开发,不需要在被管理的节点上安装任何客户端代理。它采用一种简洁的YAML格式来编写配置文件,通过SSH协
- Ansible基础安装与配置
powerx_yc
pythonshell开发工具
==========================================================================================二、Ansible基础安装与配置==========================================================================================1、An
- 使用Ansible-playbook 自建CA,并签发客户端IP证书
运维小弟| srebro.cn
运维ansible网络ssl
使用Ansible-playbook自建CA,并签发客户端IP证书需求使用Ansible-playbook来签发客户端IP证书签发单个IP地址,比如脚本中使用{{inventory_hostname}}来获取主机的IP地址作为证书签发地址----name:GenerateandsignclientIPcertificatehosts:nginxbecome:truevars:#CAsettings
- paramiko CryptographyDeprecationWarning
weixin_34228387
报错如图:解决:importwarningswarnings.filterwarnings(action='ignore',module='.*paramiko.*')复制代码详细可以看:github.com/ansible/ans…
- 执行ansible报CryptographyDeprecationWarning
rockstics
ansiblepython开发语言
现象:执行ansible报CryptographyDeprecationWarning/usr/local/lib/python3.6/site-packages/ansible/parsing/vault/init.py:44:CryptographyDeprecationWarning:Python3.6isnolongersupportedbythePythoncoreteam.Theref
- 探索Ansible自动化运维:提高效率的关键工具
一个代码猎人
笔记本自动化部署/运维运维ansible自动化
探索Ansible自动化运维:提高效率的关键工具在现代IT环境中,自动化已经成为提高效率、减少错误和优化资源利用的重要手段。作为一款领先的开源自动化工具,Ansible在运维、配置管理和应用部署等方面得到了广泛应用。本文将介绍Ansible的核心概念,并通过一个实际项目示例,展示如何利用Ansible来实现自动化运维。1.Ansible简介Ansible是由RedHat开发的一款自动化工具,旨在简
- ansible详解
husterlichf
ansibleansible
一、语法usage:ansible[-h][--version][-v][-b][--become-methodBECOME_METHOD][--become-userBECOME_USER][-K|--become-password-fileBECOME_PASSWORD_FILE][-iINVENTORY][--list-hosts][-lSUBSET][-PPOLL_INTERVAL][-B
- ASM系列四 利用Method 组件动态注入方法逻辑
lijingyao8206
字节码技术jvmAOP动态代理ASM
这篇继续结合例子来深入了解下Method组件动态变更方法字节码的实现。通过前面一篇,知道ClassVisitor 的visitMethod()方法可以返回一个MethodVisitor的实例。那么我们也基本可以知道,同ClassVisitor改变类成员一样,MethodVIsistor如果需要改变方法成员,注入逻辑,也可以
- java编程思想 --内部类
百合不是茶
java内部类匿名内部类
内部类;了解外部类 并能与之通信 内部类写出来的代码更加整洁与优雅
1,内部类的创建 内部类是创建在类中的
package com.wj.InsideClass;
/*
* 内部类的创建
*/
public class CreateInsideClass {
public CreateInsideClass(
- web.xml报错
crabdave
web.xml
web.xml报错
The content of element type "web-app" must match "(icon?,display-
name?,description?,distributable?,context-param*,filter*,filter-mapping*,listener*,servlet*,s
- 泛型类的自定义
麦田的设计者
javaandroid泛型
为什么要定义泛型类,当类中要操作的引用数据类型不确定的时候。
采用泛型类,完成扩展。
例如有一个学生类
Student{
Student(){
System.out.println("I'm a student.....");
}
}
有一个老师类
- CSS清除浮动的4中方法
IT独行者
JavaScriptUIcss
清除浮动这个问题,做前端的应该再熟悉不过了,咱是个新人,所以还是记个笔记,做个积累,努力学习向大神靠近。CSS清除浮动的方法网上一搜,大概有N多种,用过几种,说下个人感受。
1、结尾处加空div标签 clear:both 1 2 3 4
.div
1
{
background
:
#000080
;
border
:
1px
s
- Cygwin使用windows的jdk 配置方法
_wy_
jdkwindowscygwin
1.[vim /etc/profile]
JAVA_HOME="/cgydrive/d/Java/jdk1.6.0_43" (windows下jdk路径为D:\Java\jdk1.6.0_43)
PATH="$JAVA_HOME/bin:${PATH}"
CLAS
- linux下安装maven
无量
mavenlinux安装
Linux下安装maven(转) 1.首先到Maven官网
下载安装文件,目前最新版本为3.0.3,下载文件为
apache-maven-3.0.3-bin.tar.gz,下载可以使用wget命令;
2.进入下载文件夹,找到下载的文件,运行如下命令解压
tar -xvf apache-maven-2.2.1-bin.tar.gz
解压后的文件夹
- tomcat的https 配置,syslog-ng配置
aichenglong
tomcathttp跳转到httpssyslong-ng配置syslog配置
1) tomcat配置https,以及http自动跳转到https的配置
1)TOMCAT_HOME目录下生成密钥(keytool是jdk中的命令)
keytool -genkey -alias tomcat -keyalg RSA -keypass changeit -storepass changeit
- 关于领号活动总结
alafqq
活动
关于某彩票活动的总结
具体需求,每个用户进活动页面,领取一个号码,1000中的一个;
活动要求
1,随机性,一定要有随机性;
2,最少中奖概率,如果注数为3200注,则最多中4注
3,效率问题,(不能每个人来都产生一个随机数,这样效率不高);
4,支持断电(仍然从下一个开始),重启服务;(存数据库有点大材小用,因此不能存放在数据库)
解决方案
1,事先产生随机数1000个,并打
- java数据结构 冒泡排序的遍历与排序
百合不是茶
java
java的冒泡排序是一种简单的排序规则
冒泡排序的原理:
比较两个相邻的数,首先将最大的排在第一个,第二次比较第二个 ,此后一样;
针对所有的元素重复以上的步骤,除了最后一个
例题;将int array[]
- JS检查输入框输入的是否是数字的一种校验方法
bijian1013
js
如下是JS检查输入框输入的是否是数字的一种校验方法:
<form method=post target="_blank">
数字:<input type="text" name=num onkeypress="checkNum(this.form)"><br>
</form>
- Test注解的两个属性:expected和timeout
bijian1013
javaJUnitexpectedtimeout
JUnit4:Test文档中的解释:
The Test annotation supports two optional parameters.
The first, expected, declares that a test method should throw an exception.
If it doesn't throw an exception or if it
- [Gson二]继承关系的POJO的反序列化
bit1129
POJO
父类
package inheritance.test2;
import java.util.Map;
public class Model {
private String field1;
private String field2;
private Map<String, String> infoMap
- 【Spark八十四】Spark零碎知识点记录
bit1129
spark
1. ShuffleMapTask的shuffle数据在什么地方记录到MapOutputTracker中的
ShuffleMapTask的runTask方法负责写数据到shuffle map文件中。当任务执行完成成功,DAGScheduler会收到通知,在DAGScheduler的handleTaskCompletion方法中完成记录到MapOutputTracker中
- WAS各种脚本作用大全
ronin47
WAS 脚本
http://www.ibm.com/developerworks/cn/websphere/library/samples/SampleScripts.html
无意中,在WAS官网上发现的各种脚本作用,感觉很有作用,先与各位分享一下
获取下载
这些示例 jacl 和 Jython 脚本可用于在 WebSphere Application Server 的不同版本中自
- java-12.求 1+2+3+..n不能使用乘除法、 for 、 while 、 if 、 else 、 switch 、 case 等关键字以及条件判断语句
bylijinnan
switch
借鉴网上的思路,用java实现:
public class NoIfWhile {
/**
* @param args
*
* find x=1+2+3+....n
*/
public static void main(String[] args) {
int n=10;
int re=find(n);
System.o
- Netty源码学习-ObjectEncoder和ObjectDecoder
bylijinnan
javanetty
Netty中传递对象的思路很直观:
Netty中数据的传递是基于ChannelBuffer(也就是byte[]);
那把对象序列化为字节流,就可以在Netty中传递对象了
相应的从ChannelBuffer恢复对象,就是反序列化的过程
Netty已经封装好ObjectEncoder和ObjectDecoder
先看ObjectEncoder
ObjectEncoder是往外发送
- spring 定时任务中cronExpression表达式含义
chicony
cronExpression
一个cron表达式有6个必选的元素和一个可选的元素,各个元素之间是以空格分隔的,从左至右,这些元素的含义如下表所示:
代表含义 是否必须 允许的取值范围 &nb
- Nutz配置Jndi
ctrain
JNDI
1、使用JNDI获取指定资源:
var ioc = {
dao : {
type :"org.nutz.dao.impl.NutDao",
args : [ {jndi :"jdbc/dataSource"} ]
}
}
以上方法,仅需要在容器中配置好数据源,注入到NutDao即可.
- 解决 /bin/sh^M: bad interpreter: No such file or directory
daizj
shell
在Linux中执行.sh脚本,异常/bin/sh^M: bad interpreter: No such file or directory。
分析:这是不同系统编码格式引起的:在windows系统中编辑的.sh文件可能有不可见字符,所以在Linux系统下执行会报以上异常信息。
解决:
1)在windows下转换:
利用一些编辑器如UltraEdit或EditPlus等工具
- [转]for 循环为何可恨?
dcj3sjt126com
程序员读书
Java的闭包(Closure)特征最近成为了一个热门话题。 一些精英正在起草一份议案,要在Java将来的版本中加入闭包特征。 然而,提议中的闭包语法以及语言上的这种扩充受到了众多Java程序员的猛烈抨击。
不久前,出版过数十本编程书籍的大作家Elliotte Rusty Harold发表了对Java中闭包的价值的质疑。 尤其是他问道“for 循环为何可恨?”[http://ju
- Android实用小技巧
dcj3sjt126com
android
1、去掉所有Activity界面的标题栏
修改AndroidManifest.xml 在application 标签中添加android:theme="@android:style/Theme.NoTitleBar"
2、去掉所有Activity界面的TitleBar 和StatusBar
修改AndroidManifes
- Oracle 复习笔记之序列
eksliang
Oracle 序列sequenceOracle sequence
转载请出自出处:http://eksliang.iteye.com/blog/2098859
1.序列的作用
序列是用于生成唯一、连续序号的对象
一般用序列来充当数据库表的主键值
2.创建序列语法如下:
create sequence s_emp
start with 1 --开始值
increment by 1 --増长值
maxval
- 有“品”的程序员
gongmeitao
工作
完美程序员的10种品质
完美程序员的每种品质都有一个范围,这个范围取决于具体的问题和背景。没有能解决所有问题的
完美程序员(至少在我们这个星球上),并且对于特定问题,完美程序员应该具有以下品质:
1. 才智非凡- 能够理解问题、能够用清晰可读的代码翻译并表达想法、善于分析并且逻辑思维能力强
(范围:用简单方式解决复杂问题)
- 使用KeleyiSQLHelper类进行分页查询
hvt
sql.netC#asp.nethovertree
本文适用于sql server单主键表或者视图进行分页查询,支持多字段排序。KeleyiSQLHelper类的最新代码请到http://hovertree.codeplex.com/SourceControl/latest下载整个解决方案源代码查看。或者直接在线查看类的代码:http://hovertree.codeplex.com/SourceControl/latest#HoverTree.D
- SVG 教程 (三)圆形,椭圆,直线
天梯梦
svg
SVG <circle> SVG 圆形 - <circle>
<circle> 标签可用来创建一个圆:
下面是SVG代码:
<svg xmlns="http://www.w3.org/2000/svg" version="1.1">
<circle cx="100" c
- 链表栈
luyulong
java数据结构
public class Node {
private Object object;
private Node next;
public Node() {
this.next = null;
this.object = null;
}
public Object getObject() {
return object;
}
public
- 基础数据结构和算法十:2-3 search tree
sunwinner
Algorithm2-3 search tree
Binary search tree works well for a wide variety of applications, but they have poor worst-case performance. Now we introduce a type of binary search tree where costs are guaranteed to be loga
- spring配置定时任务
stunizhengjia
springtimer
最近因工作的需要,用到了spring的定时任务的功能,觉得spring还是很智能化的,只需要配置一下配置文件就可以了,在此记录一下,以便以后用到:
//------------------------定时任务调用的方法------------------------------
/**
* 存储过程定时器
*/
publi
- ITeye 8月技术图书有奖试读获奖名单公布
ITeye管理员
活动
ITeye携手博文视点举办的8月技术图书有奖试读活动已圆满结束,非常感谢广大用户对本次活动的关注与参与。
8月试读活动回顾:
http://webmaster.iteye.com/blog/2102830
本次技术图书试读活动的优秀奖获奖名单及相应作品如下(优秀文章有很多,但名额有限,没获奖并不代表不优秀):
《跨终端Web》
gleams:http