MyBatis源码分享篇---Plugin插件原理
前言
最近在研读MyBatis的源码,刚好看到了插件扩展这一块,所以就此分享一下阅读体会以及插件的原理;
概述
可拦截接口
MyBatis允许在映射语句执行过程中的某一点进行拦截调用。默认情况下,MyBatis允许使用插件来拦截的方法调用包括:Executor (update, query, flushStatements, commit, rollback, getTransaction, close, isClosed)ParameterHandler (getParameterObject, setParameters)ResultSetHandler (handleResultSets, handleOutputParameters)StatementHandler (prepare, parameterize, batch, update, query)
- 通过
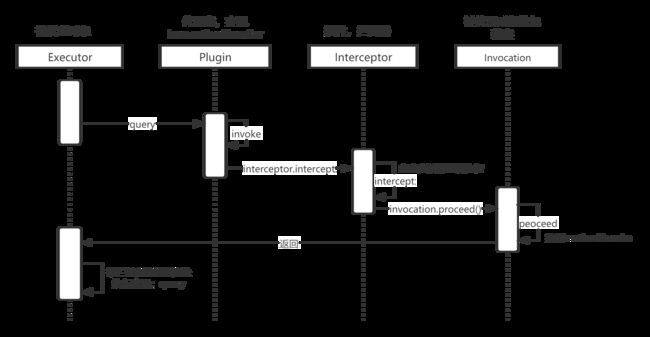
MyBatis提供的强大机制,使用插件是非常简单的,只需实现Interceptor接口,并指定想要拦截的方法签名即可; - 由下图,我们也可以推断出,其可拦截的接口有如下4类;
简单示例
-
新建插件类
ExamplePlugin,实现:org.apache.ibatis.plugin.Interceptor接口; -
插件将会拦截在
Executor实例中所有的update方法调用, 这里的Executor是负责执行底层映射语句的内部对象; -
@Intercepts({@Signature( type= Executor.class, method = "update", args = {MappedStatement.class,Object.class})}) public class ExamplePlugin implements Interceptor { private Properties properties = new Properties(); public Object intercept(Invocation invocation) throws Throwable { //实现你的拦截逻辑 // implement pre processing if need Object returnObject = invocation.proceed(); // implement post processing if need return returnObject; } public void setProperties(Properties properties) { this.properties = properties; } } -
上面代码逻辑实现后,要想改拦截器生效,则还需要在全局配置文件中配置,方能使其生效
-
<plugins>
    <plugin interceptor="org.mybatis.example.ExamplePlugin">

        <property name="someProperty" value="100"/>
    plugin>
plugins>
原理剖析
-
拦截顺序:
Executor -> ParameterHandler -> StatementHandler -> ResultSetHandler
-
通过上面的示例,我们可以实现一个插件的开发,扩展
MyBatis的功能,那么他到底是如何实现增强的呢?接下来,我们瞜一眼源码: -
犹记得,我们分享
MyBatis初始化的时候,提到过这个方法:org.apache.ibatis.builder.xml.XMLConfigBuilder#pluginElement
初始化解析
-
org.apache.ibatis.builder.xml.XMLConfigBuilder类中,执行配置文件解析时,pluginElement(XNode)方法执行了配置的 -
//节点数据解析 private void parseConfiguration(XNode root) { try { //issue #117 read properties first propertiesElement(root.evalNode("properties"));//properties Properties settings = settingsAsProperties(root.evalNode("settings"));//settings loadCustomVfs(settings);//虚拟文件系统(VFS),用来读取服务器里的资源 loadCustomLogImpl(settings);//指定 MyBatis 所用日志的具体实现,未指定时将自动查找 typeAliasesElement(root.evalNode("typeAliases"));//实体别名设置 pluginElement(root.evalNode("plugins"));//插件扩展 objectFactoryElement(root.evalNode("objectFactory"));//对象工厂 objectWrapperFactoryElement(root.evalNode("objectWrapperFactory"));//对象包装工厂 reflectorFactoryElement(root.evalNode("reflectorFactory")); settingsElement(settings);//设置 // read it after objectFactory and objectWrapperFactory issue #631 environmentsElement(root.evalNode("environments"));//环境 databaseIdProviderElement(root.evalNode("databaseIdProvider")); typeHandlerElement(root.evalNode("typeHandlers"));//类型处理器 mapperElement(root.evalNode("mappers"));//MappedStatement对象的初始化 } catch (Exception e) { throw new BuilderException("Error parsing SQL Mapper Configuration. Cause: " + e, e); } } -
解析了
Configuration对象中的InterceptorChain属性中; -
//插件扩展,自定义插件会影响MyBatis底层逻辑,使用时应注意
private void pluginElement(XNode parent) throws Exception {
    if (parent != null) {
        for (XNode child : parent.getChildren()) {
            String interceptor = child.getStringAttribute("interceptor");
            Properties properties = child.getChildrenAsProperties();
            Interceptor interceptorInstance = (Interceptor) resolveClass(interceptor).getDeclaredConstructor().newInstance();
            interceptorInstance.setProperties(properties);
            //调用InterceptorChain#addInterceptor
            configuration.addInterceptor(interceptorInstance);
        }
    }
}
SqlSession执行器的创建
-
初始化解析逻辑完成后,我们使用获取到的
SqlSessionFactory开启一个SqlSession会话,会话会持有一个Excutor执行器; -
当执行到此处是时,
org.apache.ibatis.session.Configuration#interceptorChain中已经包含了你所声明的所有插件,由于底层逻辑实现是给需要执行的插件使用JDK动态代理生成一个代理,所以插件执行的顺序刚好和加载顺序相反;比如:插件加载顺序1、2、3,那么执行顺序是3、2、1(责任链模式); -
//org.apache.ibatis.session.defaults.DefaultSqlSessionFactory#openSessionFromDataSource
private SqlSession openSessionFromDataSource(ExecutorType execType, TransactionIsolationLevel level, boolean autoCommit) {
    Transaction tx = null;
    try {
        final Environment environment = configuration.getEnvironment();
        final TransactionFactory transactionFactory = getTransactionFactoryFromEnvironment(environment);
        //通过事务工厂来产生一个事务
        tx = transactionFactory.newTransaction(environment.getDataSource(), level, autoCommit);
        //生成一个执行器(事务包含在执行器里)
        final Executor executor = configuration.newExecutor(tx, execType);
        //然后产生一个DefaultSqlSession
        return new DefaultSqlSession(configuration, executor, autoCommit);
    } catch (Exception e) {
        closeTransaction(tx); // may have fetched a connection so lets call close()
        throw ExceptionFactory.wrapException("Error opening session.  Cause: " + e, e);
    } finally {
        ErrorContext.instance().reset();
    }
}
处理拦截逻辑
-
在创建执行器:
final Executor executor = configuration.newExecutor(tx, execType);时执行处理插件逻辑; -
//org.apache.ibatis.session.Configuration#newExecutor(org.apache.ibatis.transaction.Transaction, org.apache.ibatis.session.ExecutorType) //构建执行器Executor public Executor newExecutor(Transaction transaction, ExecutorType executorType) { executorType = executorType == null ? defaultExecutorType : executorType; executorType = executorType == null ? ExecutorType.SIMPLE : executorType;//二次保护,防止有人将将defaultExecutorType设成null Executor executor; if (ExecutorType.BATCH == executorType) { executor = new BatchExecutor(this, transaction);//批处理的执行器 } else if (ExecutorType.REUSE == executorType) { executor = new ReuseExecutor(this, transaction);//可重用的执行器 } else { //简单执行器 //默认SimpleExecutor executor = new SimpleExecutor(this, transaction); } //二级缓存开关,settings中cacheEnabled默认为true if (cacheEnabled) { //如果需要缓存,生成CachingExecutor(默认有缓存),装饰者模式,所以默认都是返回CachingExecutor executor = new CachingExecutor(executor); } //将该执行器加入到拦截器链中 //植入插件逻辑,至此,四大可拦截对象已全部拦截完毕 executor = (Executor) interceptorChain.pluginAll(executor); return executor; } -
executor = (Executor) interceptorChain.pluginAll(executor);植入插件逻辑; -
//org.apache.ibatis.plugin.InterceptorChain //拦截器链 public class InterceptorChain { private final List<Interceptor> interceptors = new ArrayList<>(); public Object pluginAll(Object target) { //遍历所有的插件,调用插件 for (Interceptor interceptor : interceptors) { //调用插件的plugin方法 target = interceptor.plugin(target); } return target; } public void addInterceptor(Interceptor interceptor) { interceptors.add(interceptor); } public List<Interceptor> getInterceptors() { return Collections.unmodifiableList(interceptors); } } -
调用
org.apache.ibatis.plugin.Interceptor#plugin方法生成代理类; -
//org.apache.ibatis.plugin.Interceptor //拦截器,我们所有扩展点插件都必须实现改接口 public interface Interceptor { //实现具体的拦截逻辑 Object intercept(Invocation invocation) throws Throwable; default Object plugin(Object target) { //默认的Plugin.wrap方法,使用JDK动态代理生成代理类,可自定义实现 return Plugin.wrap(target, this); } default void setProperties(Properties properties) { //获取初始化插件时的相应属性 // NOP } -
生成的代理类,其实他的本质还是一个执行器,最终执行query等方法时,会调用代理类的invoke方法;
-
//org.apache.ibatis.plugin.Plugin
public static Object wrap(Object target, Interceptor interceptor) {
    Map<Class<?>, Set<Method>> signatureMap = getSignatureMap(interceptor);
    Class<?> type = target.getClass();
    Class<?>[] interfaces = getAllInterfaces(type, signatureMap);
    if (interfaces.length > 0) {
        //JDK动态代理
        return Proxy.newProxyInstance(
            type.getClassLoader(),
            interfaces,
            new Plugin(target, interceptor, signatureMap));
    }
    return target;
}

@Override
public Object invoke(Object proxy, Method method, Object[] args) throws Throwable {
    try {
        Set<Method> methods = signatureMap.get(method.getDeclaringClass());
        if (methods != null && methods.contains(method)) {
            //调用插件逻辑
            return interceptor.intercept(new Invocation(target, method, args));
        }
        return method.invoke(target, args);
    } catch (Exception e) {
        throw ExceptionUtil.unwrapThrowable(e);
    }
}
小结
- 插件的实现使用代理模式、责任链模式;
- 插件执行逻辑
分页插件PageHelper的使用
- 官网地址
https://pagehelper.github.io
Maven依赖
SSM项目
-
	com.github.pagehelper
	pagehelper
	5.1.8
SpringBoot项目
-
	com.github.pagehelper
	pagehelper-spring-boot-starter
	1.2.10
配置文件配置
-
SSM项目MyBatis全局配置文件
mybatis-conf.xml配置 -
<plugins> <plugin interceptor="com.github.pagehelper.PageInterceptor"> <property name="offsetAsPageNum" value="true"/> <property name="rowBoundsWithCount" value="true"/> <property name="pageSizeZero" value="true"/> <property name="reasonable" value="true"/> <property name="params" value="pageNum=start;pageSize=limit;"/> <property name="supportMethodsArguments" value="true"/> <property name="returnPageInfo" value="check"/> plugin> plugins> -
SpringBoot配置文件
application.properties或application.yml配置 -
# 分页配置 pagehelper.helper-dialect=mysql pagehelper.reasonable=true pagehelper.support-methods-arguments: true pagehelper.params=count=countSql -
具体的参数配置,可以参考官网介绍,此处就不再赘述。
使用
-
分页插件支持以下几种调用方式:
-
//第一种,RowBounds方式的调用
List<Country> list = sqlSession.selectList("x.y.selectIf", null, new RowBounds(0, 10));

//第二种,Mapper接口方式的调用,推荐这种使用方式。
PageHelper.startPage(1, 10);
List<Country> list = countryMapper.selectIf(1);

//第三种,Mapper接口方式的调用,推荐这种使用方式。
PageHelper.offsetPage(1, 10);
List<Country> list = countryMapper.selectIf(1);

//第四种,参数方法调用
//存在以下 Mapper 接口方法,你不需要在 xml 处理后两个参数
public interface CountryMapper {
    List<Country> selectByPageNumSize(
        @Param("user") User user,
        @Param("pageNum") int pageNum,
        @Param("pageSize") int pageSize);
}
//配置supportMethodsArguments=true
//在代码中直接调用:
List<Country> list = countryMapper.selectByPageNumSize(user, 1, 10);

//第五种,参数对象
//如果 pageNum 和 pageSize 存在于 User 对象中,只要参数有值,也会被分页
//有如下 User 对象
public class User {
    //其他fields
    //下面两个参数名和 params 配置的名字一致
    private Integer pageNum;
    private Integer pageSize;
}
//存在以下 Mapper 接口方法,你不需要在 xml 处理后两个参数
public interface CountryMapper {
    List<Country> selectByPageNumSize(User user);
}
//当 user 中的 pageNum!= null && pageSize!= null 时,会自动分页
List<Country> list = countryMapper.selectByPageNumSize(user);

//第六种,ISelect 接口方式
//jdk6,7用法,创建接口
Page<Country> page = PageHelper.startPage(1, 10).doSelectPage(new ISelect() {
    @Override
    public void doSelect() {
        countryMapper.selectGroupBy();
    }
});
//jdk8 lambda用法
Page<Country> page = PageHelper.startPage(1, 10).doSelectPage(()-> countryMapper.selectGroupBy());

//也可以直接返回PageInfo,注意doSelectPageInfo方法和doSelectPage
pageInfo = PageHelper.startPage(1, 10).doSelectPageInfo(new ISelect() {
    @Override
    public void doSelect() {
        countryMapper.selectGroupBy();
    }
});
//对应的lambda用法
pageInfo = PageHelper.startPage(1, 10).doSelectPageInfo(() -> countryMapper.selectGroupBy());

//count查询,返回一个查询语句的count数
long total = PageHelper.count(new ISelect() {
    @Override
    public void doSelect() {
        countryMapper.selectLike(country);
    }
});
//lambda
total = PageHelper.count(()->countryMapper.selectLike(country));
结语
本文介绍了MyBatis的插件原理及简单示例,以及分页插件PageHelper的简单介绍及使用,后续我将持续分享Java相关技术栈博文,推荐关注博主公众号


