WPF 路由事件(RoutedEventArgs 路由事件参数、 RoutedEvent 路由事件、RoutedEventHandler路由事件处理程序、RaiseEvent引发路由事件)
推荐阅读:
【依赖属性】 https://blog.csdn.net/litao2/article/details/53066736
【路由事件】 https://blog.csdn.net/litao2/article/details/54947009
【用户控件】 https://blog.csdn.net/litao2/article/details/65444617
属性系统在WPF中得到升级、进化为依赖属性。
事件系统在WPF中也被升级进化成为路由事件(Routed Event),并在其基础上衍生出命令传递机制。(冒泡)
这些机制在很大程度上减少对程序员的束缚,让程序的设计和实现更加灵活,模块之间的耦合度也进一步降低。本章就让我们领略这些新消息机制的风采。
WPF路由事件看成一个小蚂蚁,它可以从树的 基部 向 顶部 目标(或反向)爬行,每路过一个树枝的分叉点,就会把消息带给这个分叉点。
WPF树形结构?
应为 WPF事件 的 路由环境 是UI组件树,所以我们有必要仔细研究这颗树。
WPF有两种“树”,一种叫逻辑树(LogicalTree),一种叫可视元素树(VisualTree)
前面我们见到的所有树形结构都是逻辑树(LogicalTree),它完全有 布局组件 和 控件组成 (包括列表类控件中的条目元素)。
可视元素树(VisualTree),可以细化到 控件内部结构。
如何操作树?
LogicalTreeHelper 操作逻辑树
VisualTreeHelper 操作可视树
路由事件沿可视元素树(VisualTree)传递的,只有这样藏在Template里的控件才能把消息送出去。
事件的来龙去脉?
事件的前身是消息(Message)。Window是消息驱动的操作系统,运行其上的程序也遵循这个机制运行。消息本质是一条数据,这条数据记载着消息的类别,消息的参数。
消息驱动?

消息处理函数:中有一个多级嵌套的Switch结构,进入Switch结构的消息,会被分门别类并最终流入某个末端分支,在这个分支里会有一个由程序员开发的函数被调用。
面向对象的出现,微软把消息机制封装成事件模型。
CLR事件模型?
事件通过委托指向方法
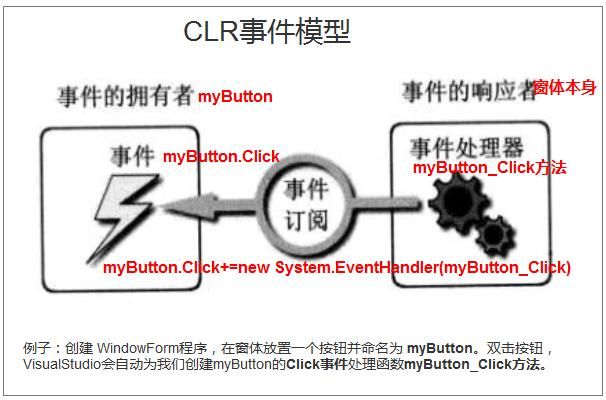
CLR事件模型不完美之处,就是事件的响应者与事件拥有者之间必须建立事件订阅的专线联系。这样至少有2个弊端。
1、每对消息是 “发送->响应”关系,必须建立显式的 点对点订阅关系。
2、事件的宿主 必须能够直接 访问事件的响应者,不然无法创建订阅关系。
一、WPF内置路由事件
路由事件机制:降低由事件订阅带来的耦合度和代码量。
路由事件的事件拥有者和事件响应者之间没有直接显式的订阅关系,事件的拥有者只负责激活事件,事件将由谁响应它并不知道,事件的响应者则安装有事件侦听器,针对某类事件进行侦听,当有此类事件传递至此时,事件响应者就使用事件处理器来响应事件(事件原始的发送点是哪个控件、上一站是哪里、事件是否可以继续传递)。
效果:

方法一:c#代码
    public partial class Window4 : Window
    {
        public Window4()
        {
            InitializeComponent();
            //AddHandler方法把监听事件与事件处理器关联起来 (为gridRoot添加对 Button.Click 事件的侦听)
            this.gridRoot.AddHandler(Button.ClickEvent, new RoutedEventHandler(this.ButtonClicked));
        }
        //sender是gridRoot,e是被点击的按钮
        public void ButtonClicked(object sender, RoutedEventArgs e)
        {
            //e.OriginalSource 事件源头
            MessageBox.Show((e.OriginalSource as FrameworkElement).Name);
        }

    }
RoutedEventArgs.Handled=true 终止路由事件
方法二:XAML 添加路由事件
...
二、自定义路由事件
为了方便程序中对象之间的通信,常需要我们自定义路由事件。
自定义路由事件大体分3步:
第一步:创建路由事件
第二步:CLR事件包装器
第三步:调用元素的RaiseEvent方法(继承自UIElement类),将事件发出
实例一: 报告事件发生的时间
效果图:

using System;
using System.Collections.Generic;
using System.Linq;
using System.Text;
using System.Windows;
using System.Windows.Controls;
using System.Windows.Data;
using System.Windows.Documents;
using System.Windows.Input;
using System.Windows.Media;
using System.Windows.Media.Imaging;
using System.Windows.Shapes;

namespace WpfApplication
{
    ///
    /// Window6.xaml 的交互逻辑
    ///
    public partial class Window6 : Window
    {
        public Window6()
        {
            InitializeComponent();
            //事件、委托指向方法
            mybutton.Open+=new RoutedEventHandler(mybutton_Open);
        }

        public void mybutton_Open(object sender, RoutedEventArgs e)
        {
            MessageBox.Show("打开");
        }
    }

    class MyButton : Button
    {
        //第一步:声明并注册【路由事件】
        //EventManager.RegisterRoutedEvent(CLR事件包装器名称,路由事件冒泡策略,事件处理程序的类型,路由事件的所有者类类型)
        public static readonly RoutedEvent OpenEvent = EventManager.RegisterRoutedEvent
            ("Open",RoutingStrategy.Bubble,typeof(RoutedEventHandler),typeof(MyButton));

        //第二步:为路由事件添加CLR事件包装器
        public event RoutedEventHandler Open
        {
            add { this.AddHandler(OpenEvent, value); }
            remove { this.RemoveHandler(OpenEvent, value); }
        }

        //第三步:激发路由事件
        protected override void OnClick()
        {
            base.OnClick();
            //创建事件携带信息(RoutedEventArgs类实例),并和路由事件关联
            RoutedEventArgs args = new RoutedEventArgs(OpenEvent,this);
            //调用元素的RaiseEvent方法(继承自UIElement类),将事件发出去
            this.RaiseEvent(args);
        }
    }
}
效果图:事件携带信息传递。(推荐)

using System;
using System.Collections.Generic;
using System.Linq;
using System.Text;
using System.Windows;
using System.Windows.Controls;
using System.Windows.Data;
using System.Windows.Documents;
using System.Windows.Input;
using System.Windows.Media;
using System.Windows.Media.Imaging;
using System.Windows.Shapes;

namespace WpfApplication
{
    ///
    /// Window5.xaml 的交互逻辑
    ///
    public partial class Window5 : Window
    {
        public Window5()
        {
            InitializeComponent();
        }

        private void F1(object sender, EMessages e)
        {
            FrameworkElement element = sender as FrameworkElement;
            this.listbox.Items.Add(string.Format("{0}到达{1}",e.ClickTime.ToLongTimeString(),element.Name));
        }
    }


    class TimeButton : Button
    {
        //第一步:声明并注册路由事件,与消息 EMessages 关联。
        //EventManager.RegisterRoutedEvent(CLR事件包装器名称,路由事件冒泡策略,事件处理程序的类型,路由事件的所有者类类型)
        public static readonly RoutedEvent ReportTimeEvent = EventManager.RegisterRoutedEvent
            ("ReportTime", RoutingStrategy.Bubble, typeof(EventHandler), typeof(TimeButton));


        //第二步:为路由事件添加CLR事件包装器
        public event RoutedEventHandler ReportTime
        {
            add { this.AddHandler(ReportTimeEvent, value); }
            remove { this.RemoveHandler(ReportTimeEvent, value); }
        }

        //第三步:激发路由事件
        protected override void OnClick()
        {
            base.OnClick();//保证 Button 原有功能正常使用,Click事件能被激活
            //创建事件携带信息(RoutedEventArgs类实例),并和路由事件关联
            EMessages args = new EMessages(ReportTimeEvent, this);
            args.ClickTime = DateTime.Now;
            //调用元素的RaiseEvent方法(继承自UIElement类),将事件发出去
            this.RaiseEvent(args);

        }
    }

    //路由事件关联的状态信息和事件数据(按钮被单击时间)
    class EMessages : RoutedEventArgs
    {
        public EMessages(RoutedEvent routedEvent, object source) : base(routedEvent, source) { }
        public DateTime ClickTime { get; set; }
    }

}
xmlns:x="http://schemas.microsoft.com/winfx/2006/xaml"
xmlns:local="clr-namespace:WpfApplication"
Title="Window5" Height="300" Width="300" local:TimeButton.ReportTime="F1">
三、RoutedEventArgs(事件消息) 的 Source 与 OriginalSource
RoutedEventArgs 路由事件关联的状态信息和事件数据
Source 表示 LogicalTree 上消息的源头
OriginalSource 表示 VisualTree 的源头(路由事件的消息是在 VisualTree 上传递的)
效果图:

创建用户控件
窗体使用用户控件
xmlns="http://schemas.microsoft.com/winfx/2006/xaml/presentation"
xmlns:x="http://schemas.microsoft.com/winfx/2006/xaml"
Title="Window7" Height="300" Width="300">
代码
    public partial class Window7 : Window
    {
        public Window7()
        {
            InitializeComponent();
            //为主窗体添加对 Button.Click 事件侦听
            this.AddHandler(Button.ClickEvent, new RoutedEventHandler(F1));
        }

        //路由事件处理器
        public void F1(object sender, RoutedEventArgs e)
        {
            //e.Source是MyUserControl1
            //e.OriginalSource 是用户控件的innerButton按钮
            MessageBox.Show("Source消息源是:" + (e.Source as FrameworkElement).Name + "\r\n"
                         + "OriginalSource 消息源是:"+(e.OriginalSource as FrameworkElement).Name);
        }
    }
四、附加事件
附加事件的本质也是路由事件,
路由事件的宿主是Button、Grid等这些我们可以在界面上看得见的控件对象,
而附加事件的宿主是Binding类、Mouse类、KeyBoard类这种无法在界面显示的类对象。
附加事件的提出就是为了让这种我们无法看见的类也可以通过路由事件同其他类对象进行交流。
实例一:
附加事件:
Button.Click="DoSomething"
        private void DoSomething(object sender, RoutedEventArgs e)
        {
            if (sender == cmd1)
            {
                //code
            }
            else if (sender == cmd2)
            {
                //code
            }
            else if (sender == cmd3)
            {
                //code
            }
            else if (sender == cmd4)
            {
                //code
            }
        }
实例二:设计一个名为Student2的类,如果Student2实例的Name属性值发生了变化就激发一个路由事件,我会使用界面元素来捕捉这个事件。
Student2 不是UIElement的派生类,所以它不具有RaiseEvent这个方法,为了发送路由事件就不得不“借用”一下 Button 的RaiseEvent方法了。

代码:
using System;
using System.Collections.Generic;
using System.Linq;
using System.Text;
using System.Windows;
using System.Windows.Controls;
using System.Windows.Data;
using System.Windows.Documents;
using System.Windows.Input;
using System.Windows.Media;
using System.Windows.Media.Imaging;
using System.Windows.Shapes;

namespace WpfApplication
{
    ///
    /// Window8.xaml 的交互逻辑
    ///
    public partial class Window8 : Window
    {
        public Window8()
        {
            InitializeComponent();
            //gridMain添加 路由事件Student2.AEvent 侦听,委托指向F1方法
            //this.gridMain.AddHandler(Student2.AEvent, new RoutedEventHandler(F1));

            Student2.AddAEventHandler(this.gridMain, new RoutedEventHandler(F1));
        }

        private void button1_Click(object sender, RoutedEventArgs e)
        {
            Student2 stu = new Student2() { Id = 101, Name = "Tim" };
            stu.Name = "Tom";
            //第三步:发送路由事件
            //创建事件携带信息(RoutedEventArgs类实例),并和路由事件关联
            RoutedEventArgs args = new RoutedEventArgs(Student2.AEvent, stu);
            this.button1.RaiseEvent(args);
        }

        public void F1(object sender, RoutedEventArgs e)
        {
            MessageBox.Show((e.OriginalSource as Student2).Id.ToString());
        }
    }

    public class Student2
    {
        public int Id { get; set; }
        public string Name { get; set; }

        //第一步:声明并注册【路由事件】
        public static readonly RoutedEvent AEvent = EventManager.RegisterRoutedEvent
            ("NameChanged", RoutingStrategy.Bubble, typeof(RoutedEventHandler), typeof(Student));


        //第二步:为附加事件添加CLR事件包装器(侦听器名称为Add路由事件名称Handler、Remove路由事件名称Handler。方法要Static)
        //为附加事件添加侦听器
        public static void AddAEventHandler(DependencyObject d,RoutedEventHandler h)
        {
            UIElement e = d as UIElement;
            if (e != null)
            {
                e.AddHandler(Student2.AEvent, h);
            }
        }
        //移出侦听器
        public static void RemoveAEventHandler(DependencyObject d, RoutedEventHandler h)
        {
            UIElement e = d as UIElement;
            if (e != null)
            {
                e.RemoveHandler(Student2.AEvent, h);
            }
        }
    }
}