6. mongodb 分片集群
文章目录
- 1. 什么是分片集群
- 2. 包含的组件
- 3. 分片集群搭建
- 3.1 规化
- 3.2 分片副本集搭建
- 1. 配置文件
- 2. 和普通副本集一样, 添加:主,从,仲裁节点
- 3.3 配置副本集搭建
- 1. 配置文件
- 2. 添加从节点
- 3.4 路由节点搭建
- 1. 配置文件
- 2. 添加分片
- 3. 开启分片功能
- 4. 分片规则
- 5. 添加第二个路由节点
- 4. 连接
1. 什么是分片集群
简单说: 将数据进行拆分, 分布在不同的机器上进行存储
2. 包含的组件
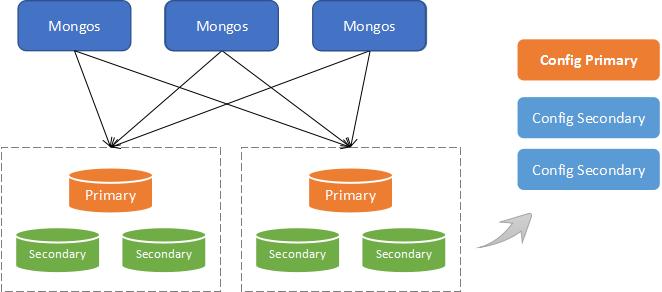
- shard (分片存储): 存储数据的地方; 每个分片都可以部署为副本集
- mongos (路由): 位于客户端和分片集群之间, 通过 config server 获取配置信息, 进而与相应的分片通信达到操作数据库存储数据的目的
- config servers ("调度"配置): 配置服务器存储的集群的元数据和配置设置; 从 3.4 开始, 必须将配置服务部署为副本集
原理图:
3. 分片集群搭建
3.1 规化
- shard: 2个分片副本集(1主1从1仲裁,共6个节点:[27030, …31, …32],[…33, …34, …35] )
- config servers: 1个配置副本集(1主2从, 共3个节点:[27040, …41, …42])
- mongos: 2个路由节点([27050, …51])
拓扑图(多了一个路由节点):
3.2 分片副本集搭建
1. 配置文件
在普通副本配置中多这个:
sharding:
  # 分片角色
  clusterRole: shardsvr
完整配置
# where to write logging data.
systemLog:
  destination: file
  logAppend: true
  # 修改日志位置
  path: /opt/mongo-sharded-cluster/sharded/sharded1/27030/log/mongod.log

# Where and how to store data.
storage:
  # 修改数据库位置
  dbPath: /opt/mongo-sharded-cluster/sharded/sharded1/27030/data/db
  journal:
    enabled: true

# how the process runs
processManagement:
  fork: true  # fork and run in background
  # 修改 pid 位置
  pidFilePath: /opt/mongo-sharded-cluster/sharded/sharded1/27030/log/mongod.pid  # location of pidfile
  timeZoneInfo: /usr/share/zoneinfo

# network interfaces
net:
  # 修改端口
  port: 27030
  bindIp: localhost  # Enter 0.0.0.0,:: to bind to all IPv4 and IPv6 addresses or, alternatively, use the net.bindIpAll setting.

replication:
  # 副本集名字
  replSetName: shard01

sharding:
  # 分片角色
  clusterRole: shardsvr
2. 和普通副本集一样, 添加:主,从,仲裁节点
主要步骤
1. 启动三个节点
2. 连接到主节点
3. 进行初始化 : rs.initiate()
4. 添加副节点 : rs.add("localhost:27031")
5. 添加仲裁节点 : rs.addArb("localhost:27032")
3.3 配置副本集搭建
1. 配置文件
在普通副本配置中多这个:
sharding:
  # 分片角色
  clusterRole: configsvr
完整配置
# where to write logging data.
systemLog:
  destination: file
  logAppend: true
  # 修改日志位置
  path: /opt/mongo-sharded-cluster/config/27040/log/mongod.log

# Where and how to store data.
storage:
  # 修改数据库位置
  dbPath: /opt/mongo-sharded-cluster/config/27040/data/db
  journal:
    enabled: true

# how the process runs
processManagement:
  fork: true  # fork and run in background
  # 修改 pid 位置
  pidFilePath: /opt/mongo-sharded-cluster/config/27040/log/mongod.pid  # location of pidfile
  timeZoneInfo: /usr/share/zoneinfo

# network interfaces
net:
  # 修改端口
  port: 27040
  bindIp: localhost  # Enter 0.0.0.0,:: to bind to all IPv4 and IPv6 addresses or, alternatively, use the net.bindIpAll setting.

replication:
  # 副本集名字
  replSetName: config

sharding:
  # 分片角色
  clusterRole: configsvr
2. 添加从节点
1. 启动三个节点
2. 连接到主节点
3. 进行初始化 : rs.initiate()
4. 添加从节点

rs.add("localhost:27041")
rs.add("localhost:27042")
3.4 路由节点搭建
1. 配置文件
少了数据库目录
多了如下内容
sharding:
  # 指定配置节点副本集(config 为配置节点名)
  configDB: config/localhost:27040,localhost:27041,localhost:27042
完整内容
# where to write logging data.
systemLog:
  destination: file
  logAppend: true
  # 修改日志位置
  path: /opt/mongo-sharded-cluster/mongos/27050/log/mongod.log

# how the process runs
processManagement:
  fork: true  # fork and run in background
  # 修改 pid 位置
  pidFilePath: /opt/mongo-sharded-cluster/mongos/27050/log/mongod.pid  # location of pidfile
  timeZoneInfo: /usr/share/zoneinfo

# network interfaces
net:
  # 修改端口
  port: 27050
  bindIp: 0.0.0.0  # Enter 0.0.0.0,:: to bind to all IPv4 and IPv6 addresses or, alternatively, use the net.bindIpAll setting.

sharding:
  # 指定配置节点副本集(config 为配置节点名)
  configDB: config/localhost:27040,localhost:27041,localhost:27042
2. 添加分片
配置中添加了: 路由 和 配置服务之间的关系, 并没有指出 路由 和 分片之间的关系
1. 启动路由节点
2. 连接
3. 添加分片

sh.addShard("shard01/localhost:27030,localhost:27031,localhost:27032")
sh.addShard("shard02/localhost:27033,localhost:27034,localhost:27035")

4. 查看
sh.status()
==========================================================================================================================================================
--- Sharding Status ---
  sharding version: {
  	"_id" : 1,
  	"minCompatibleVersion" : 5,
  	"currentVersion" : 6,
  	"clusterId" : ObjectId("5e53d8f62a0088413e2f0d31")
  }
  #  添加的分片, 结果在这里显示
  shards:
        {  "_id" : "shard01",  "host" : "shard01/localhost:27030,localhost:27031",  "state" : 1 }
        {  "_id" : "shard02",  "host" : "shard02/localhost:27033,localhost:27034",  "state" : 1 }
  active mongoses:
        "4.0.16" : 1
  autosplit:
        Currently enabled: yes
  balancer:
        Currently enabled:  yes
        Currently running:  no
        Failed balancer rounds in last 5 attempts:  0
        Migration Results for the last 24 hours:
                No recent migrations
  databases:
        {  "_id" : "config",  "primary" : "config",  "partitioned" : true }
                config.system.sessions
                        shard key: { "_id" : 1 }
                        unique: false
                        balancing: true
                        chunks:
                                shard01	1
                        { "_id" : { "$minKey" : 1 } } -->> { "_id" : { "$maxKey" : 1 } } on : shard01 Timestamp(1, 0)
==========================================================================================================================================================
如果失败,则需要先手动移除分片,保用如下命令, 然后重新添加
db.runCommand({removeShard: "已添加的分片, 以上述结果为例:'shard01'"})
3. 开启分片功能
1. 先要为库开启分片
sh.enableSharding("库名")

2. 再为集合开启分片
sh.shardCollection(namespace, key, unique)
    namespace(String): 格式: "库名.集合名"
    key(document): 根据某个字段来分片
    unique(boolean): 如果 key 中使用的是一个唯索引字段, 这里就可以保用true(用得不多)
4. 分片规则
分片规则:
只能通过一个字段为集合分片
1. 哈希(用得多)

对 yjh 这个库的 user 集合的 openid 字段使用 hash 策略
sh.shardCollection("yjh.user", {openid:"hashed"})

2. 值范围
对 yjh 这个库的 user 集合的 age 字段使用"范围"策略
sh.shardCollection("yjh.use", {age:1})
5. 添加第二个路由节点
只需要参考路由1节点进行配置文件的修改, 然后启动就行(因为1节点的分片配置已存在 配置服务中);
4. 连接
- 对于客户端工具, 只需连接任一路由节点即可
- 对于 spring boot:
### 分片集群连接
spring:
  data:
    mongodb:
      # yjh 为库名
      uri: mongodb://192.168.0.10:27050,192.168.0.10:27051/yjh
