MySQL高可用集群搭建 ----- MHA
一、何为高可用?
高可用性说白了就是应用可以 持续不间断 的 提供服务的能力!
注:
高可用和负载均衡的概念有些初学者可能会混淆,在这也说说负载均衡:
负载均衡:指后端服务器没有状态,可以任意分配,它们之间是同时工作的,能够通过增加机器增加吞吐量、减小服务器压力。
高可用:指后端服务器有状态,一般来说是一主一备的结构,它们之间是一个工作而另一个不工作,在主服务器出故障后,备服务器去接管服务,从而达到持续不间断的提供服务。
二、MHA介绍
MHA使用perl语言编写的一个脚本管理管理工具,用于维持master主库的高可用性。
MHA包含两个部分:MHA Manager(管理节点)和MHA Node(数据节点)
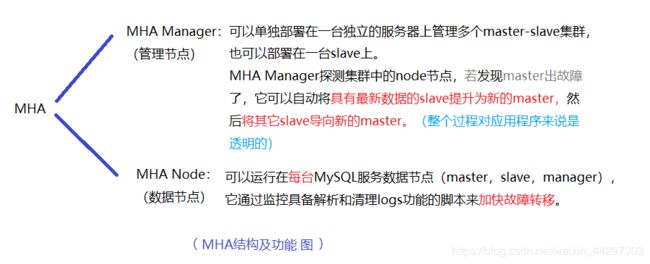
MHA原理:
MHA用于维持 MySQL Replication 中 master 库的高可用性,最大的特点是可以修复多个slave上的差异日志,最终使所有slave保持数据一致,然后从中选取一个充当新的 master,并让其他 slave 指向它。
当master出现故障时,通过对比 slave 之间的 I/O thread 读取主库的 binlog 的 position 号,选取最接近的slave作为备胎(被选主库),其它从库通过与备胎对比,生成差异的中继日志,在备胎上运用从原来的 master 保存的 binlig,同时将备胎提升为master。最后在其他 slave 上运用相应的差异中继日志,并从新的 master 开始复制。
优点:
- 故障切换时,自动判断哪个从库与主库离的最近,并切换到上面
- 支持binlog server,提高 binlog 的传送效率
- 结合半同步功能,确保故障切换时数据不丢失
三、实验环境介绍
使用三台机器来完成本次MHA的搭建:
	IP			主机名		系统版本		角色					 	节点
172.25.5.1		lxn1		RHEL7		master node				node1

172.25.5.3      lxn3		RHEL7		slave1 node				node2
172.25.5.4      lxn4		RHEL7		slave2 node+manager		node3
四、MHA搭建
MHA下载:
https://github.com/yoshinorim/mha4mysql-manager
https://github.com/yoshinorim/mha4mysql-node
wget https://github.com/yoshinorim/mha4mysql-manager/releases/download/v0.58/mha4mysql-manager-0.58.tar.gz
wget https://github.com/yoshinorim/mha4mysql-node/releases/download/v0.58/mha4mysql-node-0.58.tar.gz
1、配置三台机器免密通信
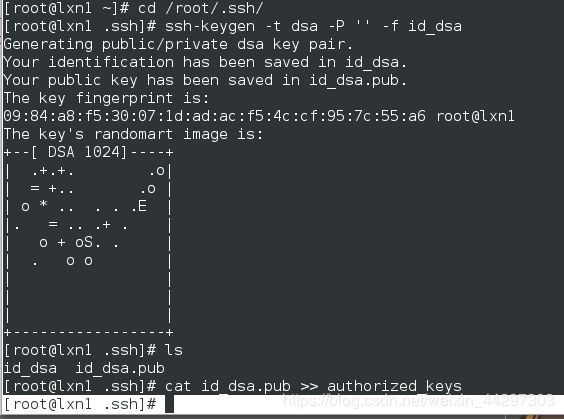
所有节点都执行生成密钥操作
cd /root/.ssh/
ssh-keygen -t dsa -P '' -f id_dsa
cat id_dsa.pub >> authorized_keys
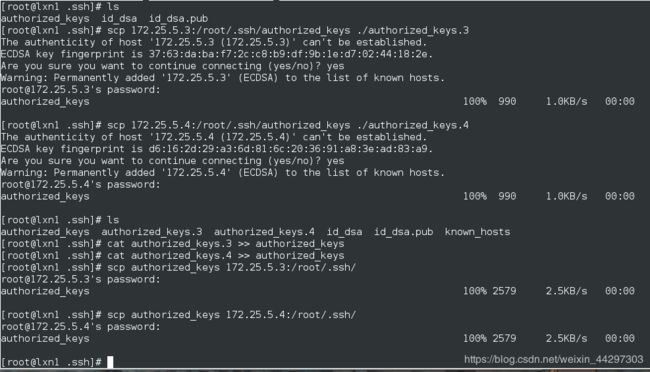
在主库上接收slave上的密钥
scp 172.25.5.3:/root/.ssh/authorized_keys ./authorized_keys.3
scp 172.25.5.4:/root/.ssh/authorized_keys ./authorized_keys.4
在主库上执行合并密钥的命令
cat authorized_keys.3 >> authorized_keys
cat authorized_keys.4 >> authorized_keys
在主库上将合并后的密钥文件发给其他节点
scp authorized_keys 172.25.5.3:/root/.ssh/
scp authorized_keys 172.25.5.4:/root/.ssh/
- 完整命令截图(进供参考)
所有节点在/etc/hosts文件中写入本地解析:
172.25.5.1      lxn1 node1
172.25.5.3      lxn3 node2
172.25.5.4      lxn4 node3
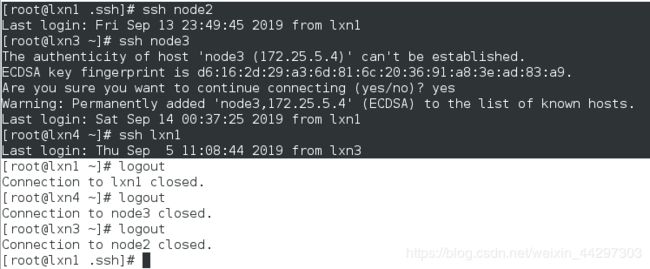
测试
能够互相ssh且不要密码,即成功!
示例:
2、搭建主从环境
环境说明
本次实验搭建的是一主两从环境,使用的MySQL5.7版本,基于GTID+row模式
在所有服务器MySQL上执行以下操作
#创建主从复制帐号
create user 'gtid'@'172.25.5.%' identified by 'gtid123';
grant replication slave on *.* to 'gtid'@'172.25.5.%';
flush privileges;
#创建管理帐号
create user 'manage'@'172.25.5.%' identified by 'manage123';
grant all privileges on *.* to 'manage'@'172.25.5.%';
flush privileges;
在主库上复制数据到所有从库,完成在某个时刻GTID的同步
mysqldump --single-transaction -uroot -p -A > all.sql
scp all.sql node2:/root/
scp all.sql node3:/root/
在各从库上恢复备份并配置主从复制,开启主从同步
mysql -uroot -p < all.sql
mysql -uroot -p
root@localhost [(none)]>change master to
    -> master_host='172.25.5.1',
    -> master_user='gtid',
    -> master_password='gtid123',
    -> master_auto_position=1;

root@localhost [(none)]>start slave;

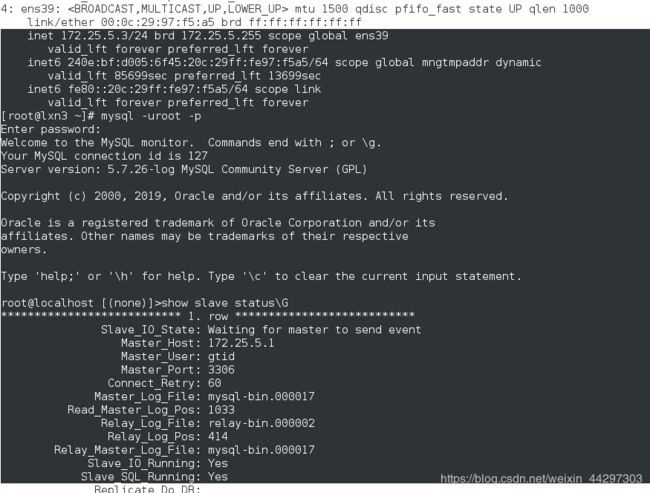
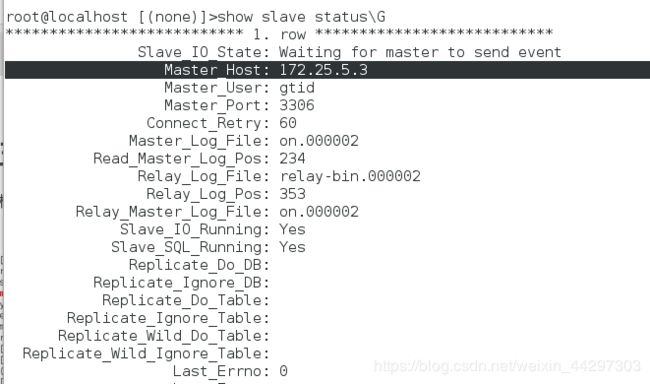
root@localhost [(none)]>show slave status\G
- 注:
Slave_IO_Running: Yes
Slave_SQL_Running: Yes
为主从搭建成功!
3、安装MHA-Node节点
在所有节点上安装数据节点
首先安装 MySQL 依赖的 perl 环境
yum install perl-DBD-MySQL.x86_64 -y
解压 mha4mysql-node 包,并安装 perl-cpan
tar -zxf mha4mysql-node-0.58.tar.gz
cd mha4mysql-node-0.58/
yum install perl-CPAN* -y
perl Makefile.PL
make && make install
4、安装配置 MHA-Manager 管理节点
以下操作都是在node3(172.25.5.4)上完成的
安装环境需要的介质包:
- 注意:我的操作系统是rhel7,下载软件时注意软件版本问题
yum install perl-DBD-MySQL*

wget ftp://ftp.pbone.net/mirror/ftp5.gwdg.de/pub/opensuse/repositories/home:/matthewdva:/build:/RedHat:/RHEL-7/complete/x86_64/perl-Params-Validate-1.08-4.el7.x86_64.rpm
rpm -ivh perl-Params-Validate-1.08-4.el7.x86_64.rpm

wget ftp://ftp.pbone.net/mirror/ftp5.gwdg.de/pub/opensuse/repositories/home:/csbuild:/Perl/RHEL_7/noarch/perl-Config-Tiny-2.20-1.2.noarch.rpm
rpm -ivh perl-Config-Tiny-2.20-1.2.noarch.rpm

wget ftp://ftp.pbone.net/mirror/ftp5.gwdg.de/pub/opensuse/repositories/home:/csbuild:/Perl/RHEL_7/noarch/perl-Log-Dispatch-2.41-2.2.noarch.rpm
rpm -ivh perl-Log-Dispatch-2.41-2.2.noarch.rpm

wget ftp://ftp.pbone.net/mirror/download.fedora.redhat.com/pub/fedora/epel/7/aarch64/Packages/p/perl-Parallel-ForkManager-1.18-2.el7.noarch.rpm
rpm -ivh perl-Parallel-ForkManager-1.18-2.el7.noarch.rpm
安装管理节点
tar -zxf mha4mysql-manager-0.58.tar.gz
cd mha4mysql-manager-0.58
perl Makefile.PL
make && make install
配置MHA
mkdir /etc/mha
mkdir -p /usr/local/mha
cd /etc/mha/
vim mha.conf
#####################################################写入配置
[server default]
user=manage
password=manage123
manager_log=/usr/local/mha/manager.log
manager_workdir=/usr/local/mha
master_binlog_dir=/mvtech/mysql/logs
remote_workdir=/usr/local/mha
ssh_user=root
repl_user=gtid
repl_password=gtid123
master_ip_failover_script=/usr/local/scripts/master_ip_failover
master_ip_online_change_script=/usr/local/scripts/master_ip_online_change
ping_interval=1

[server1]
hostname=172.25.5.1
ssh_port=22
master_binlog_dir=/data/mysql
candidate_master=1
port=3306

[server2]
candidate_master=1
hostname=172.25.5.3
ssh_port=22
master_binlog_dir=/data/mysql
port=3306

[server3]
hostname=172.25.5.4
ssh_port=22
master_binlog_dir=/data/mysql
no_master=1
port=3306
####################################################
编辑 failover 切换脚本
mkdir /usr/local/mha/scripts
cd /usr/local/mha/scripts
vim master_ip_failover
#脚本内部的VIP和网卡需要根据自己的实际要求更改
###############################################写入
#!/usr/bin/env perl
use strict;
use warnings FATAL =>'all';

use Getopt::Long;

my (
$command,          $ssh_user,        $orig_master_host, $orig_master_ip,
$orig_master_port, $new_master_host, $new_master_ip,    $new_master_port
);

my $vip = '172.25.5.100/24';  # Virtual IP 这里需要根据自己的环境修改
my $key = "1";
my $ssh_start_vip = "/sbin/ifconfig ens39:$key $vip";	#注意网卡
my $ssh_stop_vip = "/sbin/ifconfig ens39:$key down";
my $exit_code = 0;

GetOptions(
'command=s'          => \$command,
'ssh_user=s'         => \$ssh_user,
'orig_master_host=s' => \$orig_master_host,
'orig_master_ip=s'   => \$orig_master_ip,
'orig_master_port=i' => \$orig_master_port,
'new_master_host=s'  => \$new_master_host,
'new_master_ip=s'    => \$new_master_ip,
'new_master_port=i'  => \$new_master_port,
);

exit &main();

sub main {

#print "\n\nIN SCRIPT TEST====$ssh_stop_vip==$ssh_start_vip===\n\n";

if ( $command eq "stop" || $command eq "stopssh" ) {

        # $orig_master_host, $orig_master_ip, $orig_master_port are passed.
        # If you manage master ip address at global catalog database,
        # invalidate orig_master_ip here.
        my $exit_code = 1;
        eval {
            print "\n\n\n***************************************************************\n";
            print "Disabling the VIP - $vip on old master: $orig_master_host\n";
            print "***************************************************************\n\n\n\n";
&stop_vip();
            $exit_code = 0;
        };
        if ($@) {
            warn "Got Error: $@\n";
            exit $exit_code;
        }
        exit $exit_code;
}
elsif ( $command eq "start" ) {

        # all arguments are passed.
        # If you manage master ip address at global catalog database,
        # activate new_master_ip here.
        # You can also grant write access (create user, set read_only=0, etc) here.
my $exit_code = 10;
        eval {
            print "\n\n\n***************************************************************\n";
            print "Enabling the VIP - $vip on new master: $new_master_host \n";
            print "***************************************************************\n\n\n\n";
&start_vip();
            $exit_code = 0;
        };
        if ($@) {
            warn $@;
            exit $exit_code;
        }
        exit $exit_code;
}
elsif ( $command eq "status" ) {
        print "Checking the Status of the script.. OK \n";
        `ssh $ssh_user\@$orig_master_host \" $ssh_start_vip \"`;
        exit 0;
}
else {
&usage();
        exit 1;
}
}

# A simple system call that enable the VIP on the new master
sub start_vip() {
`ssh $ssh_user\@$new_master_host \" $ssh_start_vip \"`;
}
# A simple system call that disable the VIP on the old_master
sub stop_vip() {
`ssh $ssh_user\@$orig_master_host \" $ssh_stop_vip \"`;
}

sub usage {
print
"Usage: master_ip_failover –command=start|stop|stopssh|status –orig_master_host=host –orig_master_ip=ip –orig_master_port=po
rt –new_master_host=host –new_master_ip=ip –new_master_port=port\n";
}
###############################################

chmod +x master_ip_failover
编写 online_change 脚本
vim master_ip_online_change

#注意VIP
###############################################写入
#/bin/bash
source /root/.bash_profile

vip=`echo '172.25.5.100/24'`  # Virtual IP
key=`echo '1'`

command=`echo "$1" | awk -F = '{print $2}'`
orig_master_host=`echo "$2" | awk -F = '{print $2}'`
new_master_host=`echo "$7" | awk -F = '{print $2}'`
orig_master_ssh_user=`echo "${12}" | awk -F = '{print $2}'`
new_master_ssh_user=`echo "${13}" | awk -F = '{print $2}'`

stop_vip=`echo "ssh root@$orig_master_host /sbin/ifconfig  eth0:$key  down"`
start_vip=`echo "ssh root@$new_master_host /sbin/ifconfig  eth0:$key  $vip"`

if [ $command = 'stop' ]
   then
   echo -e "\n\n\n***************************************************************\n"
   echo -e "Disabling the VIP - $vip on old master: $orig_master_host\n"
   $stop_vip
   if [ $? -eq 0 ]
      then
      echo "Disabled the VIP successfully"
   else
      echo "Disabled the VIP failed"
   fi
   echo -e "***************************************************************\n\n\n\n"
fi

if [ $command = 'start' -o $command = 'status' ]
   then
   echo -e "\n\n\n***************************************************************\n"
   echo -e "Enabling the VIP - $vip on new master: $new_master_host \n"
   $start_vip
   if [ $? -eq 0 ]
      then
      echo "Enabled the VIP successfully"
   else
      echo "Enabled the VIP failed"
   fi
   echo -e "***************************************************************\n\n\n\n"
fi
#############################################

chmod +x master_ip_online_change
检测所有主机的连通性:
/usr/local/bin/masterha_check_ssh --conf=/etc/mha/mha.conf
/usr/local/bin/masterha_check_repl --conf=/etc/mha/mha.conf
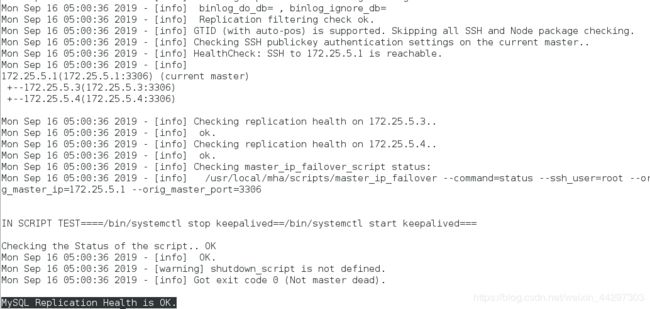
- 注:这里容易报错,请仔细看报错,能解决
5、在主库上添加VIP
ip addr add 172.25.5.100/24 dev ens39
6、在管理节点启动MHA服务
启动MHA:
nohup masterha_manager --conf=/etc/mha/mha.conf > /tmp/mha_manager.log < /dev/null 2>&1 &
检测MHA是否启动:
masterha_check_status --conf=/etc/mha/mha.conf
五、模拟主库故障,故障切换
0、模拟主库(172.25.5.1)故障
kill 掉主库MySQL服务
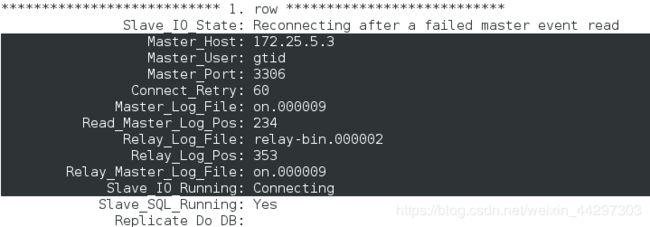
1、MHA 自动切换主库
在node2(172.25.5.3)上:
在node3(172.25.5.4)上看主从信息:
masterha_check_status --conf=/etc/mha/mha.conf
- mha.failover.complete 文件:该文件生成后,将不在允许主库故障后自动切换
2、手动切换主库
手动failover,这种场景意味着在业务上没有启用MHA自动切换功能,当主服务器故障时,人工手动调用MHA来进行故障切换操作
环境介绍
由于刚才 MHA 自动切换成功,所以现在主库是172.25.5.3,重启宕掉的主库后成为新的slave
masterha_stop --conf=/etc/mha/mha.conf
MHA 自动切换主库失败后,可以用手动切换
在管理节点操作:
masterha_master_switch --master_state=dead --conf=/etc/mha/mha.conf --dead_master_host=172.25.5.3 --dead_master_port=3306 --new_master_ip=172.25.5.1 --new_master_port=3306
将宕掉的MySQL主库恢复起来
node1,原主库
mysqld_safe --defaults-file=/etc/my.cnf &
重新指向新的主库,配置主从
node1,原主库
mysql -uroot -p

root@localhost [(none)]>change master to
    -> master_host='172.25.5.3',
    -> master_user='gtid',
    -> master_password='gtid123',
    -> master_auto_position=1;

 root@localhost [(none)]>start slave;
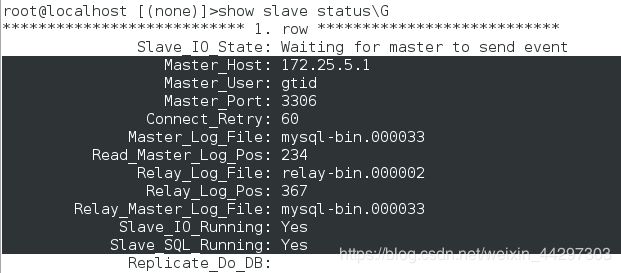
 root@localhost [(none)]>show slave status\G
- 至此,新的一主两从结构完成!
六、让宕掉的主库重新成为新的主库
- 手动回切需要关闭MHA监控,如下图
- masterha_check_status --conf=/etc/mha/mha.conf 来查看MHA监控是否打开
![]()
将宕掉的MySQL主库重启并成为新的 slave 后,在管理节点操作:
masterha_master_switch --conf=/etc/mha/mha.conf --master_state=alive --new_master_host=172.25.5.1 --orig_master_is_new_slave

在node2节点(刚才故障切换的新主库)上可以看到:node2已经成为了一个slave,而主库是172.25.5.1(node1)
