PostgreSQL高可用(二)使用pgpool实现主从切换+读写分离
文章目录
- 1主从流复制
- 1.1 主机分配
- 2主从切换
- 2.1 手动切换
- 2.2 pgpool 自动切换
- 2.2.1 解压编译安装
- 2.2.2 添加环境变量
- 2.2.3 配置pool_hba.conf
- 2.2.4 配置pcp.conf和pool_passwd
- 2.2.5 修改pcp.conf
- 2.2.6 配置pgpool.conf
- 2.2.7 failover_stream.sh内容:
- 2.2.8 pgpool的启动和关闭
- 2.2.9 查看集群状态
- 3 测试(模拟master宕机)
- 3.1 关闭master数据库
- 3.2 宕机后的恢复
- 3.2.1 首先将master中的recovery.done改为recovery.conf,让它成为新的从库
- 3.2.2 启动宕机的数据库
- 3.2.3 使用pcp_attach_node命令
- 3.2.4 查看当前集群状态
- 4 读写分离
1主从流复制
主从复制请看:[PostgreSQL高可用(一)主从流复制]
1.1 主机分配
- OS:CentOS 7
- 节点1:master(192.168.36.130)
- 节点2:slave(192.168.36.131)
- 节点3:slave(192.168.36.133)
2主从切换
2.1 手动切换
在上一节中,配置好了流复制结构,接下来模拟主库宕机,进行测试。
1.主库宕机
在master上执行
pg_ctl stop
会发现测试库报错,连接不上主库。
这时我们创建触发文件。
touch /tmp/trigger_file0
也可以放在别的目录,记得要给postgres权限。
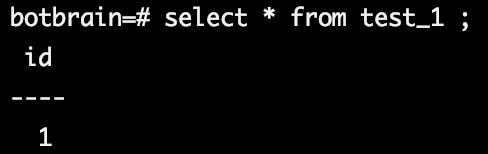
这时,测试库会变成主库。我们在slave上的测试库中新建测试表,并插入数据。
create database test;
create teble test_1 (id int);
insert into test_1 valuse (1);
将主库的recover.done变为recovery.conf
mv recovery.done recovery.conf
启动主库
pg_ctl start
主库会自动的发现时间线的差异,并拷贝过来。
登录主库查询,可以查到数据。
如果你们更改recovery.done,或者进行了别的操作,你会发现数据是不一样的。
这是你需要停掉被恢复的库,手动同步时间线。
pg_rewind --target-pgdata=/home/postgres/data --source-server='host=slave port=5432 user=postgres dbname=postgres'
将主库的recover.done变为recovery.conf
mv recovery.done recovery.conf
再次启动主库。数据就已经同步了。
你可以多次手动切换进行测试,但是你会发现一个问题。
触发文件trigger_file0每次在即创建完成后并不会存在,他在切换完成后就消失了。每次都要手动创建文件的话很麻烦,所以使用pgpool进行自动切换。
2.2 pgpool 自动切换
下载地址:http://www.pgpool.net/mediawiki/images/
2.2.1 解压编译安装
tar -zxvf pgpool-II-3.6.0.tar.gz -C /opt/
cd /opt/pgpol-II/
./configure –prefix=/opt/pgpool -with-pgsql=path -with-pgsql=/home/postgres
make
make install
2.2.2 添加环境变量
vim /etc/profile

PGPOOL_HOME=/opt/pgpool
export PGPOOL_HOME
PATH=$PATH:$HOME/.local/bin:$HOME/bin:$PGHOME/bin:$PGPOOL_HOME/bin
export PATH
#使之生效
source /etc/profile
2.2.3 配置pool_hba.conf
增加一下内容
host all all 0.0.0.0/0 md5
[postgres@pool etc]$ pwd
/opt/pgpool/etc
[postgres@pool etc]$ cat pool_hba.conf
local   all         all                               trust
host    all         all         ::1/128               trust
host    all         all         0.0.0.0/0             md5
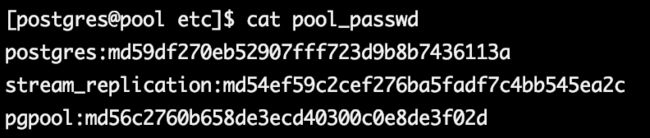
2.2.4 配置pcp.conf和pool_passwd
(master)主节点登陆后执行:
postgres=# select rolname,rolpassword from pg_authid;
      rolname       |             rolpassword
--------------------+-------------------------------------
 postgres           | md59df270eb52907fff723d9b8b7436113a
 stream_replication | md54ef59c2cef276ba5fadf7c4bb545ea2c
 pgpool             | md50b5752e4c7711493bdd283d5c4853774
(3 rows)
修改pool_passwd增加SQL执行结果的内容
形式为rolname:rolpassword例如:
postgres:md59df270eb52907fff723d9b8b7436113a
[postgres@pool etc]$ pwd
/opt/pgpoo/etc
[postgres@pool etc]$ cat pool_passwd
postgres:md59df270eb52907fff723d9b8b7436113a
stream_replication:md54ef59c2cef276ba5fadf7c4bb545ea2c
pgpool:md56c2760b658de3ecd40300c0e8de3f02d
2.2.5 修改pcp.conf
[postgres@pool etc]$ pg_md5 -u postgres 123
202cb962ac59075b964b07152d234b70
[postgres@pool etc]$ vim /etc/pgpool/pcp.conf ## 加入 postgres:上一命令的输出
postgres:202cb962ac59075b964b07152d234b70

2.2.6 配置pgpool.conf
内容如下:根据自己的配置进行相应的修改
#CONNECTIONS

listen_addresses = '*'
port = 9999
socket_dir = '/opt/pgpool'
pcp_listen_addresses = '*'
pcp_port = 9898
pcp_socket_dir = '/opt/pgpool'

# - Backend Connection Settings -

backend_hostname0 = '192.168.36.130' #主库hosts
backend_port0 = 5432
backend_weight0 = 1
backend_data_directory0 = '/home/postgres/data' #数据库位置
backend_flag0 = 'ALLOW_TO_FAILOVER'
#
backend_hostname1 = '192.168.36.131' #从库hosts
backend_port1 = 5432
backend_weight1 = 1
backend_data_directory1 = '/home/postgres/data' #数据库位置
backend_flag1 = 'ALLOW_TO_FAILOVER'
#
# # - Authentication -
#
enable_pool_hba = on
pool_passwd = 'pool_passwd'
#
# # FILE LOCATIONS
#
pid_file_name = '/opt/pgpool/pgpool.pid' ##pid文件位置
logdir = '/data1/pg_logs' ##日志位置
#
replication_mode = off
load_balance_mode = on
master_slave_mode = on
master_slave_sub_mode = 'stream'
#
sr_check_period = 5
sr_check_user = 'pgpool' ##主库创建的用户
sr_check_password = '123' ##密码
sr_check_database = 'postgres'
#
# # HEALTH CHECK 健康检查
#
health_check_period = 10
health_check_timeout = 20
health_check_user = 'pgpool'  ##主库创建的用户
health_check_password = '123'  ##密码
health_check_database = 'postgres'  ##检查的库
#
# # FAILOVER AND FAILBACK
# # 这是一个切换脚本,高可用全靠它
failover_command = '/data1/pg_bin/failover_stream.sh %d %H /tmp/trigger_file0'
给脚本放到指定位置,加执行权限
2.2.7 failover_stream.sh内容:
# Failover command for streaming replication.
# This script assumes that DB node 0 is primary, and 1 is standby.
#
# If standby goes down, do nothing. If primary goes down, create a
# trigger file so that standby takes over primary node.
#
# Arguments: $1: failed node id. $2: new master hostname. $3: path to
# trigger file.

failed_node=$1
new_master=$2
trigger_file=$3

# Do nothing if standby goes down.
if [ $failed_node = 1 ]; then
        exit 0;
fi

# Create the trigger file.
/usr/bin/ssh -T $new_master /bin/touch $trigger_file

exit 0;
2.2.8 pgpool的启动和关闭
启动 pgpool -n -D > /data1/pg_logs/pgpool.log 2>&1 &
关闭 pgpool -m fast stop
2.2.9 查看集群状态
[postgres@localhost etc]$ psql -p 9999 -h pool -U pgpool -d postgres
用户 pgpool 的口令:

postgres=> show pool_nodes;
 node_id |    hostname    | port  | status | lb_weight |  role   | select_cnt | load_balance_node | replication_delay
---------+----------------+-------+--------+-----------+---------+------------+-------------------+-------------------
 0       | 192.168.36.130 | 5432 | up     | 0.500000  | primary | 0          | false             | 0
 1       | 192.168.36.131 | 5432 | up     | 0.500000  | standby | 0          | true              | 0
(2 rows)
3 测试(模拟master宕机)
3.1 关闭master数据库
master
#因为加了PGDATA,所以在启动和关闭时不用指定数据库位置,很方便
[postgres@master data]$ pg_ctl stop
waiting for server to shut down.... done
server stopped
pool
master关闭后,从节点的连接中断后又成功连接上
postgres=> show pool_nodes;
server closed the connection unexpectedly
        This probably means the server terminated abnormally
        before or while processing the request.
The connection to the server was lost. Attempting reset: Succeeded.
postgres=> show pool_nodes;
 node_id |    hostname    | port  | status | lb_weight |  role   | select_cnt | load_balance_node | replication_delay
---------+----------------+-------+--------+-----------+---------+------------+-------------------+-------------------
 0       | 192.168.36.130 | 5432 | down   | 0.500000  | standby | 0          | false             | 0
 1       | 192.168.36.131 | 5432 | up     | 0.500000  | primary | 0          | true              | 0
(2 rows)

发现master已经是standby了,且down机了,slave升为了primary
slave成为新的主且slave中的recovery.conf 变成recovery.done
3.2 宕机后的恢复
最简单的方法就是将宕机的主库删掉,是用pg_basebackup的命令重新备份,但在生产环境中,数据量会越来越多,所以每次都重新拷贝很大的数据是很麻烦的,所以需要增量拷贝。
3.2.1 首先将master中的recovery.done改为recovery.conf,让它成为新的从库
[postgres@master data]$ mv recovery.done recovery.conf
3.2.2 启动宕机的数据库
[postgres@master pg_xlog]$ pg_ctl start
server starting
[postgres@master pg_xlog]$ LOG:  redirecting log output to logging collector process
HINT:  Future log output will appear in directory "pg_log".
3.2.3 使用pcp_attach_node命令
pcp_attach_node -d -U postgres -h pool -p 9898 -n 0
3.2.4 查看当前集群状态
[postgres@pool etc]$ psql -h pool -p 9999 -U pgpool -d postgres

postgres=> show pool_nodes;
 node_id |    hostname    | port  | status | lb_weight |  role   | select_cnt | load_balance_node | replication_delay
---------+----------------+-------+--------+-----------+---------+------------+-------------------+-------------------
 0       | 192.168.36.131 | 5432 | up     | 0.500000  | primary | 0          | false             | 0
 1       | 192.168.36.130 | 5432 | up     | 0.500000  | standby | 0          | true              | 0
(2 行记录)
恢复完成,master成为了新的standby。
4 读写分离
实现读写分离非常简单,在pgpool.conf中添加参数就可以实现。
load_balance_mode = on
pgpool会自动的将select语句分到从库上,将update等语句分到主库上。