Android极光推送手工整合到项目中的方法
1.在我们的eclipse中新建一个Android项目
2.首先去极光推送官网创建一个应用
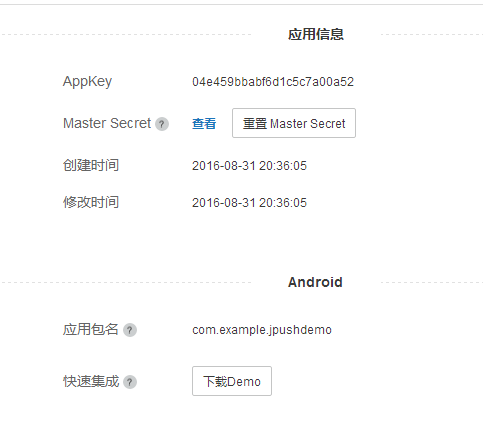
1.注意这个包名一定要和我们Android项目中的AndroidManifest.xml文件中的包名一致
2.创建好之后会在我们可以看到这个应用信息,这里比较重要的是AppKey
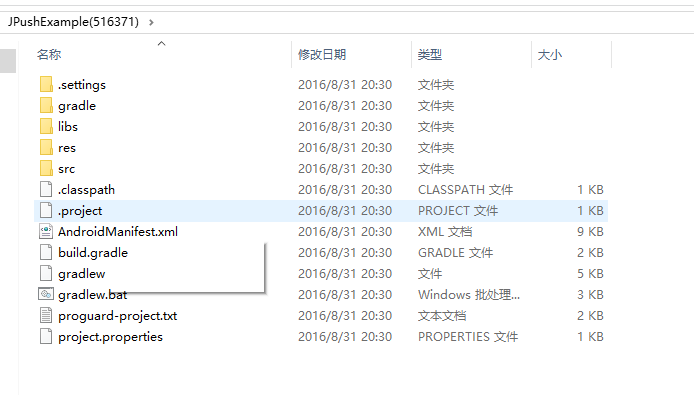
3.下载这个Demo,我们需要用到里面的一些资源
解压后如图所示:
4.导入资源
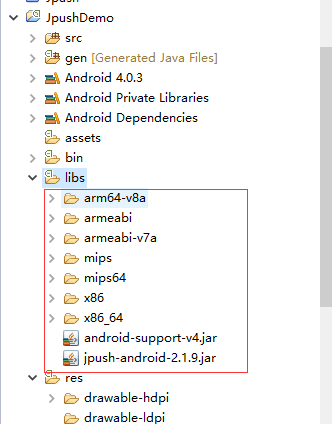
将压缩包中的lib文件夹拷贝到我们的Android项目中,同时把res/value/jpush_style.xml拷贝进来
5.修改我们项目的AndroidManifest.xml文件
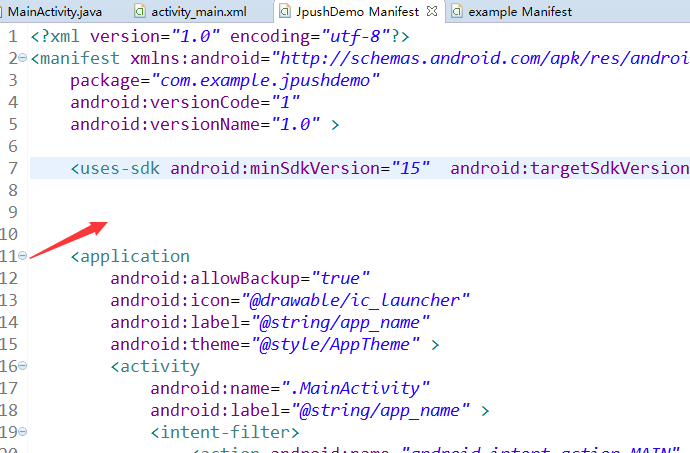
打开下载的AndroidManifest.xml文件,复制如下语句,插入到箭头所指处,要对应我们的包名
<permission
        android:name="com.example.jpushdemo.permission.JPUSH_MESSAGE"
        android:protectionLevel="signature" />


    <uses-permission android:name="com.example.jpushdemo.permission.JPUSH_MESSAGE" />
    <uses-permission android:name="android.permission.RECEIVE_USER_PRESENT" />
    <uses-permission android:name="android.permission.INTERNET" />
    <uses-permission android:name="android.permission.WAKE_LOCK" />
    <uses-permission android:name="android.permission.READ_PHONE_STATE" />
    <uses-permission android:name="android.permission.WRITE_EXTERNAL_STORAGE" />
    <uses-permission android:name="android.permission.READ_EXTERNAL_STORAGE" />
    <uses-permission android:name="android.permission.WRITE_SETTINGS" />
    <uses-permission android:name="android.permission.VIBRATE" />
    <uses-permission android:name="android.permission.MOUNT_UNMOUNT_FILESYSTEMS" />
    <uses-permission android:name="android.permission.ACCESS_NETWORK_STATE" />
    <uses-permission android:name="android.permission.ACCESS_WIFI_STATE" />
接着拷贝Required的核心功能,放到之前/application
        <activity
            android:name="cn.jpush.android.ui.PopWinActivity"
            android:theme="@style/MyDialogStyle"
            android:exported="false">
        activity>

        <activity
            android:name="cn.jpush.android.ui.PushActivity"
            android:configChanges="orientation|keyboardHidden"
            android:theme="@android:style/Theme.NoTitleBar"
            android:exported="false">
            <intent-filter>
                <action android:name="cn.jpush.android.ui.PushActivity" />
                <category android:name="android.intent.category.DEFAULT" />
                <category android:name="com.wly.jpush" />
            intent-filter>
        activity>

        <service
            android:name="cn.jpush.android.service.DownloadService"
            android:enabled="true"
            android:exported="false" >
        service>


        <service
            android:name="cn.jpush.android.service.PushService"
            android:enabled="true"
            android:exported="false">
            <intent-filter>
                <action android:name="cn.jpush.android.intent.REGISTER" />
                <action android:name="cn.jpush.android.intent.REPORT" />
                <action android:name="cn.jpush.android.intent.PushService" />
                <action android:name="cn.jpush.android.intent.PUSH_TIME" />
            intent-filter>
        service>


        <service
            android:name="cn.jpush.android.service.DaemonService"
            android:enabled="true"
            android:exported="true">
            <intent-filter>
                <action android:name="cn.jpush.android.intent.DaemonService" />
                <category android:name="com.wly.jpush" />
            intent-filter>
        service>


        <receiver
            android:name="cn.jpush.android.service.PushReceiver"
            android:enabled="true"
            android:exported="false">
             <intent-filter android:priority="1000">
                <action android:name="cn.jpush.android.intent.NOTIFICATION_RECEIVED_PROXY" />
                <category android:name="com.wly.jpush" />
            intent-filter>
            <intent-filter>
                <action android:name="android.intent.action.USER_PRESENT" />
                <action android:name="android.net.conn.CONNECTIVITY_CHANGE" />
            intent-filter>

            <intent-filter>
                <action android:name="android.intent.action.PACKAGE_ADDED" />
                <action android:name="android.intent.action.PACKAGE_REMOVED" />
                <data android:scheme="package" />
            intent-filter>

        receiver>


        <receiver android:name="cn.jpush.android.service.AlarmReceiver" android:exported="false"/>


        <receiver
            android:name="com.example.jpushdemo.MyReceiver"
            android:exported="false"
            android:enabled="true">
            <intent-filter>
                <action android:name="cn.jpush.android.intent.REGISTRATION" />
                <action android:name="cn.jpush.android.intent.MESSAGE_RECEIVED" />
                <action android:name="cn.jpush.android.intent.NOTIFICATION_RECEIVED" />
                <action android:name="cn.jpush.android.intent.NOTIFICATION_OPENED" />
                <action android:name="cn.jpush.android.intent.ACTION_RICHPUSH_CALLBACK" />
                <action android:name="cn.jpush.android.intent.CONNECTION" />
                <category android:name="com.wly.jpush" />
            intent-filter>
        receiver>


        <meta-data android:name="JPUSH_CHANNEL" android:value="developer-default"/>
        <meta-data android:name="JPUSH_APPKEY" android:value="83caf896cfe62b62c432bdab" />
这样就完成了AndroidManifest.xml的初步配置
6.初始化Jpush
1创建一个MyApplication.java类文件,用于初始化Jpush
package com.example.jpushdemo;
import cn.jpush.android.api.JPushInterface;
import android.app.Application;
public class MyApplication extends Application {
    @Override
    public void onCreate() {
         super.onCreate();

         JPushInterface.setDebugMode(true);     // 设置开启日志,发布时请关闭日志
         JPushInterface.init(this);             // 初始化 JPush
    }
}
2.然后再打开我们的AndroidManifest.xml 文件,在加入如下图所示的语句初始化Application
7.自己编写一接收器MyReceiver继承与Android的BroadcastReceiver,并实现其中的onReceive方法,用于接收各类消息和通知
public class MyReceiver extends BroadcastReceiver {
    @Override
    public void onReceive(Context context, Intent intent) {
        // TODO Auto-generated method stub
        Bundle bundle = intent.getExtras();
        if (JPushInterface.ACTION_REGISTRATION_ID.equals(intent.getAction())) {
            String regId = bundle.getString(JPushInterface.EXTRA_REGISTRATION_ID);
            //send the Registration Id to your server...
            System.out.println("接收Registration Id : " + regId);

        } else if (JPushInterface.ACTION_MESSAGE_RECEIVED.equals(intent.getAction())) {
            //processCustomMessage(context, bundle);
            System.out.println("接收到推送下来的自定义消息: " + bundle.getString(JPushInterface.EXTRA_MESSAGE));

        } else if (JPushInterface.ACTION_NOTIFICATION_RECEIVED.equals(intent.getAction())) {
            System.out.println("[MyReceiver] 接收到推送下来的通知");
            int notifactionId = bundle.getInt(JPushInterface.EXTRA_NOTIFICATION_ID);
            System.out.println("[MyReceiver] 接收到推送下来的通知的ID: " + notifactionId);

        } else if (JPushInterface.ACTION_NOTIFICATION_OPENED.equals(intent.getAction())) {
            System.out.println("[MyReceiver] 用户点击打开了通知");

        } else if (JPushInterface.ACTION_RICHPUSH_CALLBACK.equals(intent.getAction())) {
            System.out.println("[MyReceiver] 用户收到到RICH PUSH CALLBACK: " + bundle.getString(JPushInterface.EXTRA_EXTRA));
            //在这里根据 JPushInterface.EXTRA_EXTRA 的内容处理代码,比如打开新的Activity, 打开一个网页等..

        } else if(JPushInterface.ACTION_CONNECTION_CHANGE.equals(intent.getAction())) {
            boolean connected = intent.getBooleanExtra(JPushInterface.EXTRA_CONNECTION_CHANGE, false);
            System.out.println( "[MyReceiver]" + intent.getAction() +" connected state change to "+connected);
        } else {
            System.out.println( "[MyReceiver] Unhandled intent - " + intent.getAction());
        }
    }


