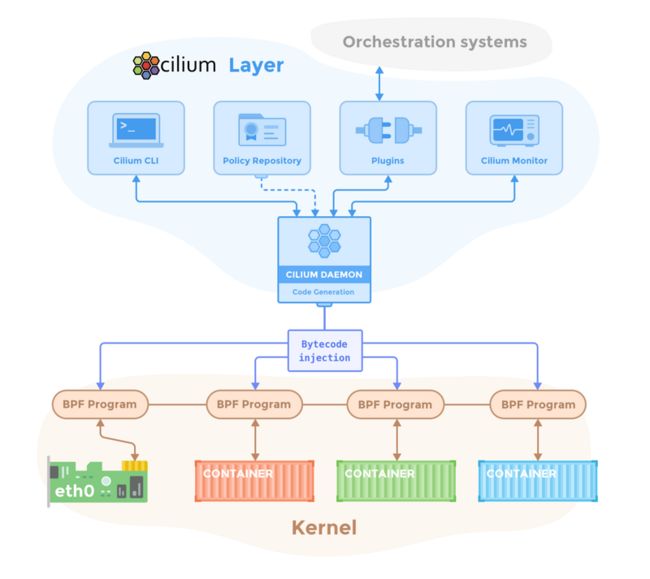
在介绍CNI Chaining之前,我们先简单介绍一下Cilium。要说现在最火的容器网络,莫过于Cilium了。Cilium 是一个基于 eBPF 和 XDP 的高性能容器网络方案,代码开源在https://github.com/cilium/cilium。其主要功能特性包括
-
安全上,支持 L3/L4/L7 安全策略,这些策略按照使用方法又可以分为
- 基于身份的安全策略(security identity)
- 基于 CIDR 的安全策略
- 基于标签的安全策略
-
网络上,支持三层平面网络(flat layer 3 network),如
- 覆盖网络(Overlay),包括 VXLAN 和 Geneve 等
- Linux 路由网络,包括原生的 Linux 路由和云服务商的高级网络路由等
- 提供基于 BPF 的负载均衡
- 提供便利的监控和排错能力
此外最新版本的Cilium已经包含了Kube-proxy的功能。
CNI Chaining
今天我们试想一种场景:你的集群运行在公有云上,整个k8s的网络模型已经使用了公有云提供的ENI弹性网络,比如aws的aws-cni和阿里云的terway。ENI带给我们诸多好处,高性能,拉平了Pod网络。
但是我们却希望使用Cilium带来的高性能负载均衡和可观察性。
于是今天的主角CNI Chaining出场了。
CNI Chaining允许将Cilium与其他CNI插件结合使用。
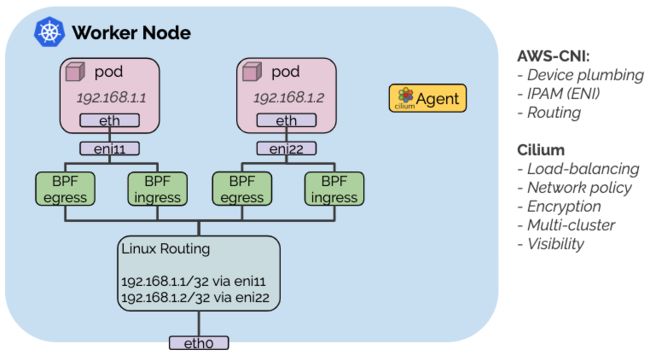
通过Cilium CNI Chaining,基本网络连接和IP地址管理由非Cilium CNI插件管理,但是Cilium将BPF程序附加到由非Cilium插件创建的网络设备上,以提供L3/L4/L7网络可见性和策略强制执行和其他高级功能,例如透明加密。
目前Cilium支持与以下网络模型配合使用:
今天我们主要测试AWS-CNI。
Cilium与AWS eni
接下来主要介绍如何与aws-cni结合设置Cilium。在这种混合模式下,aws-cni插件负责通过ENI设置虚拟网络设备以及地址分配(IPAM)。安装程序中,调用Cilium CNI插件将BPF程序附加到aws-cni设置的网络设备上,以实施网络策略,执行负载平衡和加密。
关于EKS集群部署,本文不涉及。大家可以参考相关文档。
安装成功后,执行kubectl get nodes可以类似如下输出:
NAME                                               STATUS   ROLES    AGE   VERSION
ip-172-xx-56-151.ap-southeast-1.compute.internal   Ready       10m   v1.15.11-eks-af3caf
ip-172-xx-94-192.ap-southeast-1.compute.internal   Ready       10m   v1.15.11-eks-af3caf
部署helm3
执行
curl -fsSL -o get_helm.sh https://raw.githubusercontent.com/helm/helm/master/scripts/get-helm-3

chmod 700 get_helm.sh

./get_helm.sh
看到如下输出,表明安装成功:
Helm v3.2.0 is available. Changing from version .
Downloading https://get.helm.sh/helm-v3.2.0-linux-amd64.tar.gz
Preparing to install helm into /usr/local/bin
helm installed into /usr/local/bin/helm
安装Cilium
增加Cilium helm repo:
helm repo add cilium https://helm.cilium.io/通过Helm部署Cilium:
helm install cilium cilium/cilium --version 1.7.3 \
  --namespace kube-system \
  --set global.cni.chainingMode=aws-cni \
  --set global.masquerade=false \
  --set global.tunnel=disabled \
  --set global.nodeinit.enabled=true
这将启用与aws-cni插件的chaining,也将禁用隧道。由于ENI IP地址可以直接在您的VPC中路由,因此不需要隧道,也可以出于相同原因禁用伪装。
看到如下类似输出,表明安装成功:
NAME: cilium
LAST DEPLOYED: Thu Apr 30 17:56:11 2020
NAMESPACE: kube-system
STATUS: deployed
REVISION: 1
TEST SUITE: None
NOTES:
You have successfully installed Cilium.

Your release version is 1.7.3.

For any further help, visit https://docs.cilium.io/en/v1.7/gettinghelp
重启已经部署的Pod
新的CNIchaining配置将不适用于群集中已在运行的任何Pod。现有Pod将可以访问,Cilium将对其进行负载平衡,但策略实施将不适用于它们并且不对源流量进行负载平衡您必须重新启动这些Pod才能在其上调用链配置。
如果不确定某个Pod是否由Cilium管理,请在相应的名称空间中运行kubectl get cep并查看是否列出了该Pod。
如下:
kubectl get cep -n kube-system
NAME                       ENDPOINT ID   IDENTITY ID   INGRESS ENFORCEMENT   EGRESS ENFORCEMENT   VISIBILITY POLICY   ENDPOINT STATE   IPV4            IPV6
coredns-5d76c48b7c-q2z5b   1297          43915                                                                        ready            172.26.92.175
coredns-5d76c48b7c-ths7q   863           43915                                                                        ready            172.26.55.46
coredns 已经重启,并且生效。
检验安装
接下来我们查看一下部署了那些组件:
kubectl get pods -n kube-system
NAME                              READY   STATUS    RESTARTS   AGE
aws-node-5lgwp                    1/1     Running   0          18m
aws-node-cpj9g                    1/1     Running   0          18m
cilium-7ql6n                      1/1     Running   0          94s
cilium-node-init-kxh2t            1/1     Running   0          94s
cilium-node-init-zzlrd            1/1     Running   0          94s
cilium-operator-6f9f88d64-lrt7f   1/1     Running   0          94s
cilium-zdtxq                      1/1     Running   0          94s
coredns-5d76c48b7c-q2z5b          1/1     Running   0          55s
coredns-5d76c48b7c-ths7q          1/1     Running   0          40s
kube-proxy-27j82                  1/1     Running   0          18m
kube-proxy-qktk8                  1/1     Running   0          18m
部署连通性测试
您可以部署“连通性检查”以测试Pod之间的连通性。
kubectl apply -f https://raw.githubusercontent.com/cilium/cilium/1.7.3/examples/kubernetes/connectivity-check/connectivity-check.yaml可以看到如下输出:
service/echo-a created
deployment.apps/echo-a created
service/echo-b created
service/echo-b-headless created
deployment.apps/echo-b created
deployment.apps/echo-b-host created
service/echo-b-host-headless created
deployment.apps/host-to-b-multi-node-clusterip created
deployment.apps/host-to-b-multi-node-headless created
deployment.apps/pod-to-a-allowed-cnp created
ciliumnetworkpolicy.cilium.io/pod-to-a-allowed-cnp created
deployment.apps/pod-to-a-l3-denied-cnp created
ciliumnetworkpolicy.cilium.io/pod-to-a-l3-denied-cnp created
deployment.apps/pod-to-a created
deployment.apps/pod-to-b-intra-node-hostport created
deployment.apps/pod-to-b-intra-node created
deployment.apps/pod-to-b-multi-node-clusterip created
deployment.apps/pod-to-b-multi-node-headless created
deployment.apps/pod-to-b-multi-node-hostport created
deployment.apps/pod-to-a-external-1111 created
deployment.apps/pod-to-external-fqdn-allow-google-cnp created
它将部署一系列部署,这些部署将使用各种连接路径相互连接,包括和不具有服务负载平衡以及各种网络策略组合的连接路径。Pod名称指示连接性变体,就绪和活跃性门指示成功或测试失败:
kubectl get pods
NAME                                                     READY   STATUS    RESTARTS   AGE
echo-a-558b9b6dc4-hjpqx                                  1/1     Running   0          72s
echo-b-59d5ff8b98-gxrb8                                  1/1     Running   0          72s
echo-b-host-f4bd98474-5bpfz                              1/1     Running   0          72s
host-to-b-multi-node-clusterip-7bb8b4f964-4zslk          1/1     Running   0          72s
host-to-b-multi-node-headless-5c5676647b-7dflx           1/1     Running   0          72s
pod-to-a-646cccc5df-ssg8l                                1/1     Running   0          71s
pod-to-a-allowed-cnp-56f4cfd999-2vln8                    1/1     Running   0          72s
pod-to-a-external-1111-7c5c99c6d9-mbglt                  1/1     Running   0          70s
pod-to-a-l3-denied-cnp-556fb69b9f-v9b74                  1/1     Running   0          72s
pod-to-b-intra-node-b9454c7c6-k9s4s                      1/1     Running   0          71s
pod-to-b-intra-node-hostport-665b46c945-x7g8s            1/1     Running   0          71s
pod-to-b-multi-node-clusterip-754d5ff9d-rsqgz            1/1     Running   0          71s
pod-to-b-multi-node-headless-7876749b84-c9fr5            1/1     Running   0          71s
pod-to-b-multi-node-hostport-77fcd6f59f-m7w8s            1/1     Running   0          70s
pod-to-external-fqdn-allow-google-cnp-6478db9cd9-4cc78   1/1     Running   0          70s
安装Hubble
我们使用Cilium,一个很大的原因,为了流量的可观察性,所以我们部署Hubble。
Hubble是一个用于Cloud Native工作负载的完全分布式的网络和安全性可观察性平台,它基于Cilium和eBPF构建,以完全透明的方式实现对服务以及网络基础架构的通信和行为的深入可见性。
生成部署文件:
git clone https://github.com/cilium/hubble.git
cd hubble/install/kubernetes

helm template hubble \
    --namespace kube-system \
    --set metrics.enabled="{dns,drop,tcp,flow,port-distribution,icmp,http}" \
    --set ui.enabled=true \
> hubble.yaml
查看生产的hubble.yaml 文件:
---
# Source: hubble/templates/serviceaccount.yaml
apiVersion: v1
kind: ServiceAccount
metadata:
  name: hubble
  namespace: kube-system
---
# Source: hubble/templates/serviceaccount.yaml
apiVersion: v1
kind: ServiceAccount
metadata:
  namespace: kube-system
  name: hubble-ui
---
# Source: hubble/templates/clusterrole.yaml
apiVersion: rbac.authorization.k8s.io/v1
kind: ClusterRole
metadata:
  name: hubble
rules:
- apiGroups:
  - ""
  resources:
  - pods
  verbs:
  - get
  - list
---
# Source: hubble/templates/clusterrole.yaml
kind: ClusterRole
apiVersion: rbac.authorization.k8s.io/v1
metadata:
  name: hubble-ui
rules:
  - apiGroups:
      - networking.k8s.io
    resources:
      - networkpolicies
    verbs:
      - get
      - list
      - watch
  - apiGroups:
      - ""
    resources:
      - componentstatuses
      - endpoints
      - namespaces
      - nodes
      - pods
      - services
    verbs:
      - get
      - list
      - watch
  - apiGroups:
      - apiextensions.k8s.io
    resources:
      - customresourcedefinitions
    verbs:
      - get
      - list
      - watch
  - apiGroups:
      - cilium.io
    resources:
      - "*"
    verbs:
      - get
      - list
      - watch
---
# Source: hubble/templates/clusterrolebinding.yaml
apiVersion: rbac.authorization.k8s.io/v1
kind: ClusterRoleBinding
metadata:
  name: hubble
roleRef:
  apiGroup: rbac.authorization.k8s.io
  kind: ClusterRole
  name: hubble
subjects:
- kind: ServiceAccount
  name: hubble
  namespace: kube-system
---
# Source: hubble/templates/clusterrolebinding.yaml
kind: ClusterRoleBinding
apiVersion: rbac.authorization.k8s.io/v1
metadata:
  name: hubble-ui
roleRef:
  apiGroup: rbac.authorization.k8s.io
  kind: ClusterRole
  name: hubble-ui
subjects:
  - kind: ServiceAccount
    namespace: kube-system
    name: hubble-ui
---
# Source: hubble/templates/svc.yaml
kind: Service
apiVersion: v1
metadata:
  name: hubble-grpc
  namespace: kube-system
  labels:
    k8s-app: hubble
spec:
  type: ClusterIP
  clusterIP: None
  selector:
    k8s-app: hubble
  ports:
  - targetPort: 50051
    protocol: TCP
    port: 50051
---
# Source: hubble/templates/svc.yaml
kind: Service
apiVersion: v1
metadata:
  namespace: kube-system
  name: hubble-ui
spec:
  selector:
    k8s-app: hubble-ui
  ports:
    - name: http
      port: 12000
      targetPort: 12000
  type: ClusterIP
---
# Source: hubble/templates/daemonset.yaml
apiVersion: apps/v1
kind: DaemonSet
metadata:
  name: hubble
  namespace: kube-system
spec:
  selector:
    matchLabels:
      k8s-app: hubble
      kubernetes.io/cluster-service: "true"
  template:
    metadata:
      annotations:
        prometheus.io/port: "6943"
        prometheus.io/scrape: "true"
      labels:
        k8s-app: hubble
        kubernetes.io/cluster-service: "true"
    spec:
      priorityClassName: system-node-critical
      affinity:
        podAffinity:
          requiredDuringSchedulingIgnoredDuringExecution:
          - labelSelector:
              matchExpressions:
              - key: "k8s-app"
                operator: In
                values:
                - cilium
            topologyKey: "kubernetes.io/hostname"
            namespaces:
            - cilium
            - kube-system
      containers:
      - name: hubble
        image: "quay.io/cilium/hubble:v0.5.0"
        imagePullPolicy: Always
        command:
        - hubble
        args:
        - serve
        - --listen-client-urls=0.0.0.0:50051
        - --listen-client-urls=unix:///var/run/hubble.sock
        - --metrics-server
        - ":6943"
        - --metric=dns
        - --metric=drop
        - --metric=tcp
        - --metric=flow
        - --metric=port-distribution
        - --metric=icmp
        - --metric=http
        env:
          - name: HUBBLE_NODE_NAME
            valueFrom:
              fieldRef:
                fieldPath: spec.nodeName
          - name: HUBBLE_NAMESPACE
            valueFrom:
              fieldRef:
                fieldPath: metadata.namespace
        ports:
        - containerPort: 6943
          protocol: TCP
          name: metrics
        readinessProbe:
          exec:
            command:
            - hubble
            - status
          failureThreshold: 3
          initialDelaySeconds: 5
          periodSeconds: 30
          successThreshold: 1
          timeoutSeconds: 5
        resources:
          {}
        volumeMounts:
        - mountPath: /var/run/cilium
          name: cilium-run
      restartPolicy: Always
      serviceAccount: hubble
      serviceAccountName: hubble
      terminationGracePeriodSeconds: 1
      tolerations:
      - operator: Exists
      volumes:
      - hostPath:
          # We need to access Cilium's monitor socket
          path: /var/run/cilium
          type: Directory
        name: cilium-run
---
# Source: hubble/templates/deployment.yaml
kind: Deployment
apiVersion: apps/v1
metadata:
  namespace: kube-system
  name: hubble-ui
spec:
  replicas: 1
  selector:
    matchLabels:
      k8s-app: hubble-ui
  template:
    metadata:
      labels:
        k8s-app: hubble-ui
    spec:
      priorityClassName:
      serviceAccountName: hubble-ui
      containers:
        - name: hubble-ui
          image: "quay.io/cilium/hubble-ui:latest"
          imagePullPolicy: Always
          env:
            - name: NODE_ENV
              value: "production"
            - name: LOG_LEVEL
              value: "info"
            - name: HUBBLE
              value: "true"
            - name: HUBBLE_SERVICE
              value: "hubble-grpc.kube-system.svc.cluster.local"
            - name: HUBBLE_PORT
              value: "50051"
          ports:
            - containerPort: 12000
              name: http
          resources:
            {}
部署Hubble:
kubectl apply -f hubble.yaml可以看到创建了以下的对象:
serviceaccount/hubble created
serviceaccount/hubble-ui created
clusterrole.rbac.authorization.k8s.io/hubble created
clusterrole.rbac.authorization.k8s.io/hubble-ui created
clusterrolebinding.rbac.authorization.k8s.io/hubble created
clusterrolebinding.rbac.authorization.k8s.io/hubble-ui created
service/hubble-grpc created
service/hubble-ui created
daemonset.apps/hubble created
deployment.apps/hubble-ui created
此时,我们还需要为Hubble UI 部署一个负载均衡器,方便我们从外部访问。
所以需要把service hubble-ui 类型更改为LoadBalancer。
如下:
kind: Service
apiVersion: v1
metadata:
  annotations:
    service.beta.kubernetes.io/aws-load-balancer-type: nlb
  namespace: kube-system
  name: hubble-ui
spec:
  selector:
    k8s-app: hubble-ui
  ports:
    - name: http
      port: 12000
      targetPort: 12000
  type: LoadBalancer
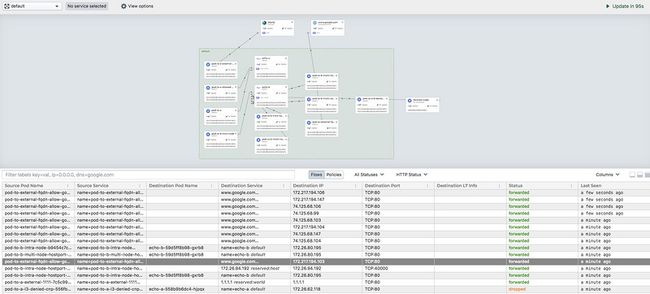
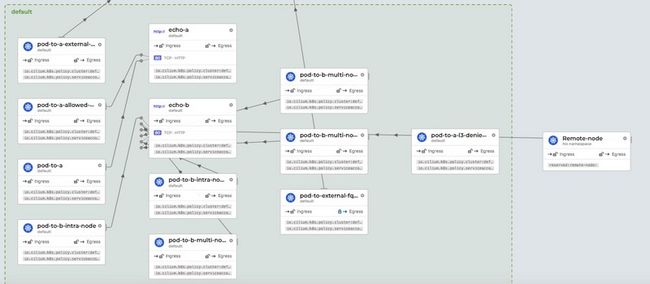
访问UI,我们可以看到如下:
总结
本文主要介绍了如何借助CNI Chaining ,实现Cilium对其他网络模型的功能增强。
不过由于eBPF对内核版本要求比较高,3.x系列的内核是不支持的。
最新版的Cilium利用eBPF实现负载均衡,完全可以不用部署Kube-proxy。
接下来,我们会详细讲述下Cilium原理和其他知识点。


