ARouter源码解析
文章目录
- ARouter概述
- ARouter使用
- ARouter源码分析
- arouter-annotation注解
- arouter-compiler注解编译器
- arouter-api路由控制
- ARouter 初始化
- ARouter API跳转
- 拦截器原理
- 参考文档
ARouter概述
ARouter 是一个用于帮助 Android App 进行组件化改造的框架 —— 支持模块间的路由、通信、解耦
适用于以下场景:
- 从外部URL映射到内部页面,以及参数传递与解析
- 跨模块页面跳转,模块间解耦
- 拦截跳转过程,处理登陆、埋点等逻辑
- 跨模块API调用,通过控制反转来做组件解耦
主要包括这些功能:
- 支持直接解析标准URL进行跳转,并自动注入参数到目标页面中
- 支持多模块工程使用
- 支持添加多个拦截器,自定义拦截顺序
- 支持依赖注入,可单独作为依赖注入框架使用
- 支持InstantRun
- 支持MultiDex(Google方案)
- 映射关系按组分类、多级管理,按需初始化
- 支持用户指定全局降级与局部降级策略
- 页面、拦截器、服务等组件均自动注册到框架
- 支持多种方式配置转场动画
- 支持获取Fragment
- 完全支持Kotlin以及混编(配置见文末 其他#5)
- 支持第三方 App 加固(使用 arouter-register 实现自动注册)
- 支持生成路由文档
- 提供 IDE 插件便捷的关联路径和目标类
其中加粗部分的功能是我们后面结合源码重点要解析的功能。
ARouter使用
这里只介绍ARouter最基础的用法–Activity跳转,其他用法如通过URL跳转、解析参数、声明拦截器、处理跳转结果、声明服务等,请详细阅读ARouter官网使用说明
- 添加依赖和配置
android {
    defaultConfig {
        ...
        javaCompileOptions {
            annotationProcessorOptions {
                arguments = [AROUTER_MODULE_NAME: project.getName()]
            }
        }
    }
}

dependencies {
    // 替换成最新版本, 需要注意的是api
    // 要与compiler匹配使用,均使用最新版可以保证兼容
    compile 'com.alibaba:arouter-api:x.x.x'
    annotationProcessor 'com.alibaba:arouter-compiler:x.x.x'
    ...
}
- 添加注解
// 在支持路由的页面上添加注解(必选)
// 这里的路径需要注意的是至少需要有两级,/xx/xx
@Route(path = "/test/activity")
public class YourActivity extend Activity {
    ...
}
- 初始化SDK
if (isDebug()) {           // 这两行必须写在init之前,否则这些配置在init过程中将无效
    ARouter.openLog();     // 打印日志
    ARouter.openDebug();   // 开启调试模式(如果在InstantRun模式下运行,必须开启调试模式!线上版本需要关闭,否则有安全风险)
}
ARouter.init(mApplication); // 尽可能早,推荐在Application中初始化
- 发起路由操作
// 1. 应用内简单的跳转(通过URL跳转在'进阶用法'中)
ARouter.getInstance().build("/test/activity").navigation();

// 2. 跳转并携带参数
ARouter.getInstance().build("/test/1")
            .withLong("key1", 666L)
            .withString("key3", "888")
            .withObject("key4", new Test("Jack", "Rose"))
            .navigation();
ARouter源码分析
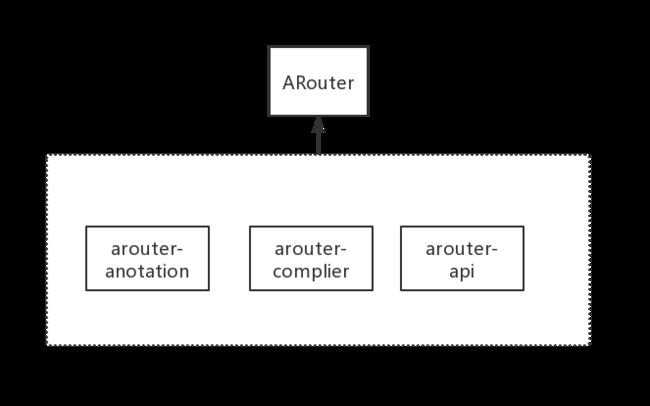
- arouter-annotation: 定义路由表的结构,ARouter路由框架所使用的全部注解,及其相关类
- arouter-compiler: 创建路由表,注解编译处理器,引入“arouter-annotation”,在编译期把注解标注的相关目标类生成映射文件
- arouter-api: 在运行期加载逻辑构建路由表,并实现路由控制
基于此,ARouter提供了两个SDK:一个是arouter-api,面向运行期;另一个是arouter-compiler,面向编译期。
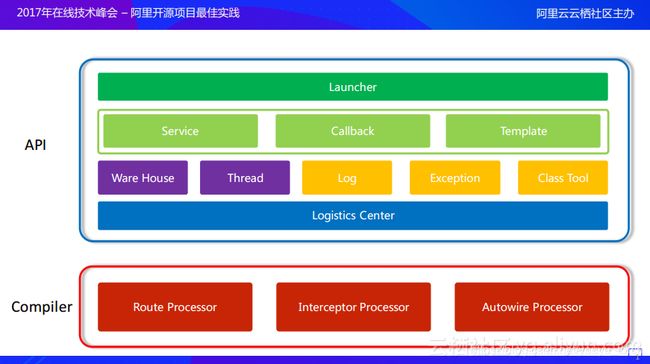
arouter-compiler包括三个部分
- Route Processor用于处理路径路由
- Interceptor Processor用于处理拦截器
- Autowire Processor用于自动装配
使用arouter-compiler部分编译后,会生成映射文件,供arouter-api运行时建立映射关系时使用。
arouter-api共分为4层,上面绿色的两层是对外开放,提供给开发者调用的接口;底下的两层是ARouter SDK的内部实现。
- Launcher层: ARouter对外开发的主要接口,包括初始化、添加注解及页面跳转等
- Frossard层: 开发者可通过实现此层提供的Service、Callback、Template接口,对外提供组件服务、处理降级逻辑,生成自定义模板映射文件等
- SDK内部实现层: Ware House主要存储了ARouter在运行期间加载的一些配置文件以及映射关系;而Thread则是提供了线程池,因为存在多个拦截器的时候以及跳转过程中都是需要异步执行的;Class工具则是用于解决不同类型APK的兼容问题的。
- Logistics Center层: 从名字上翻译就是物流中心,整个SDK的流转以及内部调用最终都会下沉到这一层,当然也会按照功能模块进行划分。
arouter-annotation注解
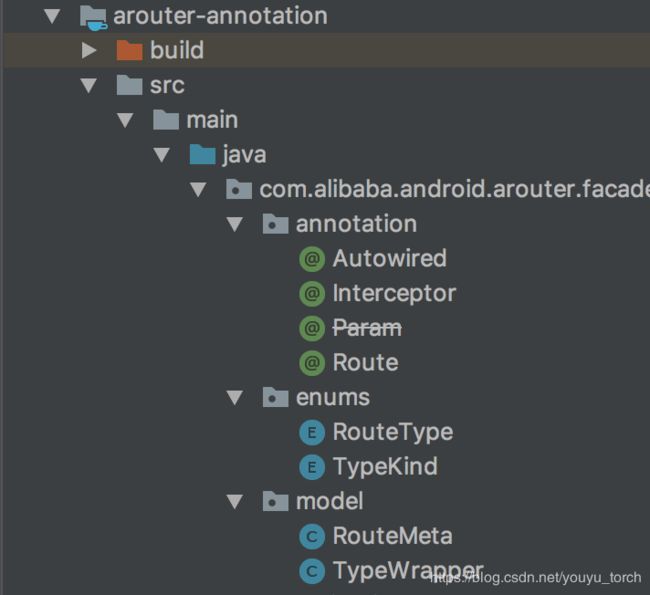
可以看到,arouter主要定义了三类注解:route注解、Interceptor注解、Autowired注解,刚好对应compiler中的三类处理器。
这里重点看一下route注解的定义
/**
 * Mark a page can be route by router.
 *
 * @author Alex Contact me.
 * @version 1.0
 * @since 16/8/15 下午9:29
 */
@Target({ElementType.TYPE})
@Retention(RetentionPolicy.CLASS)
public @interface Route {

    /**
     * Path of route
     */
    String path();

    /**
     * Used to merger routes, the group name MUST BE USE THE COMMON WORDS !!!
     */
    String group() default "";

    /**
     * Name of route, used to generate javadoc.
     */
    String name() default "";

    /**
     * Extra data, can be set by user.
     * Ps. U should use the integer num sign the switch, by bits. 10001010101010
     */
    int extras() default Integer.MIN_VALUE;

    /**
     * The priority of route.
     */
    int priority() default -1;
}
@Route 是 ARouter 最重要的注解,也是路由最基本的节点,该注解主要用于描述路由中的路径URL信息,使用该注解标注的类将被自动添加至路由表中。
值得说明的一点是 ARouter 并非仅提供页面(Activity)的路由功能,还可以用来路由模块想要暴露给其他模块调用的接口。
也就是说 @Route 不仅可用于 Activity 类,还可用于模块对外接口的实现类,实现类似于 AIDL 的功能,也就是IOC
我们还注意这里使用的是编译型注解@Retention(RetentionPolicy.CLASS),即在编译期就会生成映射文件,而不是运行期时通过反射生成,这大大提高了效率。
anotation中还有一个很重要的类,RouteMeta,它用于描述路由原信息。
/**
 * It contains basic route information.
 *
 * @author Alex Contact me.
 * @version 1.0
 * @since 16/8/24 09:45
 */
public class RouteMeta {
    private RouteType type;         // Type of route
    private Element rawType;        // Raw type of route
    private Class destination;   // Destination
    private String path;            // Path of route
    private String group;           // Group of route
    private int priority = -1;      // The smaller the number, the higher the priority
    private int extra;              // Extra data
    private Map paramsType;  // Param type
    private String name;

    private Map injectConfig;  // Cache inject config.

    public RouteMeta() {
    }
如果全部路由信息认为是一张表格,那么RouteMeta就是表格的一行,代表路由表的一条元信息。
arouter-compiler使用注解自动注册,生成映射文件后,arouter-api将通过读取信息,生成路由表元信息,从而建立映射关系
arouter-compiler注解编译器
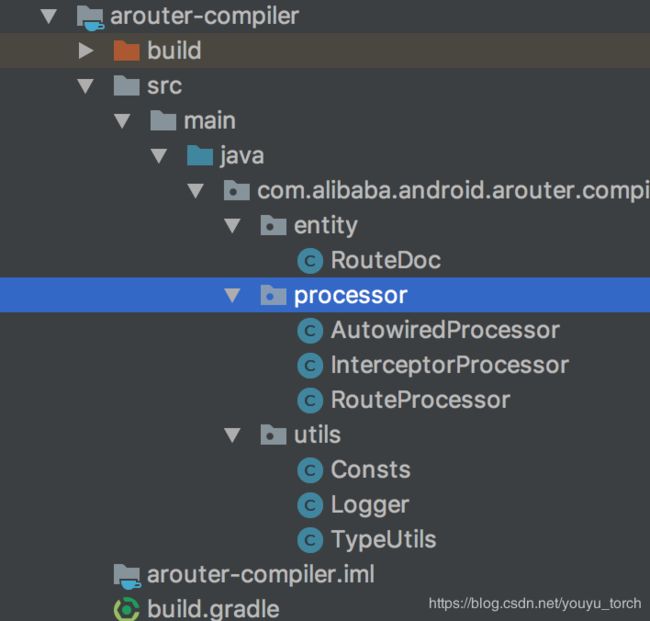
compiler最主要的还是processor文件下的三个类,用于在编译器读取注解,生成映射文件。
我们来看下官方demo所生成的映射文件示例:
ARouterRootapp的具体内容如下:
/**
 * DO NOT EDIT THIS FILE!!! IT WAS GENERATED BY AROUTER. */
public class ARouter$$Root$$app implements IRouteRoot {
  @Override
  public void loadInto(Map> routes) {
    routes.put("test", ARouter$$Group$$test.class);
    routes.put("yourservicegroupname", ARouter$$Group$$yourservicegroupname.class);
  }
}
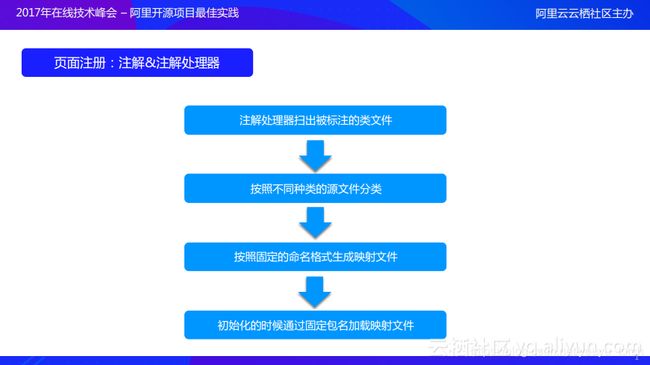
- 首先通过注解处理器扫出被标注的类文件;
- 然后按照不同种类的源文件进行分类,这是因为ARouter是一个框架,其能够提供的功能非常多,所以不仅仅提供了跳转功能,它也能够实现模块之间的解耦,除此之外ARouter还能够提供很多的功能,像刚才提到的拦截器可以实现自动注册,其实ARouter中的所有组件都是自动注册的
- 在按照不同种类的源文件进行分类完成之后,就能够按照固定的命名格式(工程名Group分组名)生成映射文件,这部分完成之后就意味着编译期的部分已经结束了
arouter-api路由控制
包括初始化和api跳转两个步骤。
ARouter 初始化
ARouter 的初始化过程其实就是是把前面编译产生的路由清单文件加载到内存,形成一个路由表,以供后面路由查找之用。
调用init开始初始化流程
ARouter.init(getApplication());
接着,跟踪看下init方法
 /**
     * Init, it must be call before used router.
     */
    public static void init(Application application) {
        if (!hasInit) {
            logger = _ARouter.logger;
            _ARouter.logger.info(Consts.TAG, "ARouter init start.");
            hasInit = _ARouter.init(application);

            if (hasInit) {
                _ARouter.afterInit();
            }

            _ARouter.logger.info(Consts.TAG, "ARouter init over.");
        }
    }
可以看出,Class ARouter 其实是一个代理类,它的所有函数实现都交给Class_ARouter去实现,两个都是单例模式
既然代码移交到了_ARouter去 初始化,我们再来看
   protected static synchronized boolean init(Application application) {
        mContext = application;
        LogisticsCenter.init(mContext, executor);
        logger.info(Consts.TAG, "ARouter init success!");
        hasInit = true;
        mHandler = new Handler(Looper.getMainLooper());

        return true;
    }
继续往下走, LogisticsCenter 中进行初始化
   /**
     * LogisticsCenter init, load all metas in memory. Demand initialization
     */
    public synchronized static void init(Context context, ThreadPoolExecutor tpe) throws HandlerException {
        mContext = context;
        executor = tpe;

        try {
            long startInit = System.currentTimeMillis();
            //billy.qi modified at 2017-12-06
            //load by plugin first
            loadRouterMap();
            if (registerByPlugin) {
                logger.info(TAG, "Load router map by arouter-auto-register plugin.");
            } else {
                Set routerMap;

                // It will rebuild router map every times when debuggable.
                if (ARouter.debuggable() || PackageUtils.isNewVersion(context)) {
                    logger.info(TAG, "Run with debug mode or new install, rebuild router map.");
                    // These class was generated by arouter-compiler.
                    routerMap = ClassUtils.getFileNameByPackageName(mContext, ROUTE_ROOT_PAKCAGE);
                    if (!routerMap.isEmpty()) {
                        context.getSharedPreferences(AROUTER_SP_CACHE_KEY, Context.MODE_PRIVATE).edit().putStringSet(AROUTER_SP_KEY_MAP, routerMap).apply();
                    }

                    PackageUtils.updateVersion(context);    // Save new version name when router map update finishes.
                } else {
                    logger.info(TAG, "Load router map from cache.");
                    routerMap = new HashSet<>(context.getSharedPreferences(AROUTER_SP_CACHE_KEY, Context.MODE_PRIVATE).getStringSet(AROUTER_SP_KEY_MAP, new HashSet()));
                }

                logger.info(TAG, "Find router map finished, map size = " + routerMap.size() + ", cost " + (System.currentTimeMillis() - startInit) + " ms.");
                startInit = System.currentTimeMillis();

                for (String className : routerMap) {
                    if (className.startsWith(ROUTE_ROOT_PAKCAGE + DOT + SDK_NAME + SEPARATOR + SUFFIX_ROOT)) {
                        // This one of root elements, load root.
                        ((IRouteRoot) (Class.forName(className).getConstructor().newInstance())).loadInto(Warehouse.groupsIndex);
                    } else if (className.startsWith(ROUTE_ROOT_PAKCAGE + DOT + SDK_NAME + SEPARATOR + SUFFIX_INTERCEPTORS)) {
                        // Load interceptorMeta
                        ((IInterceptorGroup) (Class.forName(className).getConstructor().newInstance())).loadInto(Warehouse.interceptorsIndex);
                    } else if (className.startsWith(ROUTE_ROOT_PAKCAGE + DOT + SDK_NAME + SEPARATOR + SUFFIX_PROVIDERS)) {
                        // Load providerIndex
                        ((IProviderGroup) (Class.forName(className).getConstructor().newInstance())).loadInto(Warehouse.providersIndex);
                    }
                }
            }

            logger.info(TAG, "Load root element finished, cost " + (System.currentTimeMillis() - startInit) + " ms.");

            if (Warehouse.groupsIndex.size() == 0) {
                logger.error(TAG, "No mapping files were found, check your configuration please!");
            }

            if (ARouter.debuggable()) {
                logger.debug(TAG, String.format(Locale.getDefault(), "LogisticsCenter has already been loaded, GroupIndex[%d], InterceptorIndex[%d], ProviderIndex[%d]", Warehouse.groupsIndex.size(), Warehouse.interceptorsIndex.size(), Warehouse.providersIndex.size()));
            }
        } catch (Exception e) {
            throw new HandlerException(TAG + "ARouter init logistics center exception! [" + e.getMessage() + "]");
        }
    }
首先,我们要有一个概念。前文说了,我们断定初始化操作是要把 映射信息加载到内存,那么在哪里存储呢?这里就引入了 内存仓库Warehouse的概念,实际上它就是持有了多个statice 的Map对象,在下文我们给出其源码。
/**
 * Storage of route meta and other data.
 *
 * @author zhilong Contact me.
 * @version 1.0
 * @since 2017/2/23 下午1:39
 */
class Warehouse {
    // Cache route and metas
    static Map> groupsIndex = new HashMap<>();
    static Map routes = new HashMap<>();

    // Cache provider
    static Map providers = new HashMap<>();
    static Map providersIndex = new HashMap<>();

    // Cache interceptor
    static Map> interceptorsIndex = new UniqueKeyTreeMap<>("More than one interceptors use same priority [%s]");
    static List interceptors = new ArrayList<>();

    static void clear() {
        routes.clear();
        groupsIndex.clear();
        providers.clear();
        providersIndex.clear();
        interceptors.clear();
        interceptorsIndex.clear();
    }
}
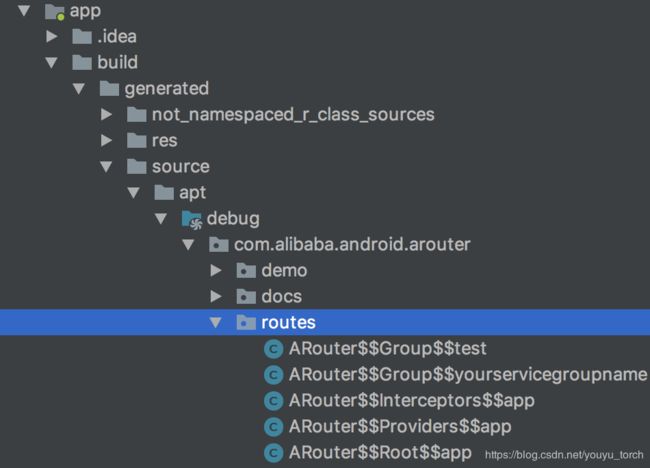
我们继续分析LogisticsCenter.init(),首先就是根据包名com.alibaba.android.arouter.routes找到了下边的所有类,那些类呢?所有模块下的这几个类:

些类都是编译期间通过“手动”的方式创建出来的,他们分别继承了IRouteRoot、IInterceptorGroup、IProviderGroup接口,实现了其loadInto()方法
接下来就是,根据反射将类实例化出来后,调用其loadInto()将对应的路由信息加载到 内存仓库中。
需要注意的是:初始化阶段只加载了Root【组别的清单列表】,并没有具体载入每个 Group 中包含的具体的路由节点清单,这就与 ARouter 的官方说明一致了:映射关系按组分类、多级管理,按需初始化,只有我们使用到具体的 Group 时,才会加载对应的 Group 列表。
最后,别忘了最开始的_ARouter.afterInit(),根据 Ioc.ByName()方式获取 拦截器界面,注意这个拦截器并不是我们定义的拦截器,而是Arouter实现的拦截器逻辑,它持有我们定义的拦截器,可以理解为“拦截器截面控制器”
 static void afterInit() {
        // Trigger interceptor init, use byName.
        interceptorService = (InterceptorService) ARouter.getInstance().build("/arouter/service/interceptor").navigation();
    }
至此,初始化工作全部完成,其中 内存仓库Warehouse缓存了全局应用的【组别的清单列表】、【Ioc的动作路由清单列表】、【模块内的拦截器清单列表】,3个以_index为结尾的Map对象
ARouter API跳转
跳转入口如下
ARouter.getInstance()
                        .build("/test/activity2")
                        .navigation();
单例模式我们不过多赘述,我们看build的最终调用,其使用了代理类_ARouter的build()并构建和返回PostCard对象,一个Postcard 对象就对应了一次路由请求,该对象作用于本次路由全过程
    /**
     * Build the roadmap, draw a postcard.
     *
     * @param path Where you go.
     */
    public Postcard build(String path) {
        return _ARouter.getInstance().build(path);
    }

    /**
     * Build postcard by path and group
     */
    protected Postcard build(String path, String group) {
        if (TextUtils.isEmpty(path) || TextUtils.isEmpty(group)) {
            throw new HandlerException(Consts.TAG + "Parameter is invalid!");
        } else {
            PathReplaceService pService = ARouter.getInstance().navigation(PathReplaceService.class);
            if (null != pService) {
                path = pService.forString(path);
            }
            return new Postcard(path, group);
        }
    }
build的最终结果会得到一个PostCard,携带参数path和group,数据来源于参数传入。
获取到PostCard后,接着调用navigation()方法,经过传递最终调回到ARouter.getInstance.navigation()
   /**
     * Navigation to the route with path in postcard.
     * No param, will be use application context.
     */
    public Object navigation() {
        return navigation(null);
    }

    /**
     * Navigation to the route with path in postcard.
     *
     * @param context Activity and so on.
     */
    public Object navigation(Context context, NavigationCallback callback) {
        return ARouter.getInstance().navigation(context, this, -1, callback);
    }
接着,我们来看下具体的navigation实现
   /**
     * Use router navigation.
     *
     * @param context     Activity or null.
     * @param postcard    Route metas
     * @param requestCode RequestCode
     * @param callback    cb
     */
    protected Object navigation(final Context context, final Postcard postcard, final int requestCode, final NavigationCallback callback) {
        try {
            LogisticsCenter.completion(postcard);
        } catch (NoRouteFoundException ex) {
            logger.warning(Consts.TAG, ex.getMessage());

            if (debuggable()) {
                // Show friendly tips for user.
                runInMainThread(new Runnable() {
                    @Override
                    public void run() {
                        Toast.makeText(mContext, "There's no route matched!\n" +
                                " Path = [" + postcard.getPath() + "]\n" +
                                " Group = [" + postcard.getGroup() + "]", Toast.LENGTH_LONG).show();
                    }
                });
            }

            if (null != callback) {
                callback.onLost(postcard);
            } else {    // No callback for this invoke, then we use the global degrade service.
                DegradeService degradeService = ARouter.getInstance().navigation(DegradeService.class);
                if (null != degradeService) {
                    degradeService.onLost(context, postcard);
                }
            }

            return null;
        }

        if (null != callback) {
            callback.onFound(postcard);
        }

        if (!postcard.isGreenChannel()) {   // It must be run in async thread, maybe interceptor cost too mush time made ANR.
            interceptorService.doInterceptions(postcard, new InterceptorCallback() {
                /**
                 * Continue process
                 *
                 * @param postcard route meta
                 */
                @Override
                public void onContinue(Postcard postcard) {
                    _navigation(context, postcard, requestCode, callback);
                }

                /**
                 * Interrupt process, pipeline will be destory when this method called.
                 *
                 * @param exception Reson of interrupt.
                 */
                @Override
                public void onInterrupt(Throwable exception) {
                    if (null != callback) {
                        callback.onInterrupt(postcard);
                    }

                    logger.info(Consts.TAG, "Navigation failed, termination by interceptor : " + exception.getMessage());
                }
            });
        } else {
            return _navigation(context, postcard, requestCode, callback);
        }

        return null;
    }
找到Postcard后,执行 LogisticsCenter.completion(postcard)函数,完善postcard对象,再将对象继续向前传递
   private Object _navigation(final Context context, final Postcard postcard, final int requestCode, final NavigationCallback callback) {
        final Context currentContext = null == context ? mContext : context;

        switch (postcard.getType()) {
            case ACTIVITY:
                // Build intent
                final Intent intent = new Intent(currentContext, postcard.getDestination());
                intent.putExtras(postcard.getExtras());

                // Set flags.
                int flags = postcard.getFlags();
                if (-1 != flags) {
                    intent.setFlags(flags);
                } else if (!(currentContext instanceof Activity)) {    // Non activity, need less one flag.
                    intent.setFlags(Intent.FLAG_ACTIVITY_NEW_TASK);
                }

                // Set Actions
                String action = postcard.getAction();
                if (!TextUtils.isEmpty(action)) {
                    intent.setAction(action);
                }

                // Navigation in main looper.
                runInMainThread(new Runnable() {
                    @Override
                    public void run() {
                        startActivity(requestCode, currentContext, intent, postcard, callback);
                    }
                });

                break;
            case PROVIDER:
                return postcard.getProvider();
            case BOARDCAST:
            case CONTENT_PROVIDER:
            case FRAGMENT:
                Class fragmentMeta = postcard.getDestination();
                try {
                    Object instance = fragmentMeta.getConstructor().newInstance();
                    if (instance instanceof Fragment) {
                        ((Fragment) instance).setArguments(postcard.getExtras());
                    } else if (instance instanceof android.support.v4.app.Fragment) {
                        ((android.support.v4.app.Fragment) instance).setArguments(postcard.getExtras());
                    }

                    return instance;
                } catch (Exception ex) {
                    logger.error(Consts.TAG, "Fetch fragment instance error, " + TextUtils.formatStackTrace(ex.getStackTrace()));
                }
            case METHOD:
            case SERVICE:
            default:
                return null;
        }

        return null;
    }
最后根据PostCard携带的类型,做相应的操作,当为Activity类型时,通过startActivity()方法实现跳转。
拦截器原理
拦截器常用的应用场景在登录逻辑上,对app的各个页面,有些页面需要检查是否已经登录,若在所有页面都去增加判断显然不合理,这时候就可以使用ARouter拦截器来实现。
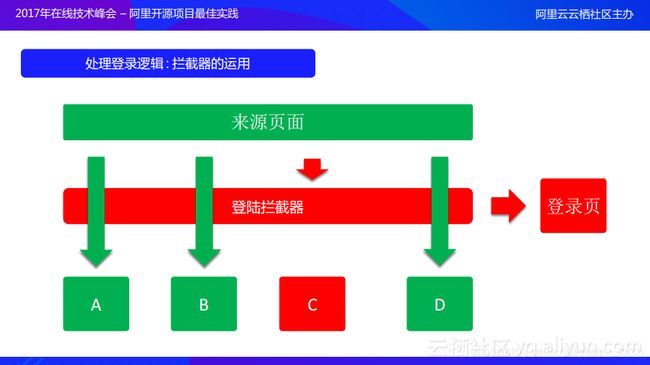
那ARouter是如何进行全局拦截的呢?
首先,在初始化的时候,初始化了一个interceptorService,这个service有个默认实现类
/**
 * All of interceptors
 *
 * @author zhilong Contact me.
 * @version 1.0
 * @since 2017/2/23 下午2:09
 */
@Route(path = "/arouter/service/interceptor")
public class InterceptorServiceImpl implements InterceptorService {
   ...
     @Override
    public void init(final Context context) {
        LogisticsCenter.executor.execute(new Runnable() {
            @Override
            public void run() {
                if (MapUtils.isNotEmpty(Warehouse.interceptorsIndex)) {
                    for (Map.Entry> entry : Warehouse.interceptorsIndex.entrySet()) {
                        Class interceptorClass = entry.getValue();
                        try {
                            IInterceptor iInterceptor = interceptorClass.getConstructor().newInstance();
                            iInterceptor.init(context);
                            Warehouse.interceptors.add(iInterceptor);
                        } catch (Exception ex) {
                            throw new HandlerException(TAG + "ARouter init interceptor error! name = [" + interceptorClass.getName() + "], reason = [" + ex.getMessage() + "]");
                        }
                    }

                    interceptorHasInit = true;

                    logger.info(TAG, "ARouter interceptors init over.");

                    synchronized (interceptorInitLock) {
                        interceptorInitLock.notifyAll();
                    }
                }
            }
        });
    }
    ...
}
在这个过程中,ARouter会找出所有实现了IInterceptor的拦截器实现类,并对其做初始化。
接着,当调用navigation开始做activity跳转时,会调用interceptorService的doInterceptions方法,来实现全局拦截
    interceptorService.doInterceptions(postcard, new InterceptorCallback() {
                /**
                 * Continue process
                 *
                 * @param postcard route meta
                 */
                @Override
                public void onContinue(Postcard postcard) {
                    _navigation(context, postcard, requestCode, callback);
                }

                /**
                 * Interrupt process, pipeline will be destory when this method called.
                 *
                 * @param exception Reson of interrupt.
                 */
                @Override
                public void onInterrupt(Throwable exception) {
                    if (null != callback) {
                        callback.onInterrupt(postcard);
                    }

                    logger.info(Consts.TAG, "Navigation failed, termination by interceptor : " + exception.getMessage());
                }
            });


    @Override
    public void doInterceptions(final Postcard postcard, final InterceptorCallback callback) {
        if (null != Warehouse.interceptors && Warehouse.interceptors.size() > 0) {

            checkInterceptorsInitStatus();

            if (!interceptorHasInit) {
                callback.onInterrupt(new HandlerException("Interceptors initialization takes too much time."));
                return;
            }

            LogisticsCenter.executor.execute(new Runnable() {
                @Override
                public void run() {
                    CancelableCountDownLatch interceptorCounter = new CancelableCountDownLatch(Warehouse.interceptors.size());
                    try {
                        _excute(0, interceptorCounter, postcard);
                        interceptorCounter.await(postcard.getTimeout(), TimeUnit.SECONDS);
                        if (interceptorCounter.getCount() > 0) {    // Cancel the navigation this time, if it hasn't return anythings.
                            callback.onInterrupt(new HandlerException("The interceptor processing timed out."));
                        } else if (null != postcard.getTag()) {    // Maybe some exception in the tag.
                            callback.onInterrupt(new HandlerException(postcard.getTag().toString()));
                        } else {
                            callback.onContinue(postcard);
                        }
                    } catch (Exception e) {
                        callback.onInterrupt(e);
                    }
                }
            });
        } else {
            callback.onContinue(postcard);
        }
参考文档
- ARouter 官方文档
本篇列出的所有代码均来自于官网
- 阿里开源路由框架ARouter的源码分析
- 开源最佳实践:Android平台页面路由框架ARouter
- 深入理解Java:注解(Annotation)–编译时注解的处理
