Zabbix(一)之监控概述,Zabbix基础,Zabbix监控服务
一、监控概述
1.监控目的
每一部分必须监控
内容包括吞吐量,反应时间,使用率等
提前发现问题
进行服务器性能调整前,知道调整什么
找出系统的瓶颈在什么地方
2.监控的资源类别
公开数据
web,FTP,SSH,数据库等应用服务
TCP或UDP端口
私有数据
CPU,内存,磁盘,网卡流量等使用信息
用户,进程等运行信息
3.系统监控命令
ps,ifconfig,uptime,netstat或ss,free,ping,swapon -s,traceroute,df -h,iostat
4.监控软件
Cacti
基于SNMP协议的监控软件,强大的绘图能力
Nagios
基于Agent监控,强大的状态检查与报警机制
插件极多,自己写监控脚本嵌入到Nagios非常方便
Zabbix
基于多种监控机制,支持分布式监控
二、Zabbix基础
1.简介:
Zabbix是一个高度集成的监控解决方案
可以实现企业级的开源分布监控
Zabbix通过C/S模式采集监控数据
Zabbix通过B/S模式实现web管理
2.监控服务器
监控服务器可以通过SNMP或Agent采集数据
数据可以写入MySQL,Oracle等数据库中
服务器使用LNMP实现web前端的管理
3.被监控主机
被监控主机需要安装Agent
常见的网路设备一般都支持SNMP
三、Zabbix监控服务
安装前准备
监控服务器
设置主机名(zabbix server)
设置ip地址(192.168.2.5)
关闭防火墙,SELinux
监控客户端(2.100和2.200)
主机web1(192.168.2.100)
主机web2(192.168.2.200)
关闭防火墙,SELinux
1.安装LNMP
[root@zabbixserver ~]# systemctl stop firewalld
[root@zabbixserver ~]# systemctl disable firewalld
[root@zabbixserver ~]# yum -y install gcc pcre-devel zlib-devel openssl-devel
[root@zabbixserver ~]# tar -xf nginx-1.12.2.tar.gz
[root@zabbixserver ~]# cd nginx-1.12.2/
[root@zabbixserver nginx-1.12.2]# ./configure --with-http_ssl_module
[root@zabbixserver nginx-1.12.2]# make && make install
[root@zabbixserver ~]# cd /root/
[root@zabbixserver ~]# yum -y install php php-fpm php-mysql mariadb mariadb-devel mariadb-server
[root@zabbixserver ~]# vim +65 /usr/local/nginx/conf/nginx.conf
65 location ~ \.php$ {
66 root html;
67 fastcgi_pass 127.0.0.1:9000;
68 fastcgi_index index.php;
69 # fastcgi_param SCRIPT_FILENAME /scripts$fastcgi_script_name;
70 include fastcgi.conf;
71 }
[root@zabbixserver ~]# systemctl start mariadb
[root@zabbixserver ~]# systemctl start php-fpm
[root@zabbixserver ~]# /usr/local/nginx/sbin/nginx
[root@zabbixserver ~]# netstat -ntlup|grep :3306
tcp 0 0 0.0.0.0:3306 0.0.0.0:* LISTEN 7623/mysqld
[root@zabbixserver ~]# netstat -ntlup|grep :80
tcp 0 0 0.0.0.0:80 0.0.0.0:* LISTEN 7671/nginx: master
[root@zabbixserver ~]# netstat -ntlup|grep :9000
tcp 0 0 127.0.0.1:9000 0.0.0.0:* LISTEN 7663/php-fpm: maste
[root@zabbixserver ~]# vim /usr/local/nginx/html/test.php
$i=33;
echo $i;
?>
[root@zabbixserver ~]# curl http://192.168.4.240/test.php
33
2.安装源码的zabbix软件
[root@zabbixserver ~]# yum -y install net-snmp-devel curl-devel libevent-devel
[root@zabbixserver ~]# tar -xf zabbix-3.4.4.tar.gz
[root@zabbixserver ~]# cd zabbix-3.4.4/
[root@zabbixserver zabbix-3.4.4]# ./configure --enable-server --enable-proxy --enable-agent --with-mysql=/usr/bin/mysql_config --with-net-snmp --with-libcurl
[root@zabbixserver zabbix-3.4.4]# make install
[root@zabbixserver zabbix-3.4.4]# ls /usr/local/etc/ ==>>Zabbix配置文件
zabbix_agentd.conf zabbix_proxy.conf zabbix_server.conf
zabbix_agentd.conf.d zabbix_proxy.conf.d zabbix_server.conf.d
[root@zabbixserver zabbix-3.4.4]# ls /usr/local/bin/ ==>>Zabbix命令
zabbix_get zabbix_sender
[root@zabbixserver zabbix-3.4.4]# ls /usr/local/sbin/ ==>>Zabbix启动服务的命令
zabbix_agentd zabbix_proxy zabbix_server
3.初始化配置
创建数据库与数据库账户
[root@zabbixserver ~]# mysql
MariaDB [(none)]> create database zabbix character set utf8;
MariaDB [(none)]> grant all on zabbix.* to zabbix@'localhost' identified by 'zabbix';
MariaDB [(none)]> exit
[root@zabbixserver ~]# cd zabbix-3.4.4/database/mysql/
[root@zabbixserver mysql]# mysql -uzabbix -pzabbix zabbix < schema.sql
[root@zabbixserver mysql]# mysql -uzabbix -pzabbix zabbix < images.sql
[root@zabbixserver mysql]# mysql -uzabbix -pzabbix zabbix < data.sql
[root@zabbixserver mysql]# cd /root/zabbix-3.4.4/frontends/php/
[root@zabbixserver php]# cp -a * /usr/local/nginx/html/
[root@zabbixserver php]# chmod -R 777 /usr/local/nginx/html/
[root@zabbixserver php]# vim /usr/local/nginx/conf/nginx.conf
17 http {
18 include mime.types;
19 default_type application/octet-stream;
20 fastcgi_buffers 8 16k; ==>>缓存php生成的页面内容,8个16k
21 fastcgi_buffer_size 32k; ==>>缓存php生产的头部信息
22 fastcgi_connect_timeout 300; ==>>连接php的超时时间
23 fastcgi_send_timeout 300; ==>>发送请求的超时时间
24 fastcgi_read_timeout 300; ==>>读取请求的超时时间
[root@zabbixserver php]# /usr/local/nginx/sbin/nginx -t
[root@zabbixserver php]# /usr/local/nginx/sbin/nginx -s reload
[root@zabbixserver php]# cd /root/
[root@zabbixserver ~]# yum -y install php-gd php-xml php-ldap php-bcmath php-mbstring
[root@zabbixserver ~]# vim /etc/php.ini
384 max_execution_time = 300 ==>>最大执行时间,秒
394 max_input_time = 300 ==>>服务器接受数据的时间限制
672 post_max_size = 32M ==>>POST数据最大容量
878 date.timezone = Asia/Shanghai ==>>设置时区
[root@zabbixserver ~]# systemctl restart php-fpm
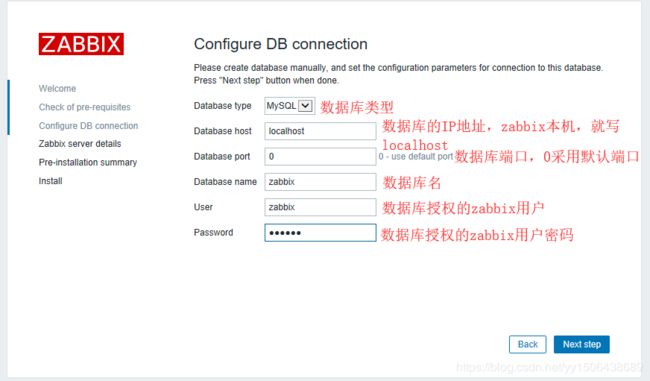
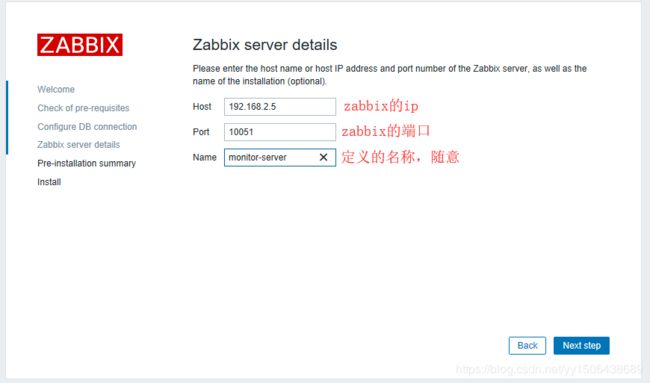
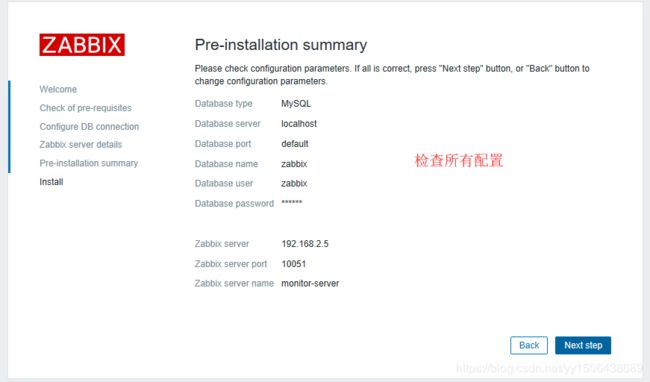
4.访问监控页面
5.启动监控服务
[root@zabbixserver ~]# vim /usr/local/etc/zabbix_server.conf
38 LogFile=/tmp/zabbix_server.log ==>>设置日志
85 DBHost=localhost ==>>数据库主机
95 DBName=zabbix ==>>设置数据库账户
111 DBUser=zabbix ==>>设置数据库账户
119 DBPassword=zabbix ==>>设置数据库密码
[root@zabbixserver ~]# useradd zabbix ==>>不添加用户无法启动服务
[root@zabbixserver ~]# zabbix_server ==>>启动服务
[root@zabbixserver ~]# netstat -ntlup|grep :10051
tcp 0 0 0.0.0.0:10051 0.0.0.0:* LISTEN 17480/zabbix_server
6.监控客户端
[root@web100 ~]# yum -y install gcc pcre-devel
[root@web100 ~]# tar -xf zabbix-3.4.4.tar.gz
[root@web100 ~]# cd zabbix-3.4.4/
[root@web100 zabbix-3.4.4]# ./configure --enable-agent
[root@web100 zabbix-3.4.4]# make install
[root@web100 zabbix-3.4.4]# ls /usr/local/etc/
zabbix_agentd.conf zabbix_agentd.conf.d
[root@web100 zabbix-3.4.4]# ls /usr/local/bin/
zabbix_get zabbix_sender
[root@web100 zabbix-3.4.4]# ls /usr/local/sbin/
zabbix_agentd
[root@web100 ~]# vim /usr/local/etc/zabbix_agentd.conf
30 LogFile=/tmp/zabbix_agentd.log ==>>日志文件
93 Server=127.0.0.1,192.168.2.5 ==>>允许访问服务地址列表
134 ServerActive=192.168.2.5:10051 ==>>监控服务器IP地址
[root@web100 ~]# useradd zabbix
[root@web100 ~]# zabbix_agentd
[root@web100 ~]# netstat -ntlup|grep :10050
tcp 0 0 0.0.0.0:10050 0.0.0.0:* LISTEN 9534/zabbix_agentd
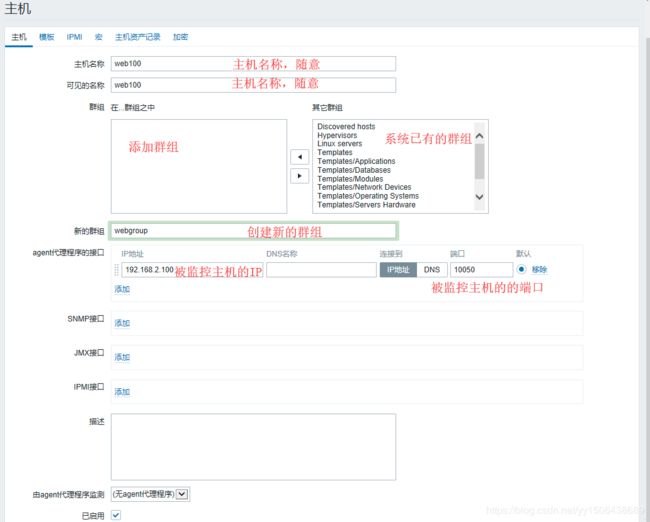
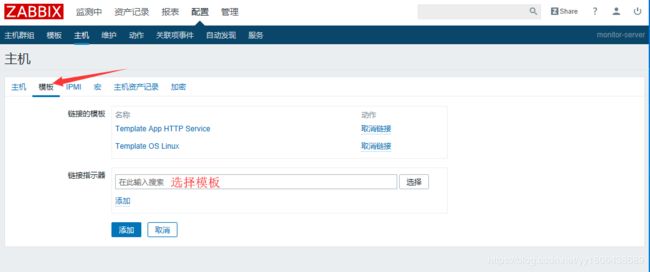
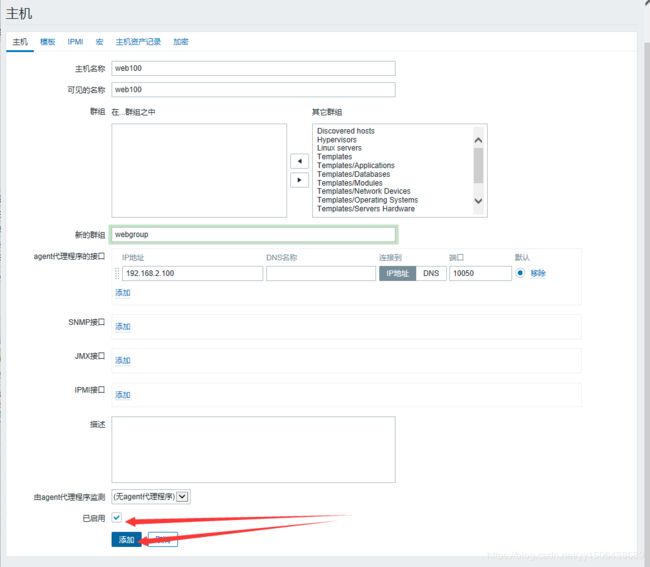
7.zabbix添加监控主机
8.自定义监控项目
在被监控的客户端本机编写脚本给监控服务器使用
监控私有数据
配置客户端:
启用自定义监控项
定义监控命令
测试命令
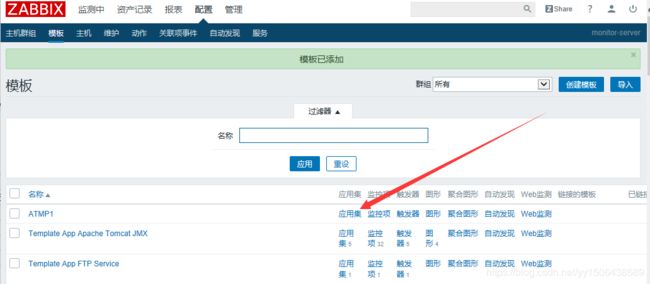
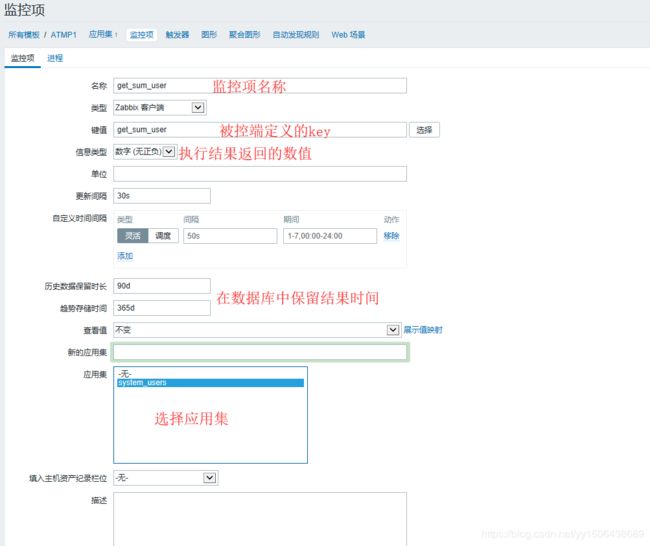
配置监控服务器:在管理页面
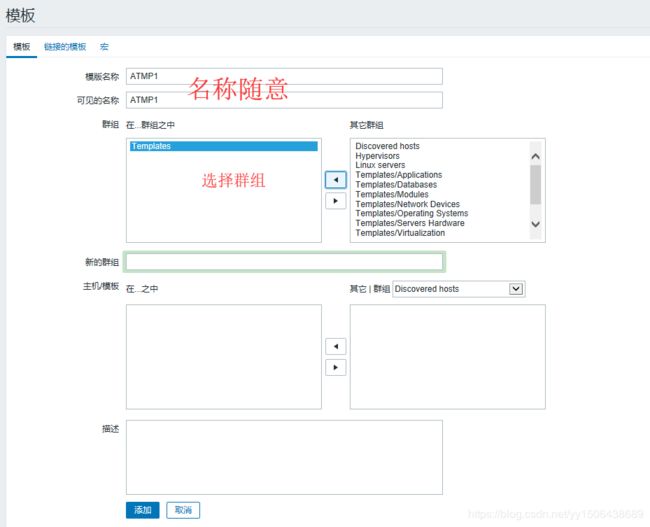
创建监控模板 名
创建应用集 名
监控项 名
调用新建的模板监控客户端
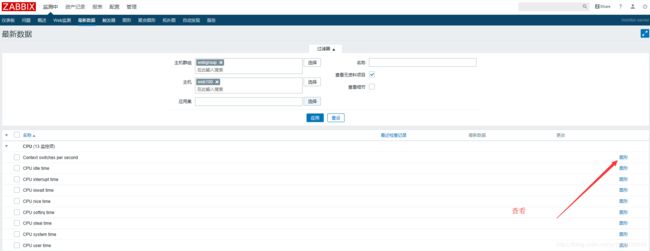
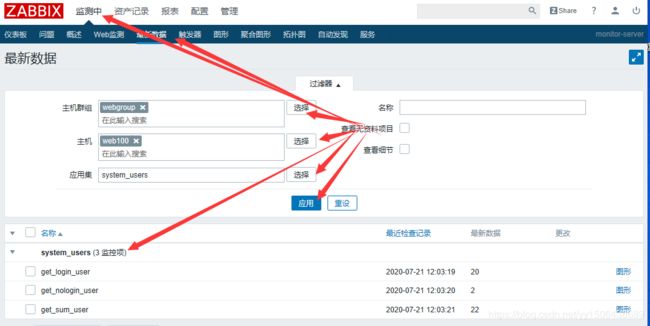
查看数据
[root@web100 ~]# vim /usr/local/etc/zabbix_agentd.conf
264 Include=/usr/local/etc/zabbix_agentd.conf.d/ ==>>加载配置文件目录
280 UnsafeUserParameters=1 ==>>是由允许自定义key
[root@web100 ~]# cd /usr/local/etc/zabbix_agentd.conf.d/
[root@web100 zabbix_agentd.conf.d]# vim count.line.passwd
UserParameter=get_sum_user,wc -l /etc/passwd |awk '{print $1}'
--------------------------------------------------------------------
UserParameter=自定义key名称,命令 ==>>自定义key语法格式
--------------------------------------------------------------------
[root@web100 zabbix_agentd.conf.d]# killall -9 zabbix_agentd
[root@web100 zabbix_agentd.conf.d]# zabbix_agentd
[root@web100 zabbix_agentd.conf.d]# netstat -ntlup|grep :10050
tcp 0 0 0.0.0.0:10050 0.0.0.0:* LISTEN 10416/zabbix_agentd
[root@web100 zabbix_agentd.conf.d]# zabbix_get -s 127.0.0.1 -k get_sum_user ==>>测试key命令
22
[root@web100 zabbix_agentd.conf.d]# vim count.line.passwd
UserParameter=get_sum_user,wc -l /etc/passwd |awk '{print $1}'
UserParameter=get_login_user,grep -c "/bin/bash" /etc/passwd
UserParameter=get_nologin_user,grep -c -v "/bin/bash" /etc/passwd
[root@web100 zabbix_agentd.conf.d]# killall -9 zabbix_agentd
[root@web100 zabbix_agentd.conf.d]# zabbix_agentd
[root@web100 zabbix_agentd.conf.d]# netstat -ntlup|grep :10050
tcp 0 0 0.0.0.0:10050 0.0.0.0:* LISTEN 10559/zabbix_agentd
[root@web100 zabbix_agentd.conf.d]# zabbix_get -s 127.0.0.1 -k get_login_user
20
[root@web100 zabbix_agentd.conf.d]# zabbix_get -s 127.0.0.1 -k get_nologin_user
2
创建应用集
将模板关联主机


