Linux网络系列--Cobbler自动装机(Cobbler架构、Cobbler自动化部署)
文章目录
- 一、 Cobbler概述
- 二、Cobbler装机服务器部署
- 2.1 安装所需服务
- 2.2 部署步骤
- 1、关闭SElinux功能
- 2、 修改tftp配置文件
- 3、 开启同步
- 4、 给新系统用户添加密码
- 5、 配置dhcp
- 6、 下载装机地启动文件
- 7、挂载光盘镜像
- 8、 开启服务
- 三、 验证安装
一、 Cobbler概述
Cobbler是一个使用Python开发的开源项目,通过将部署系统所涉及的所有服务集中在一起,来提供一个全自动批量快速建立Linux系统的网络安装环境。
Cobbler提供了DHCP管理、YUM源管理、电源管理等功能,还支持命令行管理、WEB界面管理,并且提供了API接口,方便二次开发。
二、Cobbler装机服务器部署
cobbler服务的日志文件在/var/log/cobbler/cobbler.log中
2.1 安装所需服务
所需软件:cobbler、cobbler-web、dhcp、tftp、pykickstart、httpd、rsync、xinetd openssl
服务器主机IP地址:14.0.0.7
注意:服务器与被自动装机的主机须绑定同一块网卡,为vmnet8网卡。
[root@localhost ~]# wget -O /etc/yum.repos.d/epel.repo http://mirrors.aliyun.com/repo/epel-7.repo     ##阿里云的epel源
--2020-07-26 14:04:12--  http://mirrors.aliyun.com/repo/epel-7.repo
正在解析主机 mirrors.aliyun.com (mirrors.aliyun.com)... 58.216.4.241, 58.216.4.238, 180.122.78.242, ...
正在连接 mirrors.aliyun.com (mirrors.aliyun.com)|58.216.4.241|:80... 已连接。
已发出 HTTP 请求,正在等待回应... 200 OK
长度:664 [application/octet-stream]
正在保存至: “/etc/yum.repos.d/epel.repo”

100%[================================>] 664         --.-K/s 用时 0s

2020-07-26 14:04:12 (337 MB/s) - 已保存 “/etc/yum.repos.d/epel.repo” [664/664])
[root@localhost ~]#  yum -y install cobbler cobbler-web dhcp tftp pykickstart httpd rsync xinetd
已加载插件:fastestmirror, langpacks
Loading mirror speeds from cached hostfile
 * base: mirrors.aliyun.com
 * extras: mirrors.aliyun.com
 * updates: mirrors.163.com
软件包 cobbler-2.8.5-0.3.el7.x86_64 已安装并且是最新版本
软件包 cobbler-web-2.8.5-0.3.el7.noarch 已安装并且是最新版本
软件包 12:dhcp-4.2.5-79.el7.centos.x86_64 已安装并且是最新版本
软件包 tftp-5.2-22.el7.x86_64 已安装并且是最新版本
软件包 pykickstart-1.99.66.21-1.el7.noarch 已安装并且是最新版本
软件包 httpd-2.4.6-93.el7.centos.x86_64 已安装并且是最新版本
软件包 rsync-3.1.2-10.el7.x86_64 已安装并且是最新版本
软件包 2:xinetd-2.3.15-14.el7.x86_64 已安装并且是最新版本
无须任何处理
2.2 部署步骤
cobbler的主配置文件在/etc/cobbler/settings中

[root@localhost ~]# cd /etc/cobbler/
[root@localhost cobbler]# ls
auth.conf               ldap            secondary.template
cheetah_macros          modules.conf    settings
cobbler_bash            mongodb.conf    tftpd.template
completions             named.template  users.conf
dhcp.template           power           users.digest
dnsmasq.template        pxe             version
genders.template        reporting       zone.template
import_rsync_whitelist  rsync.exclude   zone_templates
iso                     rsync.template
[root@localhost cobbler]# vi settings    //进配置文件中修改部分参数
 next_server: 14.0.0.7                   //指明服务器IP地址为14.0.0.7
server: 14.0.0.7   //cobbler服务器的IP
manage_dhcp: 1    //让cobbler服务接管dhcp,1表示接管
pxe_just_once: 1  //避免重复安装
[root@localhost cobbler]# systemctl start  httpd     //开启httpd服务
[root@localhost cobbler]# systemctl start cobblerd   //开启cobbler服务
[root@localhost cobbler]# systemctl stop firewalld   //关闭防火墙
[root@localhost cobbler]# systemctl disable firewalld   //禁止防火墙开机自启
[root@localhost cobbler]# setenforce 0     //关闭增强型核心防护
1、关闭SElinux功能
关闭SElinux的两种方式:永久关闭和临时关闭
- 永久关闭:进入/etc/selinux/config文件(selinux的配置文件)中,将"SELINUX=disabled"写入配置文件并重启。
- 临时关闭:setenforce 0 ;以命令行的形式直接关闭。
2、 修改tftp配置文件
3、 开启同步
在完成以上两个步骤后,我们使用"cobbler check"查看一下

[root@localhost cobbler]# systemctl restart cobblerd    //重启cobblerd服务
[root@localhost cobbler]# systemctl start rsyncd       //开启ysyncd同步功能
[root@localhost cobbler]# systemctl enable rsyncd      //设置为开机自启
Created symlink from /etc/systemd/system/multi-user.target.wants/rsyncd.service to /usr/lib/systemd/system/rsyncd.service.
4、 给新系统用户添加密码
再次检查我们需要修改的配置信息
其中1、3、5我们可以忽略,对实验的结果无影响
[root@localhost cobbler]# cobbler check
The following are potential configuration items that you may want to fix:

1 : SELinux is enabled. Please review the following wiki page for details on ensuring cobbler works correctly in your SELinux environment:
    https://github.com/cobbler/cobbler/wiki/Selinux
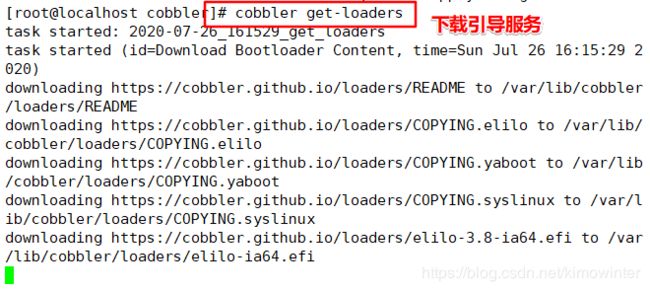
2 : Some network boot-loaders are missing from /var/lib/cobbler/loaders, you may run 'cobbler get-loaders' to download them, or, if you only want to handle x86/x86_64 netbooting, you may ensure that you have installed a *recent* version of the syslinux package installed and can ignore this message entirely.  Files in this directory, should you want to support all architectures, should include pxelinux.0, menu.c32, elilo.efi, and yaboot. The 'cobbler get-loaders' command is the easiest way to resolve these requirements.
3 : debmirror package is not installed, it will be required to manage debian deployments and repositories
4 : The default password used by the sample templates for newly installed machines (default_password_crypted in /etc/cobbler/settings) is still set to 'cobbler' and should be changed, try: "openssl passwd -1 -salt 'random-phrase-here' 'your-password-here'" to generate new one
5 : fencing tools were not found, and are required to use the (optional) power management features. install cman or fence-agents to use them
[root@localhost cobbler]# openssl passwd -1 -salt '123456' '123456'   //盐值加密的方式添加密码
$1$123456$wOSEtcyiP2N/IfIl15W6Z0    //生成的密钥文件
[root@localhost cobbler]# vim /etc/cobbler/settings
default_password_crypted: "$1$123456$wOSEtcyiP2N/IfIl15W6Z0"
[root@localhost cobbler]# systemctl restart rsyncd   //重启同步服务
[root@localhost cobbler]# systemctl restart cobblerd   //重启cobblerd服务
5、 配置dhcp
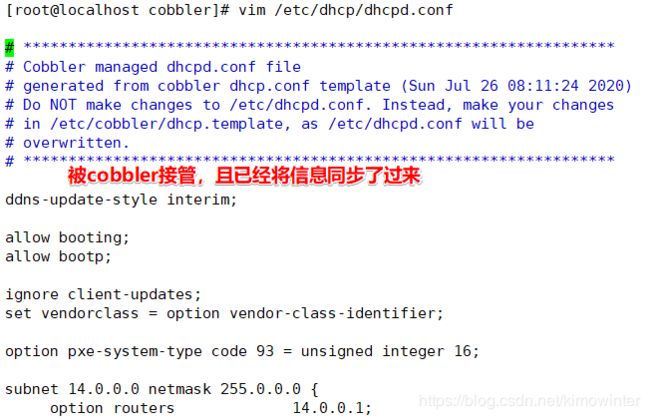
虽然dhcp服务被cobbler接管,但是cobbler同样是从网络自动装机的,那么也要配置dhcp的地址池来分配给主机。
[root@localhost cobbler]# vim /etc/cobbler/dhcp.template    //这个配置文件的地址是cobblerd接管dhcp的配置文件,要在这个配置文件中修改地址池
subnet 14.0.0.0 netmask 255.0.0.0 {
     option routers             14.0.0.1;
     option domain-name-servers 14.0.0.2;
     option subnet-mask         255.0.0.0;
     range dynamic-bootp        14.0.0.10 14.0.0.110;
     default-lease-time         21600;
     max-lease-time             43200;
     next-server                $next_server;
[root@localhost cobbler]# cobbler sync   //同步一下cobbler
task started: 2020-07-26_161123_sync
task started (id=Sync, time=Sun Jul 26 16:11:23 2020)
running pre-sync triggers
cleaning trees
removing: /var/lib/tftpboot/grub/images
copying bootloaders
copying: /usr/share/syslinux/pxelinux.0 -> /var/lib/tftpboot/pxelinux.0
copying: /usr/share/syslinux/menu.c32 -> /var/lib/tftpboot/menu.c32
copying: /usr/share/syslinux/memdisk -> /var/lib/tftpboot/memdisk
copying distros to tftpboot
copying images
generating PXE configuration files
generating PXE menu structure
rendering DHCP files
generating /etc/dhcp/dhcpd.conf
rendering TFTPD files
generating /etc/xinetd.d/tftp
cleaning link caches
running post-sync triggers
running python triggers from /var/lib/cobbler/triggers/sync/post/*
running python trigger cobbler.modules.sync_post_restart_services
running: dhcpd -t -q
received on stdout:
received on stderr:
running: service dhcpd restart
received on stdout:
received on stderr: Redirecting to /bin/systemctl restart dhcpd.service

running shell triggers from /var/lib/cobbler/triggers/sync/post/*
running python triggers from /var/lib/cobbler/triggers/change/*
running python trigger cobbler.modules.manage_genders
running python trigger cobbler.modules.scm_track
running shell triggers from /var/lib/cobbler/triggers/change/*
*** TASK COMPLETE ***
[root@localhost cobbler]# vim /etc/dhcp/dhcpd.conf    //进dhcp配置文件中查看
[root@localhost cobbler]# systemctl restart dhcpd //重启dhcpd服务
6、 下载装机地启动文件
[root@localhost cobbler]# cobbler check    //再检查一下cobbler服务,剩下的三项已经不需要修改了
The following are potential configuration items that you may want to fix:
1 : SELinux is enabled. Please review the following wiki page for details on ensuring cobbler works correctly in your SELinux environment:
    https://github.com/cobbler/cobbler/wiki/Selinux
2 : debmirror package is not installed, it will be required to manage debian deployments and repositories
3 : fencing tools were not found, and are required to use the (optional) power management features. install cman or fence-agents to use them
[root@localhost cobbler]# systemctl restart cobblerd    //重启cobblerd服务
7、挂载光盘镜像
[root@localhost cobbler]# mount /dev/sr0 /mnt/   将光盘镜像挂载到/mnt目录下
mount: /dev/sr0 写保护,将以只读方式挂载
[root@localhost cobbler]# df -hT   //查看挂载情况
文件系统                类型      容量  已用  可用 已用% 挂载点
/dev/mapper/centos-root xfs        15G  3.9G   12G   26% /
devtmpfs                devtmpfs  1.9G     0  1.9G    0% /dev
tmpfs                   tmpfs     1.9G     0  1.9G    0% /dev/shm
tmpfs                   tmpfs     1.9G   13M  1.9G    1% /run
tmpfs                   tmpfs     1.9G     0  1.9G    0% /sys/fs/cgroup
/dev/sda1               xfs       2.0G  179M  1.9G    9% /boot
/dev/mapper/centos-home xfs        25G   33M   25G    1% /home
tmpfs                   tmpfs     378M  4.0K  378M    1% /run/user/42
tmpfs                   tmpfs     378M   36K  378M    1% /run/user/0
/dev/sr0                iso9660   4.3G  4.3G     0  100% /mnt
[root@localhost cobbler]# cobbler import --path=/mnt/ --name=CentOS-7-x86_64 --arch=x86_64   //导入iso镜像
task started: 2020-07-26_162549_import
task started (id=Media import, time=Sun Jul 26 16:25:49 2020)
...
[root@localhost cobbler]# cobbler list     //查看装机列表
   CentOS-7-x86_64

profiles:
   CentOS-7-x86_64

systems:

repos:

images:

mgmtclasses:

packages:

files:
[root@localhost cobbler]# yum install tree -y //安装tree软件
8、 开启服务
[root@localhost cobbler]# systemctl restart httpd
[root@localhost cobbler]# systemctl restart dhcpd
[root@localhost cobbler]# systemctl restart tftp
[root@localhost cobbler]# systemctl restart cobblerd
[root@localhost cobbler]# systemctl restart rsyncd
三、 验证安装
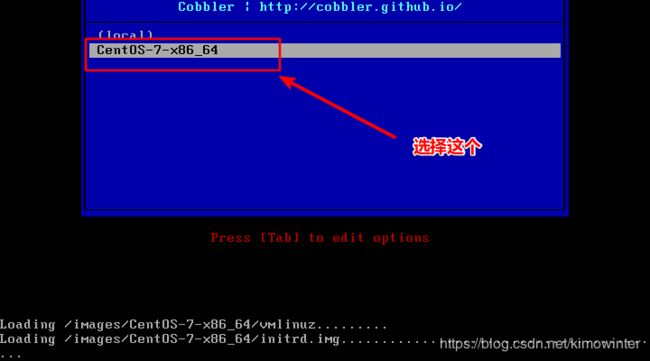
创建一台新的虚拟机,不需要选择光盘镜像,只要和服务器绑定同一张网卡,设置完成后点击开启虚拟机就可以

开始自动安装

注意:这里的安装是最小化安装


