Nginx负载均衡 /http 服务器/反响代理服务器及电子邮件(IMAP/POP3)代理服务器 安装错误集 no1.
1.nginx介绍
Nginx能够支撑5万并发链接 温病 cpu 内存消耗低 ,运行比较稳定。开源
2.nginx应用场景
1.http服务器。nginx是一个http服务可以独立体哦那个http服务。可以做网页静态服务器
2.虚拟机。可以实现在一台服务器虚拟除多个网站。列如个人网站使用的虚拟机
3.反向代理,负载均衡。当网站的访问量达到一定程度后,单台服务器不能满足用户请求时,需要用堕胎服务器集群可以使用nginx做反向代理,并且多台服务器可以平均分担负载,不会因为某台服务器负载高汞机.二某台服务器闲置的情况。
3.nginx的使用
官方网站:
http://nginx.org/
nginx是C语言开发,建议在linux上运行,本教程使用Centos6.5作为安装环境。
gcc
安装nginx需要先将官网下载的源码进行编译,编译依赖gcc环境,如果没有gcc环境,需要安装gcc:yum install gcc-c++
PCRE
PCRE(Perl Compatible Regular Expressions)是一个Perl库,包括 perl 兼容的正则表达式库。nginx的http模块使用pcre来解析正则表达式,所以需要在linux上安装pcre库。
yum install -y pcre pcre-devel
注:pcre-devel是使用pcre开发的一个二次开发库。nginx也需要此库。
zlib
zlib库提供了很多种压缩和解压缩的方式,nginx使用zlib对http包的内容进行gzip,所以需要在linux上安装zlib库。
yum install -y zlib zlib-devel
openssl
OpenSSL 是一个强大的安全套接字层密码库,囊括主要的密码算法、常用的密钥和证书封装管理功能及SSL协议,并提供丰富的应用程序供测试或其它目的使用。
nginx不仅支持http协议,还支持https(即在ssl协议上传输http),所以需要在linux安装openssl库。
yum install -y openssl openssl-devel
错误集
错误列表:
(1)
./configure: error: the HTTP rewrite module requires the PCRE library.
You can either disable the module by using --without-http_rewrite_module
option, or install the PCRE library into the system, or build the PCRE library
statically from the source with nginx by using --with-pcre= option.
(2)
./configure: error: the HTTP cache module requires md5 functions
from OpenSSL library. You can either disable the module by using
–without-http-cache option, or install the OpenSSL library into the system,
or build the OpenSSL library statically from the source with nginx by using
–with-http_ssl_module --with-openssl= options.
(3)
./configure: error: the HTTP gzip module requires the zlib library. You can
either disable the module by using --without-http_gzip_module option,
or install the zlib library into the system, or build the zlib library statically
from the source with nginx
出现(1)错误:
需要安装pcre包:
下载地址:https://ftp.pcre.org/pub/pcre/
tar zxvf pcre-8.12.tar.gz
cd pcre-8.12
./configure
make
make install
出现(2)错误:
需要安装openssl
下载地址:http://gnuwin32.sourceforge.net/packages/openssl.htm
tar zxvf openssl-0.9.8h.tar.gz
cd openssl-0.9.8h
./config --prefix=/usr/local/ --openssldir=/usr/local/openssl -g3 shared zlib-dynamic enable-camellia
make
make install
测试是否安装成功:openssl version
出现(3)错误:
需要安装zlib包:
下载地址:http://www.zlib.net/
tar zxvf zlib-1.2.11.tar.gz
cd zlib-1.2.11
./configure
make
make install
安装:
在进行编译:
./configure
–prefix=/usr/local/nginx
–pid-path=/var/run/nginx/nginx.pid
–lock-path=/var/lock/nginx.lock
–error-log-path=/var/log/nginx/error.log
–http-log-path=/var/log/nginx/access.log
–with-http_gzip_static_module
–http-client-body-temp-path=/var/temp/nginx/client
–http-proxy-temp-path=/var/temp/nginx/proxy
–http-fastcgi-temp-path=/var/temp/nginx/fastcgi
–http-uwsgi-temp-path=/var/temp/nginx/uwsgi
–http-scgi-temp-path=/var/temp/nginx/scgi
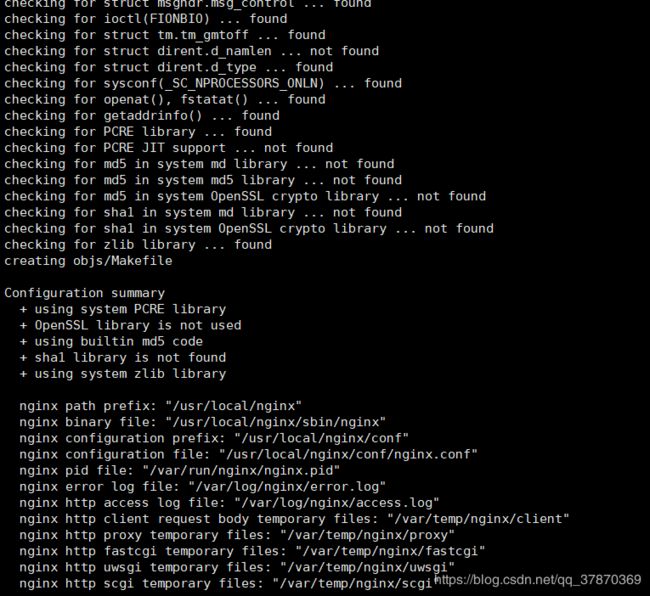
编译完成后 创建了一个Makefile

当下一步进行编译安装时候发生:
命令:make
make: *** No rule to make target build', needed bydefault’. Stop.
解决方案
yum update
然后找到上述错误一二三
正确编译应该:
编译安装命令:make
成功:

make install
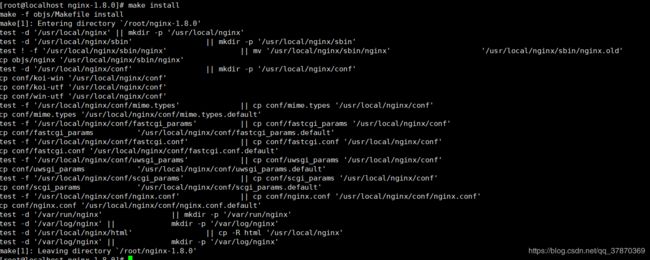
进入目录:
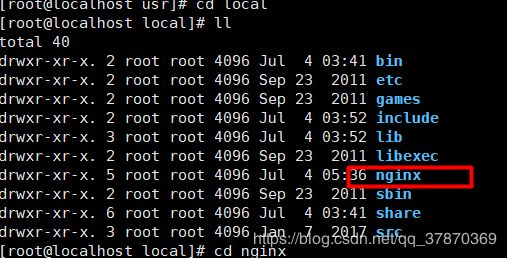
启动nginx


nginx的3个命令:
启动命令
./nginx
关闭命令
./nginx -s stop 和
./nginx -s quit
刷新配置文件
./nginx -s reload
修改了nginx.conf文件之后,可以不重启Nginx,能马上生效
4.nginx配置虚拟机:
虚拟的主机就是在一台服务器启动多个网站。
如何区分不同的网站:
1、端口不同
2、域名不同
通过端口区分不同的虚拟的主机
Nginx的配置文件配置项解释如下:
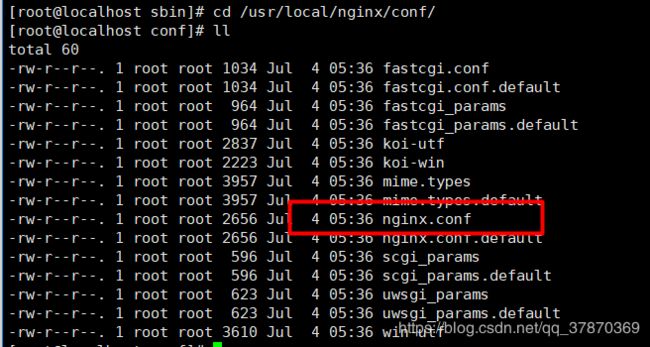
/usr/local/nginx/conf/nginx.conf
#user  nobody;
worker_processes  1;

#error_log  logs/error.log;
#error_log  logs/error.log  notice;
#error_log  logs/error.log  info;

#pid        logs/nginx.pid;


events {
    worker_connections  1024;
}


http {
    include       mime.types;
    default_type  application/octet-stream;

    #log_format  main  '$remote_addr - $remote_user [$time_local] "$request" '
    #                  '$status $body_bytes_sent "$http_referer" '
    #                  '"$http_user_agent" "$http_x_forwarded_for"';

    #access_log  logs/access.log  main;

    sendfile        on;
    #tcp_nopush     on;
修改conf文件
vim nginx.conf
#user  nobody;
worker_processes  1;

#error_log  logs/error.log;
#error_log  logs/error.log  notice;
#error_log  logs/error.log  info;

#pid        logs/nginx.pid;


events {
    worker_connections  1024;
}


http {
    include       mime.types;
    default_type  application/octet-stream;

    #log_format  main  '$remote_addr - $remote_user [$time_local] "$request" '
    #                  '$status $body_bytes_sent "$http_referer" '
    #                  '"$http_user_agent" "$http_x_forwarded_for"';

    #access_log  logs/access.log  main;

    sendfile        on;
    #tcp_nopush     on;

    #keepalive_timeout  0;
    keepalive_timeout  65;

    #gzip  on;

    server {
        listen       80;
        server_name  localhost;

        #charset koi8-r;

        #access_log  logs/host.access.log  main;

        location / {
            root   html;
            index  index.html index.htm;
        }

        #error_page  404              /404.html;

        # redirect server error pages to the static page /50x.html
        #
        error_page   500 502 503 504  /50x.html;
        location = /50x.html {
            root   html;
        }


    }

	server {
        listen       81;
        server_name  localhost;

        #charset koi8-r;

        #access_log  logs/host.access.log  main;

        location / {
            root   html81;
            index  index.html index.htm;
        }

        #error_page  404              /404.html;

        # redirect server error pages to the static page /50x.html
        #
        error_page   500 502 503 504  /50x.html;
        location = /50x.html {
            root   html;
        }


    }
}
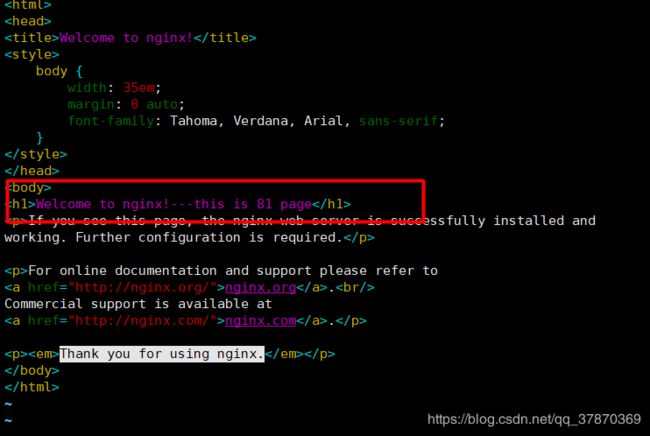
需要创建一个相同的html
测试结果:
更改:nginx.conf
 server {
        listen       80;
        server_name  www.baidu.com;

        #charset koi8-r;

        #access_log  logs/host.access.log  main;

        location / {
            root   htmlbaidu;
            index  index.html index.htm;
        }

        #error_page  404              /404.html;

        # redirect server error pages to the static page /50x.html
        #
        error_page   500 502 503 504  /50x.html;
        location = /50x.html {
            root   html;
        }


    }

	 server {
        listen       80;
        server_name  www.taobao.com;

        #charset koi8-r;

        #access_log  logs/host.access.log  main;

        location / {
            root   htmltaobao;
            index  index.html index.htm;
        }

        #error_page  404              /404.html;

        # redirect server error pages to the static page /50x.html
        #
        error_page   500 502 503 504  /50x.html;
        location = /50x.html {
            root   html;
        }


    }
5.配置反向代理:
正向代理:
反向代理:
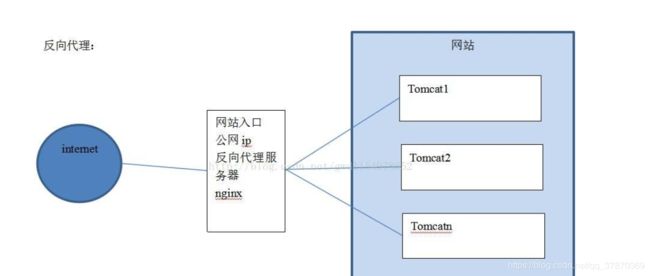
解压两个tomcat分别是
01 02
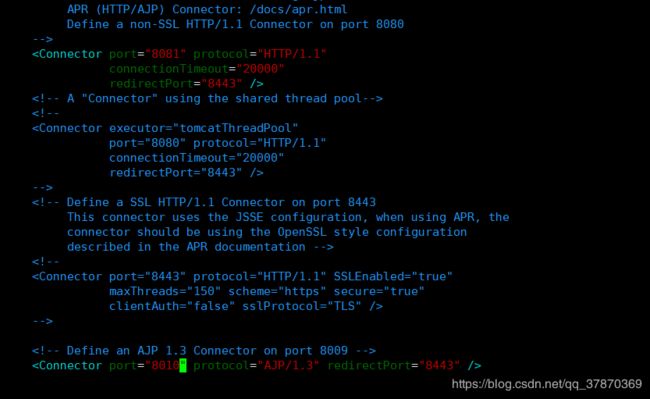
vim server.xml修改端口号
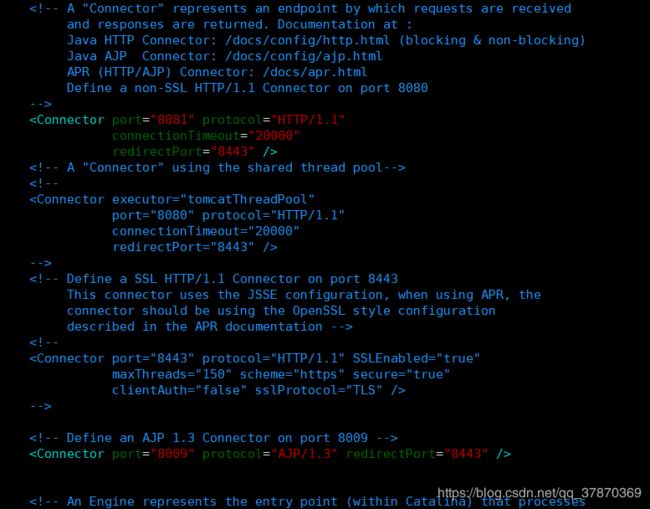
cd ROOT
vim index.jsp
在这里如果tomcat02挂了,tomcat01依然可以运行。

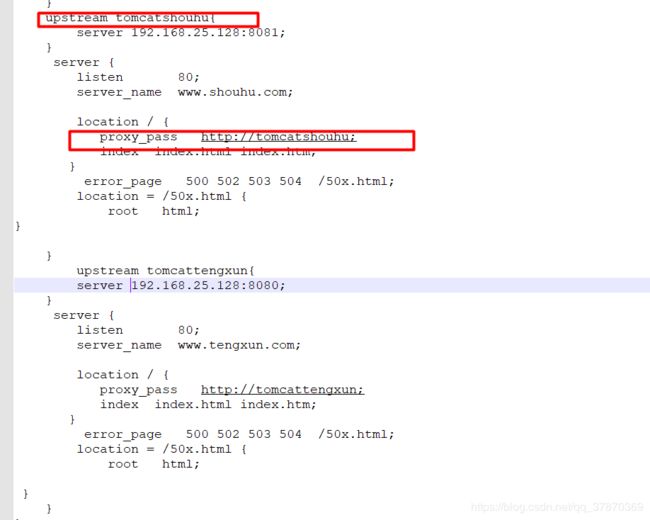
6.nginx负载均衡
如果一个服务由多台服务器提供,需要把负载分配到不同的服务器处理,需要负载均衡。
upstream tomcat2 {
server 192.168.25.128:8081;
server 192.168.25.128:8082;
}
默认的负载均衡的策略就是轮询的方式。
可以根据服务器的实际情况调整服务器权重。权重越高分配的请求越多,权重越低,请求越少。默认是都是1
upstream tomcat2 {
server 192.168.25.128:8081;
server 192.168.25.128:8082 weight=2;
}
其他的负载均衡的策略:1.通过IP地址的hash值 做映射。2.通过URL的方式计算出Hash值 。3.随机策略。4.最少并发量。
7 nginx的高可用(了解)
nginx作为负载均衡器,所有请求都到了nginx,可见nginx处于非常重点的位置,如果nginx服务器宕机后端web服务将无法提供服务,影响严重。
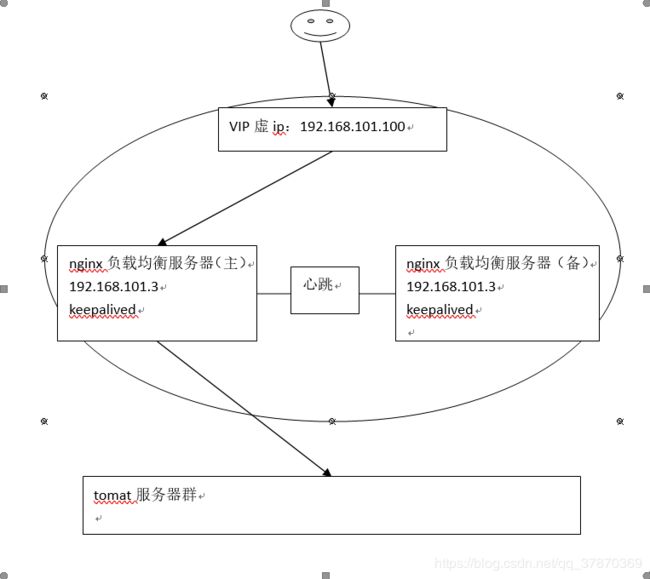
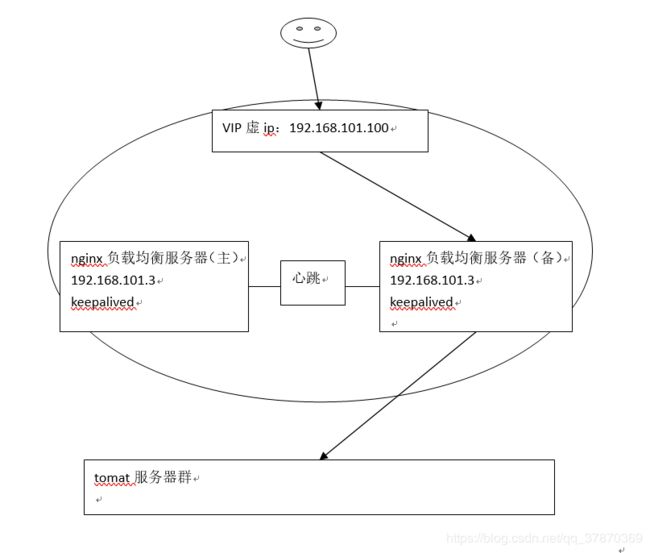
为了屏蔽负载均衡服务器的宕机,需要建立一个备份机。主服务器和备份机上都运行高可用(High Availability)监控程序,通过传送诸如“I am alive”这样的信息来监控对方的运行状况。当备份机不能在一定的时间内收到这样的信息时,它就接管主服务器的服务IP并继续提供负载均衡服务;当备份管理器又从主管理器收到“I am alive”这样的信息时,它就释放服务IP地址,这样的主服务器就开始再次提供负载均衡服务。
keepalived+nginx实现主备
什么是keepalived
keepalived是集群管理中保证集群高可用的一个服务软件,用来防止单点故障。
Keepalived的作用是检测web服务器的状态,如果有一台web服务器死机,或工作出现故障,Keepalived将检测到,并将有故障的web服务器从系统中剔除,当web服务器工作正常后Keepalived自动将web服务器加入到服务器群中,这些工作全部自动完成,不需要人工干涉,需要人工做的只是修复故障的web服务器。
keepalived工作原理
keepalived是以VRRP协议为实现基础的,VRRP全称Virtual Router Redundancy Protocol,即虚拟路由冗余协议。
虚拟路由冗余协议,可以认为是实现路由器高可用的协议,即将N台提供相同功能的路由器组成一个路由器组,这个组里面有一个master和多个backup,master上面有一个对外提供服务的vip(VIP = Virtual IP Address,虚拟IP地址,该路由器所在局域网内其他机器的默认路由为该vip),master会发组播,当backup收不到VRRP包时就认为master宕掉了,这时就需要根据VRRP的优先级来选举一个backup当master。这样的话就可以保证路由器的高可用了。
keepalived主要有三个模块,分别是core、check和VRRP。core模块为keepalived的核心,负责主进程的启动、维护以及全局配置文件的加载和解析。check负责健康检查,包括常见的各种检查方式。VRRP模块是来实现VRRP协议的。
详细参考:Keepalived权威指南中文.pdf
keepalived+nginx实现主备过程
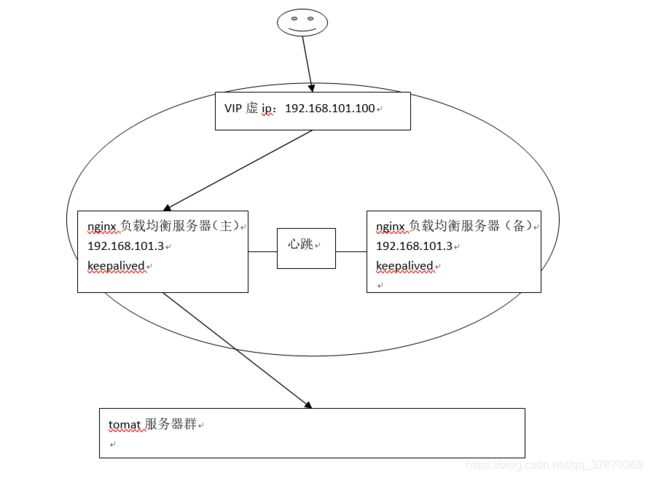
初始状态
高可用环境
两台nginx,一主一备:192.168.101.3和192.168.101.4
两台tomcat服务器:192.168.101.5、192.168.101.6
安装keepalived
分别在主备nginx上安装keepalived,参考“安装手册”进行安装:
