Struts1.X与Spring集成——第一种方案
spring+struts(第一种方案)
集成原理:在Action中取得BeanFactory,通过BeanFactory取得业务逻辑对象,调用业务逻辑方法。
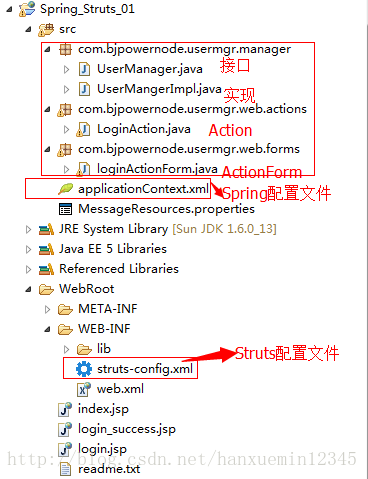
一,新建一个项目Spring_Struts_01
二,步骤
1、spring和Struts的依赖包配置
*Struts
(1)拷贝Struts和jstl的依赖包
(2)在web.xml文件中配置ActionServlet
   action
   org.apache.struts.action.ActionServlet

     config
     /WEB-INF/struts-config.xml


     debug
      2


     detail
      2

   2


   action
    *.do
(3)提供struts-config.xml文件
![]()
(4)提供国际化支持,提供缺省的国际化资源文件
![]()
# -- standard errors--
errors.header=
errors.prefix=-
errors.suffix=
errors.footer=
# -- validator --
errors.invalid={0}is invalid.
errors.maxlength={0}can not be greater than {1} characters.
errors.minlength={0}can not be less than {1} characters.
errors.range={0} isnot in the range {1} through {2}.
errors.required={0}is required.
errors.byte={0} mustbe an byte.
errors.date={0} isnot a date.
errors.double={0}must be an double.
errors.float={0}must be an float.
errors.integer={0}must be an integer.
errors.long={0} mustbe an long.
errors.short={0}must be an short.
errors.creditcard={0}is not a valid credit card number.
errors.email={0} isan invalid e-mail address.
# -- other --
errors.cancel=Operationcancelled.
errors.detail={0}
errors.general=Theprocess did not complete. Details should follow.
errors.token=Requestcould not be completed. Operation is not in sequence.
# -- welcome --
welcome.title=StrutsBlank Application
welcome.heading=Welcome!
welcome.message=Toget started on your own application, copy the struts-blank.war to a new WARfile using the name for your application. Place it in your container's"webapp" folder (or equivalent), and let your container auto-deploythe application. Edit the skeleton configuration files as needed, restart yourcontainer, and you are on your way! (You can find the application.propertiesfile with this message in the /WEB-INF/src/java/resources folder.)*Spring
(1)拷贝spring相关依赖包
![]()
![]()
(2)提供spring配置文件
![]()
2,在web.xml文件中配置ContextLoaderListener(作用:让web Server在启动时将BeanFactory放到ServletContext中)
   action
   org.apache.struts.action.ActionServlet

     config
     /WEB-INF/struts-config.xml


     debug
      2


     detail
      2

   2


   action
    *.do


      contextConfigLocation
      classpath:applicationContext-*.xml


    org.springframework.web.context.ContextLoaderListener
3,在Action中采用WebApplicationContextUtils.getWebApplicationContext()从ServletContext中取得BeanFactory
4,通过BeanFactory从IOC容器中取得业务逻辑对象
存在缺点:
因为Action中存在依赖查找,所以Action依赖于Spring的API
进一步了解依赖查找和依赖注入,在同一个jvm中可以依赖注入,不同jvm中不可以依赖注入
三,代码示例
一个简单的用户登录示例,没有持久层
客户端:
1,jsp
(1)index.jsp主页面
<%@ pagelanguage="java" contentType="text/html; charset=GB18030"
    pageEncoding="GB18030"%>


Inserttitle here


   Spring+Struts(第一种集成方案)

   登录
(2)login.jsp登录页面
<%@ pagelanguage="java" contentType="text/html; charset=GB18030"
pageEncoding="GB18030"%>
Inserttitle here
(3)login_success.jsp登录成功后的跳转页面
<%@ pagelanguage="java" contentType="text/html; charset=GB18030"
    pageEncoding="GB18030"%>


Inserttitle here


  韩学敏,登录成功!!
服务端
2(1),ActionForm获取表单数据
loginActionForm.java:
packagecom.bjpowernode.usermgr.web.forms;

importorg.apache.struts.action.ActionForm;

public classloginActionForm extends ActionForm {
    private String username;
    private String password;
    public String getUsername() {
returnusername;
}
publicvoid setUsername(String username) {
this.username= username;
}
publicString getPassword() {
returnpassword;
}
publicvoid setPassword(String password) {
this.password= password;
}

}2(2),Action
LoginAction.java:
packagecom.bjpowernode.usermgr.web.actions;

importjavax.servlet.http.HttpServletRequest;
importjavax.servlet.http.HttpServletResponse;

importorg.apache.struts.action.Action;
importorg.apache.struts.action.ActionForm;
importorg.apache.struts.action.ActionForward;
importorg.apache.struts.action.ActionMapping;
importorg.springframework.beans.factory.BeanFactory;
importorg.springframework.context.support.ClassPathXmlApplicationContext;
importorg.springframework.web.context.support.WebApplicationContextUtils;

importcom.bjpowernode.usermgr.manager.UserManager;
importcom.bjpowernode.usermgr.manager.UserMangerImpl;
importcom.bjpowernode.usermgr.web.forms.loginActionForm;

public classLoginAction extends Action {

@Override
publicActionForward execute(ActionMapping mapping, ActionForm form,
HttpServletRequestrequest, HttpServletResponse response)
throwsException {
//从LoginActionForm拿数据
loginActionFormlaf=(loginActionForm)form;
String username=laf.getUsername();//获取用户名
String password =laf.getPassword();//获取密码

/*UserManageruserManager=new  UserMangerImpl();
    userManager.Login(username, password);*/
//取BeanFactory拿到配置文件applicationContext.xml生成BeanFactory

BeanFactory        factory= new ClassPathXmlApplicationContext("applicationContext.xml");

/*//使用BeanFactory从IOC容器中取得相关对象(根据id取得)
     UserManageruserManager=(UserManager)factory.getBean("userManager");
    userManager.Login(username, password);//调用接口UserManager的登录方法Login()
*/
//如下方式不用每次都创建BeanFactory,而且不用在这里写死配置文件,配置文件写在了web.xml中;但是在此层中知道了Spring的存在
    BeanFactory beanFactory =WebApplicationContextUtils.getWebApplicationContext(request.getSession().getServletContext());
    UserManageruserManager=(UserManager)factory.getBean("userManager");
    userManager.Login(username, password);//调用接口UserManager的登录方法Login()
    returnmapping.findForward("success");//跳转到成功页面
}

}2(3)业务层 接口+实现
接口UserManager.java:
packagecom.bjpowernode.usermgr.manager;

public interfaceUserManager {
/**
 * 用户登录
 * @param username:用户名
 * @param password:密码
 */
publicvoid Login(String username,String password);

}实现UserManagerImp.java:
packagecom.bjpowernode.usermgr.manager;

public classUserMangerImpl implements UserManager {

@Override
publicvoid Login(String username, String password) {
System.out.print(this.getClass()+",username="+username);

}

}3,Struts配置文件 配置数据
![]()
4,Spring配置文件
![]()
5,运行
启动Tomcat
浏览器中输入地址http://localhost:8080/Spring_Struts_01/
进入主页面index.jsp:
点击“登录”,进入用户登录页面login.jsp:
输入用户名、密码
点击“登录”按钮,跳转到登录成功页面login_success:
6,总结:
(1)此方案的集成原理:在Action中取得BeanFactory,通过BeanFactory取得业务逻辑对象,调用业务逻辑方法。
(2)缺点:产生了依赖,spring的类在action中产生了依赖查找。(依赖查找和依赖注入的区别(前者为主动,后者是Spring主动提供))


