Ubuntu18.04+Linux5.6.12简易添加系统调用、内核模块以及一个综合实验。

一、写在前面的话。

本文的实现主要参考了https://www.stolaf.edu/people/rab/os/lab/newsyscall.html的实验指导书以及西安邮电大学陈莉君老师的在学堂在线上的《Linux内核分析与应用》课程中1.5以及6.3的实验视频演示。其中,Rab老师的实验指导书对于系统调用有着浅显易懂的讲解,而陈莉君老师的课程视频则是手把手教会了我如何添加一个内核模块以及综合的实验。

此外,就我个人的经验而言,我觉得还是至少在虚拟机,甚至在购买的云服务器上实现这个实验比较好。因为我之前跟着一些错误的视频进行操作,回滚了好几次。而从每一次回滚来看,似乎硬盘空间都要被吃掉4-5个G。另外,如果在双系统中装了tf,cudnn等等,那么一旦需要重装,带来的工作量将是灾难性的。

我的实验环境

VMware 15.1 player.
Ubuntu 18.04.4LTS官方镜像。
Linux 5.6.12 kernel压缩包。

二、添加一个最简单的系统调用。

对于像我一样水平不高的开发者来说,内核这么复杂的东西显然不是我们能够驾驭的。所以,类似系统调用、内核模块等等的实验,最好力求简单,代码的改动越少越好。

此处我们实现的是一个和getpid()函数功能一样的内核调用。修改内核源码的部分非常简单,只需如下两步:
1、在当前运行内核(可以使用uname -r命令查看)目录下找到arch/x86/entry/syscalls/syscall_64.tbl系统调用表,用sudo gedit等等方式打开,在空白的且可用的系统调用号下(例如335,439等)照着旁边的格式加上如下一行
439 common myhello __x64_sys_myhello
即可。注意中间空白需要与其余表项一致,用tab键分隔。
2、在内核目录下找到kernel/sys.c,在其中找出如下代码:

SYSCALL_DEFINE0(getpid)
    {
        return task_tgid_vnr(current);
    }

在紧接着它的地方加上:

SYSCALL_DEFINE0(myhello)
    {
        return task_tgid_vnr(current);
    }

作为myhello系统调用的实现。
3、随后编译内核。
在内核目录下,依次输入:

sudo make menuconfig	#(随后依次选择load ok save ok exit exit)
sudo make olddefconfig
sudo make bzImage -jx	#(为了节省时间,x建议为机器CPU最大可用内核数量,注意需调整虚拟机可以使用核心数的设置)
sudo make modules -jx
sudo make modules_install -jx
sudo make install
sudo update-grub2
sudo reboot

即可编译完成。
4、编写用户态测试程序
此时编写一个用户态程序,来调用我们写好的内核代码。此处我编写的程序如下:

/* lib.h, Header file for example of system call library function. */
long int my_hello_kernel(void);

/* lib.c, library source for new system calls */

#define _GNU_SOURCE
#include 
#include 
#include 
#include 

extern int errno;

long int my_hello_kernel(void)
{
	printf("In lib.c, my_hello_kernel() returns %ld\n", syscall(__NR_myhello));
	return syscall(__NR_myhello);
}

/*test.c,  test program for system calls */

#include 
#include 
#include 
#include "lib.h"

int main(void)
{
	int new_fd;
	char *msg = "Hello world!\n";
	printf("my_hello_kernel() is simply a duplicate of getpid().\n");
	printf("You see, my_hello_kernel() returns %ld and getpid() returns %d\n.", my_hello_kernel(), getpid());
	return 0;
}

编译这三个用户程序,运行即可得到结果。

三、添加一个内核模块。

此处我们按照学堂在线视频照做即可。
我们首先在编写用户态内核模块helloworld.c,具体内容如下:

#include 
#include 
#include 

static int __init lkm_init(void)
{
	printk("Hello World\n");
	return 0;
}

static void __exit lkm_exit(void)
{
	printk("Goodbye\n");
}

module_init(lkm_init);
module_exit(lkm_exit);

MODULE_LICENSE("GPL");

此处我们使用__init 和 __exit 来声明这两个函数分别是加载和退出内核的模块,再用module_init,module_exit分别声明内核的起始和退出函数。
随后我们写 Makefile, makefile的内容如下:

`obj-m:=helloworld.o

CURRENT_PATH:=$(shell pwd)
LINUX_KERNEL:=$(shell uname -r)
LINUX_KERNEL_PATH:=/usr/src/linux-headers-$(LINUX_KERNEL)

all:
	make -C $(LINUX_KERNEL_PATH) M=$(CURRENT_PATH) modules

clean:
	make -C $(LINUX_KERNEL_PATH) M=$(CURRENT_PATH) clean

这个makefile的内容较为通用,不同的路径下均可实现对于内核模块的编译。
使用make命令开始编译,可以看到当前目录下多了若干个.ko等等的文件,随后我们使用命令sudo insmod helloworld.ko插入我们写好的内核模块,使用lsmod命令可以找到我们的内核模块。
最后,使用dmesg命令可以找到我们插入的内核模块在内核日志中的输出。

四、综合实验:内核日志手机系统。

本部分实验即为陈莉君老师网课视频6.3的内容,此处仅作简略讲解并贴上视频中的代码。
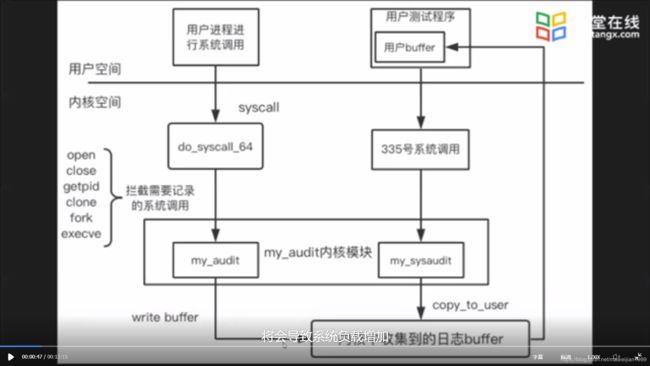
Ubuntu18.04+Linux5.6.12简易添加系统调用、内核模块以及一个综合实验。_第1张图片
如图,该系统可大体分为如下几部分:
0、下载一个新的Linux内核,并在/usr/src中解压。
1、修改内核,拦截内核中open、close等等的系统调用,并将其通过my_audit内核模块写入系统收集日志的buffer。
2、通过新加入的335号系统调用,执行my_sysaudit内核模块,将日志buffer中的信息copy到用户的buffer中。
3、随后,编写用户态测试程序,将日志中的内容写到标准输出。
具体代码如下:
首先如前所述,在syscall_64.tbl下增加新的335号系统调用。
随后在arch/x86/kernel目录下插入my_audit.c,内容如下:

#include 
#include 
#include 
#include 
#include 
#include 
#include 
#include 

void (*my_audit) (int,int) = 0;

int (*my_sysaudit)(u8, u8 *, u16, u8) = 0;
SYSCALL_DEFINE4(myaudit, u8, type, u8 *, us_buf, u16, us_buf_size, u8, reset)
{
	if(my_audit){
		printk("IN KERNEL:my system call sys_myaudit() working\n");
		return (*my_sysaudit)(type, us_buf, us_buf_size, reset);
	}
	else
		printk("my_audit does not exist\n");
	return 1;
}

EXPORT_SYMBOL(my_audit);
EXPORT_SYMBOL(my_sysaudit);
 

此处实现了系统调用的具体函数,同时声明了两个钩子函数。
随后在kernel目录的makefile中,添加一项:

obj-y += my_audit.o

接着,在include/linux/syscalls.h中,添加以下语句:

asmlinkage long sys_myaudit(u8, u8 *, u16, u8);
extern void (*my_audit)(int,int);

注意要加在#endif之前。
随后在arch/x86/entry/common.c的do_syscall_64函数中,添加以下拦截系统调用的代码:

		if(nr==2 || nr==3 || nr==39 || nr==56 || nr==57 || nr==59)
		{
			if(my_audit)
				(*my_audit)(nr, regs->ax);
			else
				printk("my audit does not exist");
		}

此时,如果有进程进行了以上系统调用且hook函数my_audit已经被实现,那么就调用my_audit函数写日志。

接着,如视频所述,装内核。

随后实现钩子函数的内核模块,即myaudit.c

#include 
#include 
#include 
#include 
#include 

#define COMM_SIZE 16
#define AUDIT_BUF_SIZE 20

MODULE_LICENSE("MIT");

struct syscall_buf{
	u32 serial;
	u64 ts_sec;
	u64 ts_micro;
	u32 syscall;
	u32 status;
	pid_t pid;
	uid_t uid;
	u8 comm[COMM_SIZE];
};

DECLARE_WAIT_QUEUE_HEAD(buffer_wait);

static struct syscall_buf audit_buf[AUDIT_BUF_SIZE];
static int current_pos = 0;
static u32 serial = 0;

void syscall_audit(int syscall, int return_status)
{
	struct syscall_buf *ppb_temp;
	struct timespec64 nowtime;

	ktime_get_real_ts64(&nowtime);
	if(current_pos < AUDIT_BUF_SIZE)
	{
		ppb_temp = &audit_buf[current_pos];
		ppb_temp->serial = serial++;
		ppb_temp->ts_sec = nowtime.tv_sec;
		ppb_temp->ts_micro = nowtime.tv_nsec;
		ppb_temp->syscall = syscall;
		ppb_temp->status = return_status;
		ppb_temp->pid = current->pid;
		ppb_temp->uid = current->tgid;

		memcpy(ppb_temp->comm, current->comm, COMM_SIZE);
		if(++current_pos == AUDIT_BUF_SIZE * 6 / 10)
		{
			printk("IN_MODULE_AUDIT: Yes, it's near full\n");
			wake_up_interruptible(&buffer_wait);
		}
	}
}

int sys_audit(u8 type, u8 *us_buf, u16 us_buf_size, u8 reset)
{
	int ret = 0;
	if(!type)
	{
		if(clear_user(us_buf, us_buf_size))
		{
			printk("Error: Clear user\n");
			return 0;
		}
		printk("IN MODULE_systemcall:Starting...\n");
		ret = wait_event_interruptible(buffer_wait, current_pos >= AUDIT_BUF_SIZE * 6 / 10);
		printk("IN MODULE_systemcall:Over, current pops is %d\n", current_pos);
		if(copy_to_user(us_buf, audit_buf, (current_pos)*sizeof(struct syscall_buf)))
		{
			printk("Error: Copy error.\n");
			return 0;
		}
		ret = current_pos;
		current_pos = 0;
	}
	return ret;
}

extern void (*my_audit)(int, int);
extern int (*my_sysaudit)(u8, u8*, u16, u8);
static int __init audit_init(void)
{
	my_sysaudit = sys_audit;
	my_audit = syscall_audit;
	printk("Entering System Call Auditing\n");
	return 0;
}

module_init(audit_init);

static void __exit audit_exit(void)
{
	my_audit = NULL;
	my_sysaudit = NULL;
	printk("Exiting System Call Auditing\n");
	return;
}

module_exit(audit_exit);
   

同时编写编译钩子函数的内核模块的makefile,如下所示:

obj-m += my_audit.o

LINUX_KERNEL_PATH := /usr/src/linux-5.6.12

all:
	make -C $(LINUX_KERNEL_PATH) M=$(CURDIR) modules
clean:
	make -C $(LINUX_KERNEL_PATH) M=$(CURDIR) clean

用make编译并用sudo insmod插入内核模块后,即可看到yes, it’s near full的输出。
接着,编写用户态测试程序如下所示:

#include 
#include 
#include 
#include 
#include 
#include 
#include 
#include 

#define COMM_SIZE 16
typedef unsigned char u8;
typedef unsigned int u32;
typedef unsigned long long u64;

struct syscall_buf
{
	u32 serial;
	u64 ts_sec;
	u64 ts_micro;
	u32 syscall;
	u32 status;
	pid_t pid;
	uid_t uid;
	u8 comm[COMM_SIZE];
};

#define AUDIT_BUF_SIZE (20*sizeof(struct syscall_buf))

int main(void)
{
	u8 col_buf[AUDIT_BUF_SIZE];
	u8 reset = 1;
	int num = 0;
	int i;
	struct syscall_buf *p;
	while(1)
	{
		num = syscall(439,0,col_buf,AUDIT_BUF_SIZE,reset);
		printf("num:%d\n",num);
		p = (struct syscall_buf *)col_buf;
		for(i=0; i<num; i++)
			printf("num[%d],serial:%d,\tsyscall:%d,\tpid:%d,\tcomm:%s,\ttime:%s\n", p[i].serial, p[i].syscall, p[i].pid, p[i].comm, ctime(&p[i].ts_sec));
	}
	return 1;
}

编译运行,即可看到内核日志被输出到了标准输出上。

至此,实验全部结束。

你可能感兴趣的:(linux,内核)