0基础快速入门WebPack(2)——图解详述Webpack的打包模块安装及使用和详述mode、entry、output及超使用的loader详述(附详细案例源码解析过程及版本迭代过程)
文章目录
- 1. 重点提炼
- 2. webpack 是什么?
- 2.1 example01(官网例子)
- 3. 安装
- 3.1 example02
- 4. 使用
- 4.1 example03
- 5. 打包模块
- 5.1 入口文件
- 5.2 打包命令
- 5.3 example04
- 6. 打包配置
- 6.1 example05
- 6.1.1 example05-1
- 6.1.2 example05-2
- 7. 核心配置
- 7.1 mode
- 7.2 entry
- 7.2.1 example06
- 7.3 output
- 7.3.1 example07
- 7.3.1.1 output.filename
- 7.3.1.1.1 example07-1
- 8. 深入
- 8.1 example08
- 8.2 执行简要流程
- 9. Loaders
- 9.1 raw-loader
- 9.1.1 example09
- 9.1.1.1 example09-1
- 9.1.1.2 example09-2
- 9.1.1.3 example09-3
- 9.1.1.4 example09-4
- 9.2 file-loader
- 9.2.1example10
- 9.2.1.1 example10-1
- 9.2.1.2 example10-2
- 9.2.1.3 example10-3
- 9.2.1.4 example10-4
- 9.3 url-loader
- 9.4 css-loader
- 9.4.1 example11
- 9.4.1.1 example11-1
- 9.4.1.2 example11-2
- 9.5 style-loader
- 9.5.1 example12
- 9.6 sass-loader
1. 重点提炼
webpack
- 打包
- 模块(对于一些不支持esm模块的浏览器环境进行代码的打包)
- 不仅仅只是打包js,还能处理其它各种格式的文件
- 安装
- 使用
- 配置
- mode
- entry
- output
- loaders
- raw-loader
- markdown-loader
- file-loader
- url-loader
- css-loader
- style-loader
- ……
- 配置格式
- test :匹配文件规则
- use:
- 字符串:use: ‘xxx-loader’
- 数组: use: [‘1-loader’,‘2-loader’]
- 对象:use: {loader: ‘xxx-loader’, options: {…}}
2. webpack 是什么?
- 官⽅方⽹网站
- 中⽂文⽹网站
在引言的时候小迪说过模块化,实际我们是希望把代码拆分为一个个模块,方便去维护和管理,但是浏览器在早期的时候根本就不识别,为了解决这个问题。
在开发的时候还是拆分一个个模块去写,但最终为了让浏览器能够识别,最后在把代码合并到一个文件中。
因此打包的目的,就是为了最终能够让我们浏览器最终执行。

本质上,webpack 是一个现代 JavaScript 应用程序的静态(js是动态的语言,即可以在运行过程中处理一些问题,这里静态理解为代码运行和打包是分开的,不会是边打包边运行)模块打包器(module bundler)。当 webpack 处理应用程序时,它会递归地构建一个依赖关系图(dependency graph),其中包含应用程序需要的每个模块,然后将所有这些模块打包成一个或多个 bundle。
2.1 example01(官网例子)
test01\src\bar.js
export default function bar() {
    console.log('bar');
}
test01\src\index.js
import bar from './bar';

bar();
test01\html\1.html
<html lang="en">
<head>
    <meta charset="UTF-8">
    <title>Titletitle>
head>
<body>


<script src="../src/index.js">script>
body>
html>
这样运行会报错!

报错了,提示在一个模块内容不能使用import语句。
我们用webpack来解决。
参考:https://github.com/6xiaoDi/blog-Webpack/tree/a0.01
Branch: branch01commit description:a0.01(Webpack02官网案例example1——浏览器不支持模块化)
tag:a0.01
3. 安装
webpack 是一个使用 Node.js 实现的一个模块化代码打包工具。所以,我们需要先安装 webpack,安装之前需要搭建好 Node.js 环境
npm install -D webpack webpack-cli
注:不推荐全局安装
webpack-cli : 提供 webpack 命令、工具,类似 create-react-app
webpack : webpack 代码,类似 react
3.1 example02
注意先加载package.json
参考:https://github.com/6xiaoDi/blog-Webpack/commit/8cfa67d6896ba4deb401bca62139a6c705366833
Branch: branch01commit description:安装Webpack
4. 使用
./node_modules/.bin/webpack

// 查看版本
./node_modules/.bin/webpack -v

也可以编辑 package.json 的 scripts 来简化输入
// package.json
{
	...,
	"scripts": {
		"start": "webpack"	// scripts 中可以定位到 ./node_modules/.bin/ 目录下
	}
}
scripts中使用test、start、restart、stop命名的时候,可以在调用的时候省略run,即直接npm start
当然,还可以使用更加方便的方式:
npx webpack
通过 npx 也可以帮助我们定位命令到 ./node_modules/.bin/ 目录下
注:npm5.2+ 增加,如果没有,可以使用 npm i -g npx 来安装
4.1 example03
./node_modules/.bin/webpack
有的时候我们感觉编写这么长的命令会很不舒服,这个时候package.json这个文件夹就派上用场了。
如:我们在命令行下输入dir

package.json中我们设置或者自定义命令:
\test01\package.json
{
  "name": "test01",
  "version": "1.0.0",
  "description": "",
  "main": "index.js",
  "dependencies": {},
  "devDependencies": {
    "webpack": "^4.43.0",
    "webpack-cli": "^3.3.11"
  },
  "scripts": {
    "test": "echo \"Error: no test specified\" && exit 1",
    "aaa": "dir"
  },
  "keywords": [],
  "author": "",
  "license": "ISC"
}
npm run aaa
也可以编辑 package.json 的 scripts 来简化输入
// package.json
{
    ...,
    "scripts": {
        "start": "webpack"    // scripts 中可以定位到 ./node_modules/.bin/ 目录下
    }
}
scripts中使用test、start、restart、stop命名的时候,可以在调用的时候省略run,即直接npm start
webstorm也会提示:

\test01\package.json
{
  "name": "test01",
  "version": "1.0.0",
  "description": "",
  "main": "index.js",
  "dependencies": {},
  "devDependencies": {
    "webpack": "^4.43.0",
    "webpack-cli": "^3.3.11"
  },
  "scripts": {
    "test": "echo \"Error: no test specified\" && exit 1",
    "start": "webpack -v"
  },
  "keywords": [],
  "author": "",
  "license": "ISC"
}
npm run start
5. 打包模块
打包之前,我们需要了解一个概念,入口文件
5.1 入口文件
入口文件就是我们项目中加载的第一个文件,比如上面的 main.js 文件,其它文件都是通过 import 等方式引入的,webpack 会从我们指定的入口文件开始分析所有需要依赖的文件,然后把打包成一个完整文件。
5.2 打包命令
webpack ./js/index.js
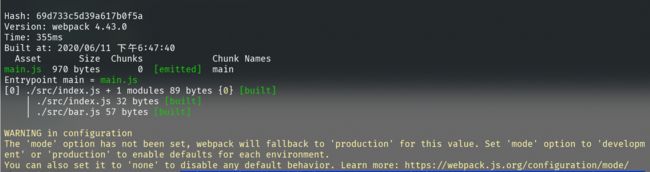
上面命令会使用 webpack 默认的一些配置对模块文件进行打包,并把打包后的文件输出到默认创建的 ./dist 目录下,打包后的文件名称默认为 main.js。
模块文件打包以后,就可以在不支持es6 模块语法的浏览器环境下引入使用了。
打包文件分析
- 把分散的模块文件打包到一个文件中,不需要外部引入了
- 内置了一个小型模块加载器(类似
requireJS),实现了打包后的代码隔离与引用
以上就是webpack 最基础的使用于基本原理,当然强大的 webpack 远远不止这些功能。
5.3 example04
{
  "name": "test01",
  "version": "1.0.0",
  "description": "",
  "main": "index.js",
  "dependencies": {},
  "devDependencies": {
    "webpack": "^4.43.0",
    "webpack-cli": "^3.3.11"
  },
  "scripts": {
    "test": "echo \"Error: no test specified\" && exit 1",
    "start": "webpack ./src/index.js"
  },
  "keywords": [],
  "author": "",
  "license": "ISC"
}
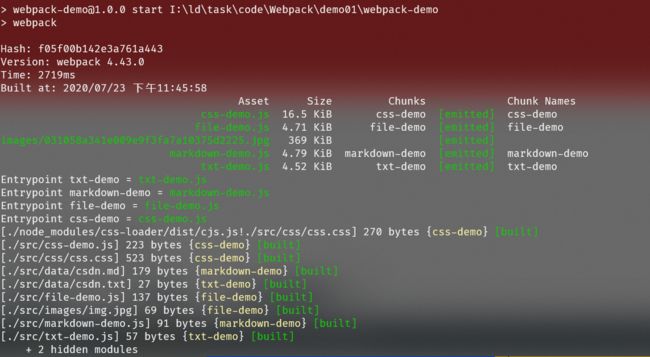
npm start
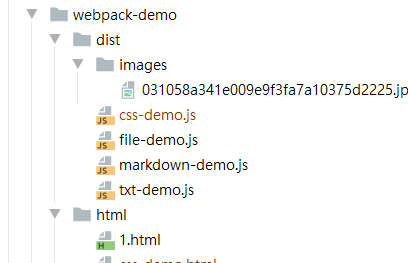
打包后生成一个dist目录

之前这里加载会报错,我们加载入口文件dist/main.js
test01\src\index.js
import bar from './bar';

bar();
test01\src\bar.js
export default function bar() {
    console.log('bar');
}
test01\html\1.html
<html lang="en">
<head>
    <meta charset="UTF-8">
    <title>Titletitle>
head>
<body>


<script src="../dist/main.js">script>
body>
html>

参考:https://github.com/6xiaoDi/blog-Webpack/tree/a0.02
Branch: branch01commit description:a0.02(Webpack02案例example04——打包代码)
tag:a0.02
6. 打包配置
虽然,我们可以直接通过命令的来打包,但是推荐创建一个 webpack.config.js 的配置文件来实现更方便和强大的功能。
webpack 命令在运行的时候,默认会读取运行命令所在的目录下的 webpack.config.js 文件,通常我们会在项目的根目录下运行命令和创建配置文件。
注意它是一个基于nodejs环境的文件,因为webpack是基于node开发的。
我们也可以通过 —config 选项来指定配置文件路径(自定义文件名):
webpack --config ./configs/my_webpack.config.js
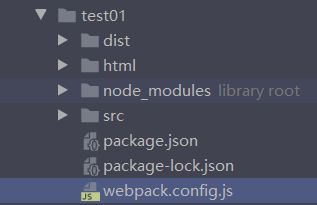
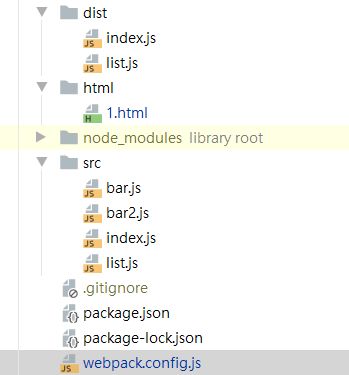
通常情况下,我们的项目目录大致如下:
/
-- /dist - 项目打包后存放目录
-- /node_modules - 第三方模块
-- /src
------ css/
------ images/
------ js/
------ index.js
-- webpack.config.js
-- package.json
配置文件
module.exports = {
  ...	//配置项
}
6.1 example05
6.1.1 example05-1
test01\webpack.config.js
module.exports = {
    //配置项
    entry: './src/index.js',    //设置入口
}
test01\package.json
{
  "name": "test01",
  "version": "1.0.0",
  "description": "",
  "main": "index.js",
  "dependencies": {},
  "devDependencies": {
    "webpack": "^4.43.0",
    "webpack-cli": "^3.3.11"
  },
  "scripts": {
    "test": "echo \"Error: no test specified\" && exit 1",
    "start": "webpack"
  },
  "keywords": [],
  "author": "",
  "license": "ISC"
}
npm start
6.1.2 example05-2
刚刚生成main.js(注意这里不是进行加密)我们可以看到非常丑化(减少代码文件体积),但是这里其实做了优化,代码执行起来效率更高,减少代码体积。
!function(e){var t={};function r(n){if(t[n])return t[n].exports;var o=t[n]={i:n,l:!1,exports:{}};return e[n].call(o.exports,o,o.exports,r),o.l=!0,o.exports}r.m=e,r.c=t,r.d=function(e,t,n){r.o(e,t)||Object.defineProperty(e,t,{enumerable:!0,get:n})},r.r=function(e){"undefined"!=typeof Symbol&&Symbol.toStringTag&&Object.defineProperty(e,Symbol.toStringTag,{value:"Module"}),Object.defineProperty(e,"__esModule",{value:!0})},r.t=function(e,t){if(1&t&&(e=r(e)),8&t)return e;if(4&t&&"object"==typeof e&&e&&e.__esModule)return e;var n=Object.create(null);if(r.r(n),Object.defineProperty(n,"default",{enumerable:!0,value:e}),2&t&&"string"!=typeof e)for(var o in e)r.d(n,o,function(t){return e[t]}.bind(null,o));return n},r.n=function(e){var t=e&&e.__esModule?function(){return e.default}:function(){return e};return r.d(t,"a",t),t},r.o=function(e,t){return Object.prototype.hasOwnProperty.call(e,t)},r.p="",r(r.s=0)}([function(e,t,r){"use strict";r.r(t),console.log("bar")}]);
我们怎样看起来代码好看一些,这里提供了mode,默认是生产环境production,我们设置为开会环境development。
test01\webpack.config.js
module.exports = {
    //配置项
    entry: './src/index.js',    //设置入口
    mode: 'development',
}
npm start
test01\dist\main.js
/******/ (function(modules) { // webpackBootstrap
/******/     // The module cache
/******/     var installedModules = {};
/******/
/******/     // The require function
/******/     function __webpack_require__(moduleId) {
/******/
/******/         // Check if module is in cache
/******/         if(installedModules[moduleId]) {
/******/             return installedModules[moduleId].exports;
/******/         }
/******/         // Create a new module (and put it into the cache)
/******/         var module = installedModules[moduleId] = {
/******/             i: moduleId,
/******/             l: false,
/******/             exports: {}
/******/         };
/******/
/******/         // Execute the module function
/******/         modules[moduleId].call(module.exports, module, module.exports, __webpack_require__);
/******/
/******/         // Flag the module as loaded
/******/         module.l = true;
/******/
/******/         // Return the exports of the module
/******/         return module.exports;
/******/     }
/******/
/******/
/******/     // expose the modules object (__webpack_modules__)
/******/     __webpack_require__.m = modules;
/******/
/******/     // expose the module cache
/******/     __webpack_require__.c = installedModules;
/******/
/******/     // define getter function for harmony exports
/******/     __webpack_require__.d = function(exports, name, getter) {
/******/         if(!__webpack_require__.o(exports, name)) {
/******/             Object.defineProperty(exports, name, { enumerable: true, get: getter });
/******/         }
/******/     };
/******/
/******/     // define __esModule on exports
/******/     __webpack_require__.r = function(exports) {
/******/         if(typeof Symbol !== 'undefined' && Symbol.toStringTag) {
/******/             Object.defineProperty(exports, Symbol.toStringTag, { value: 'Module' });
/******/         }
/******/         Object.defineProperty(exports, '__esModule', { value: true });
/******/     };
/******/
/******/     // create a fake namespace object
/******/     // mode & 1: value is a module id, require it
/******/     // mode & 2: merge all properties of value into the ns
/******/     // mode & 4: return value when already ns object
/******/     // mode & 8|1: behave like require
/******/     __webpack_require__.t = function(value, mode) {
/******/         if(mode & 1) value = __webpack_require__(value);
/******/         if(mode & 8) return value;
/******/         if((mode & 4) && typeof value === 'object' && value && value.__esModule) return value;
/******/         var ns = Object.create(null);
/******/         __webpack_require__.r(ns);
/******/         Object.defineProperty(ns, 'default', { enumerable: true, value: value });
/******/         if(mode & 2 && typeof value != 'string') for(var key in value) __webpack_require__.d(ns, key, function(key) { return value[key]; }.bind(null, key));
/******/         return ns;
/******/     };
/******/
/******/     // getDefaultExport function for compatibility with non-harmony modules
/******/     __webpack_require__.n = function(module) {
/******/         var getter = module && module.__esModule ?
/******/             function getDefault() { return module['default']; } :
/******/             function getModuleExports() { return module; };
/******/         __webpack_require__.d(getter, 'a', getter);
/******/         return getter;
/******/     };
/******/
/******/     // Object.prototype.hasOwnProperty.call
/******/     __webpack_require__.o = function(object, property) { return Object.prototype.hasOwnProperty.call(object, property); };
/******/
/******/     // __webpack_public_path__
/******/     __webpack_require__.p = "";
/******/
/******/
/******/     // Load entry module and return exports
/******/     return __webpack_require__(__webpack_require__.s = "./src/index.js");
/******/ })
/************************************************************************/
/******/ ({

/***/ "./src/bar.js":
/*!********************!*\
  !*** ./src/bar.js ***!
  \********************/
/*! exports provided: default */
/***/ (function(module, __webpack_exports__, __webpack_require__) {

// src/bar.js
"use strict";
eval("__webpack_require__.r(__webpack_exports__);\n/* harmony export (binding) */ __webpack_require__.d(__webpack_exports__, \"default\", function() { return bar; });\nfunction bar() {\n    console.log('bar');\n}\n\n//# sourceURL=webpack:///./src/bar.js?");

/***/ }),

/***/ "./src/index.js":
/*!**********************!*\
  !*** ./src/index.js ***!
  \**********************/
/*! no exports provided */
/***/ (function(module, __webpack_exports__, __webpack_require__) {
// ./src/index.js
"use strict";
eval("__webpack_require__.r(__webpack_exports__);\n/* harmony import */ var _bar__WEBPACK_IMPORTED_MODULE_0__ = __webpack_require__(/*! ./bar */ \"./src/bar.js\");\n\n\nObject(_bar__WEBPACK_IMPORTED_MODULE_0__[\"default\"])();\n\n//# sourceURL=webpack:///./src/index.js?");

/***/ })

/******/ });
参考:https://github.com/6xiaoDi/blog-Webpack/tree/a0.03
Branch: branch01commit description:a0.03(Webpack02案例example05-2——mode设置为开发模式)
tag:a0.03
其实上面代码是默认生成的,即模块化的代码,我们不做深究,真正的代码从96行开始:
-
这里就把
./src/index.js和./src/bar.js合在一个文件中来了(在一个文件就不存在加载了),这里就把加载问题解决了,即不存在import的问题了,不用再识别加载语句了。 -
但是这些多个文件中的变量和数据是怎么解决冲突问题的呢?仔细观察,它都会把文件中的代码放在一个函数中,形成闭包。
-
如果文件之间需要相互传递变量怎么整?
我们可以发现函数有三个参数,这三个参数都是对象,后两个是导出和导入的意思
function(module, webpack_exports, webpack_require)
我们仔细观察一下,去掉注释的代码:
(function(module, __webpack_exports__, __webpack_require__) {

"use strict";
eval("__webpack_require__.r(__webpack_exports__);\n/* harmony export (binding) */ __webpack_require__.d(__webpack_exports__, \"default\", function() { return bar; });\nfunction bar() {\n    console.log('bar');\n}\n\n//# sourceURL=webpack:///./src/bar.js?");

/***/ }),
function bar() {
    console.log('bar');
}
__webpack_require__.d(__webpack_exports__, "default", function() {
    return bar;
});
仔细观察代码,其实在90行之前,webpack已经帮助我们实现了一个模块加载(模块导入导出)系统,然后再处理打包好的模块。webpack其实作用就是把文件合并打包,然后提供一个模块加载机制,然后解决多个文件合并之后的冲突问题、载入问题、引入问题、导出问题等等。
7. 核心配置
7.1 mode
模式 : "production" | "development" | "none"
production(默认):生产环境,方便在线上发布后运行的。
development:开发环境,方便开发。
module.exports = {
  mode: 'production'
}
7.2 entry
Webpack打包的时候第一个分析的文件,它会指定打包⼊口⽂文件,有三种不同的形式:string | object | array
module.exports = {
  entry: './src/index.js'
}
如:做的不是单页面开发,而是多个页面(存在不同的入口),最后打包在一起,在入口页通过缓存跳转页面,因此就需要这种打包模式了。
module.exports = {
  entry: [
    './src/index1.js',
    './src/index2.js',
  ]
}
多页面打包多个,就可以不同页面切换了。
module.exports = {
  entry: {
    'index1': "./src/index1.js",
    'index2': "./src/index2.js"
  }
}
7.2.1 example06
test01\src\list.js
import bar2 from './bar2';

bar2();
test01\src\bar2.js
export default function bar2() {
    console.log('bar2');
}
test01\webpack.config.js
module.exports = {
    //配置项
    // entry: './src/index.js',    //设置入口
    mode: 'development',
    entry: {
        index: './src/index.js',
        list: './src/list.js'
    },
}
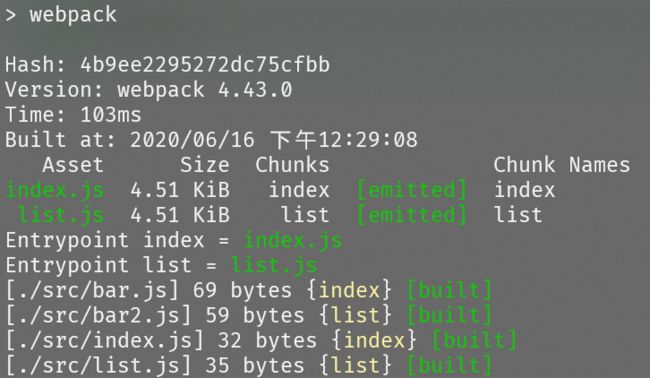
可删掉dist目录重新生成
npm start

参考:https://github.com/6xiaoDi/blog-Webpack/tree/a0.04
Branch: branch01commit description:a0.04(Webpack02案例example06——entry设置入口)
tag:a0.04
7.3 output
打包后的文件位置
module.exports = {
  ...,
  output: {
  		path: path.resolve(__dirname, "dist"),
    	filename: "bundle.js",
		filename: "[name].js"
	}
}
- 可以指定一个固定的文件名称(单出口文件设置一个filename即可),如果是多入口多出口(
entry为对象),则不能使用单文件出口,需要使用下面的方式 - 通过
webpack内置的变量占位符:[name]
7.3.1 example07
test01\webpack.config.js
const path = require('path');

module.exports = {
    //配置项
    // entry: './src/index.js',    //设置入口
    mode: 'development',
    entry: {
        index: './src/index.js',
        list: './src/list.js',
    },

    output: {
        // __dirname当前该文件所在目录(绝对路径)
        path: path.resolve(__dirname, "dist"),  // 需要path,需要引入
    },

}
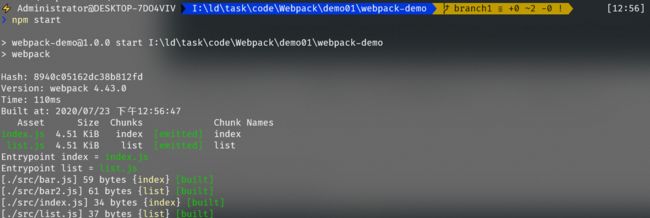
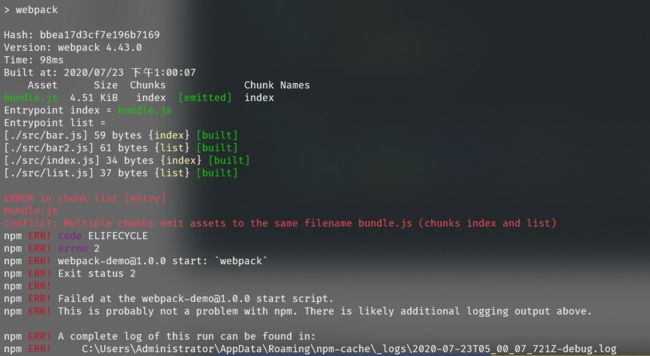
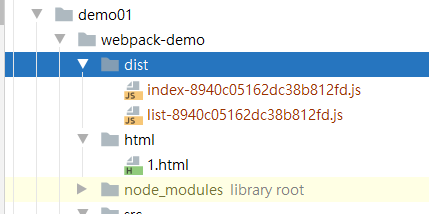
默认不设置filename,则输出文件为我们入口文件名(key值)定义。
如果配置多对多——多个入口、多打包文件,出口文件只配一个必然报错。
const path = require('path');

module.exports = {
    //配置项
    // entry: './src/index.js',    //设置入口
    mode: 'development',
    entry: {
        index: './src/index.js',
        list: './src/list.js',
    },

    output: {
        // __dirname当前该文件所在目录(绝对路径)
        path: path.resolve(__dirname, "dist"),  // 需要path,需要引入
        filename: "bundle.js",  //单文件出口的设置一个filename即可
        // filename: "[name].js"   // [name] 内置变量占位符(多出口),占位符默认就是key
    },

}
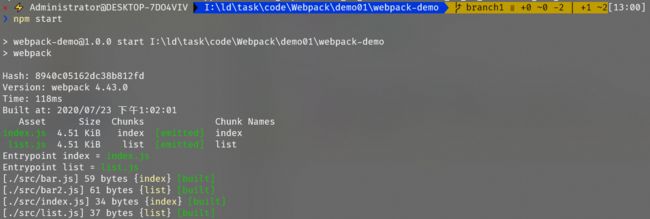
[name]内置变量占位符(多出口),占位符默认就是key,实际上不写也默认此种模式。
test01\webpack.config.js
const path = require('path');

module.exports = {
    //配置项
    // entry: './src/index.js',    //设置入口
    mode: 'development',
    entry: {
        index: './src/index.js',
        list: './src/list.js',
    },

    output: {
        // __dirname当前该文件所在目录(绝对路径)
        path: path.resolve(__dirname, "dist"),  // 需要path,需要引入
        // filename: "bundle.js",  //单文件出口的设置一个filename即可
        filename: "[name].js"   // [name] 内置变量占位符(多出口),占位符默认就是key
    },

}
详细可以看文档:
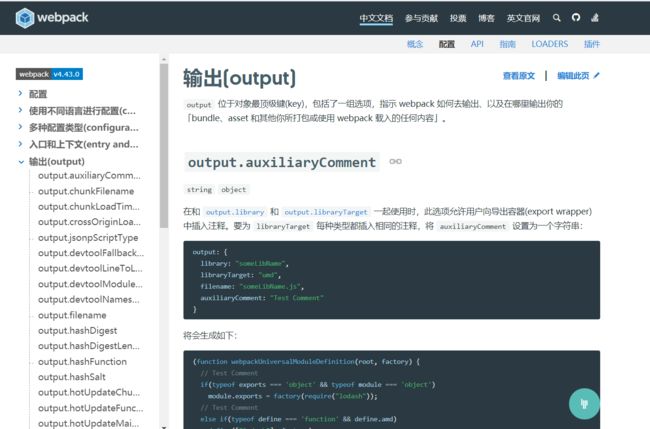
7.3.1.1 output.filename
string function
此选项决定了每个输出bundle 的名称。这些bundle将写入到 output.path 选项指定的目录下。
对于单个入口起点,filename 会是一个静态名称。
filename: "bundle.js"
然而,当通过多个入口起点(entry point)、代码拆分(code splitting)或各种插件(plugin)创建多个 bundle,应该使用以下一种替换方式,来赋予每个 bundle 一个唯一的名称……
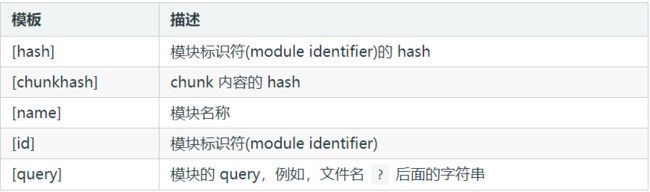
使用入口名称:
filename: "[name].bundle.js"
使用内部chunk id
filename: "[id].bundle.js"
使用每次构建过程中,唯一的hash生成
filename: "[name].[hash].bundle.js"
使用基于每个 chunk 内容的 hash:
filename: "[chunkhash].bundle.js"
请确保已阅读过指南 - 缓存的详细信息。这里涉及更多步骤,不仅仅是设置此选项。
注意此选项被称为文件名,但是你还是可以使用像 "js/[name]/bundle.js" 这样的文件夹结构。
注意,此选项不会影响那些「按需加载chunk」的输出文件。对于这些文件,请使用 output.chunkFilename 选项来控制输出。通过 loader 创建的文件也不受影响。在这种情况下,你必须尝试 loader 特定的可用选项。
可以使用以下替换模板字符串(通过 webpack内部的[TemplatedPathPlugin]TemplatedPathPlugin):
chunkhash:随机生成的hash值,不同的文件都会有,方便每次重新打包都会生成不同的文件名,即解决浏览器的加载缓存问题。
[hash] 和 [chunkhash] 的长度可以使用 [hash:16](默认为20)来指定。或者,通过指定output.hashDigestLength 在全局配置长度。
如果将这个选项设为一个函数,函数将返回一个包含上面表格中替换信息的对象。
在使用
ExtractTextWebpackPlugin时,可以用[contenthash]来获取提取文件的 hash(既不是[hash]也不是[chunkhash])。
7.3.1.1.1 example07-1
也可配合连体的模式配名称:[name]-[hash].js
const path = require('path');
module.exports = {
//配置项
// entry: './src/index.js', //设置入口
mode: 'development',
entry: {
index: './src/index.js',
list: './src/list.js',
},
output: {
// __dirname当前该文件所在目录(绝对路径)
path: path.resolve(__dirname, "dist"), // 需要path,需要引入
// filename: "bundle.js", //单文件出口的设置
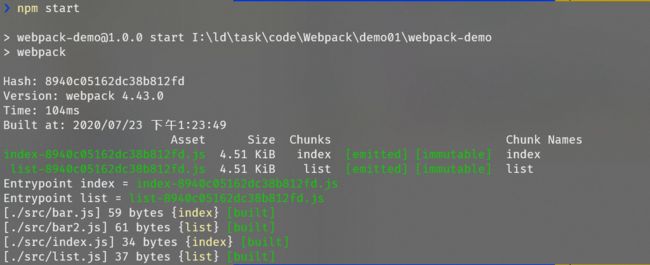
filename: "[name]-[hash].js" // [name] 内置变量占位符(多出口),占位符默认就是key
},
}

如果希望每次生成文件不一样,就用时间错,可以再重新生成看看:
const path = require('path');

module.exports = {
    //配置项
    // entry: './src/index.js',    //设置入口
    mode: 'development',
    entry: {
        index: './src/index.js',
        list: './src/list.js',
    },

    output: {
        // __dirname当前该文件所在目录(绝对路径)
        path: path.resolve(__dirname, "dist"),  // 需要path,需要引入
        // filename: "bundle.js",  //单文件出口的设置
        filename: `[name]+${Date.parse(new  Date())}.js`   // [name] 内置变量占位符(多出口),占位符默认就是key
    },

}
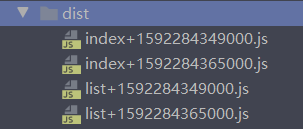
如果再次打包可以生成新的:
参考:https://github.com/6xiaoDi/blog-Webpack/tree/a0.06
Branch: branch01commit description:a0.06(Webpack02案例example07-1——output设置出口的多种模式)
tag:a0.06
8. 深入
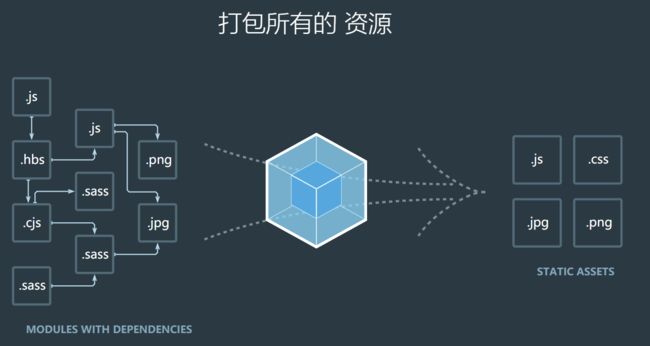
注意除了打包js,还有很多其他文件,这才是它的功能强大之处,其实就是它可对所有不同资源进行模块化打包,针对不同类型的文件,它有不同的打包方式(处理方式)。
在 webpack 中,有一个很重要的特性:模块不仅仅只是 js 的文件,webpack 可以把任意文件数据作为模块进行处理,包括:非 js 文本、css、图片等等
import txt from './a.txt';
console.log(txt);
但是 webpack 默认情况下只能处理 js 模块,如果需要处理其它类型的模块,则需要使用它提供的一些其它功能
如下例子:
8.1 example08
test01\src\data\csdn.txt
web开发
test01\src\txt-demo.js
import data from './data/csdn.txt';

console.log(data);
test01\html\txt-demo.html
<html lang="en">
<head>
    <meta charset="UTF-8">
    <title>Titletitle>
head>
<body>


<script src="../dist/txt-demo.js">script>
body>
html>
test01\webpack.config.js
const path = require('path');

module.exports = {
    //配置项
    // entry: './src/index.js',    //设置入口
    mode: 'development',
    entry: {
        // index: './src/index.js',
        // list: './src/list.js',

        'txt-demo': './src/txt-demo.js',
    },

    output: {
        // __dirname当前该文件所在目录(绝对路径)
        path: path.resolve(__dirname, "dist"),  // 需要path,需要引入
        // filename: "bundle.js",  //单文件出口的设置
        filename: `[name].js`   // [name] 内置变量占位符(多出口),占位符默认就是key
    },

}
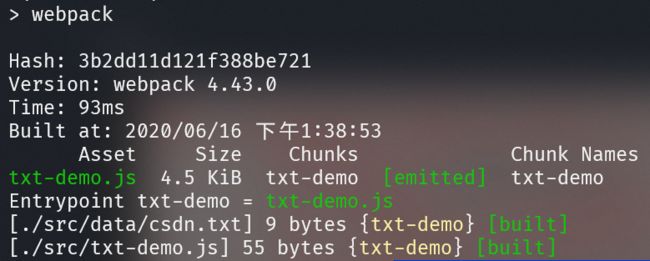
报错,默认情况下Webpack会把文件作为js进行加载,这就相当于把txt文件导入进来变成了js文件,即console.log(Web开发),这里就误认为是变量,就找不到这个变量。

怎样加载进来当成是字符串而不是js文件呢?针对非js文件,需要告诉Webpack做怎样的处理,这就是即将要学的Loaders(加载器)。
参考:https://github.com/6xiaoDi/blog-Webpack/tree/a0.07
Branch: branch01commit description:a0.07(Webpack02案例example08——打包引入txt文件,log文件内容报错)
tag:a0.07
8.2 执行简要流程
entry是入口,Webpack从入口开始分析,分析完成后,发现有import,则继续加载该依赖文件,加载完成后,默认情况下只能把文件当成js文件去处理,处理完后打包,最后输出。
如果要加载特殊资源,针对特殊资源进行处理的话,它提供了loaders接口,它可配置针对不同类型的文件的不同处理方式,因此它是webpack 中灰常核心的内容之一。
loaders并不属于webpack 本身的内容,它只是提供了loaders的处理接口,这里需要靠第三方(公司和个人)提供比较好用的loaders(和中间件差不多)。
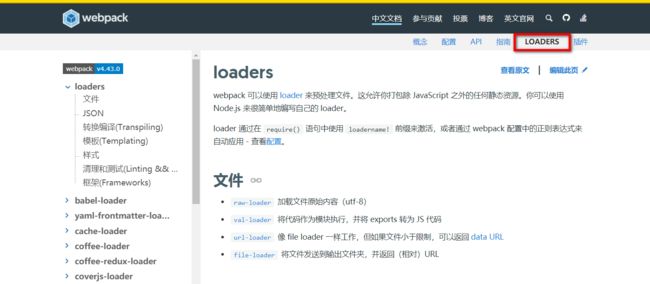
webpack可以使用 loader 来预处理文件。这允许你打包除JavaScript之外的任何静态资源。你可以使用Node.js来很简单地编写自己的 loader。
loader 通过在 require() 语句中使用 loadername! 前缀来激活,或者通过 webpack配置中的正则表达式来自动应用 - 查看配置。
loaders:webpack中灰常核心的内容之一,前面我们说的非 js 类型的模块处理就靠它了,不同类型的模块的解析就是依赖不同的loader来实现的plugins:webpack中另外一个核心的内容,它主要是扩展webpack本身的一些功能,它们会运行在各种模块解析完成以后的打包编译阶段,比如对解析后的模块文件进行压缩等
9. Loaders

https://webpack.js.org/loaders/
module.exports = {
  ...,
  module: {
  	rules:[
  		{
  			test:/\.xxx$/,
       	use:{
        	loader: 'xxx-load'
      	}
			}
  	]
	}
}
当 webpack 碰到不识别的模块的时候,webpack 会在配置的 module 中进行该文件解析规则的查找
rules就是我们为不同类型的文件定义的解析规则对应的 loader,它是一个数组- 每一种类型规则通过 test 选项来定义,通过正则进行匹配,通常我们会通过正则的方式来匹配文件后缀类型
use针对匹配到文件类型,调用对应的loader进行处理
从一个简单的案例来了解 loader
我是 txt 的内容
# 10. 我是 md 的内容
import txtData from './datas/data.txt';
import mdData from './datas/data.md';

console.log('txtData: ', txtData);
console.log('mdData: ', mdData);
默认情况下,webpack 会报错,因为 webpack 处理不了 txt 和 md 这样的非 js 的模块,但是我们可以通过专门来处理纯文本内容(不同的 loader 有不同的作用)
言归正传:用什么loader来解决将txt作为数据内容进行加载呢?raw-loader
raw-loader 加载文件原始内容(utf-8)
9.1 raw-loader

在 webpack 中通过 import 方式导入文件内容,loader 并不是 webpack 内置的,所以首先要安装
npm install --save-dev raw-loader
然后在 webpack.config.js 中进行配置
module.exports = {
  ...,
  module: {
      rules: [
      {
        test: /\.(txt|md)$/,
        use: 'raw-loader'
    	}
    ]
	}
}
9.1.1 example09
raw-loader使用。
9.1.1.1 example09-1
test01\webpack.config.js
const path = require('path');

module.exports = {
    //配置项
    // entry: './src/index.js',    //设置入口
    mode: 'development',
    entry: {
        // index: './src/index.js',
        // list: './src/list.js',

        'txt-demo': './src/txt-demo.js',
    },

    output: {
        // __dirname当前该文件所在目录(绝对路径)
        path: path.resolve(__dirname, "dist"),  // 需要path,需要引入
        // filename: "bundle.js",  //单文件出口的设置
        filename: `[name].js`   // [name] 内置变量占位符(多出口),占位符默认就是key
    },

    module: {

        rules: [

            // loader
            {
                // test:被加载的模块文件的特征,后缀
                test: /\.txt$/,
                // use:使用对应某种loader处理(即在打包之前针对此类型文件进行处理)
                use: 'raw-loader'
            }
        ]

    }

}
npm start

这时候运行就正常了。
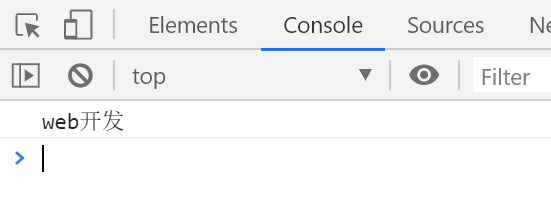
如果去浏览打包后的文件,就可以看到web开发转换为字符串做的处理。
"use strict";
eval("__webpack_require__.r(__webpack_exports__);\n/* harmony default export */ __webpack_exports__[\"default\"] = (\"web开发\");\n\n//# sourceURL=webpack:///./src/data/csdn.txt?");
参考:https://github.com/6xiaoDi/blog-Webpack/tree/a0.08
Branch: branch01commit description:a0.08(Webpack02案例example09-1——打包引入txt文件,解决log文件内容报错问题)
tag:a0.08
我们也可以看安装好的raw-loader的源码:
\webpack-demo\node_modules\raw-loader\dist\index.js
"use strict";

Object.defineProperty(exports, "__esModule", {
  value: true
});
exports.default = rawLoader;

var _loaderUtils = require("loader-utils");

var _schemaUtils = _interopRequireDefault(require("schema-utils"));

var _options = _interopRequireDefault(require("./options.json"));

function _interopRequireDefault(obj) { return obj && obj.__esModule ? obj : { default: obj }; }

function rawLoader(source) {
  const options = (0, _loaderUtils.getOptions)(this);
  (0, _schemaUtils.default)(_options.default, options, {
    name: 'Raw Loader',
    baseDataPath: 'options'
  });
  const json = JSON.stringify(source).replace(/\u2028/g, '\\u2028').replace(/\u2029/g, '\\u2029');
  const esModule = typeof options.esModule !== 'undefined' ? options.esModule : true;
  return `${esModule ? 'export default' : 'module.exports ='} ${json};`;
}
仔细看rawLoader函数,这个source参数,实际我们刚知道Webpack会根据入口进行分析,分析后去加载这个文件,加载完后会原封不动地往打包的文件里塞,但是有了loader以后,它会把加载进来的文件内容首先交给loader进行处理,如果加载的内容满足loader的条件,就会去调用loader低下的函数,source其实就是读出来的模块里的二进制代码,仔细看函数实际调用的JSON.stringify()方法用于将 JavaScript 值转换为 JSON字符串,大致了解即可,不用太过深究。
仔细再对照流程就非常清晰了,先加载入口文件,满足loader的条件,调用loader中的函数,如果有plugins(插件),是loader解析完再调用它,执行完后再输出。
9.1.1.2 example09-2
如markdown文件:
\test01\src\markdown-demo.js
import data from './data/csdn.md';
console.log(data);
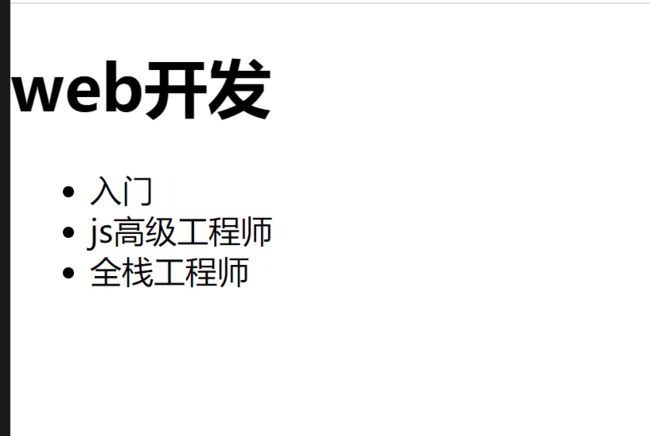
document.body.innerHTML = data;
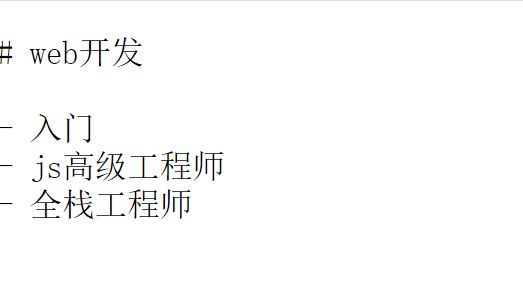
\test01\src\data\csdn.md
# 11. web开发

- 入门
- js高级工程师
- 全栈工程师
\test01\html\markdown-demo.html
<html lang="en">
<head>
    <meta charset="UTF-8">
    <title>Titletitle>
head>
<body>


<script src="../dist/markdown-demo.js">script>
body>
html>
\test01\webpack.config.js
const path = require('path');

module.exports = {
    //配置项
    // entry: './src/index.js',    //设置入口
    mode: 'development',
    entry: {
        // index: './src/index.js',
        // list: './src/list.js',

        'txt-demo': './src/txt-demo.js',
        'markdown-demo': './src/markdown-demo.js',
    },

    output: {
        // __dirname当前该文件所在目录(绝对路径)
        path: path.resolve(__dirname, "dist"),  // 需要path,需要引入
        // filename: "bundle.js",  //单文件出口的设置
        filename: `[name].js`   // [name] 内置变量占位符(多出口),占位符默认就是key
    },

    module: {

        rules: [

            // loader
            {
                // test:被加载的模块文件的特征,后缀
                test: /\.txt$/,
                // use:使用对应某种loader处理(即在打包之前针对此类型文件进行处理)
                use: 'raw-loader'
            },

            {
                test: /\.md$/,
                use: 'raw-loader'
            }
        ]

    }

}
这里只能当做字符。
但其实markdown最终是解析成html的,这才是我们想要看到的。
参考:https://github.com/6xiaoDi/blog-Webpack/tree/a0.09
Branch: branch01commit description:a0.09(Webpack02案例example09-2——打包引入markdown文件,raw-loader只能解析成字符串,但无法正常显示)
tag:a0.09
9.1.1.3 example09-3
我们在官网查看,我们发现在中文官网的markdown-loader无超链接,因此注意开发时要对照英文官方,中文官方很多超链接是没有的。
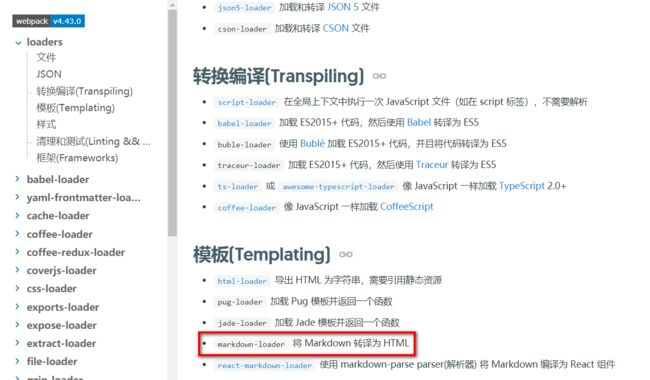
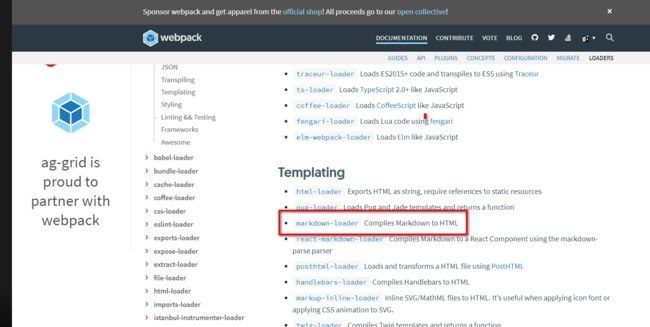
点进去跳转到github,就看到例子了。

npm install markdown-loader
多个loader可以使用数组或者对象, 执行顺序使,从右至左。
const path = require('path');

module.exports = {
    //配置项
    // entry: './src/index.js',    //设置入口
    mode: 'development',
    entry: {
        // index: './src/index.js',
        // list: './src/list.js',

        'txt-demo': './src/txt-demo.js',
        'markdown-demo': './src/markdown-demo.js'
    },

    output: {
        // __dirname当前该文件所在目录(绝对路径)
        path: path.resolve(__dirname, "dist"),  // 需要path,需要引入
        // filename: "bundle.js",  //单文件出口的设置
        filename: `[name].js`   // [name] 内置变量占位符(多出口),占位符默认就是key
    },

    module: {

        rules: [

            // loader
            {
                // test:被加载的模块文件的特征,后缀
                test: /\.txt$/,
                // use:使用对应某种loader处理(即在打包之前针对此类型文件进行处理)
                use: 'raw-loader'
            },

            {
                test: /\.md$/,
                // 多个loader可以使用数组或者对象
                // 执行顺序使,从右至左
                // use: 'raw-loader'
                use: 'markdown-loader'
            },
        ]

    }

}
npm start
报错:因为转换后变成html了,这时候需要html-loader,因此很多时候多个loader是需要配合着使用的,实际每个loader处理的事情都比较单一。
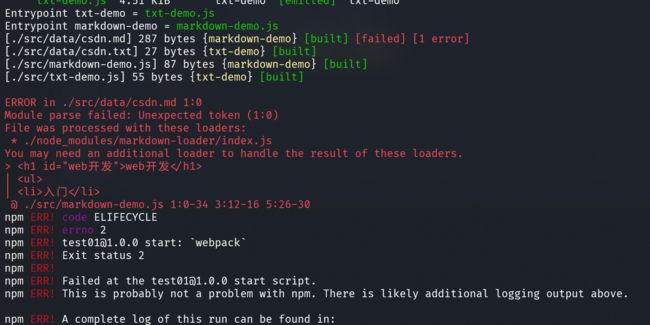
参考:https://github.com/6xiaoDi/blog-Webpack/tree/a0.10
Branch: branch01commit description:a0.10(Webpack02案例example09-3——打包引入markdown文件,markdown-loader解析成html,html无法解析报错)
tag:a0.10
9.1.1.4 example09-4
html-loader 导出 HTML为字符串,需要引用静态资源
用数组可以配多个loader,而且注意顺序是从后至前的。
多个loader可以使用数组或者对象, 执行顺序使,从右至左。
const path = require('path');

module.exports = {
    //配置项
    // entry: './src/index.js',    //设置入口
    mode: 'development',
    entry: {
        // index: './src/index.js',
        // list: './src/list.js',

        'txt-demo': './src/txt-demo.js',
        'markdown-demo': './src/markdown-demo.js'
    },

    output: {
        // __dirname当前该文件所在目录(绝对路径)
        path: path.resolve(__dirname, "dist"),  // 需要path,需要引入
        // filename: "bundle.js",  //单文件出口的设置
        filename: `[name].js`   // [name] 内置变量占位符(多出口),占位符默认就是key
    },

    module: {

        rules: [

            // loader
            {
                // test:被加载的模块文件的特征,后缀
                test: /\.txt$/,
                // use:使用对应某种loader处理(即在打包之前针对此类型文件进行处理)
                use: 'raw-loader'
            },

            {
                test: /\.md$/,
                // 多个loader可以使用数组或者对象
                // 执行顺序使,从右至左
                // use: 'raw-loader'
                // use: 'markdown-loader'
                use: ['html-loader','markdown-loader']
            }
        ]

    }

}
npm install html-loader
首先loader是先执行markdown的loader,转换成html字符串,而要显示到界面上就需要html的loader处理,最终显示在网页上。
参考:https://github.com/6xiaoDi/blog-Webpack/tree/a0.11
Branch: branch01commit description:a0.11(Webpack02案例example09-4——打包引入markdown文件,markdown-loader解析成html,再由html-loader解析)
tag:a0.11
9.2 file-loader
把识别出的资源模块(如:图片),我们并不是希望把资源当做文本输出,而只是想把它作为模块,帮我们识别模块并移动到指定的输出⽬目录,并且返回这个资源在输出目录的地址(字符串)。
npm install --save-dev file-loader
rules: [
  ...,
	{
		test: /\.(png|jpe?g|gif)$/,
    use: {
      loader: "file-loader",
      options: {
        // placeholder 占位符 [name] 源资源模块的名称
        // [ext] 源资源模块的后缀
        name: "[name]_[hash].[ext]",
        //打包后的存放位置
        outputPath: "./images"
        // 打包后文件的 url
        publicPath: './images',
      }
    }
	}
]
占位符:https://webpack.js.org/loaders/file-loader#placeholders
9.2.1example10
图片作为模块进行加载,我们只想把它作为文件去处理,而不去读它的内容。实际上打包后代码也需要引入图片,Webpack在这里实际只需要做复制粘贴,引入的图片路径对应上即可。
9.2.1.1 example10-1
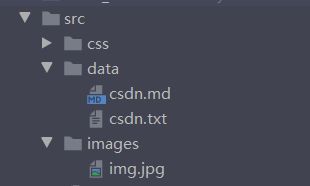
\test01\src\file-demo.js
import image from './images/img.jpg';

console.log(image);

let img = new Image();
img.src = image;
document.body.appendChild(img);
demo01\webpack-demo\webpack.config.js
const path = require('path');

module.exports = {
    //配置项
    // entry: './src/index.js',    //设置入口
    mode: 'development',
    entry: {
        // index: './src/index.js',
        // list: './src/list.js',

        'txt-demo': './src/txt-demo.js',
        'markdown-demo': './src/markdown-demo.js',
        'file-demo': './src/file-demo.js',
    },

    output: {
        // __dirname当前该文件所在目录(绝对路径)
        path: path.resolve(__dirname, "dist"),  // 需要path,需要引入
        // filename: "bundle.js",  //单文件出口的设置
        filename: "[name].js"   // [name] 内置变量占位符(多出口),占位符默认就是key
    },

    module: {

        rules: [

            // loader
            {
                // test:被加载的模块文件的特征,后缀
                test: /\.txt$/,
                // use:使用对应某种loader处理(即在打包之前针对此类型文件进行处理)
                use: 'raw-loader'
            },

            {
                test: /\.md$/,
                // 多个loader可以使用数组或者对象
                // 执行顺序使,从右至左
                // use: 'raw-loader'
                // use: 'markdown-loader'
                use: ['html-loader','markdown-loader']
            }
        ]

    }

}
引入img文件打包,配置默认报错了,模块编译失败,有未能处理/无法接受的字符,因为Webpack会把文件的二进制读出来,图片得二进制代码肯定不是js,必然无法识别,这时候它提示需要一些loader去处理这种文件类型,看到这种错误,就应该立马想到没有对应的loader,我们应该去手册里找了。
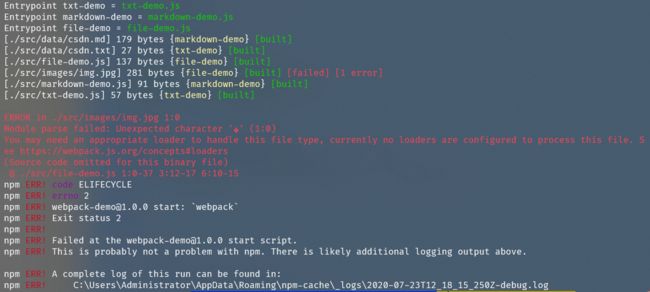
参考:https://github.com/6xiaoDi/blog-Webpack/tree/a0.12
Branch: branch01commit description:a0.12(Webpack02案例example10-1——打包引入img文件,识别不了报错)
tag:a0.12
9.2.1.2 example10-2
使用file-loader,先安装:
npm install --save-dev file-loader
\test01\html\file-demo.html
<html lang="en">
<head>
    <meta charset="UTF-8">
    <title>Titletitle>
head>
<body>


<script src="../dist/file-demo.js">script>
body>
html>
\test01\webpack.config.js
const path = require('path');

module.exports = {
    //配置项
    // entry: './src/index.js',    //设置入口
    mode: 'development',
    entry: {
        // index: './src/index.js',
        // list: './src/list.js',

        'txt-demo': './src/txt-demo.js',
        'markdown-demo': './src/markdown-demo.js',
        'file-demo': './src/file-demo.js',
    },

    output: {
        // __dirname当前该文件所在目录(绝对路径)
        path: path.resolve(__dirname, "dist"),  // 需要path,需要引入
        // filename: "bundle.js",  //单文件出口的设置
        filename: "[name].js"   // [name] 内置变量占位符(多出口),占位符默认就是key
    },

    module: {

        rules: [

            // loader
            {
                // test:被加载的模块文件的特征,后缀
                test: /\.txt$/,
                // use:使用对应某种loader处理(即在打包之前针对此类型文件进行处理)
                use: 'raw-loader'
            },

            {
                test: /\.md$/,
                // 多个loader可以使用数组或者对象
                // 执行顺序使,从右至左
                // use: 'raw-loader'
                // use: 'markdown-loader'
                use: ['html-loader','markdown-loader']
            },

            {
                test: /\.(png|jpe?g|gif)$/,
                // 用到options。use采用对象的形式
                use: {
                    loader: 'file-loader'
                }
            }
        ]

    }

}
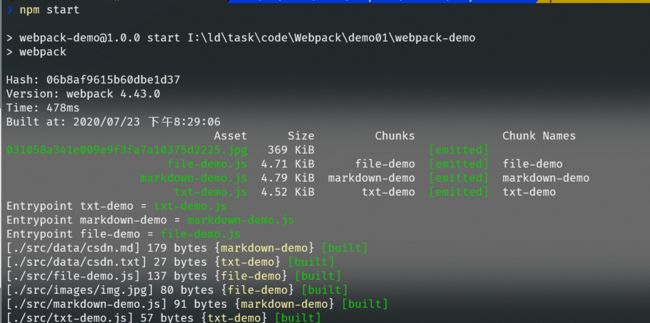
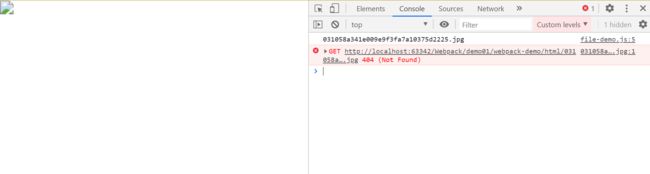
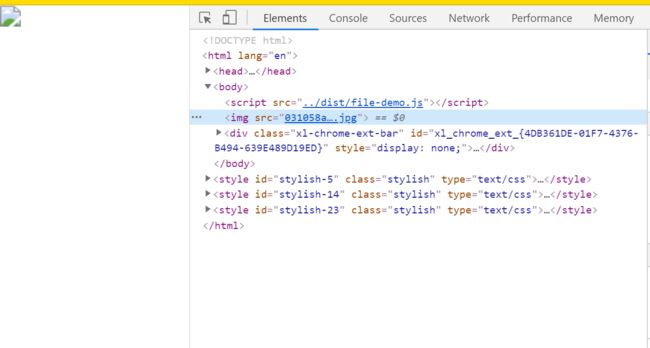
我们发现Webpack的确自动帮助我们加载图片了,但是我们不需要它处理图片得二进制数据,只需要把它原封不动地复制到dist目录就行了,它会根据文件生成一个对应文件名的hash赋给发布后的图片文件名称,这个时候也发现开发和发布后图片的相对路径就不再对应了,开发的时候image目录下,而发布后在根目录底下,因此引用的路径必然出错了,图片也必然加载不出来了。
实际上默认配置的话,移动文件默认是移动到dist跟目录下的。
所以我们打包的时候,需要根据实际情况,打包改写文件的移动地址,保持好原有引用的路径关系。
参考:https://github.com/6xiaoDi/blog-Webpack/tree/a0.13
Branch: branch01commit description:a0.13(Webpack02案例example10-2——打包引入img文件,使用fileolader由于路径问题图片加载失败)
tag:a0.13
9.2.1.3 example10-3
用到options,use采用对象的形式,第一个配置loader,怎么配置option我们具体看loader的使用说明!
如果不设置自定义位置会报错,并且看不到图片,很容易发现解析图片的地址是有问题的。
地址是文件在dist目录下的路径,默认返回的地址路径是针对于output目录而来的,但是针对当前file-demo.html的引用关系是有问题的,对于此路径是错误的。
我们在打包的时候,应该根据实际情况去改写当前文件的地址(引用的位置与图片资源的相对路径关系,即html文件与资源文件的相对关系),即用到选项中的publicPath(打包后的资源url路径),应该为../dist/+文件名。use配置多个属性的时候,这个时候就采用对象了,而不是字符串了。
\test01\webpack.config.js
const path = require('path');

module.exports = {
    //配置项
    // entry: './src/index.js',    //设置入口
    mode: 'development',
    entry: {
        // index: './src/index.js',
        // list: './src/list.js',

        'txt-demo': './src/txt-demo.js',
        'markdown-demo': './src/markdown-demo.js',
        'file-demo': './src/file-demo.js',
    },

    output: {
        // __dirname当前该文件所在目录(绝对路径)
        path: path.resolve(__dirname, "dist"),  // 需要path,需要引入
        // filename: "bundle.js",  //单文件出口的设置
        filename: `[name].js`   // [name] 内置变量占位符(多出口),占位符默认就是key
    },

    module: {

        rules: [

            // loader
            {
                // test:被加载的模块文件的特征,后缀
                test: /\.txt$/,
                // use:使用对应某种loader处理(即在打包之前针对此类型文件进行处理)
                use: 'raw-loader'
            },

            {
                test: /\.md$/,
                // 多个loader可以使用数组或者对象
                // 执行顺序使,从右至左
                // use: 'raw-loader'
                // use: 'markdown-loader'
                use: ['html-loader','markdown-loader']
            },

            {
                test: /\.(png|jpe?g|gif)$/,
                 use: {
                    loader: 'file-loader',
                    options: {
                        //为你的文件配置自定义 `public` 发布目录
                        publicPath: '../dist/'
                    }
                }
            }
        ]

    }

}
参考:https://github.com/6xiaoDi/blog-Webpack/tree/a0.14
Branch: branch01commit description:a0.14(Webpack02案例example10-3——打包引入img文件,使用fileolader由于路径问题图片加载失败,使用正确的引用路径)
tag:a0.14
file-loader说明
| 名称 | 类型 | 默认值 | 描述 |
|---|---|---|---|
name |
{String|Function} | [hash].[ext] | 为你的文件配置自定义文件名模板 |
context |
{String} | this.options.context | 配置自定义文件 context,默认为 webpack.config.js context |
publicPath |
{String|Function} | __webpack_public_path__ |
为你的文件配置自定义 public 发布目录 |
outputPath |
{String|Function} | ‘undefined’ | 为你的文件配置自定义 output 输出目录 |
useRelativePath |
{Boolean} | false | 如果你希望为每个文件生成一个相对 url 的 context 时,应该将其设置为 true |
emitFile |
{Boolean} | true | 默认情况下会生成文件,可以通过将此项设置为 false 来禁止(例如,使用了服务端的 packages) |
9.2.1.4 example10-4
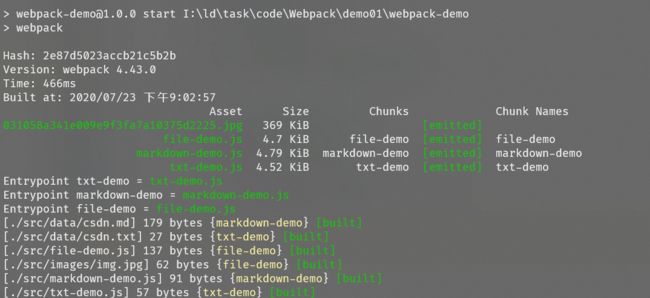
如果想把打包后的图片放在images里面呢?同样有另外一个配置是outputPath,这个其实就是打包后的文件输出的路径,默认情况下,它是根据dist来定的(相对于),即./images也就是dist下的images目录。
const path = require('path');

module.exports = {
    //配置项
    // entry: './src/index.js',    //设置入口
    mode: 'development',
    entry: {
        // index: './src/index.js',
        // list: './src/list.js',

        'txt-demo': './src/txt-demo.js',
        'markdown-demo': './src/markdown-demo.js',
        'file-demo': './src/file-demo.js',
    },

    output: {
        // __dirname当前该文件所在目录(绝对路径)
        path: path.resolve(__dirname, "dist"),  // 需要path,需要引入
        // filename: "bundle.js",  //单文件出口的设置
        filename: `[name].js`   // [name] 内置变量占位符(多出口),占位符默认就是key
    },

    module: {

        rules: [

            // loader
            {
                // test:被加载的模块文件的特征,后缀
                test: /\.txt$/,
                // use:使用对应某种loader处理(即在打包之前针对此类型文件进行处理)
                use: 'raw-loader'
            },

            {
                test: /\.md$/,
                // 多个loader可以使用数组或者对象
                // 执行顺序使,从右至左
                // use: 'raw-loader'
                // use: 'markdown-loader'
                use: ['html-loader','markdown-loader']
            },

            {
                test: /\.(png|jpe?g|gif)$/,
                // 用到options。use采用对象的形式,怎么配置我们具体看loader的使用说明,如下图
                use: {
                    loader: 'file-loader',
                    options: {
                        //打包后的存放位置
                        outputPath: "./images",
                        //为你的文件配置自定义资源url引用路径
                        publicPath: '../dist/images/'
                    }
                }
            }
        ]

    }

}

参考:https://github.com/6xiaoDi/blog-Webpack/tree/a0.15
Branch: branch01commit description:a0.15(Webpack02案例example10-4——打包引入img文件,使用fileolader配置自定义输出目录)
tag:a0.15
9.3 url-loader
可以处理理 file-loader 所有的事情,但是遇到图片格式的模块,可以选择性的把图片转成 base64 格式的字符串,并打包到 js 中,对⼩体积的图片⽐较合适,⼤图⽚不合适。其实它和url-loader很类似,只不过多了一个limit属性,小于 100 字节转成 base64 格式(编码),如果大于这个容量,还是会返给我们图片,与file-loader处理一致。一般情况下,url-loader用的较多,因为它具备file-loader的功能。
npm install --save-dev url-loader
rules: [
  ...,
	{
		test: /\.(png|jpe?g|gif)$/,
    use: {
      loader: "url-loader",
      options: {
        // placeholder 占位符 [name] 源资源模块的名称
        // [ext] 源资源模块的后缀
        name: "[name]_[hash].[ext]",
        //打包后的存放位置
        outputPath: "./images"
        // 打包后文件的 url
        publicPath: './images',
        // 小于 100 字节转成 base64 格式
        limit: 100
      }
    }
	}
]
9.4 css-loader
分析 css 模块之间的关系,并合成⼀个 css,主要处理css模块加载。
npm install --save-dev css-loader
下面配置其实就是是否当中模块进行处理,我们下例用默认形式即可。
rules: [
  ...,
	{
		test: /\.css$/,
    use: {
      loader: "css-loader",
      options: {
  			// 启用/禁用 url() 处理
  			url: true,
  			// 启用/禁用 @import 处理
  			import: true,
        // 启用/禁用 Sourcemap
        sourceMap: false
      }
    }
	}
]
9.4.1 example11
9.4.1.1 example11-1
先安装css-loader
npm install --save-dev css-loader
\test01\src\css\css.css
body {
    background: red;
}
\test01\src\css-demo.js
import data from './css/css.css';

console.log(data);
\test01\html\css-demo.html
<html lang="en">
<head>
    <meta charset="UTF-8">
    <title>Titletitle>
head>
<body>


<script src="../dist/css-demo.js">script>
body>
html>
\test01\webpack.config.js
const path = require('path');

module.exports = {
    //配置项
    // entry: './src/index.js',    //设置入口
    mode: 'development',
    entry: {
        // index: './src/index.js',
        // list: './src/list.js',

        'txt-demo': './src/txt-demo.js',
        'markdown-demo': './src/markdown-demo.js',
        'file-demo': './src/file-demo.js',
        'css-demo': './src/css-demo.js'
    },

    output: {
        // __dirname当前该文件所在目录(绝对路径)
        path: path.resolve(__dirname, "dist"),  // 需要path,需要引入
        // filename: "bundle.js",  //单文件出口的设置
        filename: `[name].js`   // [name] 内置变量占位符(多出口),占位符默认就是key
    },

    module: {

        rules: [

            // loader
            {
                // test:被加载的模块文件的特征,后缀
                test: /\.txt$/,
                // use:使用对应某种loader处理(即在打包之前针对此类型文件进行处理)
                use: 'raw-loader'
            },

            {
                test: /\.md$/,
                // 多个loader可以使用数组或者对象
                // 执行顺序使,从右至左
                // use: 'raw-loader'
                // use: 'markdown-loader'
                use: ['html-loader','markdown-loader']
            },

            {
                test: /\.(png|jpe?g|gif)$/,
                use: {
                    loader: 'file-loader',
                    options: {
                        //打包后的存放位置
                        outputPath: "./images",
                        publicPath: '../dist/images/'
                    }
                }
            },

            {
                test: /\.css$/,
                use: [
                    {
                        loader: 'css-loader'
                    }
                ]
            }

        ]

    }

}

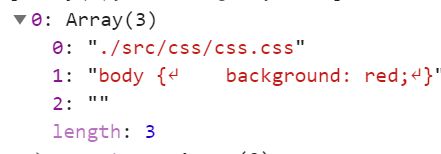
css-loader加载进来后,不是解析成css字符串了,而是解析成了一个数组,这个数组里有很多的引用,因为css有很多的引用关系,比如说import引入,在css中是@import。

数组的第0项,就是我们引用的css的地址,第1项是文件解析出来的内容,但是这个文件是没有转义过去的,因为css-loader并没有file-loader的功能,它仅仅是帮助我们解析css,解析完根据返给我们的数据,取出来,我们来玩一玩,看看下例。
参考:https://github.com/6xiaoDi/blog-Webpack/tree/a0.16
Branch: branch01commit description:a0.16(Webpack02案例example11-1——查看css-loader引入的数据)
tag:a0.16
9.4.1.2 example11-2
\test01\src\css-demo.js
import data from './css/css.css';

console.log(data);

let style = document.createElement('style');

style.innerHTML = data[0][1];

document.head.appendChild(style);
npm start
[外链图片转存失败,源站可能有防盗链机制,建议将图片保存下来直接上传(img-gmYJiHib-1595520939529)(https://cdn.jsdelivr.net/gh/6xiaoDi/blogpic/images/20200720_01/20200723215739.png)]


但是这样操作很麻烦,因此可以用style-loader
参考:https://github.com/6xiaoDi/blog-Webpack/tree/a0.17
Branch: branch01commit description:a0.17(Webpack02案例example11-2——查看css-loader的使用)
tag:a0.17
9.5 style-loader
把 css-loader 生成的内容,用 style 标签挂载到⻚面的 head 中。
先用css-loader解析,然后再调用style-loader帮助我们生成上面麻烦的代码。
npm install --save-dev style-loader
rules: [
  ...,
	{
		test: /\.css$/,
    use: ["style-loader", "css-loader"]
	}
]
同一个任务的 loader 可以同时挂载多个,处理顺序为:从右到左,也就是先通过 css-loader 处理,然后把处理后的 css 字符串交给 style-loader 进行处理。
rules: [
  ...,
	{
		test: /\.css$/,
    use: [
  		{
  			loader: 'style-loader',
  			options: {}
  		},
      'css-loader'
		]
	}
]
9.5.1 example12
\test01\src\css-demo.js
import './css/css.css';
use中可以配置数组,数组放一个个对象或者字符串。
\test01\webpack.config.js
const path = require('path');

module.exports = {
    //配置项
    // entry: './src/index.js',    //设置入口
    mode: 'development',
    entry: {
        // index: './src/index.js',
        // list: './src/list.js',

        'txt-demo': './src/txt-demo.js',
        'markdown-demo': './src/markdown-demo.js',
        'file-demo': './src/file-demo.js',
        'css-demo': './src/css-demo.js'
    },

    output: {
        // __dirname当前该文件所在目录(绝对路径)
        path: path.resolve(__dirname, "dist"),  // 需要path,需要引入
        // filename: "bundle.js",  //单文件出口的设置
        filename: `[name].js`   // [name] 内置变量占位符(多出口),占位符默认就是key
    },

    module: {

        rules: [

            // loader
            {
                // test:被加载的模块文件的特征,后缀
                test: /\.txt$/,
                // use:使用对应某种loader处理(即在打包之前针对此类型文件进行处理)
                use: 'raw-loader'
            },

            {
                test: /\.md$/,
                // 多个loader可以使用数组或者对象
                // 执行顺序使,从右至左
                // use: 'raw-loader'
                // use: 'markdown-loader'
                use: ['html-loader','markdown-loader']
            },

            {
                test: /\.(png|jpe?g|gif)$/,
                use: {
                    loader: 'file-loader',
                    options: {
                        //打包后的存放位置
                        outputPath: "./images",
                        publicPath: '../dist/images/'
                    }
                }
            },

            {
                test: /\.css$/,
                use: [
                    {
                        loader: 'style-loader'
                    },
                    {
                        loader: 'css-loader'
                    }
                ]
            }

        ]

    }

}
npm start
style-loader会自动帮助我们处理,不用再写那些麻烦的代码了,只需要import就行了。

参考:https://github.com/6xiaoDi/blog-Webpack/tree/a0.18
Branch: branch01
commit description:a0.18(Webpack02案例example12——css-loader配合style-loader使用)
tag:a0.18
9.6 sass-loader
把 sass 语法转换成 css ,依赖 node-sass 模块
npm install --save-dev sass-loader node-sass
但是开发大多数情况是将css单独写在一些文件里,通过link标签去引用,发布的时候移动过去即可了,这里涉及到Plugins(插件)的学习,后面我再总结。
(后续待补充)