Zabbix4.0 使用记录
安装遇到的问题,特此记录一下
1.准备工作
1.1 关闭防火墙
systemctl stop firewalld.service
systemctl disable firewalld.service(永久关闭)
systemctl status firewalld.service (查看状态)
1.2 关闭SELinux
修改配置文件 /etc/selinux/config
sudo vim /etc/selinux/config# This file controls the state of SELinux on the system.# SELINUX= can take one of these three values:# enforcing - SELinux security policy is enforced.# permissive - SELinux prints warnings instead of enforcing.# disabled - No SELinux policy is loaded.SELINUX=disabled# SELINUXTYPE= can take one of these two values:# targeted - Targeted processes are protected,# mls - Multi Level Security protection.SELINUXTYPE=targeted
1.3 重启服务器
sudo reboot
2.生产环境安装
2.1 配置zabbix yum 仓库
wget https://mirrors.aliyun.com/zabbix/zabbix/4.0/rhel/7/x86_64/zabbix-release-4.0-1.el7.noarch.rpm
rpm -ivh zabbix-release-4.0-1.el7.noarch.rpm
2.2 修改zabbix.repo
换成了阿里云的镜像
vi /etc/yum.repos.d/zabbix.repo
[zabbix]
name=Zabbix Official Repository - $basearch
baseurl=https://mirrors.aliyun.com/zabbix/zabbix/4.0/rhel/7/$basearch/
enabled=1
gpgcheck=1
gpgkey=file:///etc/pki/rpm-gpg/RPM-GPG-KEY-ZABBIX-A14FE591[zabbix-non-supported]
name=Zabbix Official Repository non-supported - $basearch
baseurl=http://repo.zabbix.com/non-supported/rhel/7/$basearch/
enabled=1
gpgkey=file:///etc/pki/rpm-gpg/RPM-GPG-KEY-ZABBIX
gpgcheck=1
2.3 安装zabbix 服务器和zabbix-web 前端
yum install -y zabbix-server-mysql zabbix-web-server
可能会提示:
--> Finished Dependency Resolution
Error: Package: php-mysql-5.4.16-42.el7.x86_64 (base)
Requires: libmysqlclient.so.18()(64bit)
Error: Package: zabbix-server-mysql-4.0.22-1.el7.x86_64 (zabbix)
Requires: libmysqlclient.so.18()(64bit)
Error: Package: php-mysql-5.4.16-42.el7.x86_64 (base)
Requires: libmysqlclient.so.18(libmysqlclient_18)(64bit)
Error: Package: zabbix-web-4.0.22-1.el7.noarch (zabbix)
Requires: php-mbstring
Error: Package: zabbix-server-mysql-4.0.22-1.el7.x86_64 (zabbix)
Requires: libmysqlclient.so.18(libmysqlclient_18)(64bit)
Error: Package: zabbix-web-4.0.22-1.el7.noarch (zabbix)
Requires: php-bcmath
You could try using --skip-broken to work around the problem
You could try running: rpm -Va --nofiles --nodigest
2.4 更新一下 yum源
前提是根据你系统的版本下载合适的repo文件
查看版本的方式
cat /etc/system-release
---》Red Hat Enterprise Linux Server release 7.4 (Maipo)
下载
curl -o /etc/yum.repos.d/CentOS-Base.repo http://mirrors.aliyun.com/repo/Centos-7.repo
修改, 将阿里云镜像设置为镜像源
文件中有两个变量,分别是 $releasever 和 $basearch
$releasever
表示当前系统的发行版本,也就是第一步查到的版本,
通过sed命令进行替换:
sed -i 's/$releasever/7/g' CentOS-Base.repo
注:根据你的版本将7替换即可。
$basearch
是我们的系统硬件架构(CPU指令集),就是我们常说的i386\i486\i586\i686\...
通过命令arch可以查看:
# arch
---》x86_64
然后根据查询结果将$basearch进行替换
sed -i 's/$basearch/x86_64/g' CentOS-Base.repo
2.5 重新运行 2.3的命令
yum install -y zabbix-server-mysql zabbix-web-server
如果还提升 上述问题,安装rpm
wget https://mirrors.tuna.tsinghua.edu.cn/mysql/yum/mysql-5.7-community-el7-x86_64/mysql-community-libs-compat-5.7.19-1.el7.x86_64.rpm
rpm -ivh mysql-community-libs-compat-5.7.19-1.el7.x86_64.rpm
注:MySQL版本要一致 或者升级到 5.7.19-1.el7.x86_64
2.6 安装Mariadb 数据库 创建zabbix 库
yum install -y mariadb
yum install -y mariadb-server
mysql_secure_installation
然后 回车
n
一路y
2.7 登录Mysql
mysql> create database zabbix default character set utf8 collate utf8_bin;
mysql> use zabbix;
2.8导入zabbix表结构和初始数据
zcat /usr/share/doc/zabbix-server-mysql*/create.sql.gz | mysql -u用户名 -p密码 zabbix
查询导入的数据是否成功
mysql > show tables;
3.配置
3.1 配置server
vi /etc/zabbix/zabbix_server.confDBHost=localhost
DBName=zabbix (和上面创建的数据库名保持一致)
DBUser=数据库用户名
DBPassword=数据库密码
3.2 启动server
systemctl start zabbix-server
systemctl enable zabbix-server
3.3 部署httpd
sudo yum install -y httpd
修改httpd 配置文件
vi /etc/httpd/conf.d/zabbix.conf
php_value date.timezone Asia/Shanghai (改为此项)
启动Zabbix-Web (httpd) 服务
systemctl start httpd / service httpd start
systemctl enable httpd
4.登录Zabbix
浏览器: http://ip地址/zabbix (默认80端口,不用输)
1.Next step --》2.检查配置 Next Step --》 3.配置数据库 Next Step
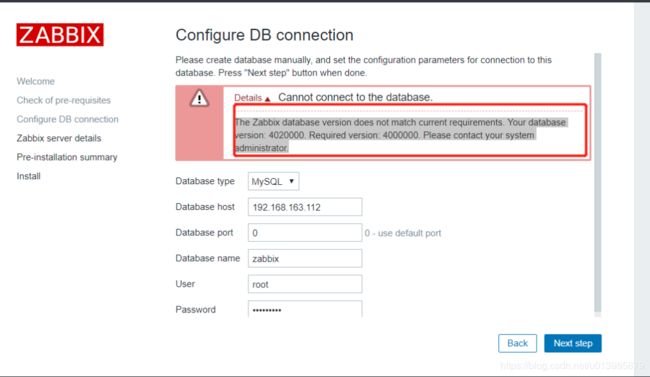
此时可能会提示:
问题原因 :当前数据库版本与所需数据库版本不一致;
解决方法:
登录数据库,修改数据库版本的mandatory值至4000000
mysql> use zabbix;
mysql> select version();
mysql> update dbversion set mandatory = 4000000;
mysql> select version();
--》4.配置 zabbix-server Next Step --》5.Install 下载配置文件,并上传到指定路径 --》
6.登录 用户名:Admin / 密码 : zabbix
5.配置zabbix-agent
5.1 安装
rpm -ivh https://mirror.tuna.tsinghua.edu.cn/zabbix/zabbix/4.0/rhel/7/x86_64/zabbix-agent-4.0.11-1.el7.x86_64.rpm
5.2 修改配置文件
vim /etc/zabbix/zabbix_agentd.conf
Server= server主机地址
# ServerActive=127.0.0.1# Hostname=Zabbix server
5.3 启动
systemctl start zabbix-agent
systemctl enable zabbix-agent
开机自启命令
sudo chkconfig --add zabbix-server
sudo chkconfig zabbix-server on
-----------------------------------------------
sudo chkconfig -add zabbix-agent
sudo chkconfig zabbix-agent on
效果图:
注意事项:
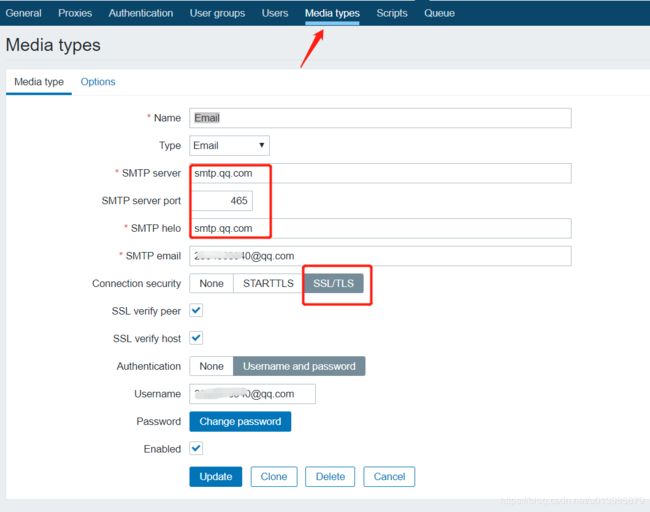
邮箱发件人信息填写位置和事项:smtp.qq.com + 465 + SSL + 授权码
邮箱收件地址 填写位置:
模板 最后 和Action 关联


