《一个图像复原实例入门深度学习&TensorFlow—第八篇》使用GPU加速
使用GPU加速:win7 配置tensorflow-gpu1.9.0 CUDA9.0 cudnn7.2.1
1. 什么是CPU、GPU、CUDA、CUDA Toolkit、cudnn、tensorflow-gpu?
1.1 CPU和GPU
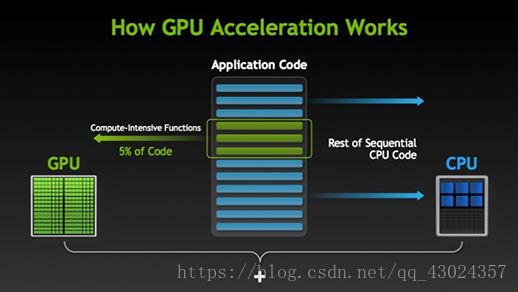
GPU:是图像处理单元(Graphics Processing Unit),如果说CPU是电脑的心脏那么GPU就是我们常说的显卡的心脏,CPU决定了电脑的档次和大部分性能,GPU决定了该显卡的档次和大部分性能。**CPU擅长逻辑控制,串行的运算,GPU擅长大规模并发计算。**下面这个视频可以让你更好的理解CPU和GPU:
https://v.youku.com/v_show/id_XNjY3MTY4NjAw.html
你可能会想,CPU太菜了吧!NO,CPU可强了,GPU的行为基本上是靠CPU调动的,GPU就是并行处理能力强大,但是CPU很多功能GPU都没有。 比如指令流水化, 多进程管理之类的。 GPU没有多少自主处理指令的能力, 基本是指令靠CPU计算靠GPU。GPU工作原理是CPU处理指令,遇到需要GPU的地方(比如图像渲染),则会在显存中开辟一个小空间,然后把这个任务分成很多小任务给GPU来并行的计算。
GPU的工作大部分就是这样,计算量大,但没什么技术含量,而且要重复很多很多次。就像你有个工作需要算几亿次一百以内加减乘除一样,最好的办法就是雇上几十个小学生一起算,一人算一部分,反正这些计算也没什么技术含量,纯粹体力活而已。而CPU就像老教授,积分微分都会算,就是工资高,一个老教授资顶二十个小学生,你要是富士康你雇哪个?GPU就是这样,用很多简单的计算单元去完成大量的计算任务,纯粹的人海战术。这种策略基于一个前提,就是小学生A和小学生B的工作没有什么依赖性,是互相独立的。很多涉及到大量计算的问题基本都有这种特性,比如你说的破解密码,挖矿和很多图形学的计算。这些计算可以分解为多个相同的简单小任务,每个任务就可以分给一个小学生去做。但还有一些任务涉及到“流”的问题。比如你去相亲,双方看着顺眼才能继续发展。总不能你这边还没见面呢,那边找人把证都给领了。这种比较复杂的问题都是CPU来做的。总而言之,CPU和GPU因为最初用来处理的任务就不同,所以设计上有不小的区别。而某些任务和GPU最初用来解决的问题比较相似,所以用GPU来算了。GPU的运算速度取决于雇了多少小学生,CPU的运算速度取决于请了多么厉害的教授。教授处理复杂任务的能力是碾压小学生的,但是对于没那么复杂的任务,还是顶不住人多。当然现在的GPU也能做一些稍微复杂的工作了,相当于升级成初中生高中生的水平。但还需要CPU来把数据喂到嘴边才能开始干活,究竟还是靠CPU来管的。
出处:https://www.cnblogs.com/chakyu/p/7405186.html
1.2 CUDA、CUDA Toolkit、cudnn、tensorflow-gpu
GPU一开始是用于处理图像数据的,而图像的变换显示需要大量的矩阵操作,出于这一特点,NVIDIA(英伟达)的研究者们发现GPU稍作改动就可以快速处理很多科学计算的问题,于是就出现了CUDA(Compute Unified Device Architecture,统一计算设备架构)这一编程模型,目的是在应用程序中充分利用CPU和GPU各自的优点,用于图像计算以外的目的。传统的GPU架构需要按一个标准的流水线编程,要经过vertex processor,fragment processor和pixel operation,这会使编程变得困难和不容易控制。早期的GPGPU(General Purpose Computing on GPU通用计算为目的的GPU)也需要按照那样的标准的流水线编程,对于我们来说CUDA的出现,才标志着真正意义上GPU通用计算的到来!CUDA使用 C 语言为基础,可以直接以大多数人熟悉的 C 语言,写出在显示芯片上执行的程序,而不需要去学习特定的显示芯片的指令或是特殊的结构。
不行啊,能不能友好一点,我们做深度学习的,不想过多的关注环境配置的问题,你既然是个加速工具,直接让我下载下来用不就行了吗?于是就出现了CUDA Toolkit,cudnn,tensorflow-gpu。CUDA Toolkit是为创建高性能GPU加速器应用程序提供开发环境的工具包。cuDNN(CUDA Deep Neural Network library),是NVIDIA打造的针对深度神经网络的加速库(同样的GPU、同样的框架(CUDA)、同样的网络、同样的数据,有cudnn运行会更快,相当于可以自动优化深度学习算法)。tensorflow-gpu,是Google深度学习框架tensorflow的gpu版本,Google与NVIDIA合作,gpu版的tensorflow可以方便的使用GPU进行计算加速,中间的大部分繁琐的配置过程由CUDA Toolkit,cudnn完成。特别的,对于单个使用单个GPU加速的情况,我们只需下载安装,CUDA Toolkit,cudnn,tensorflow-gpu,然后我们的程序不做任何改动就可以直接完成由GPU加速运行!
- 特别说明:CUDA
Toolkit,cudnn都是NVIDIA开发的用于实现使用NVIDIA自己的GPU的计算加速,如果你的显卡不是NVIDIA系列的或者你的NVIDIA显卡太破了(许多CUDA程序都需要显卡中的GPU至少搭载256
MB显存),那么CUDA Toolkit,cudnn将毫无用处(巧妇难为无米之炊)。 查看显卡型号:任务管理器->显示适配器
查看你显卡是否支持CUDA:https://developer.nvidia.com/cuda-gpus

找到你的显卡类型,点进去,如果你的显卡型号在里面,那么恭喜你,你的硬件符合要求!
2. 配置tensorflow-gpu1.9.0,CUDA Toolkit9.0,cudnn7.2.1
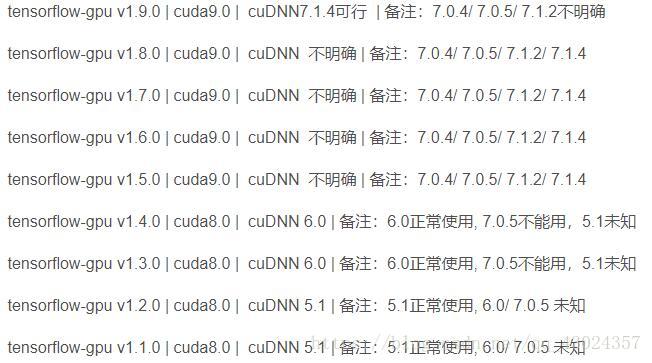
版本兼容关系参考这里:
windows tensorflow-gpu1.9.0,CUDA Toolkit9.0,cudnn7.2.1 亲测可行。
当tensorflow-gpu,CUDA Toolkit,cudnn版本不匹配时:可能出现下列错误:
tensorflow-gpu1.9.0 + CUDA Toolkit9.2
ImportError: libcublas.so.9.0: cannot open shared objectfile: No such file or directory
(提示你安装CUDA9.0)
tensorflow-gpu1.9.0 + CUDA Toolkit9.0
ImportError: libcudnn.so.7: cannot open shared objectfile: No such file or directory
(提示你安装cudnn7)
tensorflow-gpu1.9.0 + CUDA Toolkit9.0+ cudnn7.2.1
Hello tensorflow!
(成功)
2.1 配置 tensorflow-gpu1.9.0
目前tensorflow-gpu版本最新为1.9.0,在现有情况下选择配置最新的:配置tensorflow-gpu1.9.0,CUDA Toolkit9.0,cudnn7.2.1。之前我们配置的环境TensorFlow中安装的包(conda install tensorflow) 默认安装的是CPU版本的,所以我们现在重新创建一个环境吧:
打开Anaconda prompt -> conda create TensorFlow-gpu -> activate TensorFlow-gpu=1.9.0 -> conda install tensorflow-gpu
其他需要的包也需要在这个环境中配置一遍(conda install spyder numpy pandas pillow matplotlib jupyter…)
这样tensorflow-gpu1.9.0就安装好了
2.2 配置 CUDA Toolkit9.0
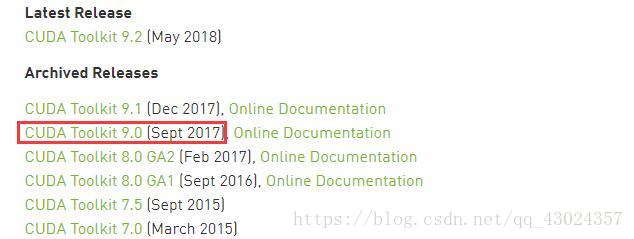
下载地址:https://developer.nvidia.com/cuda-toolkit-archive

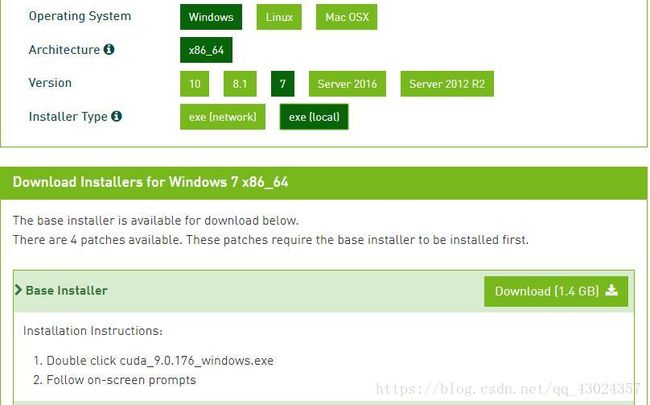
选择对应操作系系统下载对应版本:

下载好安装包之后,按照这个教程完成安装:https://www.cnblogs.com/fanfzj/p/8521728.html
安装好之后,会在 C:\Program Files\NVIDIA GPU Computing Toolkit\CUDA\v9.0 这个路径下生成bin、include、lib等多个文件夹。
这里特别说明一下环境变量配置的问题:
安装完毕后,系统中自动添加了CUDA_CUDA_PATH和CUDA_PATH_V9_0两个环境变量,然后须手动配置以下环境变量:
CUDA_SDK_PATH = C:\ProgramData\NVIDIA Coporation\CUDA Samples\v9.0
CUDA_LIB_PATH = %CUDA_PATH%\lib\x64
CUDA_BIN_PATH = %CUDA_PATH%\bin
CUDA_SDK_BIN_PATH = %CUDA_SDK_PATH%\bin\x64
CUDA_SDK_LIB_PATH = %CUDA_SDK_PATH%\common\lib\x64
最后还要在系统变量PATH的末尾添加:
;%CUDA_LIB_PATH%;%CUDA_BIN_PATH%;%CUDA_SDK_BIN_PATH%;%CUDA_SDK_LIB_PATH%;
2.3 配置 cudnn7.2.1
官网下载需要注册,直接在我这里下载吧:链接: https://pan.baidu.com/s/1LRFzBE6rFhGC2m4Saa3-JA 密码: qh2v
下载好后得到:
![]()
解压得到:

然后将bin、include、lib三个文件夹中的文件拷贝到C:\Program Files\NVIDIA GPU Computing Toolkit\CUDA\v9.0 路径中的bin、include、lib三个文件夹中就完成啦。
2.4 测试是否安装成功
打开Spyder(TensorFlow-gpu),然后输入下面的代码:
import tensorflow as tf
a = tf.constant('Hello TensorFlow!')
with tf.Session() as sess:
	print(sess.run(a))
3. 检验加速效果
折腾完环境配置之后,我们就来见识一下GPU加速计算的厉害,我们直接把之前的代码在Spyder(TensorFlow-gpu)中运行,这里我们只使用了单个GPU加速(多个GPU集群的情况我们以后再慢慢介绍),在我的电脑上(原本需要45min的程序,现在只需要9分钟左右)测试代码如下:(如果你刚刚看到这篇博客,直接用下面的代码运行肯定是不行的,因为你没有准备好数据嘛,有兴趣的话可以翻看之前的博客,关于数据的获取与准备都有详细的说明)
import tensorflow as tf
import numpy as np
import matplotlib.pyplot as plt
from PIL import Image
import os
import time

time_start=time.time() # time.time()为1970.1.1到当前时间的毫秒数
train_image_path = 'E:\\MNIST_data\\train_images\\'                # 输入图像的路径
train_label_path = 'E:\\MNIST_data\\train_labels\\'                # 输出图像的路径
Train_TFRecord_path = 'E:\\MNIST_data\\tfrecord\\train_data_set.tfrecord'# 输出TFRecord文件的路径

test_image_path = 'E:\\MNIST_data\\test_images\\'                # 输入图像的路径
test_label_path = 'E:\\MNIST_data\\test_labels\\'                # 输出图像的路径
Test_TFRecord_path = 'E:\\MNIST_data\\tfrecord\\test_data_set.tfrecord'# 输出TFRecord文件的路径

img_W = 28      # 图像宽度
img_H = 28      # 图像高度
batch_size = 10 # 每个mini-batch含有的样本数量
min_after_dequeue = 1000 # 队列中最少文件数量
capacity = min_after_dequeue + 3*batch_size # 队列中最多文件数量

def _bytes_feature(value): # 生成字符串型的属性,用于存储图片像素信息,根据自己问题的要求选择要存的属性
     return tf.train.Feature(bytes_list=tf.train.BytesList(value=[value]))

# 将image_path和label_path中的图片一一对应封装在TFRecord_path中
def generate_TFRecordfile(image_path,label_path,TFRecord_path):
    images = []
    labels = []
    for file in os.listdir(image_path):
        images.append(image_path+file) # 得到所有转置图像的文件名
    for file in os.listdir(label_path):
        labels.append(label_path+file) # 得到所有未转置图像的文件名
    num_examples = len(images)         # 统计有多少用于训练的图片
    print('There are %d images\n'%(num_examples))

    writer = tf.python_io.TFRecordWriter(TFRecord_path) #创建一个writer写TFRecord文件
    for index in range(num_examples):
        image = Image.open(images[index]) # 打开一个image
        image = image.tobytes()           # 转换为字符型格式(因为之前生成的也是字符串型的属性嘛)
        label = Image.open(labels[index]) # 打开一个对应的label
        label = label.tobytes()           # 转换为字符型格式(因为之前生成的也是字符串型的属性嘛)
        #将一个样例转换为Example Protocol Buffer的格式,并且一组数据的信息都写入这个数据结构中,(打包咯)
        example = tf.train.Example(features=tf.train.Features(feature={
            'image':_bytes_feature(image),
            'label':_bytes_feature(label)}))
        writer.write(example.SerializeToString())#将这个example 写入TFRecord文件
    print('TFRecord file was generated successfully\n')
    writer.close()

def get_batch(TFRecord_path):
    reader = tf.TFRecordReader() # 创建一个reader来读取TFRecord文件中的样例
    files = tf.train.match_filenames_once(TFRecord_path) # 获取文件列表
    # 创建文件名队列,乱序,每个样本使用num_epochs次
    filename_queue = tf.train.string_input_producer(files,shuffle = True,num_epochs = None)

    # 读取并解析一个样本
    _,example = reader.read(filename_queue)
    features = tf.parse_single_example(
        example,
        features={
            'image':tf.FixedLenFeature([],tf.string),
            'label':tf.FixedLenFeature([],tf.string)})

    # 使用tf.decode_raw将字符串解析成图像对应的像素数组 ()
    images = tf.decode_raw(features['image'],tf.uint8)
    labels = tf.decode_raw(features['label'],tf.uint8)

    # 所得像素数组为shape为((img_W*img_H),),应该reshape
    images = tf.reshape(images, shape=[img_W,img_H])
    labels = tf.reshape(labels, shape=[img_W,img_H])

    #在这里添加图像预处理函数(optional)

    #使用tf.train.shuffle_batch来随机组合数据生成用于随机梯度下降的mini-batch
    Image_Batch,Label_Batch = tf.train.shuffle_batch([images,labels],
                                             batch_size = batch_size,
                                             num_threads = 5,
                                             min_after_dequeue = min_after_dequeue,
                                             capacity = capacity)
    return Image_Batch,Label_Batch

    # 定义权重的函数
def weight_variable(shape):
    initial = tf.truncated_normal(shape, stddev=0.1) # 从截断的正态分布中输出随机值μ-2σ,μ+2σ
    return tf.Variable(initial)
    # 定义偏置的函数
def bias_variable(shape):
    initial = tf.constant(0.1, shape=shape)
    return tf.Variable(initial)
    # 定义卷积层的函数
def conv2d(x, W):
    return tf.nn.conv2d(x, W, strides=[1, 1, 1, 1], padding='SAME')
    # 定义池化层的函数
def max_pool_2x2(x):
    return tf.nn.max_pool(x, ksize=[1, 2, 2, 1],
                            strides=[1, 2, 2, 1], padding='SAME')
print('please wait for generating the TFRecord file of training sets...')
generate_TFRecordfile(train_image_path,train_label_path,Train_TFRecord_path) # 生成训练集的TFRecord文件
print('please wait for generating the TFRecord file of test sets...')
generate_TFRecordfile(test_image_path,test_label_path,Test_TFRecord_path)    # 生成测试集的TFRecord文件

Train_Images_Batch,Train_Labels_Batch = get_batch(Train_TFRecord_path)   # 多线程读取训练集的TFRecord文件生成mini-batch
Test_Images_Batch,Test_Labels_Batch = get_batch(Test_TFRecord_path)      # 多线程读取测试集的TFRecord文件生成mini-batch

# 定义将mini-batch导入网络的占位符
x = tf.placeholder(tf.float32, shape=[None,img_W,img_H,1],name = 'images')
y_label = tf.placeholder(tf.float32, shape=[None,img_W,img_H,1],name = 'labels')
# 第一卷积层
W_conv1 = weight_variable([5, 5, 1, 32])
b_conv1 = bias_variable([32])
h_conv1 = tf.nn.relu(conv2d(x, W_conv1) + b_conv1)
# 第一池化层
h_pool1 = max_pool_2x2(h_conv1)
# 第二卷积层
W_conv2 = weight_variable([5, 5, 32, 64])
b_conv2 = bias_variable([64])
h_conv2 = tf.nn.relu(conv2d(h_pool1, W_conv2) + b_conv2)
# 第二池化层
h_pool2 = max_pool_2x2(h_conv2)
# 上采样层1
W_de_conv1 = W_conv2
h_de_conv1 = tf.nn.conv2d_transpose(h_pool2,W_de_conv1,output_shape=[batch_size, 14, 14, 32],strides=[1,2,2,1],padding="SAME")
# 上采样层2
W_de_conv2 = W_conv1
h_de_conv2 = tf.nn.conv2d_transpose(h_de_conv1,W_de_conv2,output_shape=[batch_size, 28, 28, 1],strides=[1,2,2,1],padding="SAME")
# 网络输出的结果
y_conv = h_de_conv2

loss = tf.reduce_mean(tf.square(y_conv - y_label))     # 定义代价函数为均方误差
train_op = tf.train.AdamOptimizer(1e-4).minimize(loss) # 使用高级优化算法对参数进行寻优

init_op = (tf.local_variables_initializer(),tf.global_variables_initializer())#初始化操作
with tf.Session() as sess:
    sess.run(init_op)
    coord = tf.train.Coordinator() # 用于协调多个线程同时终止
    threads = tf.train.start_queue_runners(sess=sess,coord=coord) # 启动线程
    try:
        for step in range(100000):# 训练10万步
            if coord.should_stop(): # 读到结束标记后coord.should_stop()变为True,跳出循环
                break
            train_images_batch,train_labels_batch = sess.run([Train_Images_Batch,Train_Labels_Batch])

            train_images_batch = np.reshape(train_images_batch,[batch_size,img_W,img_H,1]) # 一个样本为行
            train_labels_batch = np.reshape(train_labels_batch,[batch_size,img_W,img_H,1])

            sess.run(train_op,feed_dict={x:train_images_batch,y_label:train_labels_batch})  # 将mini-batch feed给train_op 训练网络

            if step%100 == 0: # 每过100步输出网络训练集和测试集上的损失函数
                test_images_batch,test_labels_batch = sess.run([Test_Images_Batch,Test_Labels_Batch])
                test_images_batch = np.reshape(test_images_batch,[batch_size,img_W,img_H,1]) # 一个样本为行
                test_labels_batch = np.reshape(test_labels_batch,[batch_size,img_W,img_H,1])

                train_loss = sess.run(loss,feed_dict={x:train_images_batch,y_label:train_labels_batch})
                test_loss = sess.run(loss,feed_dict={x:test_images_batch,y_label:test_labels_batch})
                print('step %d: loss on training set batch:%d  loss on testing set batch:%d' % (step,train_loss,test_loss))

        test_images_batch,test_labels_batch = sess.run([Test_Images_Batch,Test_Labels_Batch])
        test_images_batch = np.reshape(test_images_batch,[batch_size,img_W,img_H,1]) # 一个样本为行
        test_labels_batch = np.reshape(test_labels_batch,[batch_size,img_W,img_H,1])

        y_pred = sess.run(y_conv,feed_dict={x:test_images_batch})
        #画个图
        input_img = test_images_batch[0,:,:,:] # 取一个mini-batch(10张)中的一张出来看看
        output_img = y_pred[0,:,:,:]
        output_img[output_img<0] = 0
        label = test_labels_batch[0,:,:,:]
        input_img = np.reshape(input_img,[28,28])
        output_img = np.reshape(output_img,[28,28])
        label = np.reshape(label,[28,28])
        input_img = Image.fromarray(input_img.astype('uint8')).convert('L')
        output_img = Image.fromarray(output_img.astype('uint8')).convert('L')
        label = Image.fromarray(label.astype('uint8')).convert('L')
        plt.imshow(input_img)
        plt.show()
        plt.imshow(output_img)
        plt.show()
        plt.imshow(label)
        plt.show()
    except tf.errors.OutOfRangeError: # 捕捉文件名队列中的结束标记
        print('epoch limit reached')
        coord.request_stop() #通知其它线程停止读取数据
    finally:
        coord.request_stop()
        coord.join(threads) #等待所有线程退出
time_end=time.time() # time.time()为1970.1.1到当前时间的毫秒数
print('Total run time is : %f s' %(time_end-time_start))

