产品优势:
1.快速集成SDK,简单易用的控制台和API
2.提供用户自定义的标签和别名系统,以及极光自己根据数据分析出的分类目标
3.支持10亿级的高并发访问,多点备份保证系统稳定
4.有专业的技术支持团队,及时响应客户的需求和问题
_CLAY_.png
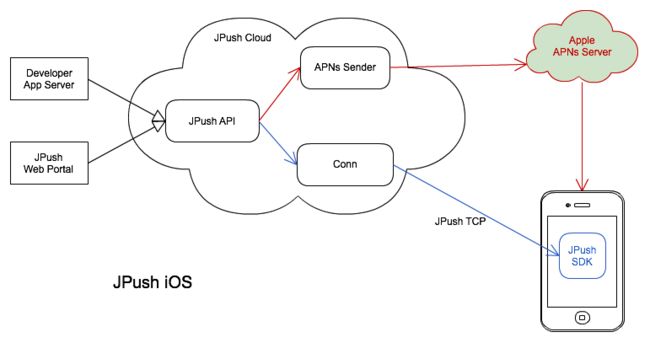
APNs通知与应用内消息对比
- 啰嗦一下大家不要介意
| APNS | 应用内消息 | |
|---|---|---|
| 推送原则 | 由JPush服务器发送至APNS服务器,再下发到手机。 | 由JPush直接下发,每次推送都会尝试发送,如果用户在线则立即收到。否则保存为离线。 |
| 离线消息 | 离线消息由APNS服务器缓存按照Apple的逻辑处理。 | 用户不在线JPush server 会保存离线消息,时长默认保留一天。离线消息保留5条。 |
| 推送与证书环境 | 应用证书和推送指定的iOS环境匹配才可以收到。 | 自定义消息与APNS证书环境无关。 |
| 接收方式 | 应用退出,后台以及打开状态都能收到APNS | 需要应用打开,与JPush 建立连接才能收到。 |
| 展示效果 | 如果应用后台或退出,会有系统的APNS提醒 如果应用处于打开状态,则不展示 | 非APNS,默认不展示。可通过获取接口自行编码处理。 |
| 处理函数 | Apple提供的接口:didReceiveRemoteNotification | JPush提供的接口:networkDidReceiveMessage |
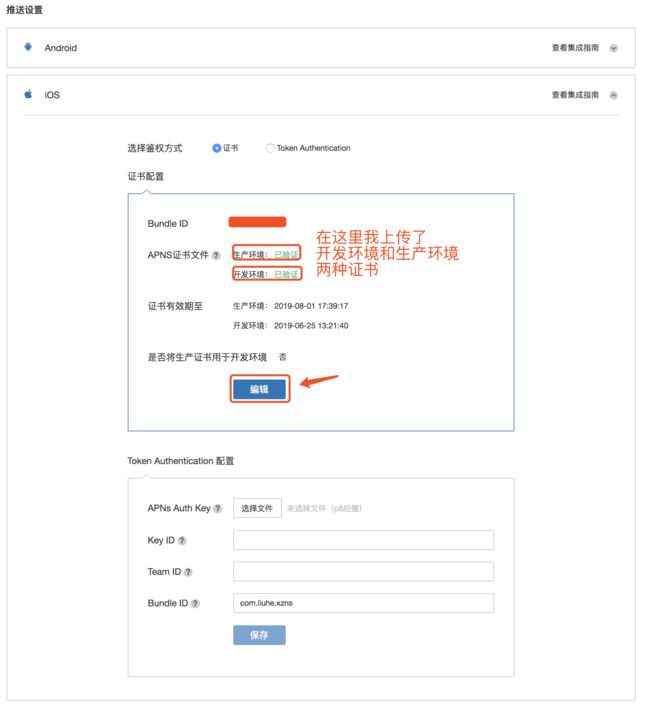
iOS SDK 集成指南
首先在JPush的后台可以创建我们的应用,然后上传证书.至于上传Appkey和bundle ID 就不细说了,有疑问可以参考另一篇文章.
_CLAY_.png
导入SDK
我是通过Cocoapods导入的SDK
- pod 'JPush'
- pod 'JPush', '3.0.2' -- >如果需要安装指定版本则使用此方式(以3.0.2版本为例)
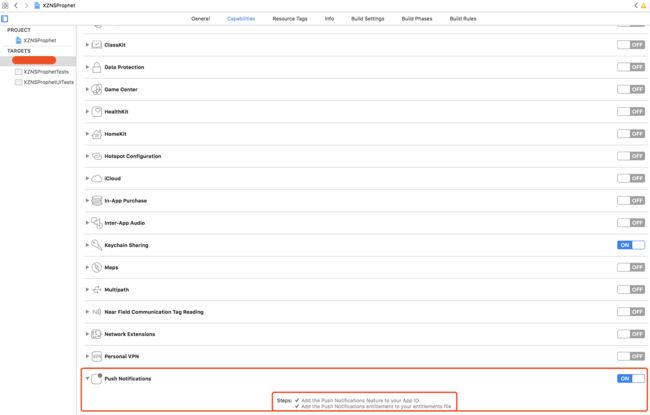
Build Settings
_CLAY_.png
添加初始化APNs代码
- 添加到 -(BOOL)application:(UIApplication *)application didFinishLaunchingWithOptions:(NSDictionary *)launchOptions
JPUSHRegisterEntity * entity = [[JPUSHRegisterEntity alloc] init];
    entity.types = JPAuthorizationOptionAlert|JPAuthorizationOptionBadge|JPAuthorizationOptionSound;
    [JPUSHService registerForRemoteNotificationConfig:entity delegate:self];

    [JPUSHService setupWithOption:launchOptions appKey:appKey//这里填写AppKey
                          channel:channel//推送的目标我写的是@"App Store"
                 apsForProduction:isProduction//我写的FALSE
            advertisingIdentifier:nil];
    [JPUSHService registrationIDCompletionHandler:^(int resCode, NSString *registrationID) {
        if(resCode == 0){
            NSLog(@"registrationID获取成功:%@",registrationID);
            //在这里我将registrationID通知给后台服务端
        } else{
            NSLog(@"registrationID获取失败,code:%d",resCode);
        }
    }];
- 设置别名
[JPUSHService getAlias:^(NSInteger iResCode, NSString *iAlias, NSInteger seq) {
        //首先我检查了别名是否已经被设置
        if (iResCode != 0 && StringIsEmpty(iAlias)) {//如果没有设置别名我在以UUID设置别名
            [JPUSHService setAlias:[[[NSUUID UUID] UUIDString] stringByReplacingOccurrencesOfString:@"-" withString:@""] completion:^(NSInteger iResCode, NSString *iAlias, NSInteger seq) {
                NSLog(@"%ld",(long)iResCode);//返回设置别名的状态
                NSLog(@"%@",iAlias);//返回所设置的别名
            } seq:1];
        }
    } seq:1];
- 设置标签
[JPUSHService setTags:[NSSet setWithObject:[NSString stringWithFormat:@"V%@",[[[NSBundle mainBundle] infoDictionary] objectForKey:@"CFBundleShortVersionString"]]] completion:^(NSInteger iResCode, NSSet *iTags, NSInteger seq) {
        NSLog(@"%@",iTags);
        NSLog(@"%ld",(long)iResCode);
        [JPUSHService getAllTags:^(NSInteger iResCode, NSSet *iTags, NSInteger seq) {
            NSLog(@"%@",iTags);
        } seq:1];
    } seq:1];
- 推送设置的回调
- (void)application:(UIApplication *)application
didRegisterForRemoteNotificationsWithDeviceToken:(NSData *)deviceToken {
    NSLog(@"%@", [NSString stringWithFormat:@"Device Token: %@", deviceToken]);
    [JPUSHService registerDeviceToken:deviceToken];
}

- (void)application:(UIApplication *)application
didFailToRegisterForRemoteNotificationsWithError:(NSError *)error {
    NSLog(@"did Fail To Register For Remote Notifications With Error: %@", error);
}
- 接收推送消息的处理 前台接收
- (void)jpushNotificationCenter:(UNUserNotificationCenter *)center willPresentNotification:(UNNotification *)notification withCompletionHandler:(void (^)(NSInteger))completionHandler  API_AVAILABLE(ios(10.0)){
    NSDictionary * userInfo = notification.request.content.userInfo;

    UNNotificationRequest *request = notification.request; // 收到推送的请求
    UNNotificationContent *content = request.content; // 收到推送的消息内容

    NSNumber *badge = content.badge;  // 推送消息的角标
    NSString *body = content.body;    // 推送消息体
    UNNotificationSound *sound = content.sound;  // 推送消息的声音
    NSString *subtitle = content.subtitle;  // 推送消息的副标题
    NSString *title = content.title;  // 推送消息的标题

    [JPUSHService setBadge:(int)content.badge];

    [UIApplication sharedApplication].applicationIconBadgeNumber = (int)content.badge;

    if([notification.request.trigger isKindOfClass:[UNPushNotificationTrigger class]] && !StringIsEmpty([XZNS_USER_DEFAULT objectForKey:@"ucid"])) {
        [JPUSHService handleRemoteNotification:userInfo];
        NSLog(@"iOS10 前台收到远程通知:%@", [self logDic:userInfo]);

        _userInfo = userInfo;
        [JPUSHService resetBadge];

        [UIApplication sharedApplication].applicationIconBadgeNumber = 0;//设置推送角标数量为0

        //在这里添加了弹出框提示用户,有新消息.(UIAlertView)

    } else {
        // 判断为本地通知
        NSLog(@"iOS10 前台收到本地通知:{\nbody:%@,\ntitle:%@,\nsubtitle:%@,\nbadge:%@,\nsound:%@,\nuserInfo:%@\n}",body,title,subtitle,badge,sound,userInfo);
    }
    //    completionHandler(UNNotificationPresentationOptionBadge|UNNotificationPresentationOptionSound|UNNotificationPresentationOptionAlert); // 需要执行这个方法,选择是否提醒用户,有Badge、Sound、Alert三种类型可以设置
    completionHandler(UNNotificationPresentationOptionSound);
}
- 接收推送消息的处理 后台接收
- (void)jpushNotificationCenter:(UNUserNotificationCenter *)center didReceiveNotificationResponse:(UNNotificationResponse *)response withCompletionHandler:(void (^)(void))completionHandler  API_AVAILABLE(ios(10.0)){

    NSDictionary * userInfo = response.notification.request.content.userInfo;
    UNNotificationRequest *request = response.notification.request; // 收到推送的请求
    UNNotificationContent *content = request.content; // 收到推送的消息内容

    NSNumber *badge = content.badge;  // 推送消息的角标
    NSString *body = content.body;    // 推送消息体
    UNNotificationSound *sound = content.sound;  // 推送消息的声音
    NSString *subtitle = content.subtitle;  // 推送消息的副标题
    NSString *title = content.title;  // 推送消息的标题

    [JPUSHService setBadge:(int)content.badge];

    [UIApplication sharedApplication].applicationIconBadgeNumber = (int)content.badge;

    if([response.notification.request.trigger isKindOfClass:[UNPushNotificationTrigger class]]) {
        [JPUSHService handleRemoteNotification:userInfo];
        NSLog(@"iOS10 收到远程通知:%@", [self logDic:userInfo]);
        //在这里我去判断页面需要的跳转
    }
    else {
        // 判断为本地通知
        NSLog(@"iOS10 收到本地通知:{\nbody:%@,\ntitle:%@,\nsubtitle:%@,\nbadge:%@,\nsound:%@,\nuserInfo:%@\n}",body,title,subtitle,badge,sound,userInfo);
    }
    completionHandler();  // 系统要求执行这个方法
}
收到推送的消息我们可以获得极光推送后台返给我们的参数,需要处理的除了消息内容之外,还需要我们处理的有推送消息的角标(badge)
[JPUSHService setBadge:(int)content.badge];//告诉极光服务器角标的个数
[UIApplication sharedApplication].applicationIconBadgeNumber = (int)content.badge;//这里是APP显示的角标个数需要我们自己处理

[JPUSHService resetBadge];//因为我们的APP还没有做消息中心,所以当APP启用的时候直接将角标清空.
[UIApplication sharedApplication].applicationIconBadgeNumber = 0;//设置推送角标数量为0
以上就是添加和处理极光推送的方法
下面的方法是我自己在做页面跳转的时候写的,技术有限就先记录在这里了
- (void)jumpToControllerWith:(NSDictionary *)userInfoDic {

    UIViewController *rootViewController = [UIApplication sharedApplication].keyWindow.rootViewController;
    UIViewController *currentVC = [self getCurrentVCFrom:rootViewController];//首先获取当前所在的控制器
    //在这里已经获取了当前所在页面的Controller,然后就可以跳转到所需要跳转的页面了
    if (xxx) {//在这里我判断出了所需要跳转的页面
        UIViewController *selfController = [[UIViewController alloc] init];
        [currentVC.navigationController pushViewController:selfController animated:YES];
    }
}

- (UIViewController *)getCurrentVCFrom:(UIViewController *)rootVC {
    UIViewController *currentVC;
    if ([rootVC presentedViewController]) {
        // 视图是被presented出来的
        rootVC = [rootVC presentedViewController];
    }
    if ([rootVC isKindOfClass:[UITabBarController class]]) {
        // 根视图为UITabBarController
        currentVC = [self getCurrentVCFrom:[(UITabBarController *)rootVC selectedViewController]];
    } else if ([rootVC isKindOfClass:[UINavigationController class]]){
        // 根视图为UINavigationController
        currentVC = [self getCurrentVCFrom:[(UINavigationController *)rootVC visibleViewController]];
    } else {
        // 根视图为非导航类
        currentVC = rootVC;
    }
    return currentVC;
}