功能:
通过高德地图SDK实现定位、返回地理位置经纬度坐标、关键字检索及周边检索功能。
使用步骤:
一、链接AMap库
参考:https://reactnative.cn/docs/0.50/linking-libraries-ios.html#content
手动添加:
1、添加react-native-amap-zmt插件到你工程的node_modules文件夹下
2、添加AMap库中的.xcodeproj文件在你的工程中
3、点击你的主工程文件,选择 Build Phases,然后把刚才所添加进去的.xcodeproj下的Products文件夹中的静态库文件(.a文件),拖到Link Binary With Libraries组内。
自动添加:
$ npm install react-native-amap-zmt --save
或
$ yarn add react-native-amap-zmt

$ react-native link
二、开发环境配置
参考:http://lbs.amap.com/api/ios-location-sdk/guide/create-project/manual-configuration
1、引入地图库
在TARGETS->Build Phases-> Link Binary With Libaries中点击“+”按钮,在弹出的窗口中点击“Add Other”按钮,选择AMap插件目录下的 MAMapKit.framework、AMapFoundationKit.framework、AMapSearchKit.framework 文件添加到工程中。
选择Build Settings,搜索Search Paths,然后添加库所在的目录$(SRCROOT)/../node_modules/react-native-amap-zmt/ios/AMap。
2、引入资源文件
需要引入的资源文件包括:AMap.bundle,其中:AMap.bundle 在 MAMapKit.framework的Resources文件夹下,AMap.bundle资源文件中存储了定位、默认大头针标注视图等图片,可利用这些资源图片进行开发。
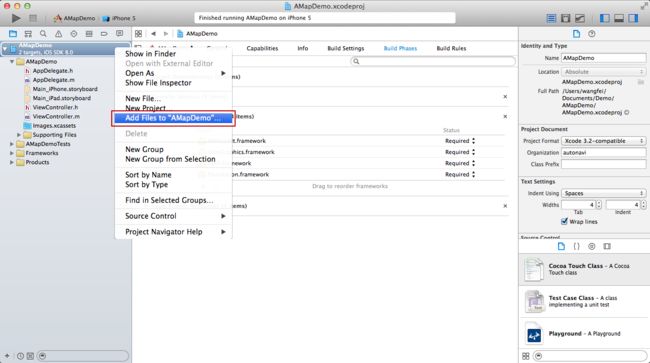
左侧目录中选中工程名,在右键菜单中选择Add Files to“工程名”…,从MAMapKit.framework->Resources文件中选择AMap.bundle文件,并勾选“Copy items if needed”复选框,单击“Add”按钮,将资源文件添加到工程中。
注意:2D地图和3D地图的资源文件是不同的,在进行SDK切换时,需要同时更换对应的资源文件。
3、引入系统库
左侧目录中选中工程名,在TARGETS->Build Phases-> Link Binary With Libaries中点击“+”按钮,在弹出的窗口中查找并选择所需的库(见下表),单击“Add”按钮,将库文件添加到工程中。
- JavaScriptcore.framework
- SystemConfiguration.framework
- CoreTelephony.framework
- CoreLocation.framework
- libz.tbd
- libc++.tbd
- libstdc++.6.0.9.tbd
- Security.framework
三、配置plist文件
1、修改数据访问安全
iOS9为了增强数据访问安全,将所有的http请求都改为了https,为了能够在iOS9中正常使用地图SDK,请在"Info.plist"中进行如下配置,否则影响SDK的使用。
NSAppTransportSecurity

    NSAllowsArbitraryLoads
2、开启定位
iOS 8 - iOS 10 版本:
NSLocationWhenInUseUsageDescription表示应用在前台的时候可以搜到更新的位置信息。
NSLocationAlwaysUsageDescription申请Always权限,以便应用在前台和后台(suspend 或terminated)都可以获取到更新的位置数据。
iOS 11 版本:
NSLocationAlwaysAndWhenInUseUsageDescription申请Always权限,以便应用在前台和后台(suspend或terminated)都可以获取到更新的位置数据(NSLocationWhenInUseUsageDescription也必须有)。
如果需要同时支持在iOS8-iOS10和iOS11系统上后台定位,建议在plist文件中同时添加NSLocationWhenInUseUsageDescription、NSLocationAlwaysUsageDescription和NSLocationAlwaysAndWhenInUseUsageDescription权限申请。
四、简单使用
属性
| Prop | Type | Default | Note |
|---|---|---|---|
| AMapKey | string | null | apiKey |
| showTraffic | bool | false | 是否显示实时路况 |
| showsCompass | bool | true | 是否显示指南针 |
| zoomEnabled | bool | true | 缩放手势的开启和关闭 |
| scrollEnabled | bool | true | 拖动的开启和关闭 |
| GeoName | string | null | 地理编码查询名称 |
| KeywordsCity | string | null | 关键字检索城市,和关键字检索名称配合使用 |
| KeywordsName | string | null | 关键字检索名称,和关键字检索城市配合使用 |
| AroundName | string | null | 周边检索名称 |
方法
| Event Name | Returns | Notes |
|---|---|---|
| onGetLocation | event | 获取当前位置信息 |
| onGeocodeSearch | event | 地理编码查询结果回调 |
| onKeywordsSearch | event | 关键字检索结果回调 |
| onAroundSearch | event | 周边检索结果回调 |
//index.ios.js
import React, { Component } from 'react';
import Map from 'react-native-amap-zmt';
import {
AppRegistry,
StyleSheet,
Text,
View,
Dimensions,
AlertIOS,
TextInput,
} from 'react-native';
export default class MapView extends Component {
constructor(){
super();
this.state={
latitude: 0,
longitude: 0,
title:'',
subtitle:'',
message:'',
GeoName:'',
KeywordsCity:'',
KeywordsName:'',
AroundName:'',
}
}
//获取当前位置信息
_onGetLocation(event){
this.setState({
latitude: event['latitude'],
longitude: event['longitude'],
title:event['title'],
subtitle:event['subtitle'],
message:event['message'],
});
}
_onGeocodeSearch(event){
AlertIOS.alert(event['message'])
}
_onSubmitEditing(event) {
this.setState({
GeoName:'北京久其软件',
// AroundName:'肯德基',
// KeywordsName:event.nativeEvent.text,
// KeywordsCity:'北京',
});
}
_onChangeText(text) {
}
render() {
return (
{'纬度='+this.state.latitude}
{'经度='+this.state.longitude}
{'title='+this.state.title}
{'subtitle='+this.state.subtitle}
{'结果='+this.state.message}
);
}
}
const styles = StyleSheet.create({
container: {
flex: 1,
justifyContent: 'center',
alignItems: 'center',
backgroundColor: '#F5FCFF',
},
map: {
marginTop:10,
height:400,
width:Dimensions.get('window').width - 20,
},
search: {
width:Dimensions.get('window').width - 20,
height: 35,
borderWidth: 1,
borderColor: '#ccc',
borderRadius:3,
fontSize:15
}
});
效果展示
github链接:
https://github.com/zhoumeitong/react-native-amap-zmt


