Vulkan教程翻译之十五 创建Graphics Pipeline
原文链接:https://vulkan.lunarg.com/doc/sdk/1.2.131.2/windows/tutorial/html/14-init_pipeline.html
创建 Graphics Pipeline
本章节的代码文件是 14-init_pipeline.cpp
你快要获得足够的组件来绘制一个立方体了!接下来的步骤是通过设置一个 graphics pipeline 来配置 GPU。
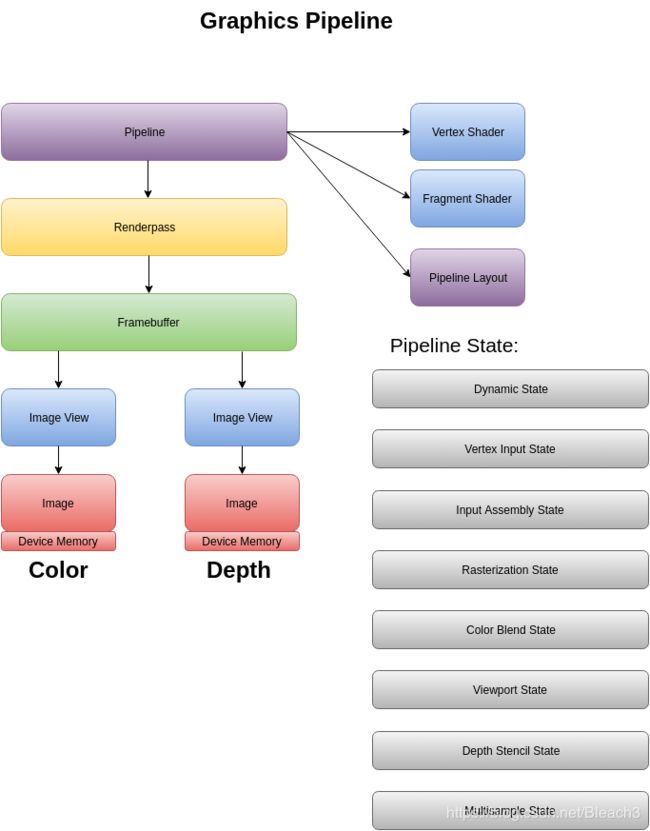
graphics pipeline 包含 shader stage,pipeline layout,render pass,和 fixed-function pipeline。在前面的章节中你已经定义了 shader 和 pipeline layout。在这里,你将会配置剩下的 fixed-function pipeline。这涉及到填充一些“创建信息”的数据结构来创建 pipeline。这里执行的大部分工作是配置 预处理-fragment 操作,就在它被放入 framebuffer 之前。
这是一张大的示意图:
下一步是配置 pipeline state 对象,即右下方灰色方块堆栈表示的那些。最后一步是连接左上方紫色pipeline方块指向的其他对象,来完成 graphics pipeline 的定义。
Dynamic State
Dynamic pipeline state 是在执行 command buffer 期间可以被其中指令所改变的一种状态。在 command buffer 执行期间预先告知状态是动态的,这对于驱动来说是很有用的,因为驱动会设置 GPU 执行 command buffer。
示例提供了想要在执行 command buffer 期间更改的一系列状态。在这里,代码以设置一系列 dynamic state 开始,并且开始时它们都是disable的。
VkDynamicState dynamicStateEnables[VK_DYNAMIC_STATE_RANGE_SIZE];
VkPipelineDynamicStateCreateInfo dynamicState = {};
memset(dynamicStateEnables, 0, sizeof dynamicStateEnables);
dynamicState.sType = VK_STRUCTURE_TYPE_PIPELINE_DYNAMIC_STATE_CREATE_INFO;
dynamicState.pNext = NULL;
dynamicState.pDynamicStates = dynamicStateEnables;
dynamicState.dynamicStateCount = 0;
稍后,示例表明了它想要随着 command buffer 里的命令动态地改变一些状态,所以稍后当配置 viewport 和 scissor 区域的时候,它会改变 dynamicStateEnables 数组。为了看的更清楚,修改 dynamicStateEnables 的代码和配置 viewport 和 scissor 的代码一起放在了下面。
Pipeline Vertex Input State
当你创建 vertex buffer 的时候,你已经初始化了 vertex input state,因为在那时候很容易做。Input state 包括 vertex data的格式和排列顺序。你可以回顾一下 vertexbuffer 示例来查看 vi_binding 和 vi_attribs 变量是如何被设置的。
VkPipelineVertexInputStateCreateInfo vi;
vi.sType = VK_STRUCTURE_TYPE_PIPELINE_VERTEX_INPUT_STATE_CREATE_INFO;
vi.pNext = NULL;
vi.flags = 0;
vi.vertexBindingDescriptionCount = 1;
vi.pVertexBindingDescriptions = &info.vi_binding;
vi.vertexAttributeDescriptionCount = 2;
vi.pVertexAttributeDescriptions = info.vi_attribs;
Pipeline Vertex Input Assembly State
Input assembly state 基本上就在你声明你想如何绘制网格顶点的地方。比如,你的顶点也许用来形成一个三角形条或者三角扇形,在这里,我们仅使用一系列三角形,每三个顶点描述一个三角形:
VkPipelineInputAssemblyStateCreateInfo ia;
ia.sType = VK_STRUCTURE_TYPE_PIPELINE_INPUT_ASSEMBLY_STATE_CREATE_INFO;
ia.pNext = NULL;
ia.flags = 0;
ia.primitiveRestartEnable = VK_FALSE;
ia.topology = VK_PRIMITIVE_TOPOLOGY_TRIANGLE_LIST;
Pipeline Rasterization State
接下来的数据结构体配置GPU中的光栅化操作。
VkPipelineRasterizationStateCreateInfo rs;
rs.sType = VK_STRUCTURE_TYPE_PIPELINE_RASTERIZATION_STATE_CREATE_INFO;
rs.pNext = NULL;
rs.flags = 0;
rs.polygonMode = VK_POLYGON_MODE_FILL;
rs.cullMode = VK_CULL_MODE_BACK_BIT;
rs.frontFace = VK_FRONT_FACE_CLOCKWISE;
rs.depthClampEnable = VK_TRUE;
rs.rasterizerDiscardEnable = VK_FALSE;
rs.depthBiasEnable = VK_FALSE;
rs.depthBiasConstantFactor = 0;
rs.depthBiasClamp = 0;
rs.depthBiasSlopeFactor = 0;
rs.lineWidth = 1.0f;
这些字段设置了很常见的值,是在我们简单的立方体渲染示例中所用到的。你也许看出来了, frontFace 成员和 GL函数glFrontFace() 之间有关联。
Pipeline Color Blend State
Blending 是另一个“end of the fixed pipe”操作,你在这里配置好,以便在目标上做简单的像素替换:
VkPipelineColorBlendStateCreateInfo cb;
cb.sType = VK_STRUCTURE_TYPE_PIPELINE_COLOR_BLEND_STATE_CREATE_INFO;
cb.pNext = NULL;
cb.flags = 0;
VkPipelineColorBlendAttachmentState att_state[1];
att_state[0].colorWriteMask = 0xf;
att_state[0].blendEnable = VK_FALSE;
att_state[0].alphaBlendOp = VK_BLEND_OP_ADD;
att_state[0].colorBlendOp = VK_BLEND_OP_ADD;
att_state[0].srcColorBlendFactor = VK_BLEND_FACTOR_ZERO;
att_state[0].dstColorBlendFactor = VK_BLEND_FACTOR_ZERO;
att_state[0].srcAlphaBlendFactor = VK_BLEND_FACTOR_ZERO;
att_state[0].dstAlphaBlendFactor = VK_BLEND_FACTOR_ZERO;
cb.attachmentCount = 1;
cb.pAttachments = att_state;
cb.logicOpEnable = VK_FALSE;
cb.logicOp = VK_LOGIC_OP_NO_OP;
cb.blendConstants[0] = 1.0f;
cb.blendConstants[1] = 1.0f;
cb.blendConstants[2] = 1.0f;
cb.blendConstants[3] = 1.0f;
注意一些配置信息是基于每个附件提供的。你的 pipeline 里每一个 color attachment 都需要有一个VkPipelineColorBlendAttachmentState 。当前示例中只有一个 color attachment。
colorWriteMask 选择R,G,B,A里哪一部分是能被写入的。在这里,你启用了所有这4个部分。
你禁用了 blendEnable,这意味着在 att_state[0] 里其余的关于 blending 的设置都不重要了。
你还禁用了像素写入逻辑操作,因为该示例中当向 framebuffer 写入像素的时候仅做了一个简单的替换。
blend constants 是用来作为某些“混合因子”(例如,VK_BLEND_FACTOR_CONSTANT_COLOR),仅仅设置了一些合理值,因为它们在本示例中没有使用。
Pipeline Viewport State
draw_cube 示例将会使用 command buffer 里的命令设置 viewport 和 scissor 区域。这里的代码告诉驱动这些 viewport 和 scissor state 是动态的,同时忽略 pViewPorts 和 pScissors 成员。
VkPipelineViewportStateCreateInfo vp = {};
vp.sType = VK_STRUCTURE_TYPE_PIPELINE_VIEWPORT_STATE_CREATE_INFO;
vp.pNext = NULL;
vp.flags = 0;
vp.viewportCount = 1;
dynamicStateEnables[dynamicState.dynamicStateCount++] = VK_DYNAMIC_STATE_VIEWPORT;
vp.scissorCount = 1;
dynamicStateEnables[dynamicState.dynamicStateCount++] = VK_DYNAMIC_STATE_SCISSOR;
vp.pScissors = NULL;
vp.pViewports = NULL;
Pipeline Depth Stencil State
继续进行后续的 fixed-function 初始化,为常用的配置设置 depth buffer 并且禁用 stencil 操作。
VkPipelineDepthStencilStateCreateInfo ds;
ds.sType = VK_STRUCTURE_TYPE_PIPELINE_DEPTH_STENCIL_STATE_CREATE_INFO;
ds.pNext = NULL;
ds.flags = 0;
ds.depthTestEnable = VK_TRUE;
ds.depthWriteEnable = VK_TRUE;
ds.depthCompareOp = VK_COMPARE_OP_LESS_OR_EQUAL;
ds.depthBoundsTestEnable = VK_FALSE;
ds.minDepthBounds = 0;
ds.maxDepthBounds = 0;
ds.stencilTestEnable = VK_FALSE;
ds.back.failOp = VK_STENCIL_OP_KEEP;
ds.back.passOp = VK_STENCIL_OP_KEEP;
ds.back.compareOp = VK_COMPARE_OP_ALWAYS;
ds.back.compareMask = 0;
ds.back.reference = 0;
ds.back.depthFailOp = VK_STENCIL_OP_KEEP;
ds.back.writeMask = 0;
ds.front = ds.back;
因为你确实想要进行深度缓存,所有启用 depth buffer 的写入和测试。另外,你设置 depth buffer 对比操作为常用的 VK_COMPARE_OP_LESS_OR_EQUAL。最后,你禁用了 stencil 操作,因为该示例中不需要它。
Pipeline Multisample State
在本示例中,你不会做任何的多重采样,所以通过设置无 multisample 来结束 pipeline 配置。
VkPipelineMultisampleStateCreateInfo ms;
ms.sType = VK_STRUCTURE_TYPE_PIPELINE_MULTISAMPLE_STATE_CREATE_INFO;
ms.pNext = NULL;
ms.flags = 0;
ms.pSampleMask = NULL;
ms.rasterizationSamples = VK_SAMPLE_COUNT_1_BIT;
ms.sampleShadingEnable = VK_FALSE;
ms.alphaToCoverageEnable = VK_FALSE;
ms.alphaToOneEnable = VK_FALSE;
ms.minSampleShading = 0.0;
综合到一起-创建Graphics Pipeline
终于,你获得了创建 pipeline 所需要的所有信息:
VkGraphicsPipelineCreateInfo pipeline;
pipeline.sType = VK_STRUCTURE_TYPE_GRAPHICS_PIPELINE_CREATE_INFO;
pipeline.pNext = NULL;
pipeline.layout = info.pipeline_layout;
pipeline.basePipelineHandle = VK_NULL_HANDLE;
pipeline.basePipelineIndex = 0;
pipeline.flags = 0;
pipeline.pVertexInputState = &vi;
pipeline.pInputAssemblyState = &ia;
pipeline.pRasterizationState = &rs;
pipeline.pColorBlendState = &cb;
pipeline.pTessellationState = NULL;
pipeline.pMultisampleState = &ms;
pipeline.pDynamicState = &dynamicState;
pipeline.pViewportState = &vp;
pipeline.pDepthStencilState = &ds;
pipeline.pStages = info.shaderStages;
pipeline.stageCount = 2;
pipeline.renderPass = info.render_pass;
pipeline.subpass = 0;

res = vkCreateGraphicsPipelines(info.device, NULL, 1,
                                &pipeline, NULL, &info.pipeline);
info.pipeline_layout, info.shaderStages, 和 info.render_pass 成员在本教程前面的章节中已经被初始化了。该结构体里的其他成员也在本章节中设置完成。
随着 pipeline 创建完成,你已经准备好了进入下一章节并绘制立方体。
