一篇文章教你学会使用SpringBoot实现文件上传和下载
文章目录
- 一、搭建SpringBoot开发环境
- 1、创建项目
- 2、配置application.properties参数
- 3、实体响应类和异常信息类
- 4、创建FileController
- 二、接口测试
- 1、在完成上述的代码之后运行程序,运行完成之后就可以使用Postman进行测试了。
- 2,测试下载文件
- 三、使用Web网页上传
写在前面: 我是「境里婆娑」。我还是从前那个少年,没有一丝丝改变,时间只不过是考验,种在心中信念丝毫未减,眼前这个少年,还是最初那张脸,面前再多艰险不退却。
写博客的目的就是分享给大家一起学习交流,如果您对 Java感兴趣,可以关注我,我们一起学习。
前言:上篇文章 一篇文章教你学会Java基础I/O流 我们已经对I/O流有了一定了解,在这里中,您将学习如何使用Spring Boot实现Web服务中的文件上传和下载功能。首先会构建一个REST API实现上传及下载的功能,然后使用Postman工具来测试这些接口,最后创建一个Web界面,如果对SpringBoot不熟悉的话可以看这篇文章: springboot系列文章
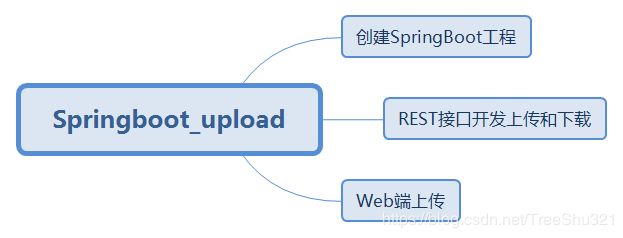
导语本文主要讲解:
一、搭建SpringBoot开发环境
1、创建项目
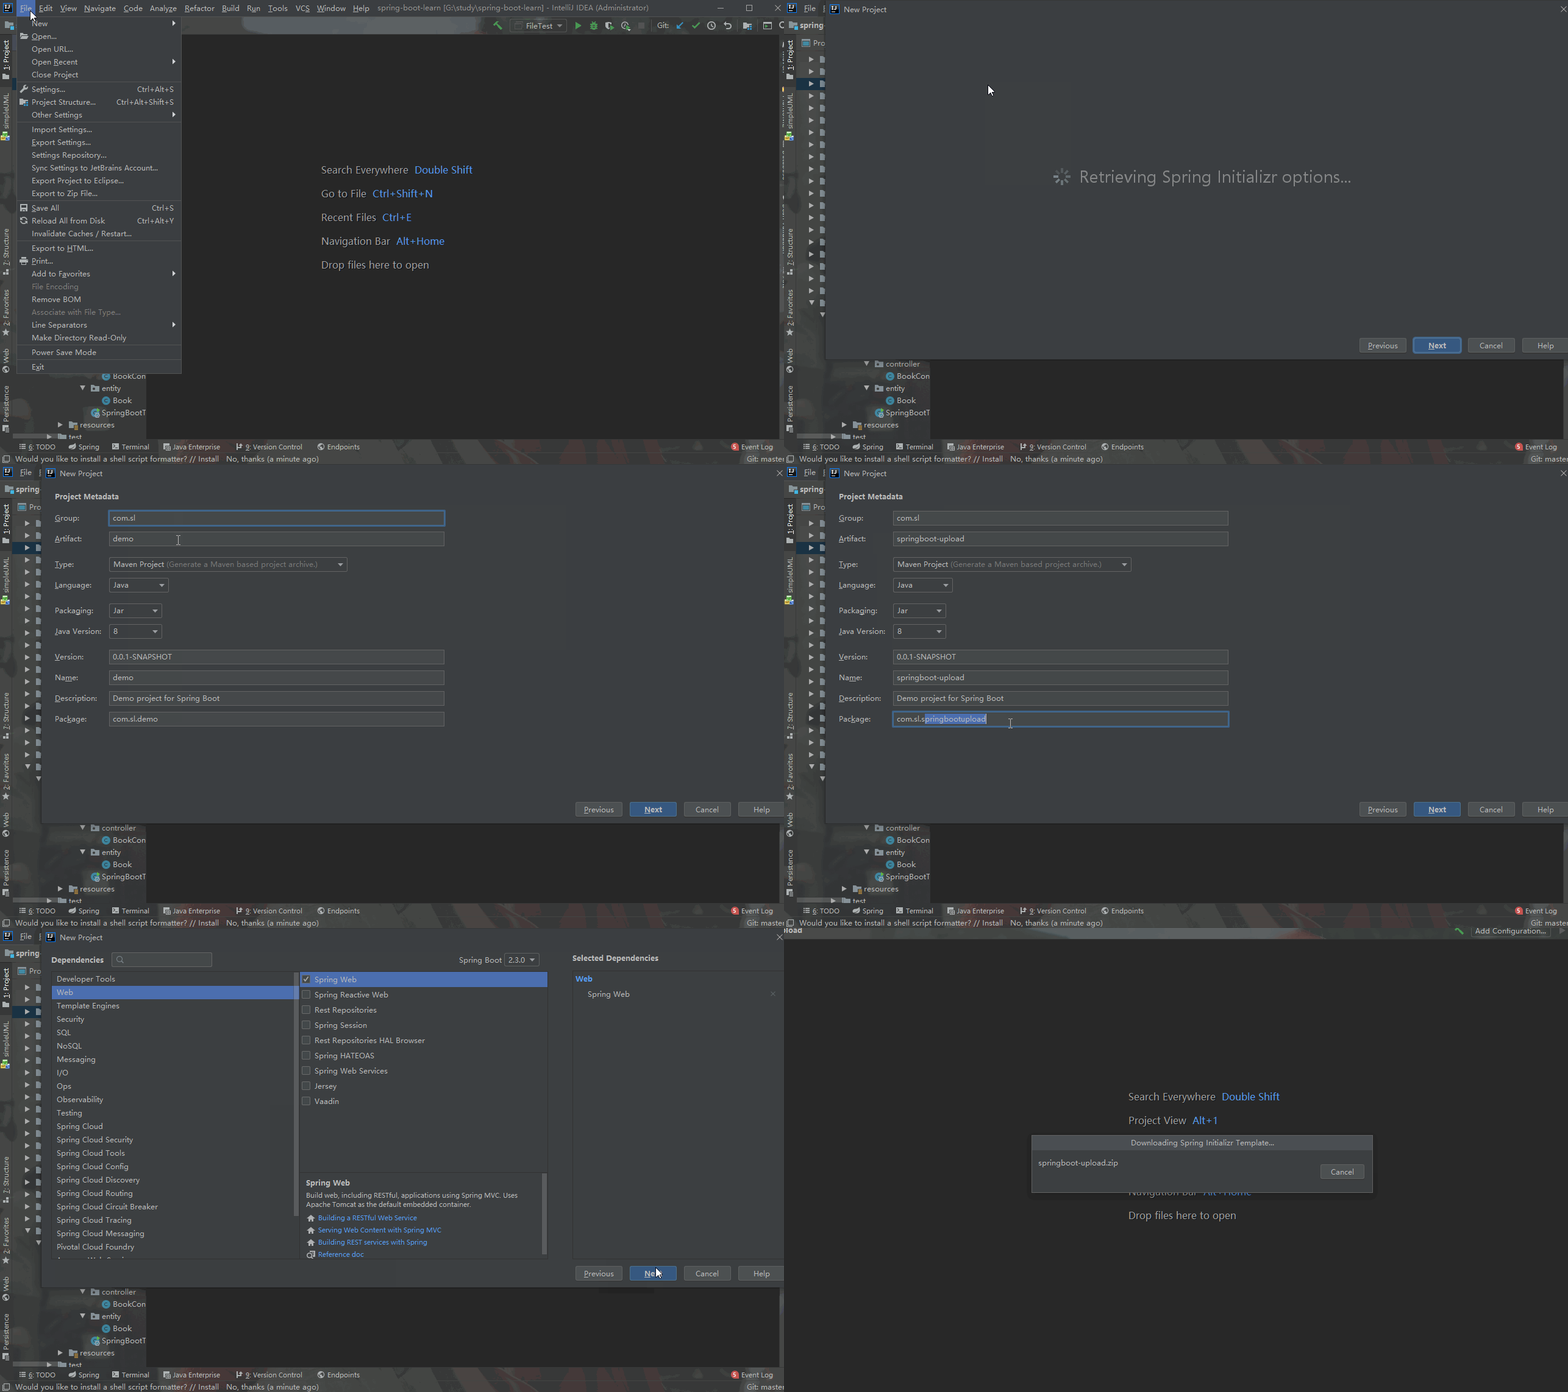
开发环境为Intellij IDEA,项目创建很简单,按照以下的步骤创建即可:
- File -> New -> Project
- 选择 Spring Initializr,点击 Next
- 填写 Group (项目域名) 和 Artifact (项目别名)
- 构建类型可以选择 Maven
- 添加 Web 依赖
- 输入项目名称及保存路径,完成创建
如果觉得上面看着不直观,可以看下面的gif图整个创建过程。
2、配置application.properties参数
项目创建完成之后,需要在application.properties中添加以下参数:
server.port=8080
## MULTIPART (MultipartProperties)
# 开启 multipart 上传功能
spring.servlet.multipart.enabled=true
# 文件写入磁盘的阈值
spring.servlet.multipart.file-size-threshold=2KB
# 最大文件大小
spring.servlet.multipart.max-file-size=200MB
# 最大请求大小
spring.servlet.multipart.max-request-size=215MB
# 文件存储所需参数
# 所有通过 REST API 上传的文件都将存储在此目录下
file.upload.path=D:/aplus
其中file.upload.path =D:/aplus参数为自定义的参数,有两种方式可以获取到此参数
- 使用@Value("${file.upload.path}")
- 使配置参数可以自动绑定到POJO类。
使配置参数绑定实体类详细代码如下:
/**
 * @author zhaosl
 * @ProjectName springboot-upload
 * @date 2020/6/3 23:51
 */
@ConfigurationProperties(prefix = "file")
public class FileProperty {

    private String filePath;

    public String getFilePath() {
        return filePath;
    }

    public void setFilePath(String filePath) {
        this.filePath = filePath;
    }
}
敲黑板这是重点如果想要此配置性能必须在@SpringbootUploadApplication注解的类中添加@EnableConfigurationProperties注解以开启ConfigurationProperties功能。
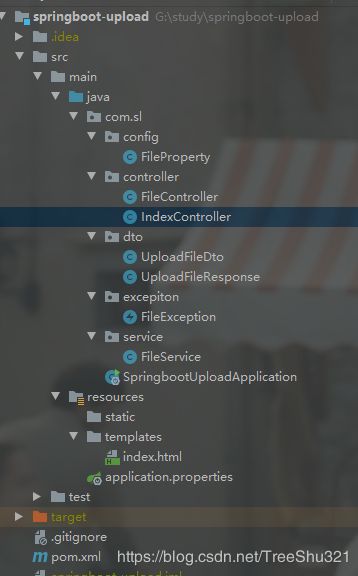
SpringbootUploadApplication启动类
@SpringBootApplication
@EnableConfigurationProperties({
        FileProperty.class
})
public class SpringbootUploadApplication {

    public static void main(String[] args) {
        SpringApplication.run(SpringbootUploadApplication.class, args);
    }

}
3、实体响应类和异常信息类
文件成功后需要有的响应实体类UploadFileResponse和文件出现上传异常类FileException来处理异常信息
响应实体类UploadFileResponse
/**
 * @author zhaosl
 * @ProjectName springboot-upload
 * @date 2020/6/3 23:58
 */
public class UploadFileResponse {

    private String fileName;
    private String fileDownloadUri;
    private String fileType;
    private long size;

    public UploadFileResponse() {
    }

    public UploadFileResponse(String fileName, String fileDownloadUri, String fileType, long size) {
        this.fileName = fileName;
        this.fileDownloadUri = fileDownloadUri;
        this.fileType = fileType;
        this.size = size;
    }
    //get set 省略
异常信息类FileException
/**
 * @author zhaosl
 * @ProjectName springboot-upload
 * @date 2020/6/4 0:04
 */
public class FileException extends RuntimeException {

    public FileException(String message) {
        super(message);
    }

    public FileException(String message, Throwable cause) {
        super(message, cause);
    }
}
4、创建FileController
创建文件上传下载所需的REST API接口
/**
 * @author shuliangzhao
 * @ProjectName springboot-upload
 * @date 2020/6/3 23:34
 */
@RestController
public class FileController {

    private static final Logger logger = LoggerFactory.getLogger(FileController.class);

    @Autowired
    private FileService fileService;

    @PostMapping("/uploadFile")
    public UploadFileResponse uploadFile(@RequestParam("file") MultipartFile file){
        String fileName = fileService.storeFile(file);

        String fileDownloadUri = ServletUriComponentsBuilder.fromCurrentContextPath()
                .path("/downloadFile/")
                .path(fileName)
                .toUriString();

        return new UploadFileResponse(fileName, fileDownloadUri,
                file.getContentType(), file.getSize());
    }

    @PostMapping("/uploadMultipleFiles")
    public List<UploadFileResponse> uploadMultipleFiles(@RequestParam("files") MultipartFile[] files) {
       List<UploadFileResponse> list = new ArrayList<>();
       if (files != null) {
           for (MultipartFile multipartFile:files) {
               UploadFileResponse uploadFileResponse = uploadFile(multipartFile);
               list.add(uploadFileResponse);
           }
       }
       return list;
        //简单写法
     /* return Arrays.stream(files)
                .map(this::uploadFile)
                .collect(Collectors.toList());*/
    }

    @GetMapping("/downloadFile/{fileName:.*}")
    public ResponseEntity<Resource> downloadFile(@PathVariable String fileName, HttpServletRequest request) {
        Resource resource = fileService.loadFileAsResource(fileName);
        String contentType = null;
        try {
            request.getServletContext().getMimeType(resource.getFile().getAbsolutePath());
        } catch (IOException e) {
            logger.info("Could not determine file type.");
        }
        if(contentType == null) {
            contentType = "application/octet-stream";
        }
        return ResponseEntity.ok()
                .contentType(MediaType.parseMediaType(contentType))
                .header(HttpHeaders.CONTENT_DISPOSITION, "attachment; filename=\"" + resource.getFilename() + "\"")
                .body(resource);
    }

}
FileController类收到请求后,调用FileService类的storeFile()方法将文件写入到系统中进行存储,其存储目录就是之前在application.properties配置文件中的file.upload.path参数的值。
下载接口downloadFile()在收到用户请求之后,使用FileService类提供的loadFileAsResource()方法获取存储在系统中文件并返回文件供用户下载。
FileService实现类为:
/**
 * @author shuliangzhao
 * @ProjectName springboot-upload
 * @date 2020/6/3 23:34
 */
@Component
public class FileService {
    private Path fileStorageLocation; // 文件在本地存储的地址

    public FileService( @Value("${file.upload.path}") String path) {
        this.fileStorageLocation = Paths.get(path).toAbsolutePath().normalize();
        try {
            Files.createDirectories(this.fileStorageLocation);
        } catch (IOException e) {
            throw new FileException("Could not create the directory", e);
        }
    }

    /**
     * 存储文件到系统
     * @param file 文件
     * @return 文件名
     */
    public String storeFile(MultipartFile file) {
        // Normalize file name
        String fileName = StringUtils.cleanPath(file.getOriginalFilename());

        try {
            // Check if the file's name contains invalid characters
            if(fileName.contains("..")) {
                throw new FileException("Sorry! Filename contains invalid path sequence " + fileName);
            }

            // Copy file to the target location (Replacing existing file with the same name)
            Path targetLocation = this.fileStorageLocation.resolve(fileName);
            Files.copy(file.getInputStream(), targetLocation, StandardCopyOption.REPLACE_EXISTING);

            return fileName;
        } catch (IOException ex) {
            throw new FileException("Could not store file " + fileName + ". Please try again!", ex);
        }
    }

    public Resource loadFileAsResource(String fileName) {
        try {
            Path filePath = this.fileStorageLocation.resolve(fileName).normalize();
            Resource resource = new UrlResource(filePath.toUri());
            if(resource.exists()) {
                return resource;
            } else {
                throw new FileException("File not found " + fileName);
            }
        } catch (MalformedURLException  ex) {
            throw new FileException("File not found " + fileName, ex);
        }
    }
}
二、接口测试
1、在完成上述的代码之后运行程序,运行完成之后就可以使用Postman进行测试了。
单个文件上传调用接口为:http://localhost:8080/uploadFile
gif图如下所示:
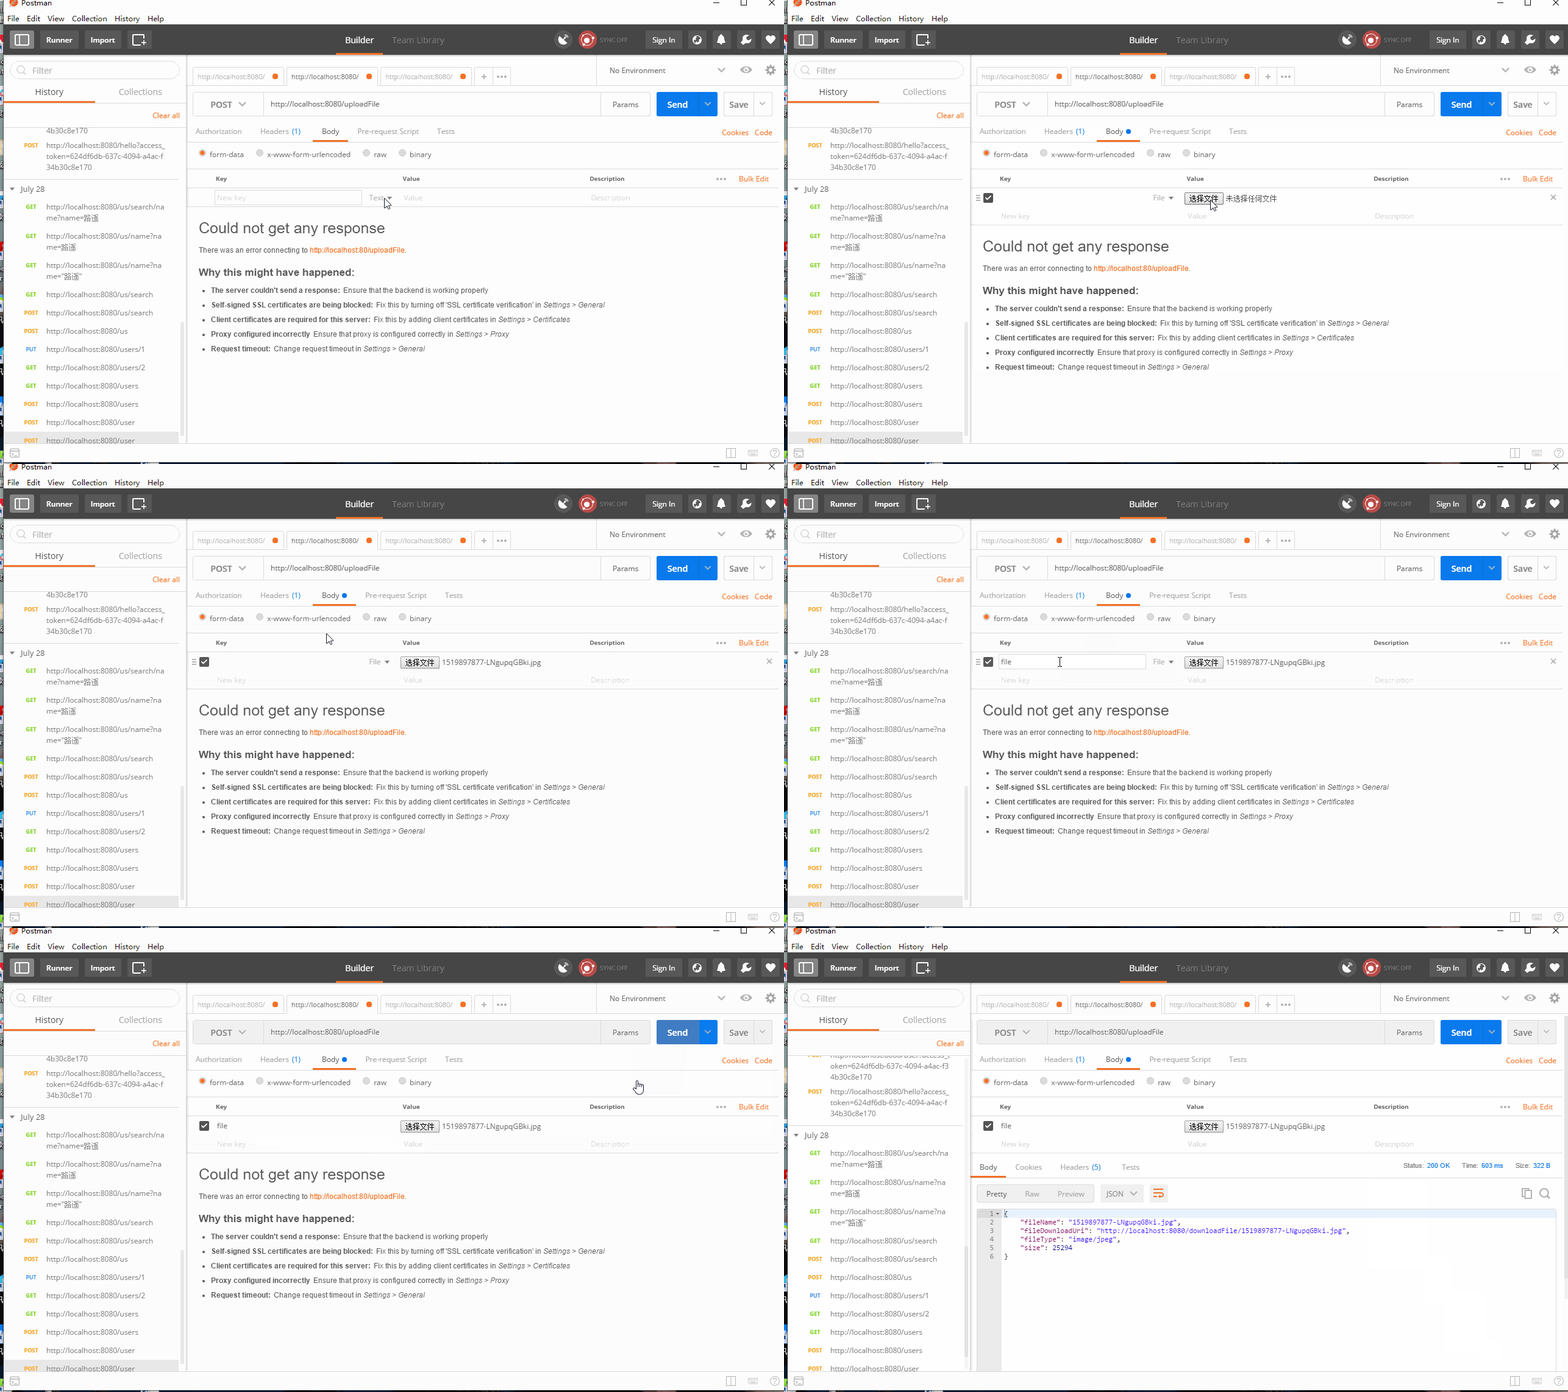
返回结果为:
{
    "fileName": "1519897877-LNgupqGBki.jpg",
    "fileDownloadUri": "http://localhost:8080/downloadFile/1519897877-LNgupqGBki.jpg",
    "fileType": "image/jpeg",
    "size": 25294
}
多个文件上传调用接口为:http://localhost:8080/uploadMultipleFiles
gif图如下所示:
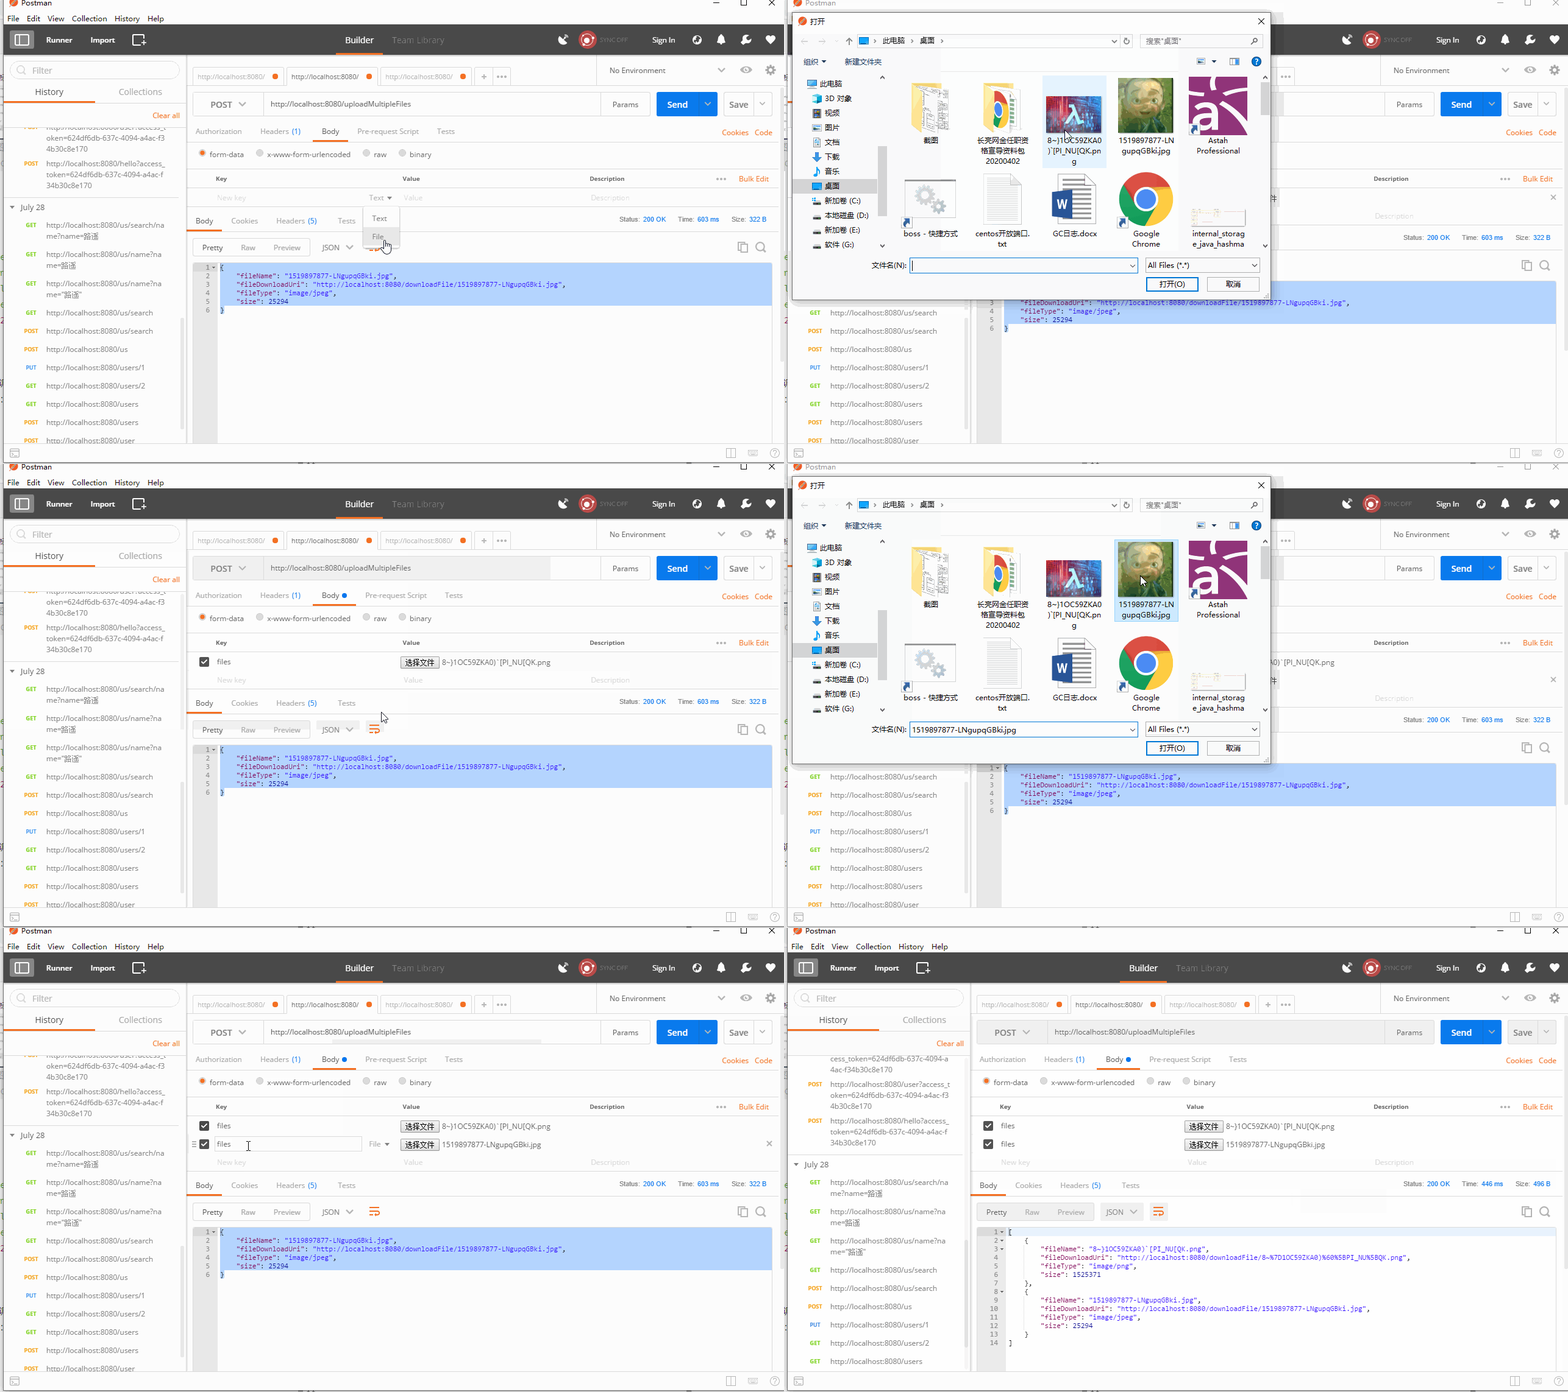
返回结果为:
[
    {
        "fileName": "8~}1OC59ZKA0)`[PI_NU[QK.png",
        "fileDownloadUri": "http://localhost:8080/downloadFile/8~%7D1OC59ZKA0)%60%5BPI_NU%5BQK.png",
        "fileType": "image/png",
        "size": 1525371
    },
    {
        "fileName": "1519897877-LNgupqGBki.jpg",
        "fileDownloadUri": "http://localhost:8080/downloadFile/1519897877-LNgupqGBki.jpg",
        "fileType": "image/jpeg",
        "size": 25294
    }
]
2,测试下载文件
在浏览器中输入网址:http://localhost:8080/downloadFile/1519897877-LNgupqGBki.jpg
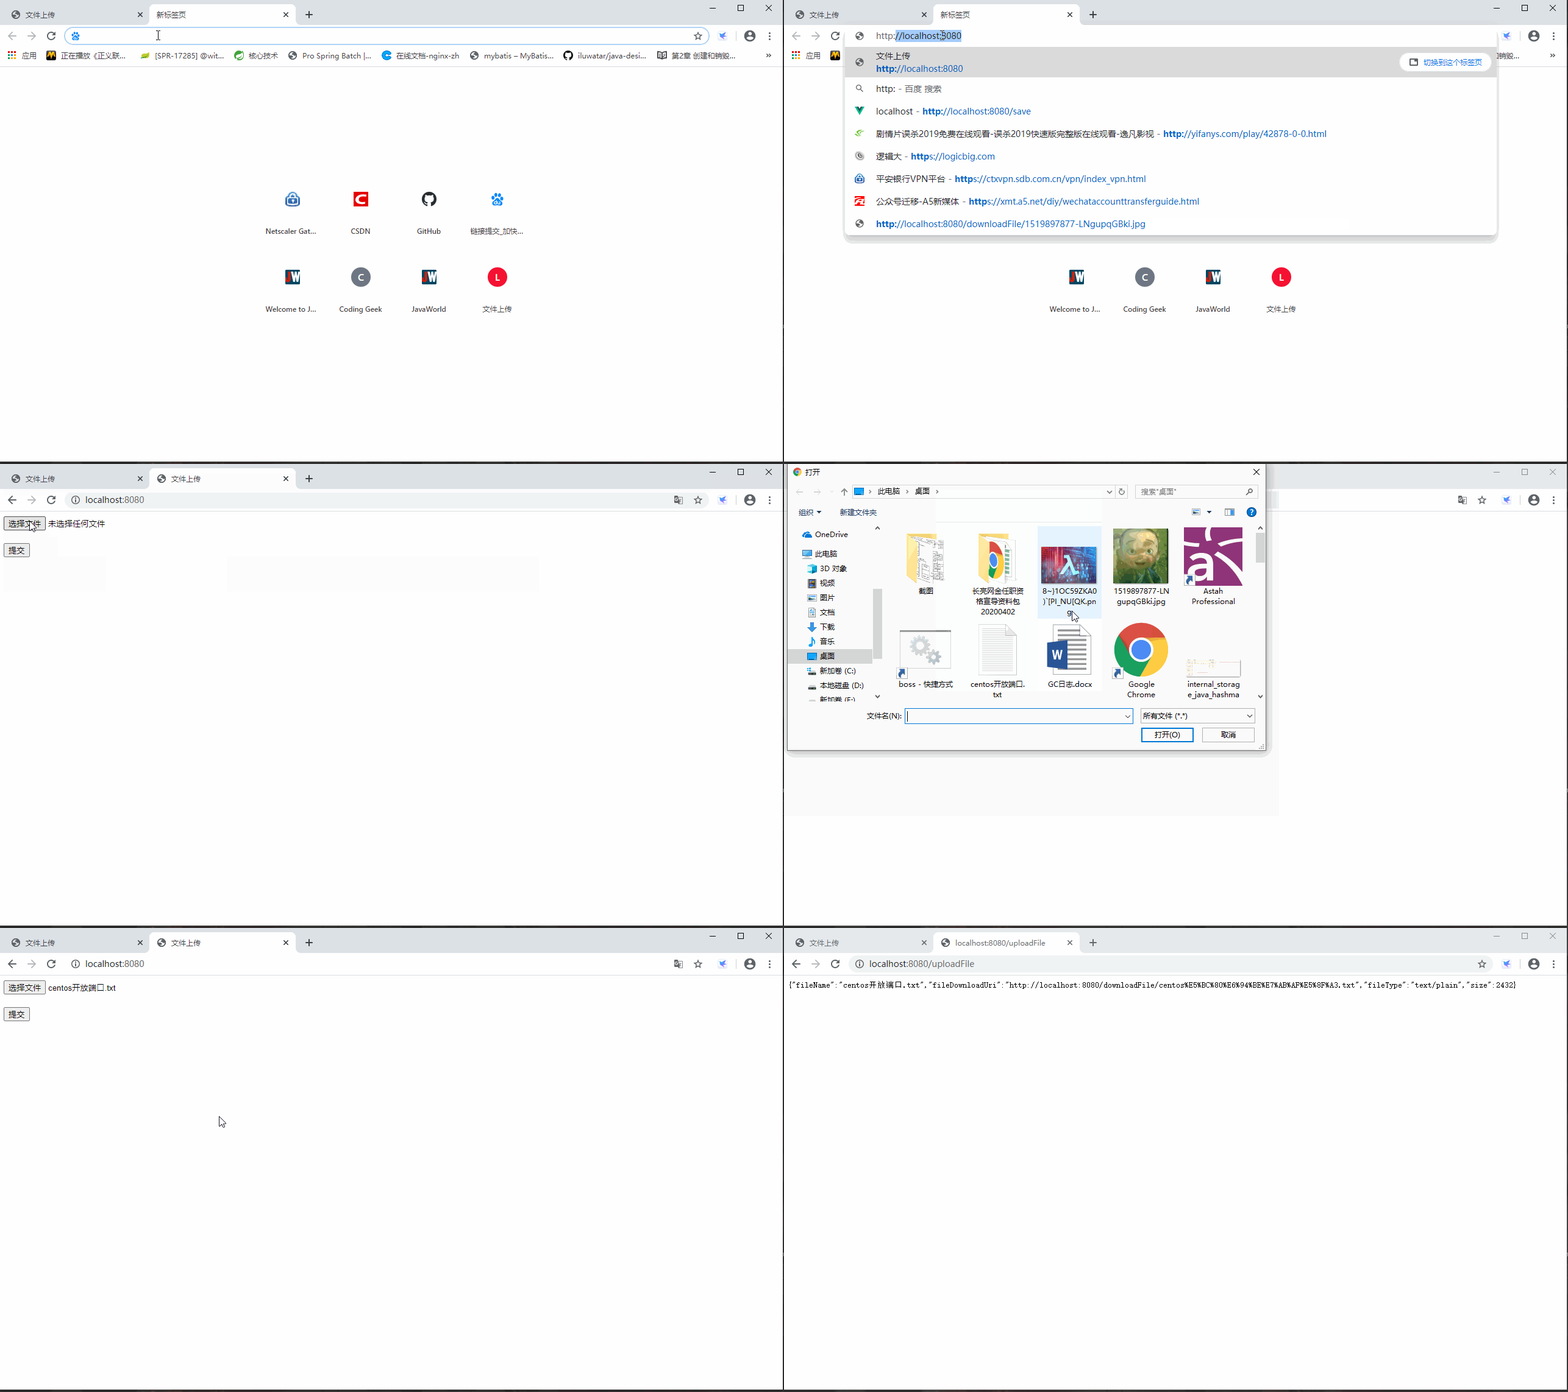
三、使用Web网页上传
增加thymeleaf前端解析器依赖,使SpringBoot工程可以访问html网页
 <dependency>
      <groupId>org.springframework.boot</groupId>
      <artifactId>spring-boot-starter-thymeleaf</artifactId>
 </dependency>
** thymeleaf视图解析器配置增加到配置文件中**
#在构建URL时添加到视图名称前的前缀(默认值:classpath:/templates/)
spring.thymeleaf.prefix=classpath:/templates/
# 在构建URL时附加到视图名称的后缀。
spring.thymeleaf.suffix=.html
新建的index.html网页
<!DOCTYPE html>
<html lang="en">
<head>
    <meta charset="UTF-8">
    <title>文件上传</title>
</head>
<body>
<form method="post" action="/uploadFile" enctype="multipart/form-data">
    <input type="file" name="file">
    <br><br>
    <input type="submit" value="提交">
</form>
</body>
</html>
增加访问的index.html网页控制器
/**
 * @author shuliangzhao
 * @ProjectName springboot-upload
 * @date 2020/6/4 23:29
 */
@Controller
public class IndexController {

    @GetMapping("/")
    public String index() {
        return "index";
    }
}
到此文件的上传及下载功能已完成。在正式环境中可能还需要将上传的文件路径保存到数据库,到时候可以根据需要做处理。
本文来源代码: https://github.com/FadeHub/springboot-upload
—————————————————————————————————
由于本人水平有限,难免有不足,恳请各位大佬不吝赐教!

