Shell 脚本中的 grep sed awk 的用法
grep 文本过滤命令
Global search regular expression and print out the line
全面搜索研究正则表达式并显示出来
grep是一种强大的文本搜索工具,根据用户指定的“模式”对目标文本进行匹配检查,打印匹配到的行
由正则表达式或者字符及基本文字字符所编写的过滤条件
grep -Ei “root|ROOT” passwd
grep 中的正则表达式
^westos 以westos开头的
westos$ 以westos结尾的
‘w…s’=‘w???s’ ‘.’表示单独匹配到一个字符
‘w…’
‘…s’
相关参数
-a 将 binary 文件以 text 文件的方式搜寻数据
-c 计算找到 ‘搜寻字符串’ 的次数
-i 忽略大小写的不同,所以大小写视为相同
-n 顺便输出行号
-v 反向选择,亦即显示出没有 ‘搜寻字符串’ 内容的那一行!
–color=auto 可以将找到的关键词部分加上颜色的显示喔!
实验
将/etc/passwd,有出现 root 的行取出来
grep root /etc/passwd
root❌0:0:root:/root:/bin/bash
operator❌11:0:operator:/root:/sbin/nologin
或
cat /etc/passwd | grep root
root❌0:0:root:/root:/bin/bash
operator❌11:0:operator:/root:/sbin/nolo
将/etc/passwd,有出现 root 的行取出来,同时显示这些行在/etc/passwd的行号
grep -n root /etc/passwd
1:root❌0:0:root:/root:/bin/bash
30:operator❌11:0:operator:/root:/sbin/nologin
将/etc/passwd,将没有出现 root 的行取出来
[root@client mnt]# grep -v root /etc/passwd
bin❌1:1:bin:/bin:/sbin/nologin
daemon❌2:2:daemon:/sbin:/sbin/nologin
adm❌3:4:adm:/var/adm:/sbin/nologin
lp❌4:7:lp:/var/spool/lpd:/sbin/nologin
sync❌5:0:sync:/sbin:/bin/sync
shutdown❌6:0:shutdown:/sbin:/sbin/shutdown
halt❌7:0:halt:/sbin:/sbin/halt
mail❌8:12:mail:/var/spool/mail:/sbin/nologin
games❌12?games:/usr/games:/sbin/nologin
ftp❌14:50:FTP User:/var/ftp:/sbin/nologin
nobody❌99:99:Nobody:/:/sbin/nologin
dbus❌81:81:System message bus:/:/sbin/nologin
polkitd❌999:998:User for polkitd:/:/sbin/nologin

grep中字符匹配字数的设定
- 字符出现零到任意次
- 字符出现零到任意次
.* 关键字之间匹配任意字符
? 字符出现零到一次
- 字符出现1到任意次
{n,m} 字符至少出现n次,至多出现m次
{,m} 字符出现0到m次
{n,} 字符出现n以上
grep -E ‘ro*t’ test //搜索含有0-任意o的以t结尾的
grep -E ‘ro{1,}’ test //搜索含有1-任意o的
grep -E ‘ro{1,2}’ test //搜索含有1,2个o的
grep -E ‘ro{,2}’ test //搜索0-2个o的
grep -E ‘ro+t’ test //搜索1-任意o的
grep “ro+t” test //\表示转义
grep -E ‘(root){1,2}’ test //搜索含有1个或2个连续root的
grep -E ‘root’ test //搜索含有root的
grep -E ‘(root){2,}’ test //搜索2个以上root连续的
grep -E ‘r…t’ test //搜索r和t中间有两个字符的
grep -E ‘r…t’ test //搜索r和t中间含有3个字符的
grep -E ‘r?t’ test //字符出现0-一次
grep -E ‘r.t’ test //搜索r和t中任意字符的
实验:
[root@node1 mnt]# vim test
[root@node1 mnt]# grep -E 'rot’ test //搜索含有0-任意o的以t结尾的
root
rootoroot
rooot
root
rootrootrroot
rootrootrrrootroot
rot
rt
[root@node1 mnt]# grep -E ‘ro{1,}’ test //搜索含有1-任意o的
root
rootoroot
rooot
root
rootrootrroot
rootrootrrrootroot
rot
[root@node1 mnt]# grep -E ‘ro{1,2}’ test //搜索含有1,2个o的
root
rootoroot
rooot
root
rootrootrroot
rootrootrrrootroot
rot
[root@node1 mnt]# grep -E ‘ro{,2}’ test //搜索0-2个o的
root
rootoroot
rooot
root
rootrootrroot
rootrootrrrootroot
rot
rt
rht
rst
[root@node1 mnt]# grep -E ‘ro+t’ test //搜索1-任意o的
root
rootoroot
rooot
root
rootrootrroot
rootrootrrrootroot
rot
[root@node1 mnt]# grep -E ‘(root){1,2}’ test //搜索含有1个或2个连续root的
root
rootoroot
root
rootrootrroot
rootrootrrrootroot
[root@node1 mnt]# grep -E ‘root’ test //搜索含有root的
root
rootoroot
root
rootrootrroot
rootrootrrrootroot
[root@node1 mnt]# grep -E ‘(root){2,}’ test //搜索2个以上root连续的
rootrootrroot
rootrootrrrootroot
[root@node1 mnt]# grep -E ‘r…t’ test //搜索r和t中间有两个字符的
root
rootoroot
root
rootrootrroot
rootrootrrrootroot
[root@node1 mnt]# grep -E ‘r…t’ test //搜索r和t中间含有3个字符的
rooot
rootrootrroot
rootrootrrrootroot
[root@node1 mnt]# grep -E ‘r?t’ test //字符出现0-一次
root
rootoroot
rooot
root
rootrootrroot
rootrootrrrootroot
rot
rt
rht
rst
[root@node1 mnt]# grep -E ‘r.*t’ test //搜索r和t中任意字符的
root
rootoroot
rooot
root
rootrootrroot
rootrootrrrootroot
rot
rt
rht
rst
grep中的字符匹配位置设定
^关键字
关键字$
<关键字
关键字>
<关键字>
实验:
[root@node1 mnt]# grep ^root passwd //找出root开头的行
root❌0:0:root:/root:/bin/bash
root:hello:root
[root@node1 mnt]# grep root$ passwd //找出以root结尾的行
root:hello:root
hello:root:root
[root@node1 mnt]# grep -E ‘r…t>’ test //后面加>,防止搜索做拓展搜索
root
rootoroot
root
rootrootrroot
rootrootrrrootroot
[root@node1 mnt]# grep -E ‘
rootoroot
root
rootrootrroot
rootrootrrrootroot
练习1:写一个脚本利用循环添加用户并配置密码
[root@client mnt]# vim userfile //建立用户文件
[root@client mnt]# cat userfile
user1
user2
user3
[root@client mnt]# vim passwdfile //建立密码文件
[root@client mnt]# cat passwdfile
user123
user234
user345
[root@client mnt]# vim creat_user.sh //编辑脚本
#!/bin/bash
MAX_LINE=$( wc -l $1 | cut -d " " -f 1) //定义一个变量显示行数,用来确定循环次数
for LINEMAX in seq 1 $MAX_LINE //循环
do
USER= ( s e d − n " (sed -n " (sed−n"{LINEMAX}P" 1 ) / / 截 取 当 前 循 环 行 的 数 据 P A S S W D = 1) // 截取当前循环行的数据 PASSWD= 1)//截取当前循环行的数据PASSWD=(sed -n “${LINEMAX}P” 2 ) u s e r a d d " 2) useradd " 2)useradd"USER" // 添加用户
echo “ P A S S W D " ∣ p a s s w d − − s t d i n " PASSWD" | passwd --stdin " PASSWD"∣passwd−−stdin"USER”
done
[root@client mnt]# sh creat_user.sh userfile passwdfile //运行脚本
Changing password for user user1.
passwd: all authentication tokens updated successfully.
Changing password for user user2.
passwd: all authentication tokens updated successfully.
Changing password for user user3.
passwd: all authentication tokens updated successfully.


写一个脚本,显示系统中存在的本地用户


sed 行编辑器
Stream editor
用来操作纯SCLL码的文本,处理时,把当前的行储存在临时缓存区中,称为“模式空间(pattern space)”可以指定仅仅处理哪些行,sed符合模式条件的处理,不符合条件的不处理,处理完成后把缓存区的内容送往屏幕,接着处理下一行,这样不断重复,直到文件末尾
调用sed命令有两种形式
1.sed [ options ] ‘command’ files(s) //直接加命令
2. sed [ options ] -f scriptfile files(s) //使用命令文件
p 查看模式
d 删除模式
a 添加模式
c 替换模式
w 写入模式
i 插入模式
p模式 查看模式
sed -n ‘/:/p’ fstab 显示文件fstab中有:的行 -n 不打印所有的行到标准输出
sed -n ‘/UUID$/p’ /etc/fstab ##显示fstab文件中以UUID结尾的行
sed -n ‘/^UUID/p’ /etc/fstab ##显示以UUID开头的行
sed -n ‘2,6p’ /etc/fstab ##显示第二到六行
sed -n ‘2,6!p’ /etc/fstab ##显示除过2到6行的内容
实验:
[root@client mnt]# cat -n fstab | sed -n ‘/^#/p’ //显示“#”开头的行
    #
    # /etc/fstab
    # Created by anaconda on Wed May  7 01:22:57 2014
    #
    # Accessible filesystems, by reference, are maintained under '/dev/disk'
    # See man pages fstab(5), findfs(8), mount(8) and/or blkid(8) for more info
    #
    UUID=9bf6b9f7-92ad-441b-848e-0257cbb883d1 /                       xfs     defaults        1 1
    /dev/vg0/vo /home   ext4    defaults    0 0
    #//172.25.254.226/student /mnt cifs defaults,username=student,password=123 0 0
[root@client mnt]# sed -n ‘/^#/!p’ fstab //显示不以”#“开头的行
UUID=9bf6b9f7-92ad-441b-848e-0257cbb883d1 / xfs defaults 1 1
/dev/vg0/vo /home ext4 defaults 0 0
[root@client ~]# cat -n /etc/fstab | sed -n ‘2p;6p’ //显示第2,6行
2 #
6 # Accessible filesystems, by reference, are maintained under '/dev/dis
[root@client ~]# cat -n /etc/fstab | sed -n ‘2,6p’ //显示第二行到第六行
2 #
3 # /etc/fstab
4 # Created by anaconda on Wed May 7 01:22:57 2014
5 #
6 # Accessible filesystems, by reference, are maintained under ‘/dev/disk’

d模式 删除模式
sed ‘/^UUID/d’ /etc/fstab ##显示除过UUID开头的行的内容
sed ‘/^#/d’ /etc/fstab ##显示除过#开头的行
sed ‘/^$/d’ /etc/fstab ##显示文件内容去除空行
sed ‘1,4d’ /etc/fstab ##显示去除文件的第1到4行
sed -n ‘/^UUID/!d’ /etc/fstab ###显示为空
实验:
[root@client etc]# sed -e ‘2,6d’ fstab //删除第2到6行
See man pages fstab(5), findfs(8), mount(8) and/or blkid(8) for more info
UUID=9bf6b9f7-92ad-441b-848e-0257cbb883d1 / xfs defaults 1 1
/dev/vg0/vo /home ext4 defaults 0 0
#//172.25.254.126/student /mnt cifs defaults,username=student,password=123 0 0
[root@client etc]# sed -e ‘/UUID$/d’ fstab //删除以UUID结尾的行
/etc/fstab
Created by anaconda on Wed May 7 01:22:57 2014
Accessible filesystems, by reference, are maintained under ‘/dev/disk’
See man pages fstab(5), findfs(8), mount(8) and/or blkid(8) for more info
UUID=9bf6b9f7-92ad-441b-848e-0257cbb883d1 / xfs defaults 1 1
/dev/vg0/vo /home ext4 defaults 0 0
#//172.25.254.126/student /mnt cifs defaults,username=student,password=123 0 0
[root@client etc]# sed -e ‘/^#/d’ fstab //删除以“#”开头的行
UUID=9bf6b9f7-92ad-441b-848e-0257cbb883d1 / xfs defaults 1 1
/dev/vg0/vo /home ext4 defaults 0 0
[root@client etc]# sed -e ‘2p;6p’ fstab //删除第2行和第六
/etc/fstab
Created by anaconda on Wed May 7 01:22:57 2014
Accessible filesystems, by reference, are maintained under ‘/dev/disk’
Accessible filesystems, by reference, are maintained under ‘/dev/disk’
See man pages fstab(5), findfs(8), mount(8) and/or blkid(8) for more info
UUID=9bf6b9f7-92ad-441b-848e-0257cbb883d1 / xfs defaults 1 1
/dev/vg0/vo /home ext4 defaults 0 0
#//172.25.254.126/student /mnt cifs defaults,username=student,passw

w模式 写入模式
sed ‘/^UUID/w/mnt/ss’ /etc/fstab ##把fstab中以UUID开头的行写入到/mnt/ss文件中
sed -n ‘/^UUID/w/mnt/ss’ /etc/fstab ##把fstab中以UUID开头的行写入到/mnt/ss文件中,并在终端不显示
sed ‘6r /etc/issue’ /etc/fstab ##在fstab文件的第6行插入issue文件的内容
实验:
[root@client mnt]# sed -e ‘/hello/wfile’ westos //将westos文件中hello行写入file.t文件中
hello
[root@client mnt]# cat file
hello
[root@client mnt]# cat file
hello
world
[root@client mnt]# cat westos
westos
[root@client mnt]# sed ‘rwestos’ file //在file文件中的每一行添加westos文件
hello
westos
world
westos
[root@client mnt]# sed ‘1rwestos’ file //在file文件中的第一行添加westos文件
hello
westos
world
[root@client mnt]# sed ‘2rwestos’ file //在file文件中的第二行添加westos文件
hello
world
westos


a模式 添加模式
sed ‘/^UUID/a \hello sed’ /etc/fstab ##在fstab文件的UUID开头行下一行添加hello sed 字符
sed ‘/^UUID/a \hello\nsed’ /etc/fstab #在fstab文件的UUID开头行下两行添加hello和sed 字符
实验:

[root@client mnt]# cat westos
hello
[root@client mnt]# sed -e ‘/hello/aworld’ westos //在hello行后添加world
hello
world
[root@client mnt]# sed -e ‘/hello/aworld\n123’ westos //在hello行后添加world,再换行添加123
hello
world
123
c(替换)模式
sed -e ‘/^UUID/chello’ fstab v//将以UUID开头的行替换为hello
实验:
[root@client mnt]# cat westos
hello
[root@client mnt]# sed -e ‘/hello/cworld\n123’ westos //将hello的行替换为world换行123
world
123

i模式 插入模式
sed ‘/^UUID/i\hello sed\nwestos’ /etc/fstab ###在fstab文件的UUID开头行上两行添加hello和sed 字符
sed的其他用法
sed ‘/^UUID/=’ /etc/fstab ##在fstab文件中在以UUID开头的行的上一行添加行号
sed -n -e ‘/^UUID/p’ -e ‘/^UUID/=’ /etc/fstab 等同于 sed ‘/UUID/p;/UUID/=’ /etc/fstab ##显示fstab文件中UUID开头的行并在他的上一行添加行号
实验:
[root@client mnt]# cat westos
westos
[root@client mnt]# sed -e ‘/westos/iworld’ westos
world
westos
[root@client mnt]# sed -e ‘/wes/iworld’ westos
world
westos
[root@client mnt]# sed -e ‘/w/iworld’ westos
world
westos
[root@client mnt]# sed -e ‘/et/iworld’ westos //由以上可以看出之可以匹配每行第一个字符,然后在上一行进行插入。
westos

vim ss
/^UUID/p
/^UUID/=
sed -f /mnt/ss /etc/fstab ## 执行ss文件中的内容对fstab进行检索
sed ‘s/^//#/g’ /etc/passed ###将passed文件以/开头的文件替换为#
sed ‘s@^/@#@g’ /etc/passwd ##注:s@^/@#@ = s/^//#/g
sed ‘s/^//#/’ /etc/passwd ###将passwd文件中每行第一个/转换为#
set ‘G’ /etc/passwd ##passwd文件每行前加空行
set ‘KaTeX parse error: Expected 'EOF', got '#' at position 18: …' /etc/fstab #̲#fstab文件最后一行不加空…p’ /etc/fstab ##显示fstab文件中的最后一行
实验:
[root@client mnt]# cp /etc/passwd .
[root@client mnt]# vim passwd
[root@client mnt]# cat passwd
root❌0:0:root:/root:/bin/bash
bin❌1:1:bin:/bin:/sbin/nologin
daemon❌2:2:daemon:/sbin:/sbin/nologin
sadm❌3:4:adm:/var/adm:/sbin/nologin
p❌4:7:lp:/var/spool/lpd:/sbin/nologin
polkitd❌999:998:User for polkitd:/:/sbin/nologin
mysql❌27:27:MariaDB Server:/var/lib/mysql:/sbin/nologin
user1❌1001:1001::/home/user1:/bin/bash
user2❌1002:1002::/home/user2:/bin/bash
user3❌1003:1003::/home/user3:/bin/bash
[root@client mnt]# sed ‘s/nologin/westos/g’ passwd
// 将文中所有出现的nologin替换为westos,不加/s时只替换每行出现的第一个字符.
root❌0:0:root:/root:/bin/bash
bin❌1:1:bin:/bin:/sbin/westos
daemon❌2:2:daemon:/sbin:/sbin/westos
sadm❌3:4:adm:/var/adm:/sbin/westos
p❌4:7:lp:/var/spool/lpd:/sbin/westos
polkitd❌999:998:User for polkitd:/:/sbin/westos
mysql❌27:27:MariaDB Server:/var/lib/mysql:/sbin/westos
user1❌1001:1001::/home/user1:/bin/bash
user2❌1002:1002::/home/user2:/bin/bash
user3❌1003:1003::/home/user3:/bin/bash
//将文件中第三到五行出现的nologin替换为westos
root❌0:0:root:/root:/bin/bash
bin❌1:1:bin:/bin:/sbin/nologin
daemon❌2:2:daemon:/sbin:/sbin/westos
sadm❌3:4:adm:/var/adm:/sbin/westos
p❌4:7:lp:/var/spool/lpd:/sbin/westos
polkitd❌999:998:User for polkitd:/:/sbin/nologin
mysql❌27:27:MariaDB Server:/var/lib/mysql:/sbin/nologin
user1❌1001:1001::/home/user1:/bin/bash
user2❌1002:1002::/home/user2:/bin/bash
user3❌1003:1003::/home/user3:/bin/bash
[root@client mnt]# sed ‘/bin/,/sadm/s/nologin/westos/g’ passwd
//将从bin开头的行到sadm结尾的行中的nologin替换为westos
root❌0:0:root:/root:/bin/bash
bin❌1:1:bin:/bin:/sbin/westos
daemon❌2:2:daemon:/sbin:/sbin/westos
sadm❌3:4:adm:/var/adm:/sbin/nologin
p❌4:7:lp:/var/spool/lpd:/sbin/nologin
polkitd❌999:998:User for polkitd:/:/sbin/westos
mysql❌27:27:MariaDB Server:/var/lib/mysql:/sbin/nologin
user1❌1001:1001::/home/user1:/bin/bash
user2❌1002:1002::/home/user2:/bin/bash
user3❌1003:1003::/home/user3:/bin/bash
[root@client mnt]# sed ‘s/nologin/westos/g;s/sbin/####/g’ passwd
//两个替换命令,1.将全文中的nologin替换为westos,2.将全文中的sbin替换为####
root❌0:0:root:/root:/bin/bash
bin❌1:1:bin:/bin:/####/westos
daemon❌2:2:daemon:/####?####/westos
sadm❌3:4:adm:/var/adm:/####/westos
p❌4:7:lp:/var/spool/lpd:/####/westos
polkitd❌999:998:User for polkitd:/?####/westos
mysql❌27:27:MariaDB Server:/var/lib/mysql:/####/westos


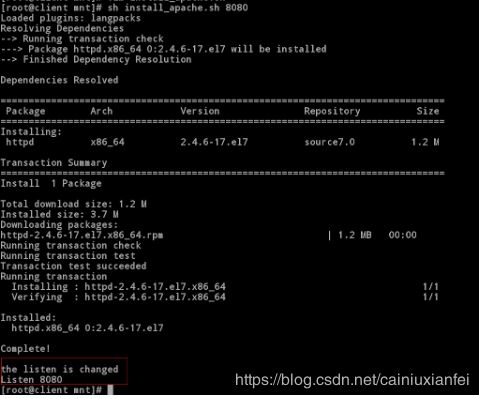
练习:写一个脚本,当执行该脚本时自动下载apache,同时修改用户输入端口号
[root@client mnt]# vim install_apache.sh
#!/bin/bash
yum install httpd.x86_64 -y; //自动下载apache
sed -i “/^Listen/cListen $1” /etc/httpd/conf/httpd.conf; //修改配置文件中端口号
echo ;
echo the listen is changed; //输出修改成功
sed -ne ‘42p’ /etc/httpd/conf/httpd.conf; //显示配置文件中第42行
systemctl restart httpd; //重启服务
[root@client mnt]# sh install_apache.sh 8080 //执行脚本,修改端口号为8080
Loaded plugins: langpacks
Resolving Dependencies
–> Running transaction check
—> Package httpd.x86_64 0:2.4.6-17.el7 will be installed
–> Finished Dependency Resolution
Dependencies Resolved
============================================================================
Package Arch Version Repository Size
Installing:
httpd x86_64 2.4.6-17.el7 source7.0 1.2 M
Transaction Summary
Install 1 Package
Total download size: 1.2 M
Installed size: 3.7 M
Downloading packages:
httpd-2.4.6-17.el7.x86_64.rpm | 1.2 MB 00:00
Running transaction check
Running transaction test
Transaction test succeeded
Running transaction
Installing : httpd-2.4.6-17.el7.x86_64 1/1
Verifying : httpd-2.4.6-17.el7.x86_64 1/1
Installed:
httpd.x86_64 0:2.4.6-17.el7
Complete!
the listen is changed //修改成功
Listen 8080

awk 报告生成器
awk处理机制:awk会逐行处理文本,支持在处理第一行之间做一些准备工作,以及在处理万最后一行*做一些总结性质的工作,在命令个和四上分别体现如下:
BEGIN{}:读如第一行文本之前执行,一般用来初始化操作
{}:逐行处理,逐行读如文本执行相应的处理,是最常见的编辑指令块
END{}:处理完最后以行文本的执行,一般用来输出处理结果
版上分别体现如下:
BEGIN{} :读入第一行文本之前执行,一般用来初始化工作
{} 逐行处理,逐行读入文本执行相应的处理,是最常见的编辑指令块
END{} : 处理完最后一行文本之后执行,一般用来输出处理结果
Linux 上默认使用gawk
awk基本用法一:
1.awk -F “:” ‘BEGIN{print NAME}{print $1}’ /etc/passwd
//以:为分隔符,处理前打印NAME,打印第一行
2.awk -F “:” ‘BEGIN{print NAME}{print $1}END{print NR}’ /etc/passwd
//以:为分隔符,处理打印前NAME,打印第一行,处理后打印行数
3.awk -F “:” ‘BEGIN{print “name” }{printKaTeX parse error: Expected 'EOF', got '}' at position 2: 1}̲END{print NF}' …/’ /etc/passwd
//以:为分隔符打印以bash结尾的行
5.awk -F “:” ‘/bash$/{print $5}’ /etc/passwd
以:为分隔符,打印以bash结尾的第5行
6.awk -F “:” ‘NR==3’ /etc/passwd
//以:为分隔符,打印第三行
7.awk -F “:” ‘BEGIN{print NAME}NR<=3&&NR>=2{print KaTeX parse error: Expected 'EOF', got '}' at position 2: 1}̲’ /etc/passwd …/{N++}END{print N}’ passwd
//利用N变量统计以bash结尾的行,每找到一行,N加一,最后输出N的个数
实验:
[root@client mnt]# cat passwd
root❌0:0:root:/root:/bin/bash
bin❌1:1:bin:/bin:/sbin/nologin
mysql❌27:27:MariaDB Server:/var/lib/mysql:/sbin/nologin
user1❌1001:1001::/home/user1:/bin/bash
user2❌1002:1002::/home/user2:/bin/bash
user3❌1003:1003::/home/user3:/bin/bash
[root@client mnt]# awk -F “:” ‘{print $1}’ passwd
//指定“:”为分隔符,输出第一列。
root
bin
mysql
user1
user2
user3
[root@client mnt]# awk -F “:” ‘BEGIN{print “name” }{print$1}’ passwd
//以:为分隔符,处理前打印NAME,打印第一行
name
root
bin
mysql
user1
user2
user3
[root@client mnt]# awk -F “:” ‘BEGIN{print “name” }{print$1}END{print “END”}’ passwd
//以:为分隔符,处理打印前NAME,打印第一行,处理后打印END
name
root
bin
mysql
user1
user2
user3
END
[root@client mnt]# awk -F “:” ‘BEGIN{print “name” }{print$1}END{print NR}’ passwd
//以:为分隔符,处理打印前NAME,打印第一行,处理后打印行数
name
root
bin
mysql
user1
user2
user3
6
[root@client mnt]# awk -F “:” ‘BEGIN{print “name” }{print$1}END{print NF}’ passwd
//以:为分隔符,处理打印前NAME,打印第一行,处理后打印列数
name
root
bin
mysql
user1
user2
user3
7
[root@client mnt]# awk -F “:” ‘BEGIN{print “name” }NR<=3&&NR>=2{print$1}’ passwd name
//以:为分隔符,处理前打印NAME,打印2-3行每行的第一个字符
bin
mysql
[root@client mnt]# cat passwd
root❌0:0:root:/root:/bin/bash
bin❌1:1:bin:/bin:/sbin/nologin
mysql❌27:27:MariaDB Server:/var/lib/mysql:/sbin/nologin
user1❌1001:1001::/home/user1:/bin/bash
user2❌1002:1002::/home/user2:/bin/bash
user3❌1003:1003::/home/user3:/bin/bash
[root@client mnt]# awk -F “:” ‘BEGIN{N=0}/bash$/{N++}END{print N}’ passwd
//利用N变量统计以bash结尾的行,每找到一行,N加一,最后输出N的个数
4


![]()
awk基本用法二:
1.awk -F “:” ‘/^ro/{print}’ passwd
//显示以ro开头的行
2.awk -F “:” ‘/1/{print}’ passwd
//显示以a到d(a,b,c,d)字母开头的行
3.awk -F “:” ‘/^ro|nologin$/{print}’ passwd
//显示以ro开头或是以nologin结尾的行
4.awk -F “:” ‘/[a-d]/{print}’ passwd
//显示不以字母a到d开头的行
5.awk -F “:” ‘$5~/^r/{print}’ passwd
//显示第五列以r开头的行
6.awk -F “:” ‘$1!~/^r/{print}’ passwd
//显示第一列不以r开头的行
7.awk -F “:” ‘{print NR,$0}’ passwd
//显示每行行号并输出
实验:
[root@client mnt]# awk -F “:” ‘/^ro/{print}’ passwd
//显示以ro开头的行
root❌0:0:root:/root:/bin/bash
[root@client mnt]# awk -F “:” ‘/2/{print}’ passwd
//显示以a到d(a,b,c,d)字母开头的行
bin❌1:1:bin:/bin:/sbin/nologin
[root@client mnt]# awk -F “:” ‘/^ro|nologin$/{print}’ passwd
//显示以ro开头或是以nologin结尾的行
root❌0:0:root:/root:/bin/bash
bin❌1:1:bin:/bin:/sbin/nologin
mysql❌27:27:MariaDB Server:/var/lib/mysql:/sbin/nologin
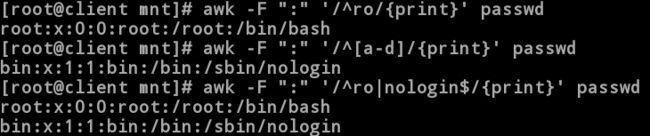
[root@client mnt]# awk -F “:” ‘/[a-d]/{print}’ passwd
//显示不以字母a到d开头的行
root❌0:0:root:/root:/bin/bash
mysql❌27:27:MariaDB Server:/var/lib/mysql:/sbin/nologin
user1❌1001:1001::/home/user1:/bin/bash
user2❌1002:1002::/home/user2:/bin/bash
user3❌1003:1003::/home/user3:/bin/bash
[root@client mnt]# awk -F “:” ‘$5~/^r/{print}’ passwd
//显示第五列以r开头的行
root❌0:0:root:/root:/bin/bash
[root@client mnt]# awk -F “:” ‘$1!~/^r/{print}’ passwd
//显示第一列不以r开头的行
bin❌1:1:bin:/bin:/sbin/nologin
mysql❌27:27:MariaDB Server:root/mysql:/sbin/nologin
user1❌1001:1001::/home/user1:/bin/bash
user2❌1002:1002::/home/user2:/bin/bash
user3❌1003:1003::/home/user3:/bin/bash

[root@client mnt]# awk -F “:” ‘{print NR,$0}’ passwd
//显示每行行号并输出
1 root❌0:0:root:/root:/bin/bash
2 bin❌1:1:bin:/bin:/sbin/nologin
3 mysql❌27:27:MariaDB Server:root/mysql:/sbin/nologin
4 user1❌1001:1001::/home/user1:/bin/bash
5 user2❌1002:1002::/home/user2:/bin/bash
6 user3❌1003:1003::/home/user3:/bin/bash
练习: 写一个脚本输出本机的ip
[root@client mnt]# cat ip_show.sh
#!/bin/bash
ifconfig eth0 | awk ‘/inet>/{print $2}’ //搜索inet不加扩展
[root@client mnt]# sh ip_show.sh
172.25.254.226
[root@client mnt]# ifconfig eth0 | awk -F " " ‘/inet /{print $2}’ //方法e二
172.25.254.226
a-d ↩︎
a-d ↩︎